 Throughout the splendid and useful process of becoming (and, for that matter, just
being) an aircraft builder, there are certain sounds to which your ears will become keenly tuned. No, not the barking of Lycomings as they tauntingly taxi by on their way out to enjoy what you’re diligently working toward—that goes without saying. But there are other more subtle sounds, which ordinarily wouldn’t get the
attention of the layman that now command your attention. For example, there’s no mistaking the clatter of that brown truck’s neglected suspension as it rounds the bend and squeals to a halt just outside your door. That’s right, I’m talking about the UPS guy—your new best friend as he brings cardboard-clad treasure to your doorstep.
He could be bringing new tools or the next installment of your airplane, but either way it’s a good day. As we discussed last month, building an airplane—of any material, not just
metal—requires practice, patience and persistence. Last month, I tried to get you started by looking at some of the tools and procedures you’ll be working with for the duration of your project—and, in fact, beyond, as you’ll be responsible for your fine airplane’s upkeep as well.
So there you are, unfurling the long inventory list and trying to make heads or tails of all these unidentifiable pieces of metal that will someday stabilize you as you hurtle through the air at blinding speeds. What you are experiencing is the desire to rush ahead, Cleco the pieces together and start making airplane sounds. You can if you want, but such fantasy making is going to cost you time and deflect you from the real mission: to finish your gorgeous airplane.
Let’s Get Started
Before we get into exciting stuff like drilling and riveting, we have to cover some of the more mundane, sometimes monotonous aspects of aircraft construction. But don’t worry, your hands will still get dirty.
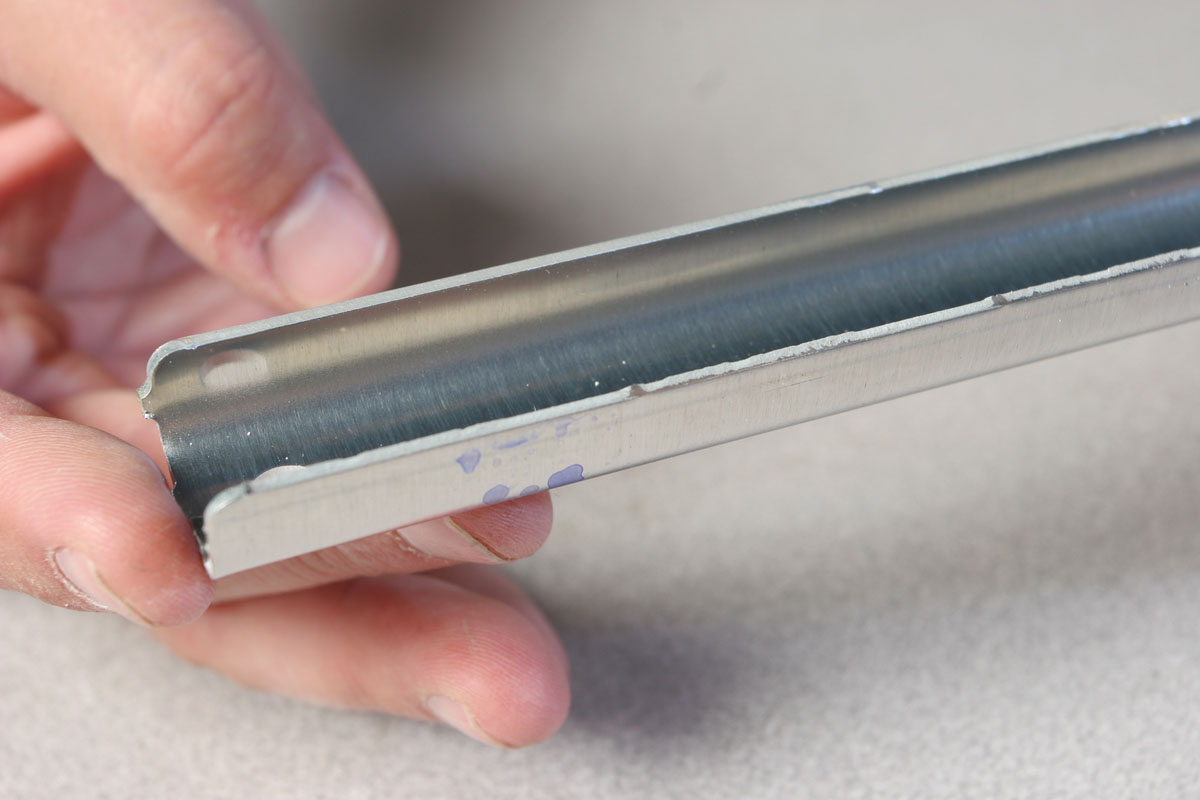
Take a look at those skins and ribs that came with your kit. They are likely
to be CNC-cut and match-drilled—in truth, beautiful works of art. Take a closer, more objective look. Check out the edges. Even though you probably wouldn’t cut yourself if you were to drag your finger across, the surfaces are not perfectly smooth. Aluminum kit components usually come from the factory with relatively “rough” edges. It’s a byproduct of the way these pieces are cut (or stamped) from raw stock, and it’s a good idea to finish the job the factory started.
Why bother? Because every one of those little tiny ridges is a crack waiting to happen. You may have heard the term “stress riser” before. Here’s one way to illustrate the concept quite clearly. Take a roll of clear packing tape, and peel a few inches away. Try to tear the tape by hand. Good luck! That stuff doesn’t tear easily. Now take scissors or a razor blade and make a tiny nick in the edge—as small as you can make it. Try to tear it now. The tape tears across with ease and little force, right?
Relieve the Stress
Consider a sheet of aluminum or the edge of a rib flange. The same principle applies. Any roughness in a surface may be enough to permit the material to begin cracking from fatigue. If you give the material a good excuse to fail, you’re asking for it. Even on the edges? Yes. Granted, most aircraft designs will generally not impose significant stresses along the edges of parts, but why give the material any opportunity to fail more easily if you can help it? As I mentioned, a little extra effort up front can make a big difference in the long run.
Those imperfections in the edge are sometimes called “burrs,” so the process of smoothing them out is called “deburring.” You may have heard and associated that term with smoothing out holes that have been drilled, but the term also applies to edges.

Learning Deburring
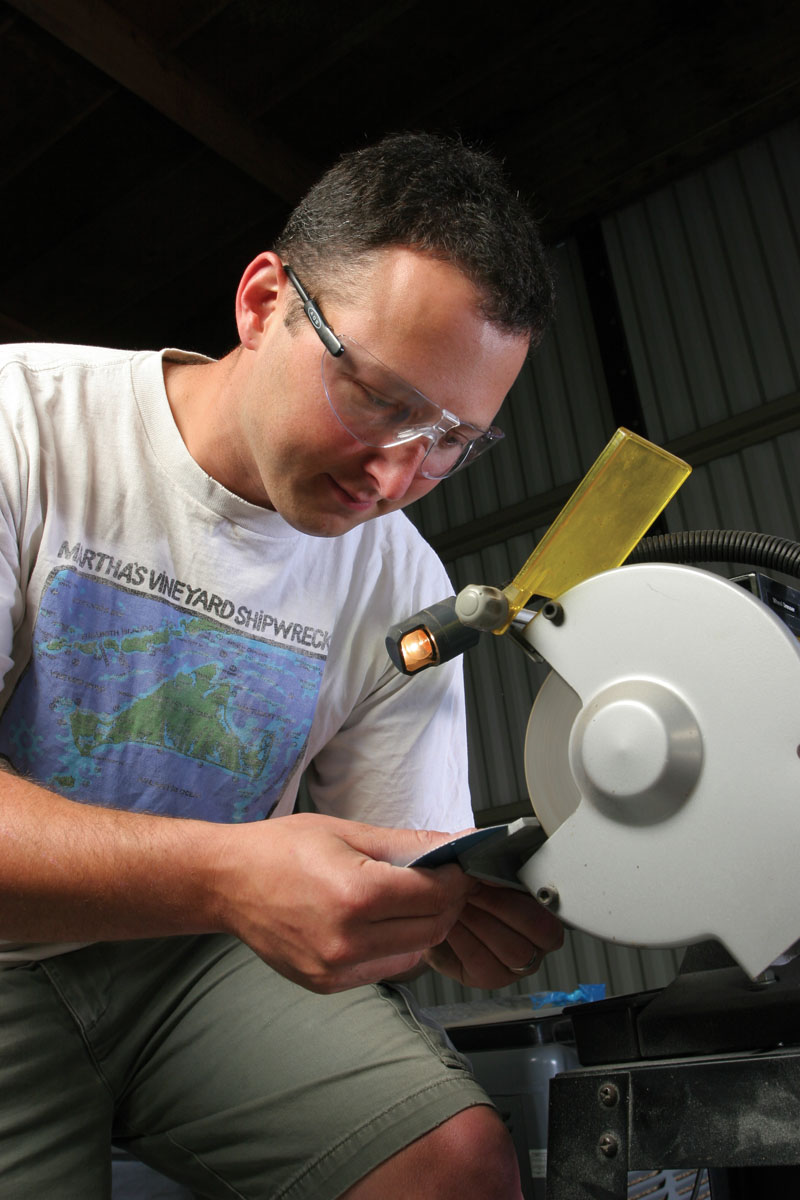
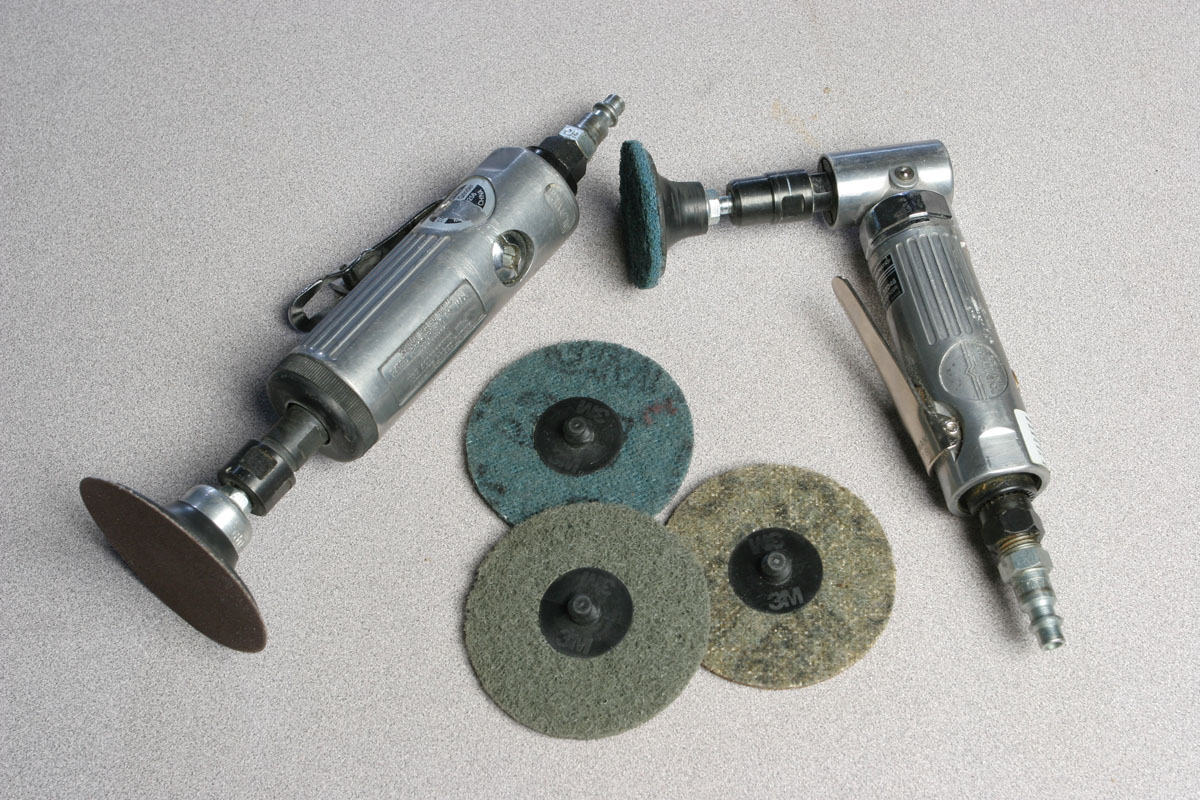
There are lots of techniques, and I’m guessing you will most likely try several of them. You can use a flat file. You can use emery cloth. You can take the part to a deburring wheel on your bench grinder or you can use a unitized wheel on your die grinder. There are deburring attachments for rotary tools. They even make about a dozen
varieties of special hand tools for deburring edges. Over time you’ll eventually settle into a method that works best for you.
If you decide to use a rotary tool of some sort, such as a Dremel or die grinder, be sure to stabilize the work. Preferably, clamp it to your bench to free up both hands to control the tool. If you use a deburring wheel on your bench grinder, use caution in how you feed the part into the wheel. It’s easy for the part to jam up and bend, possibly taking your fingers with it. And, of course, always wear proper eye protection whenever you’re working with tools that spin!
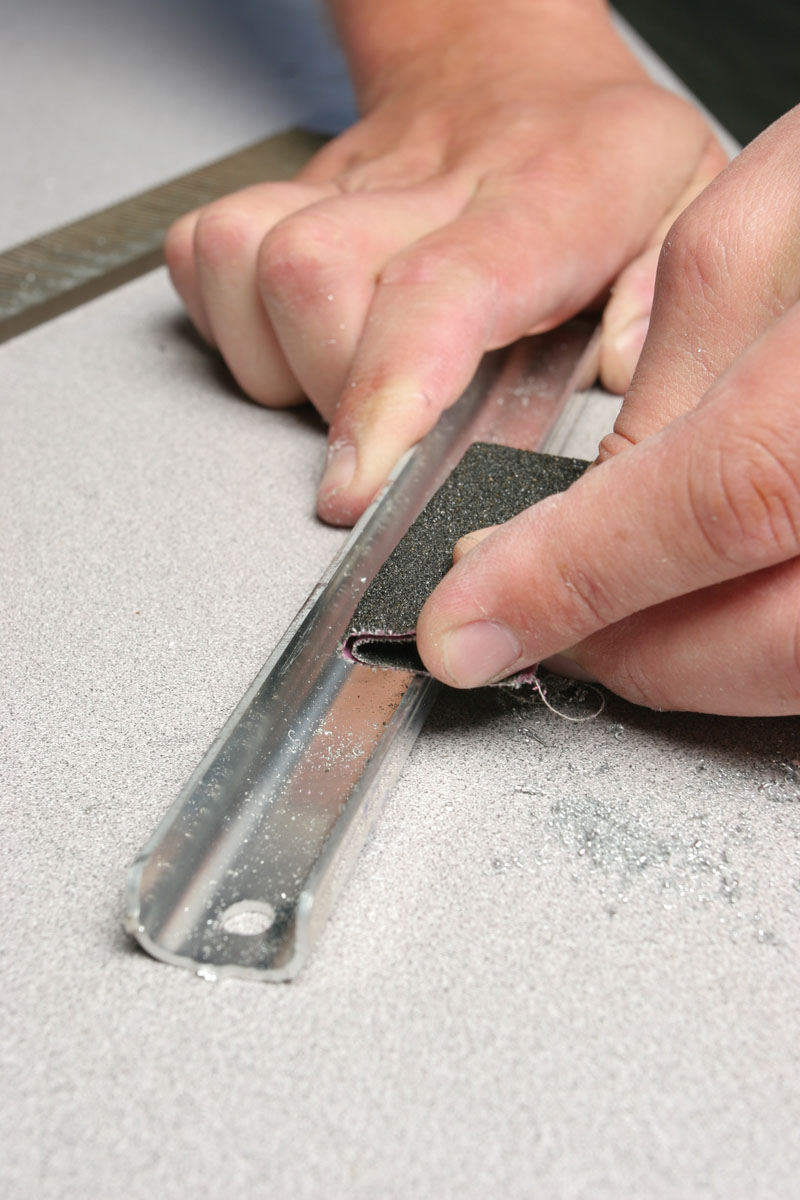
I actually prefer the “old fashioned” manual method. I generally start with a Vixen file, which is a great tool for removing material quickly and leaving a relatively smooth edge. After using the file to “level” the edge and radius the corners slightly, I switch to emery cloth, or aluminum oxide sandpaper (typically 80 or 100 grit). Then I finish with a Scotch Brite hand pad (#7447). I find that on long, straight edges, this process is most effective in keeping the edge nice and straight, while producing a very smooth finish. Using any sort of “power tool” such as a unitized wheel on a die grinder on a long edge will take less time and effort, but invariably it will introduce a slight waviness into the edge. It’s hard to beat the consistency of a file for those straight edges. If you do use a rotary tool, apply even pressure using long, consistent strokes. Take your time.
Lightening In the Hangar
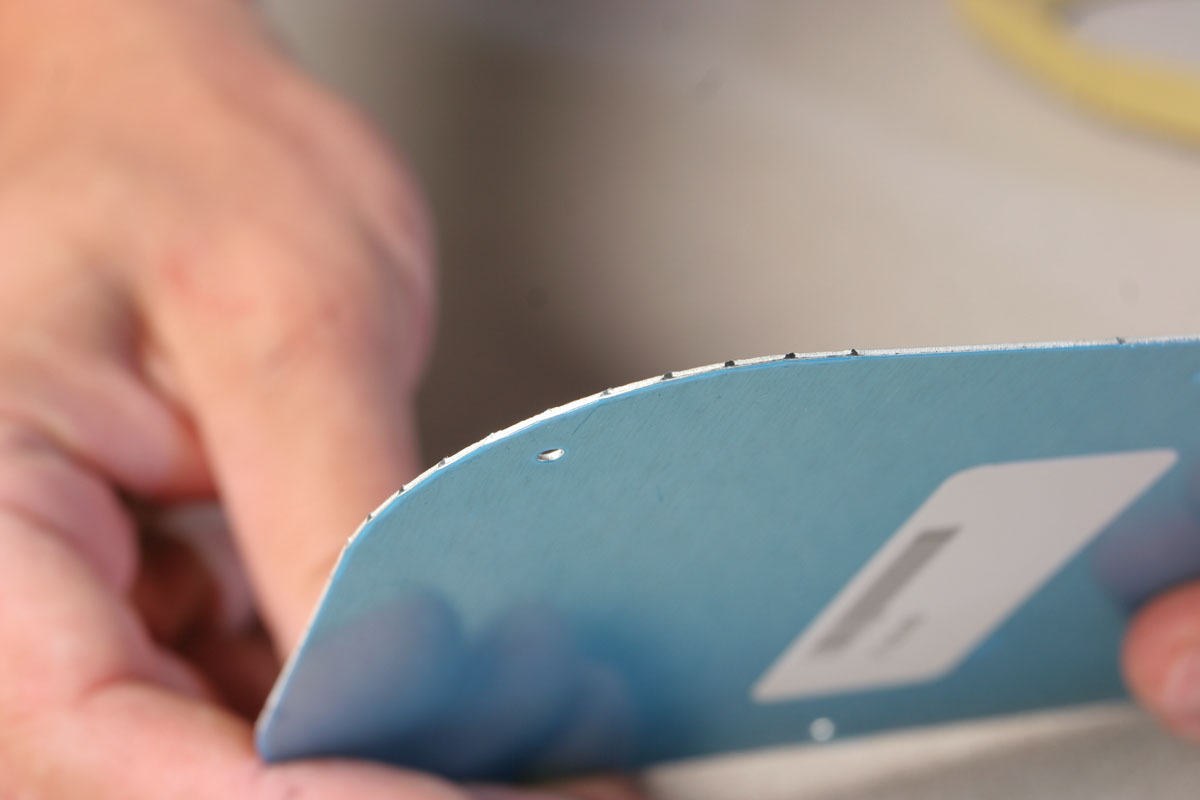
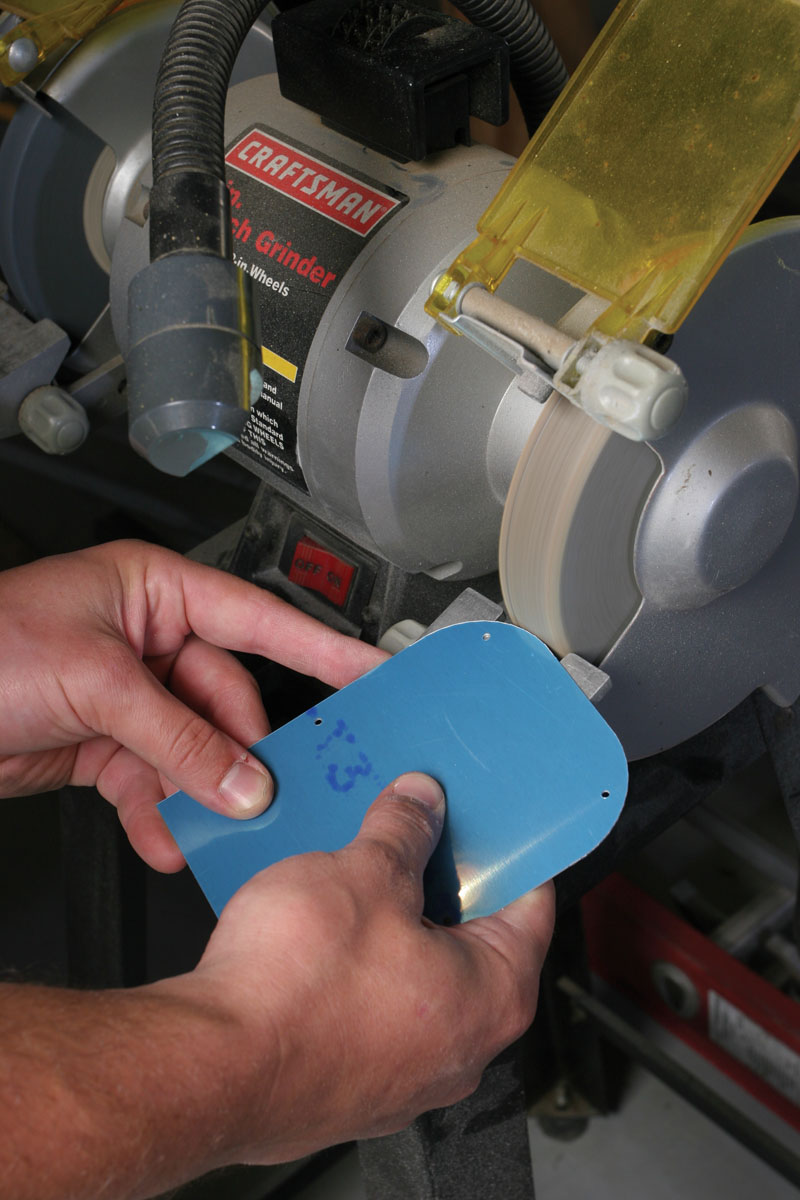
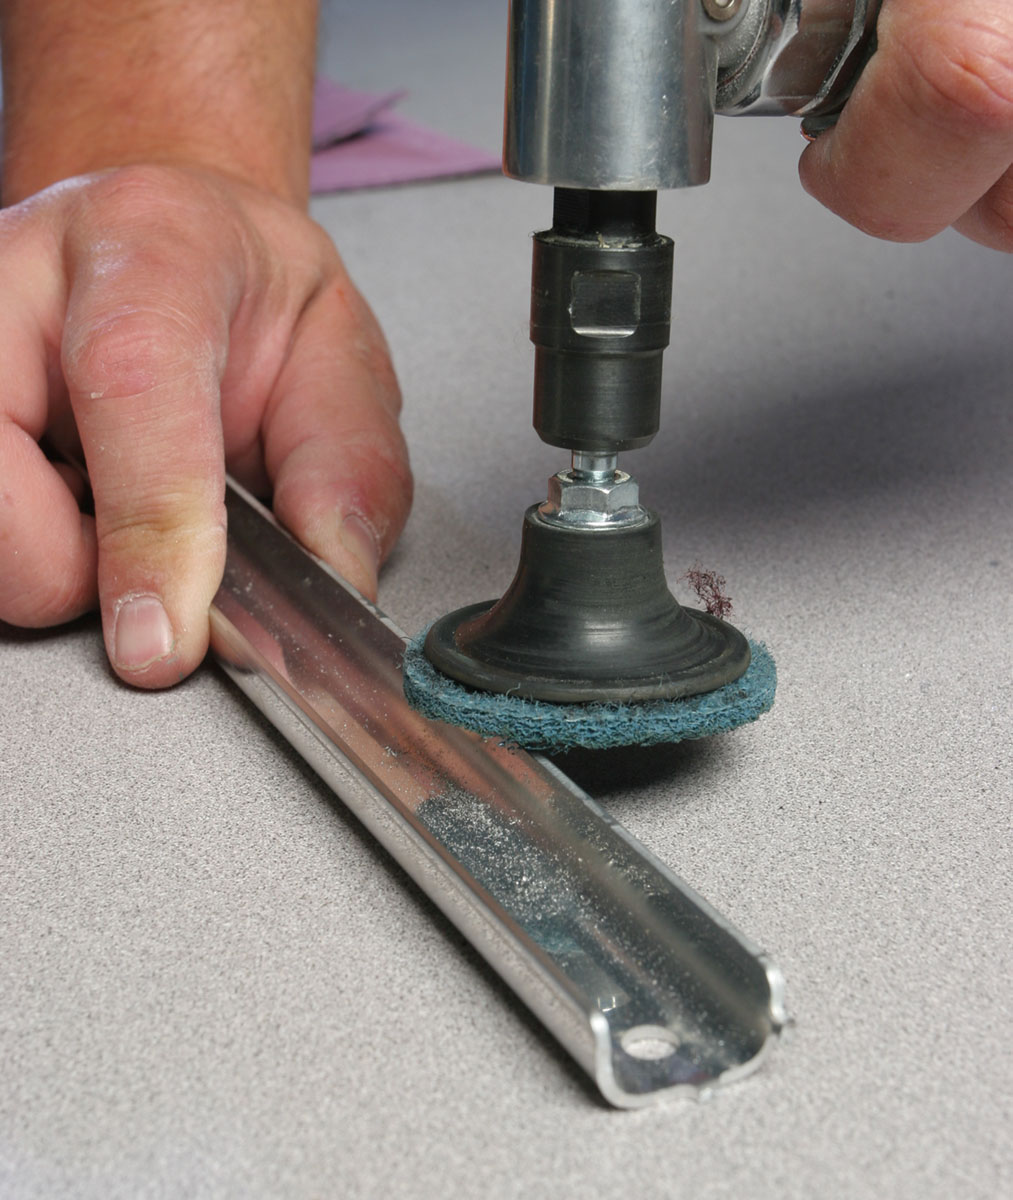
Don’t forget to deburr all edges, not just the outer edges of skins and stuff. I’m talking in particular about lightening holes and inspection holes. Any spot where you might have to reach your hand or arm through later, deburring those edges also serves the purpose of saving skin. When it comes time to buck rivets through those lightening holes or every time you’re reaching into that inspection panel to lubricate a rod end bearing, you’ll thank yourself for taking the time now; unless, of course, you like bleeding. Since you can’t just run a Vixen file along those curved edges, what’s the best way to get it done? Again, every builder will probably prefer a different method—I like using a unitized wheel on a die grinder for these curved edges.

How smooth is smooth enough? Just get it as smooth as you can within reason. If you can’t see any notches or ridges, and if you can run your fingertip or fingernail along the edge without feeling any imperfections, it’s done. Different people have different standards in this area, and you need to come up with your own. I tend to lean toward the conservative side here, and I figure even if I have to spend umpteen more hours deburring over the entire course of the project, I’ll sleep better at night knowing I did my best. There’s no good reason to take shortcuts on something this simple. Yes, it can be monotonous, but what is worse—the monotony of deburring or the prospect of finding cracks in your airframe? Enough said.
Manage the Flange
So your edges are gorgeous, and you’re probably itching to Cleco it together and start drilling. Not so fast! There’s one more step you need to take before you start assembling things. Despite these beautiful kit components having been fabricated with the help of a computer, they’re not always perfect out of the box. And much like the rough edges, there’s another area where the production process leaves some work for the builder to do: the flanges.
The flanges are the bent edges on spars, ribs and bulkheads. Most of the time, the flanges should be bent perpendicular to the web. Occasionally, such as on bulkhead flanges on a tapered fuselage, you’ll see that the flanges should be bent at an angle that accommodates the taper. There are two common problems with flanges as they come off the press. The first arises whenever the flange is curved, such as on airfoil ribs. Ever try to fold a curve into a piece of paper? It’s almost impossible. With aluminum, it takes a machine to press or stamp the rib into submission, and even then it doesn’t always come out perfectly. Invariably, the web of the rib or bulkhead will be warped slightly whenever a contoured flange is formed.
correctly—the notches should be formed away from the adjacent part.
What has happened is that as the flange was pressed into form, the aluminum was stretched a bit. The result is that the edge of the flange actually ends up being longer than the bend line itself. This forces the part to bow along that bend line. This is undesirable, because your rib or bulkhead flange isn’t perfectly straight. Who wants to see a rivet line that curves? Not only is it unappealing aesthetically, it’s also structurally undesirable. We want nice, straight rivet lines.
So how do you take the “arch” out of these parts? All you have to do is remedy the length mismatch, shortening the edge of the flange so that it has the same length as the bend line. Shorten aluminum? How do you do that?
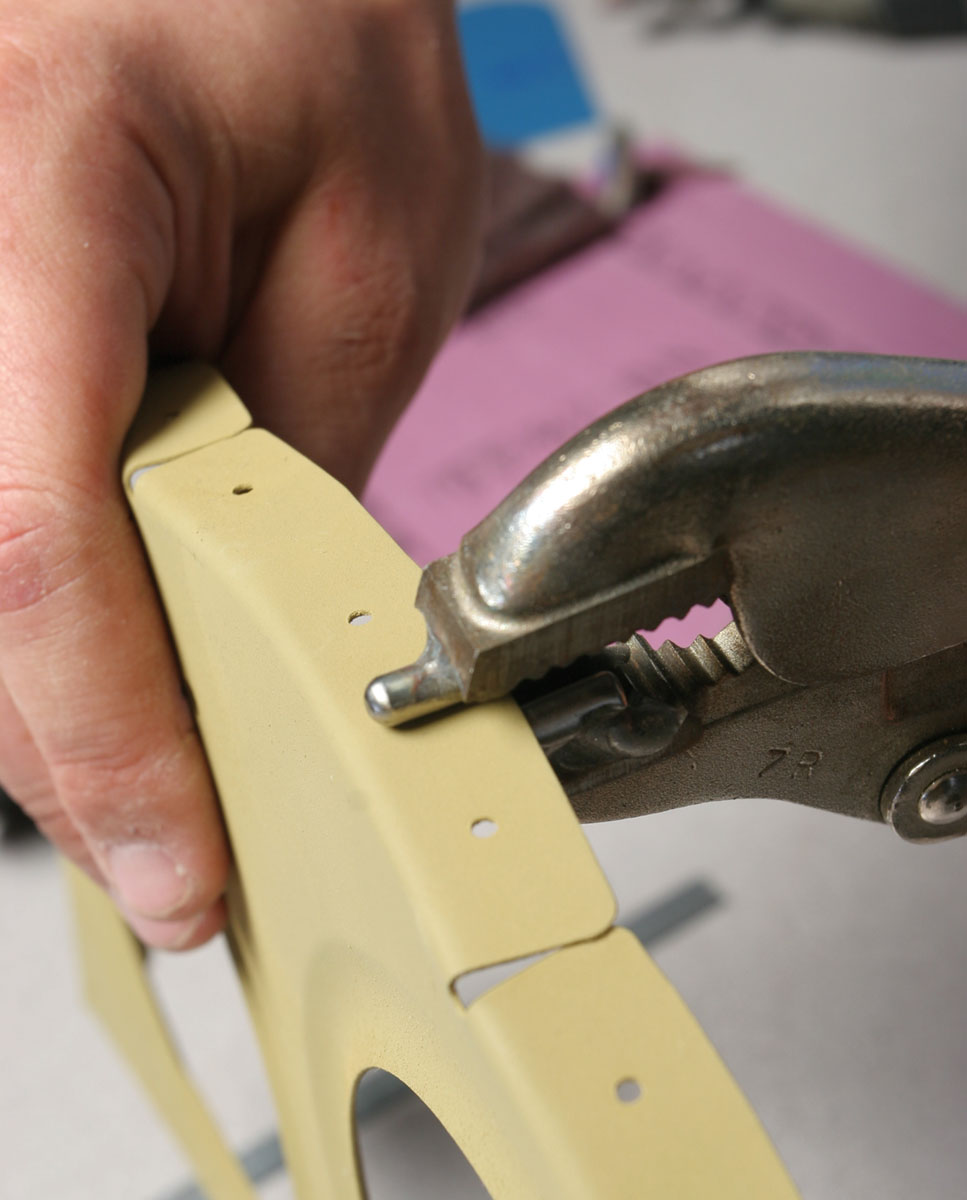
You could use a metal shrinking tool, but most of us don’t have access to one. The alternative is quite simple, really. What we’ll do is reduce the “effective length” of the flange edge without having to remove any material. That’s a fancy way of saying we’ll introduce a series of curves into the flange edge. As you know, the shortest distance between two points is a straight line, so if we add some curve to the path, it’s going to “absorb” some length. The tool: fluting pliers. With these, you squeeze little semi-circular notches into the edge of the flange in between rivet locations, and magically that part straightens right out.
Start out by placing the part on a flat surface or put a straightedge up against it. This will help you gauge just how much bow needs to be taken out. Sometimes you might luck out, and the part will be pretty straight from the factory. But more often than not—on a wing rib, for example—you’ll have as much as one-quarter to one-half inch of bow at the center, which you’ll obviously need to correct.
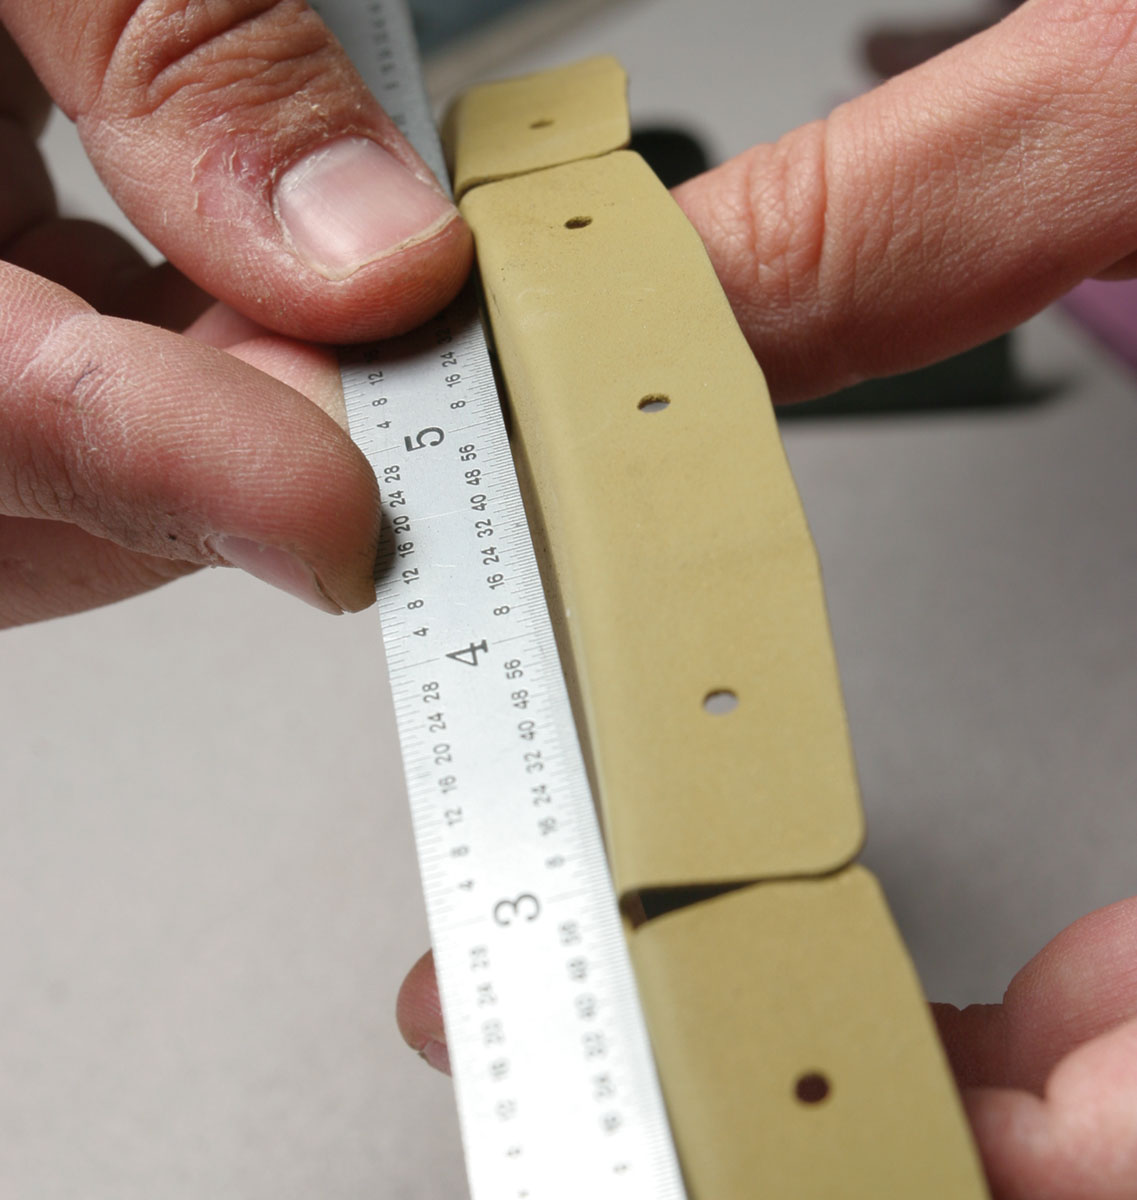
Before you start fluting, you need to identify the rivet hole locations so you don’t accidentally flute the flange right where a rivet needs to go. If your flange already has pilot holes drilled, then the guesswork has been taken out of the equation—simply flute
between the existing holes. But if your flange has not been drilled, then you will need to do some planning by determining where rivets will go. Often you can hold the piece up to the skin, assuming the skin has already been drilled, which will let you “trace” hole marks onto the rib flange. Otherwise you might have to break out the ruler or tape and measure and mark the hole pattern yourself. Sometimes kit manufacturers provide “fluting diagrams,” which are printed templates that indicate where fluting is acceptable.
Once you know where to flute, the process is pretty straightforward: Just squeeze some notches in the flange. That said, it takes more of an artistic touch rather than brute force. Go slowly and gently. The last thing you want is to “overshoot” and to cause the piece to bow in the opposite direction. Start out with intentionally gentle squeezes, making notches just barely visible. Check the web against a straightedge again to see how much difference it made. Repeat iteratively until the part is straight. You may need to flute deeper in certain spots to compensate for inconsistencies in how much the flange was stretched. Just do whatever it takes, and get it as close to perfectly straight as possible. The straighter your rib and bulkhead flanges are, the easier it will be later to drill your rivet holes dead on the center line. If you accidentally go too far and introduce bow in the opposite direction, you can simply take your hand seamer, and very gently squeeze the flutes out.

Don’t forget, you’ve got two flanges that can work with or against each other. Don’t try to take all of the bow out with just one flange. Wing leading edge or fuel tank ribs tend to be the most challenging, since they usually have dramatically different contour on the top and bottom flanges. It takes a bit of practice to learn how to fix a badly bowed rib. Take your time, and try not to “chase your tail” in this process. Getting slightly off track can turn that rib into a twisted mess. Go slowly, and only try to correct it a little bit at a time until the rib lays nice and flat.
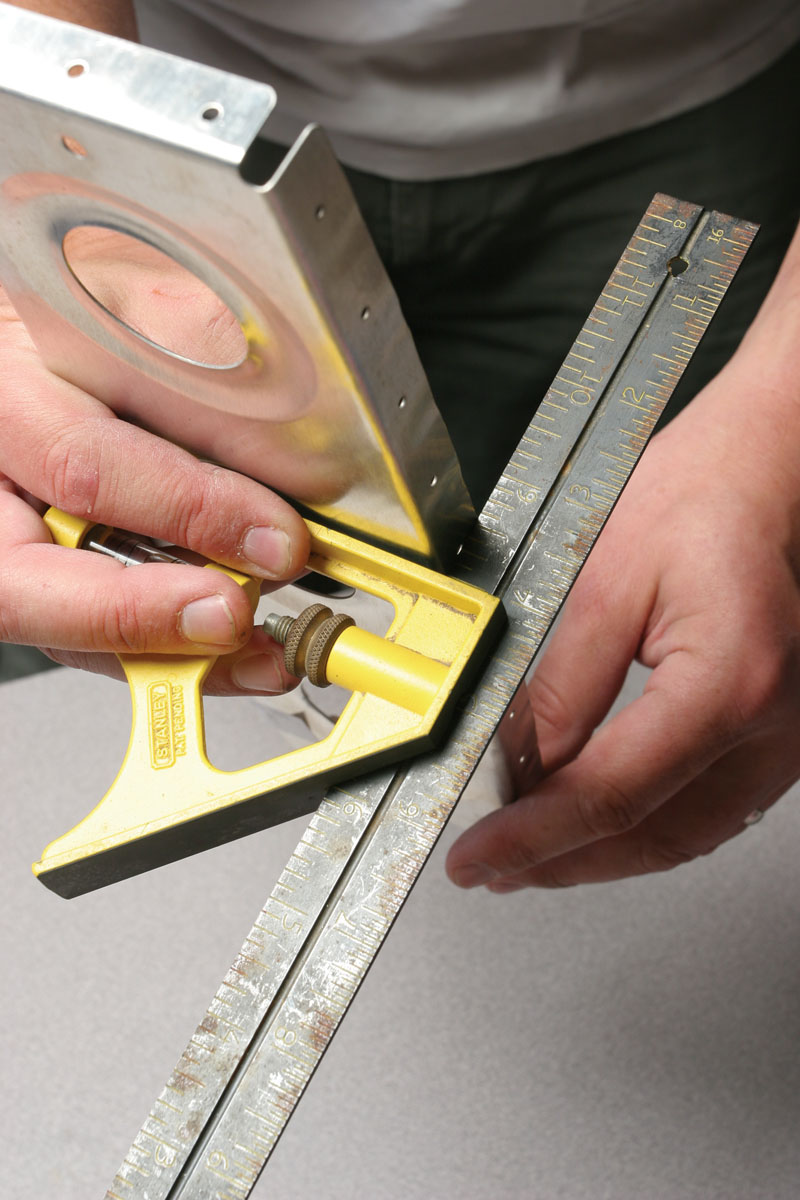
Once you’ve got your part fluted, double check the angle of the flange again to make sure you didn’t introduce any unintentional bend in either direction. You can use a square for this, assuming the flange is supposed to be perpendicular to the web. Sometimes, you’ll flute your flanges, get them squared up, and then you find the part has twist again. It’s definitely an iterative process, where you may have to go back and forth between fluting and flanging until everything is perfect.
Preparing the parts is definitely not the most rewarding aspect of building your plane. You might spend hours deburring edges and fluting and flanging, with basically nothing to show for it. Your family and friends may comment, “What were you doing out there in the garage for all those hours? It looks the same as it did three days ago.” Just remember, as monotonous as this process can be, it is definitely time well spent. And, trust me on this, it will eventually end.
I’m personally glad we got the prep work out of the way, because next time we get to start drilling holes! In the next installment, we’ll talk about assembling components, techniques for drilling all of those thousands of holes, and tips on deburring ’em. See you next month!


