When I was considering this project, it was with a grain of salt that I took the Jabiru-published statement that the factory builds one in 400 hours, and the average builder needs closer to 600 hours. Now that I’m at 900 hours and have yet to do any real preparatory work for painting, nor have I even made a first flight, I realize that pizza with extra anchovies was a bit more to the mark with regard to salt. Realistically, I expect I’ll need something closer to 1200 hours before getting near to something you might call “done.”
Oddly enough, this is not an unwelcome situation. That old saw that the journey is more important than the destination seems doubly apt when applied to those of us rash enough to think we can actually build an airplane. If you’re a member of this august club, you’ve no doubt been assaulted with, “If you’d just bought a nice, used [fill in the blank], you’d have been flying a long time ago.” But that comment says more about the speaker than the validity of the advice. It’s like telling someone who’s about to board a Caribbean cruise ship that getting from island to island would be a lot more efficient by air. As for me, neighbors drop by, I take a break to discuss progress, we get to work to make progress…the process has its own value.
In the Line of Fire
Speaking of value, I promised in last month’s stirring episode to tell all regarding the installation of the fire-extinguishing system. The idea of doing something beyond a simple handheld unit was the direct outcome of a letter to KITPLANES from Stan Burak. He pointed out that this area is woefully under-addressed and suggested that it would be a good subject, and my article was published in the August 2008 issue. You can find it and other articles on this topic at www.kitplanes.com.
Let’s now go one more step and actually install a true on-board extinguisher system. The first question: What do I need? Halon is the preferred agent for in-flight use because it’s breathable and won’t create IFR conditions within the cockpit. There are a couple of types, and which you use depends on its intended purpose. For a fixed-position system, such as in the engine compartment, use H1301; for handheld bottles, H1211 is best. The difference between them is simple: H1301 is a colorless, fast-dispersion gas; H1211 comes out of the bottle as a stream, so you can see where you’re pointing it. Think of it as tracer rounds.
The second question is how much do you need? Consider that the engines on a Boeing 747 come equipped with two 6.5-pound bottles of H1301. Like so much else on the big iron, that second bottle is in case the first one malfunctions. Now consider that a pound is all that’s needed to control 50 cubic feet of fire. I have a 3-pound bottle for reasons I’ll explain later. Total system weight? About 6 pounds.
The third question is where to get it? Aircraft Spruce & Specialty (www.aircraftspruce.com) has the handheld units, and SafeCraft (www.safecraft.com), the manufacturer, can supply you with a kit for permanent installation. The extinguisher even comes with a snazzy T handle that says “Fire.”
The next question is how to install it? This is easier than it looks. The Jabiru J250 was originally designed as a four-place aircraft, so it’s a bit nose-heavy in the two-seat configuration. The kit from SafeCraft comes with nozzles, mounting brackets, cables, T handle and even a safety pin with a flag to remind you to arm the system before flight. The aluminum tubing, also included, was sufficient to allow mounting the bottle behind the aft-most bulkhead. Jabiru built in a 4-inch tube that runs along the floor of the tail section that, once I’d cut an opening in it, allowed snaking the tube and the trigger cable all the way to the firewall. It was a simple job to mount the bracket directly to the fuselage and then snap the bottle into place. Finish off by hooking up the discharge tube, but leave the cable unconnected for now. You’ll have to install the T handle up front, and in working around it, you don’t want to set it off.
The discharge tubing is quarter-inch aluminum and comes with three nozzles in two sizes. The nozzles are color-coded aluminum and have different flow rates. Using the included fittings allowed me to put a blue nozzle on the firewall directed at the back of the instrument panel. I added a 90 fitting to take it through the firewall and then extended the tubing to the front of the engine. The finished installation now has one high-flow fitting right behind the spinner and directed at the oil filter/oil pressure/oil cooler, another high-flow fitting just above the carburetor and a lower-flow nozzle right behind the panel. Three places to flood, so a 3-pound bottle seemed adequate. I ran out of aluminum, so I used copper tube for the forward-most section. It was an easy installation that I would recommend to anyone. Each system is tailored to your requirements, so I won’t quote a price, but if it’s needed, price is no object.
The Throttles Go Where?
This seems an odd modification, but then the original installation is all the odder. As designed, the Jabiru has dual throttle levers mounted below the leading edge of the seats. The bar connecting these two levers has a third, shorter lever that is the aft-most connection point for a cable that extends through the firewall, and then to the carburetor.
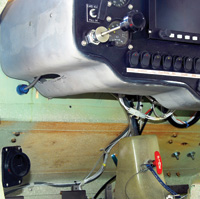
The throttle looks great, but the offset through the firewall is at its limit. The “Fire” T handle is located adjacent to the main fuel valve.
It works smoothly and it’s accurate to the touch; it’s just, well, odd. I have to say that I like odd in some things, but with the possible exception of art, I like odd to have a purpose, a reason, or at least a sense of lan. In my opinion, this layout didn’t qualify, so I moved it. (It says something that the Jabiru factory-built SLSA has conventional push-pull throttles mounted in the instrument panel.) To start the modification, I moved the bar to the engine side of the firewall, shortening the cable between the bar the carburetor. Not too difficult so far.
Step two was to get a pair of throttle-cable assemblies and put them on the panel. To secure them to the firewall, I used a pair of nice little clamps designed for just that. The point where the cable penetrated the firewall was determined by the length and position of the bar. Some simple machining on the mill was sufficient to allow attachment of small fittings designed expressly for this application. All of these parts were easily acquired through Aircraft Spruce.
With the new knobs in place I lifted the panel into position and…wow! Those cables didn’t line up well with the holes in the firewall. This panel could be 6 inches wider, and right now I wish it were, as there’s a severe jog in both cables.
Everything hooked up and it worked, but with way too much push/pull resistance on the throttle knobs for my taste. After going through everything looking for a way to alleviate this drag, I had to delete the throttle on the right side. The motion is now smooth, but if I want a throttle on the right, I’m going to have to come up with something to take care of that offset. Have I discovered the purpose behind that original design? Perhaps. But the newer Jabiru has a wider panel, so the throttles are located there.
Laser Pointers
Here’s where some of my more esoteric tools come into play. A good photography tripod and a laser with a -20 thread mount proved essential. The problem was in trying to accurately locate a drilling point when there’s no way to measure it. Specifically, the pitot tube drops down about 5 inches right at the wingstrut attach point, then turns 90, extending forward into the airstream. There is a strut cover to be attached here, and the pitot tube penetrates the cover, but where?
The solution to locating the hole was to install the pitot tube with Clecoes, and then mount the laser on the tripod. Using a level I adjusted the laser so it pointed straight up and then positioned it under the pitot tube so that the red dot hit the bottom end. Now, without moving the laser or the airplane, I removed the pitot tube and installed the strut cover.
The light shineth! In fact, it shined exactly at the point of penetration where the tube would go through the cover. I made a dot with a Sharpie and drilled 0.040 inch or so larger than the pitot tube to make the hole. Putting the pitot back in place and then spinning/twisting the cover brought it up to position about as nicely as one could ask for.
This technique would work for any difficult penetration problem. Where do the exhaust pipes go through the cowl? Same technique. Put a bit of paper over the opening on the pipe so you can see the dot. Blow a little smoke or dust around so you can see the beam, and line it up with the angle of the pipe. Remove the pipes, install the cowl, and there’s the center line of the exhaust pipe projected onto the cowl.
Of course, you’ll want a more clearance for a hot exhaust, but with this technique, how much clearance is a deliberate choice on your part rather than being a case of whittling until it looks about right.
Tools to Ease Wing Installation
Wings. There’s a milestone. I had planned to leave this installation until late, partially as a space saver, but more because they’re so low. I’ve walked into the wing on my wife’s Cessna more than once, and I’m getting tired of sitting down for coffee and being asked “Did it again?” as someone notices the diamond pattern on my forehead. I did put those swimming-pool noodles on the trailing edge, and oddly enough I’ve not bumped into those. The Jabiru wing, though, will not leave a diamond pattern on my forehead; it’ll imbed its knife edge into my throat. It’s that much lower. In fact, it will pass under the Cessna wing, inhibited only by the strut.
My buddy Ron helped me with the wing installation. He had kept the wingtip supports he built and loaned them to me. They’re cheap, simple, useful and take up a lot of floor space, so I suspect he was only too happy to bring them over. As I moved things around in an effort to assess how much help would be needed, I found that with these stands I was able to lift a wing into place and attach it by myself.
Threading the wiring, cables and tubes through the wing proved to be a lot more difficult. Jabiru had placed a string in the wing before closing it, and initially I thought this would be adequate. After a couple of tugs and aborted attempts, I was unwilling to risk breaking the string. A tool was needed. It had to be strong enough that I couldn’t break it, flexible enough to follow the curved path and not so floppy that it would catch on hidden edges.
Casting about the shop I finally came up with a multi-wire stranded cable for the main element, but if you’ve ever tried this, you understand how difficult it can be to get past a sharp edge; hang-ups are not just fodder for therapists.
The lathe! I machined a small “torpedo” and then drilled both ends with one end tapped to fit the aileron cables. I used the string to pull the tool through, and then attached the cable to the torpedo. It was so easy to pull that heavy cable back through that I was almost disappointed! The other items to be pulled were taped to a bolt that fit into the torpedo, and they also just slipped right in. As it turned out, the stiffness of the wire was an excellent guide that kept the path in large arcs instead of sharp angles and straight lines; the tapering on the torpedo ends slid right over the various edges.
One last pass, though, for the wiring. I routed it down the inside of the strut. Again, some unconventional thinking made this a breeze. Toss a handful of small-gauge chain down the strut, tie the wires to the upper end of the chain and release. The weight of the chain pulled the wire smoothly down the strut. Be sure to hold on to one end of the chain! It got quite a momentum and shot out of my grip twice.
Some days everything goes right. This is starting to look less like a white tadpole with tail fins and more like an airplane. I even find myself planning the next project. As I said, it’s the journey. Next month I’ll install the doors, the oil cooler and do some neat tricks on the cowl air intakes.
For more information on the Jabiru J250, call 559/431-1701 or visit www.jabirupacific.com.


