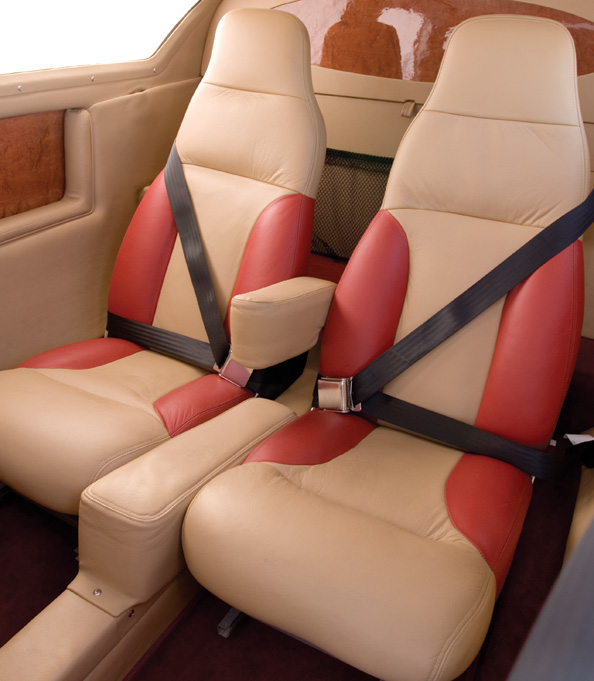
This month’s project is to make a seat cover for the foam cushion built last month. We’ll go through the process one step at a time. You’ll learn how it was done, and why it was done that way. I decided to use cloth for the seating surface and vinyl for the boxing, because I like the look of the cloth-vinyl combination, and I’d rather sit on cloth than vinyl.
With the material selection taken care of, the next step was to make patterns for the seat cover. I used an inexpensive, lightweight cloth such as unbleached muslin. You needn’t be too particular about the material used to make the patterns, except you want it to be fairly stiff. That’s important so it maintains the proper shape. A material such as the jersey fabric used to make t-shirts would not work well because it’s too flimsy.
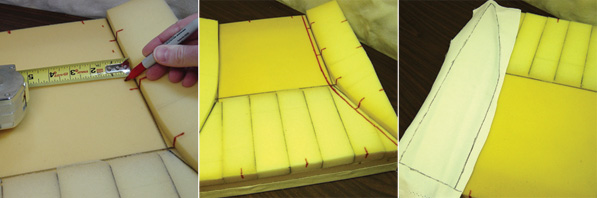
| It’s tempting to think that the seam goes where the bolster meets the insert, but it actually goes 3⁄8 inch from there. | The foam pad now has all of the necessary alignment marks and seam locations identified. It’s ready for pattern making. | For the panel pattern, mark the cloth where you want the seams to go, and transfer the alignment marks to the pattern after you cut away the excess material. |
Behavior Patterns
I like to make patterns, but some don’t. They prefer to take the upholstery material intended for the finished seat cover, place it on the seat, and mark it. That’s fine if you’re in a hurry and not terribly concerned about the accuracy of the final product. However, I prefer patterns because they allow for fine adjustments and more precision.
Patterns consist of three separate pieces: insert, panel and boxing. However, this seat cover has seven separate sections including one insert, two panels and four pieces of boxing. Yes, it is possible to make the boxing in one piece, but it’s easier to make it in four. You only need a pattern for one piece, the back piece, because the others are rectangular and can be made from measurements.
Use the symmetry and consistency of the cushion to avoid making a pattern for each piece. The sequence for making the patterns is not important, but I like to start in the middle of the seating surface and work out from there.
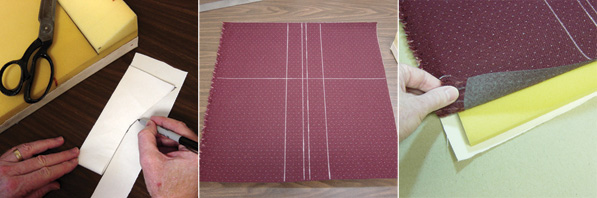
| Use the symmetry of the foam pad to make a boxing pattern for the back of the cushion. | White chalk is used to lay out the quilt lines on the insert. Compressed air run through a blower nozzle makes a great eraser after the sewing is done. | A light coat of spray glue will hold the three insert pieces, backing, foam and upholstery material, together for quilting. |
To make a pattern, cut a piece of cloth an inch or so larger than the actual piece to be covered. Then place it on the seat and mark exactly where you want the seam. You can add the ⅜-inch seam allowance when transferring the shape of the pattern to the upholstery material; remember to include the alignment marks.
The alignment marks aren’t really required on a simple project like this, but if you decide to build foam pads with a more complex shape, they might be useful. This is a good opportunity to see how they’re used.
With the patterns made, begin cutting fabric for the seating surface, which includes the insert and panels. Cut each piece a couple of inches larger than the finished size will be.
Once again, I’d recommend starting in the middle and working out, so begin with the insert. Cut a rectangular piece of fabric and then draw quilt lines on it with chalk.
Quilt Line Forms to the Left
A quilt line is a row of stitching that goes through the face of the material, the padding and the backing material. In this application it’s decorative. It creates an attractive indentation along the stitching. However, in some applications quilting is used to keep the sandwiched materials from shifting.
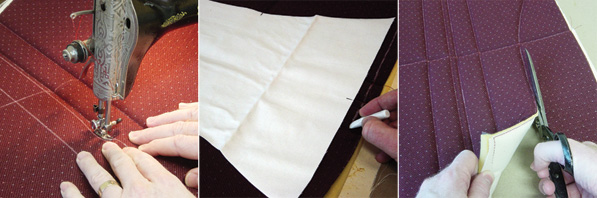
| Sewing the quilt lines is simply sewing on the chalk lines. However, simple is not always easy. Keep them straight! | Strategically place the insert pattern on the quilted insert, matching centerlines and the perpendicular quilt line. Mark around it, including the 3⁄8-inch seam allowance. | Remove the excess material after the outline of the insert pattern is sewn, cutting just outside of the line. |
I drew several parallel lines that run the length of the cushion and one line that runs across it. Use whatever pattern appeals to you. In the 1970s, a diamond pattern was the rage. The quilt line that runs across the insert corresponds with the transition in the foam for the thigh support, and it will nicely define the thigh support on the finished seat cover.
After the quilt lines are drawn on the insert, it becomes the top layer in a sandwich that begins with a piece of lightweight canvas, then a piece of half-inch foam and then the insert fabric. The insert fabric goes on the top, face up. These layers are held together with a light coat of spray glue to make them easier to quilt.
The next step is to sew the quilt lines. It’s easy. All you do is sew on the line (try to keep right on it), straight through all three pieces of the sandwich.
With the quilting complete, lay the insert pattern on the insert and mark an outline ⅜ inch from the edge of the pattern to include the seam allowance, and then sew on that line around the entire perimeter. This quilt line holds the edges of the sandwich together to make them easier to work with later. Cut just outside of this quilt line to remove the excess materials.
Use the same sandwich technique for the panels as for the insert, even though they will not have quilt lines. This is probably the biggest difference between professional and amateur upholstery jobs. Sandwiching the panels gives them additional body and helps create soft contours where harsh lines might otherwise appear. The steps are the same for the panels: Stack lightweight fabric backing, foam and then the upholstery material. Use the pattern to mark an outline, and be sure to include the seam allowance. Stitch on the line and cut away the excess materials.
| With only one panel pattern, make sure you have made the panels mirror images of each other rather than two of the same. | The alignment marks help keep the panel and insert seam on track. It’s a real bummer to get to the end of the panel before you get to the end of the insert. | The alignment marks are even more important on a long seam such as where the boxing attaches to the seating surface. |
Left is Right
Don’t forget that the panels are mirror images of each other. I made only one pattern, so I used it once right-side up and once upside down. Be careful not to make two panels for the same side. I’ve done that, and every upholsterer has done that at least once. As the old saying goes, “Measure twice and cut once.”
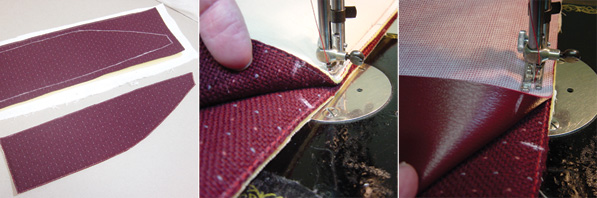
The boxing is made from vinyl, and vinyl is a directional material, meaning that it stretches more one way than the other. Most vinyl stretches more going across the roll than it does going up the roll. For this reason, cut the boxing along the length of the roll rather than the width. This is important because the sewing machine can stretch the boxing when it’s attached, and this may create wrinkles that never come out.
With all of the pieces made, it’s time to sew them together. Transfer the alignment marks to the individual pieces, and use them to guide your sewing to make sure the pieces go together as planned. Sewing the pieces together as planned is easier said than done, and this is where beginners usually have their biggest sewing challenge.
What could go wrong? First of all, if the edges of the sandwiched material had not been sewn together, it would be extremely difficult to keep all of the edges aligned. We’d have six edges to keep in their proper place, two backing materials, two pieces of foam and two pieces of upholstery material. Now we have only two, but even that can be troublesome.
The first challenge is to keep the edges even with each other, and maintain a proper and consistent seam allowance. Sometimes the panel will want to go right while the insert goes left, and vice versa. Even if the edges stay aligned, the stitch line might wander. Having it go off the side of the materials seems to be the most common error.

Spray glue works well for holding the insert in place. Do it one side at a time to make sure the seat cover alignment remains correct. Notice how the “step” in the foam accommodates the seam allowance.
Practice Pays Off
Let’s say you’ve practiced sewing enough that keeping the edges even, and maintaining a straight and consistent stitch line is doable. The next potential problem is that one of the pieces may shrink or stretch. That’s where the alignment marks come in. Make sure that as you sew, the alignment marks match up.
Alignment marks are not necessary on short seams, and they can be more trouble than they’re worth. However, on long seams, such as the seam that joins the boxing to the panels and insert, they are a practical necessity. Minor shrinkage or stretch can compound over the length of the seam to create a mismatch of an inch or two at the end.
If you discover that the alignment marks are not matching as you sew the pieces together, put more pressure on the side that’s coming up short to stretch it into place. If that doesn’t work, check to make sure the alignment marks are correct, and check to see that you’re joining the correct pieces. Back in the day, I had a job in which I struggled to get alignment marks to match, only to discover that I had joined the wrong pieces together.
Now that we understand the potential pitfalls, we should talk about some sewing specifics. I start and end every seam with backstitching, which is a technique that “locks” the ends of the stitch line to keep the seam from easily coming undone.
On a sewing machine with reverse, backstitching is easy. You begin the seam with a few stitches forward, and then a few stitches in reverse, and then sew forward until you get to the end of the seam, at which point you sew in reverse for a few stitches, and then forward until the end.
On sewing machines that do not have reverse, a modified backstitch technique can be used. Sew forward a few stitches, then remove the needle from the material and lift the presser foot, move the material back so the needle is at the beginning of the stitch line again, lower the presser foot, and continue sewing forward until the end of the stitch line. When the end of the stitch line is reached, repeat these steps.
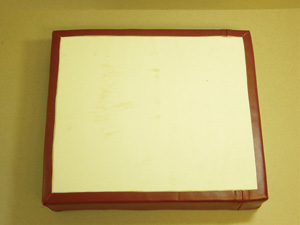
The canvas on the bottom looks good and holds the boxing better than just foam would.
Most sewing machines can sew quickly, and it seems that many people who are new to sewing-machine operation think they should sew as fast as possible. Actually, you’ll want to sew slowly most of the time. Being able to operate the sewing machine at slow speeds will make the sewing process much easier and more accurate. I said this at the beginning of this series, but it bears repeating: Don’t rush!
The length of the stitch is important, but there’s a lot of leeway. Five to six stitches per inch is about right. The biggest problem regarding stitch length is making them too short. The material is punctured with every stitch, so a stitch line is essentially a perforation of the material being sewn. When stitches are short, the material becomes more perforated and can tear easily. This is a particularly bad problem on vinyl, but it can be trouble on cloth as well.
Come Together
Now that all of the pieces are sewn together, it’s time to install the seat cover on the foam pad. It’s a common mistake to rush this process because it seems so simple, and because it’s so close to being done. But if the installation is lousy, all of the good work up to this point will look lousy as well. Take your time and do it step by step.
The first step is a trial installation to check for general fit. Set the seat cover on the foam pad and take a look at it. Is it the correct seat cover for this foam pad? Is the construction of both complete? Are there any missing parts or seams that are not properly sewn? Is the cover going to fit well? This is the time to make any last-minute adjustments.
Once you’re satisfied that the foam pad and seat cover are ready for installation, turn the seat cover inside out (in this case that means the boxing is turned up), and place it on the foam pad.
The seat cover needs to be positioned exactly where it belongs, insert centered, and perimeter edges aligned. Then place weights on the back half of the insert to hold it in position while the front half is lifted up for application of spray adhesive. Adhesive is applied to the seat cover and the foam pad, but only on the insert portion of each. The panels need to remain free of adhesive.
When the adhesive is ready, the seat cover is lowered onto the foam pad and the insert is attached to it. With the front part of the insert glued into place, the weights are not needed for the back part of the insert. The process is repeated on the back part of the insert, and it is attached to the foam pad just like the front. The panels are not glued because those parts of the seat cover need to be free to move across the foam bolsters. Otherwise, the finished seat will not look quite as nice as it could.
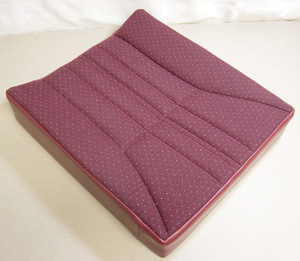
The finished cover looks pretty good. Notice that it looks a bit different than you might expect from looking at the foam pad.
Boxing Match
With the insert glued into place, it’s time to pull the boxing to the bottom of the foam pad and glue it into place. Contact adhesive is the right product for this job. Most spray adhesives don’t have the holding power of contact adhesive, but they work great for flat areas. For holding the edge of the boxing to the bottom of the foam pad, I prefer contact adhesive and apply it with an acid brush. It’s important to follow the contact adhesive application instructions to get a strong, long-lasting bond. This means that it needs to dry between coats, and on porous surfaces such as canvas more than one coat is needed.
The boxing is cut to compress the foam pad about a quarter of an inch. Draw a guide line on the canvas so you’ll know where to apply the contact adhesive and how far to pull the boxing. The canvas on the bottom of the foam pad provides a better surface for attaching the boxing than the foam itself. It also gives the bottom of the cushion a finished look.
When the boxing is attached, it’s time to turn the cushion over and admire the finished product. It looks good and it’s comfortable. Who wouldn’t be happy with it? Of course, you may never want to build a seat cushion exactly like this one, but the techniques presented here will help you design and build whatever you want. Next time we’ll look at interior panels and carpets.


