In the first installment of this series, we talked about the need for thorough planning before any test flight, especially the first flight of a new airplane. In the second installment, we talked about specific tune-up and training a wise pilot performs to get ready for that first flight. And in the third, we covered a few notes and ideas about the flight itself. I have heard a first flight described as being a little like Mount Everest: The builder is so focused on scaling the highest peak they have ever experienced that they simply haven’t thought about what lies beyond, and truthfully I have felt that same thing myself. But once you are standing atop the summit, once the first flight is complete, life must go on, and we have to focus on the next goal. In the case of your new airplane, that means the rest of Phase I. Whether you have a 25- or 40-hour Phase I test period, there is a lot to get done, and you might as well start thinking about it before you get there.
Before we get started, let me clear up one thing about Phase I flight testing. Done right, it is not about “flying off the hours.” I see this phrase repeated time and time again by pilots in hangar talk and on Internet forums. The implication (whether they do this or not) is that they simply bore holes in the sky within their designated test area until enough hours have been clocked to free them to go anywhere they want with their now slightly used airplane. Little is done in the way of testing, and they simply fly the “same hour” 25 (or 40) times. Unfortunately, you can actually get away with this because the FAA’s regulations are not specific about what you must do, though builders do have to certify (with their signature) that the airplane is safe and controllable throughout its normal range of operations. A lot of interpretation can be applied to what constitutes a complete test program, but it is clear from reading the advisory circulars that the Feds really want you to test the airplane. AC 90-89 describes the FAA’s vision for the flight-testing process for an Experimental/Amateur-Built aircraft, and it does so in great detail. While advisory circulars such as this one are not regulatory in nature, ignoring one as well written and complete as this one is ignoring a vast reservoir of accumulated knowledge. As an EAA flight advisor, I strongly encourage builders to create and fly a real test program that examines the full envelope of their aircraft’s capabilities so that their signature in the logbook means what it says, that the airplane has truly been tested!
Builders who prepare for and complete a thorough flight-test program that examines the aircraft’s full performance envelope (within the prescribed airspace for Phase I) will come to know their airplanes far better than those who see flight testing as just a necessary evil or “killing time.”
While I strongly advise everyone to read that advisory circular, I would like to present a way of looking beyond the first and second flights and propose a simple way to organize your test program. I like to organize such a program into broad categories, or “families” of tests. Many people lay out a full plan of flights and expect to fly them in order. However, once you get flying, you’ll discover that for various reasons, it is not always convenient to do it this way, and fortunately it isn’t required. You might, for instance, be planning on climb testing on a particular day, but ceilings restrict you to lower altitudes. Instead of staying on the ground, you might decide that it is a good day to do handling quality evaluations or avionics tests. If you have your test program divided into categories, and the flights grouped within those categories, it is simply a matter of substituting one test plan for another. Some things need to be done in order, of course. For example, it is wise to do an airspeed indicator calibration before doing your performance tests, or the data might be meaningless. But generally, you will have a lot of flexibility if you lay out the big picture up front.
I like to organize my test program into the following categories:
• Engine break-in
• Performance testing (to develop cruise, climb, landing, T/O charts)
• Envelope expansion (speeds, G, Loading)
• Stability and control (including stalls, CG testing, etc.)
• Aerobatics and maneuvering (to satisfy operating limitations, which require explicit tests)
• Avionics (testing performance, configuration and procedures)
Let’s take a look at what is contained within each of these categories.
Engine Break-in
Many builders understandably use a new (or newly overhauled) engine in their homebuilt. While this gives the builder an entirely “new” machine, it does carry with it the problem of breaking in the engine’s cylinders and rings during the critical first few hours of the airplane’s life. If the aircraft has been built from a popular, well-engineered kit and built to plans, chances are the flying characteristics are well known enough that the pilot can concentrate on the engine break-in (usually recommended as a fairly high power setting) and pick up the actual testing later on without undue concern. If this is a unique airframe, things get a little more complicated, and it might be prudent to see what can be done regarding break-in with a test cell and club before having to compromise the break-in during what are truly Experimental test flights early on.
If you are in the first category, then it is wise to follow the engine manufacturer’s recommendations: Fly straight and level (or large laps around your safe landing areas) until oil consumption and temperatures have stabilized, then proceed with the true flight testing of the new airplane. The break-in flights should be conservative with regard to maneuvers, and conducted with an eye on the engine and system’s instruments to make sure that no problems develop. Frequent de-cowling after test flights is a good idea to make sure that nothing bad is happening “under the hood” during this phase.
Performance Testing
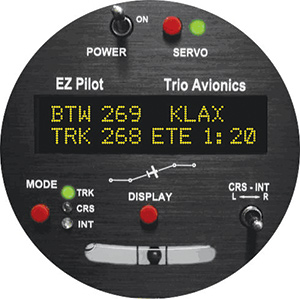
Some avionics items such as an autopilot can be very useful when attempting to fly precise performance tests, making that early work during flight testing even more beneficial.
Every new student pilot spends hours with the aircraft’s Pilot’s Operating Handbook (POH), learning to use tables to predict cruise speeds and fuel consumption for a given power setting. These tables (along with others like takeoff and landing distance) have been developed by the manufacturer using flight-test data gathered by the company test pilots. In the case of your new homebuilt, it’s up to you! Most kit manufacturers understand that no two finished airplanes are identical to the prototype and recommend that builders conduct a full series of tests to determine their particular airframe’s best climb speeds and range performance numbers. This is what performance flight testing is all about.
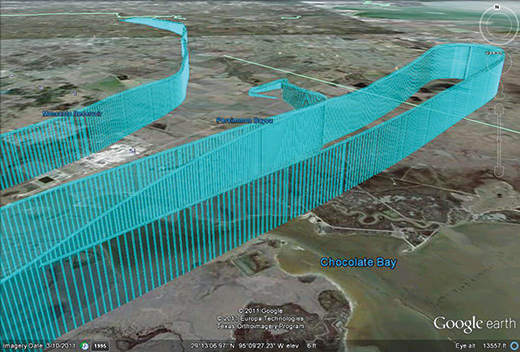
The data recording capability in modern EFIS and EIS equipment has made performance testing a snap. No longer does the test pilot have to divide his attention between flying precisely and recording data on a kneeboard. The pilot can simply fly the aircraft as accurately as possible to the desired performance characteristics and play with the data on his computer once back on the ground. This has become so easy that I cringe when I meet pilots who have been flying their homebuilt at one specific power setting or altitude “because it works” and have never explored the rest of the envelope. You might not care about the most efficient place to cruise if all you do are local flights, but strike off across the country and it is nice to know your options with regard to altitudes and power settings to get the best range or the greatest miles per gallon.
In a similar fashion, a good pilot needs to know the speed for best rate of climb, best angle and best glide, all sorts of parameters that can be determined by test flights. The kit manufacturer’s specifications are a good place to start, but many would be surprised to discover the wide variation possible due to individual build differences. Even if the airframe is close to the factory ideal, the instrumentation it is equipped with might not be, and the pilot will be flying with that instrumentation. Knowing how to get out of a short field (and how short a field that should be) is valuable information if you are going to stay safe.
Performance flight testing can take a lot of flight time, but fortunately it can be spread throughout the flight-test program. Once you have a basic feel for how to operate the airplane, you can intersperse these tests among more “interesting” operations just to break things up a bit.
Envelope Expansion
It makes good sense to start the flight testing of a new aircraft conservatively. We want to fly well away from the edges of the envelope and stay where we are comfortable. While early test pilots were known to jump in a new ship with little study to wring it out over the airfield, modern pilots prefer to keep their pictures off of memorial walls and enjoy long, safe careers in aviation. So we start with simple flights, well within the manufacturer’s parameters, and then gradually expand the known operating envelope to see where the edges might be.
Envelope expansion is all about pushing those edges without falling over them, whether the edge is related to maximum structural limits or to flutter margin. This testing is serious: While it is hard to get hurt doing performance tests, flutter at the upper edges of the aircraft’s speed range can be deadly—and exceedingly quick.
Structural limit testing is another area where you want to be careful, though in truth you will probably fly well within the design characteristics of any airplane you are likely to encounter simply for physiological reasons. Most aerobatic kit planes are stressed (and static tested) to about 9 G, and most pilots will pass out well before they get there. But flutter associated with speeds up to redline is another matter, and these can be found without looking too hard. Either way, this kind of testing is something that needs to be approached with caution, and the best margin a pilot can have is a parachute; structural failure is hard to deal with except by bailing out.
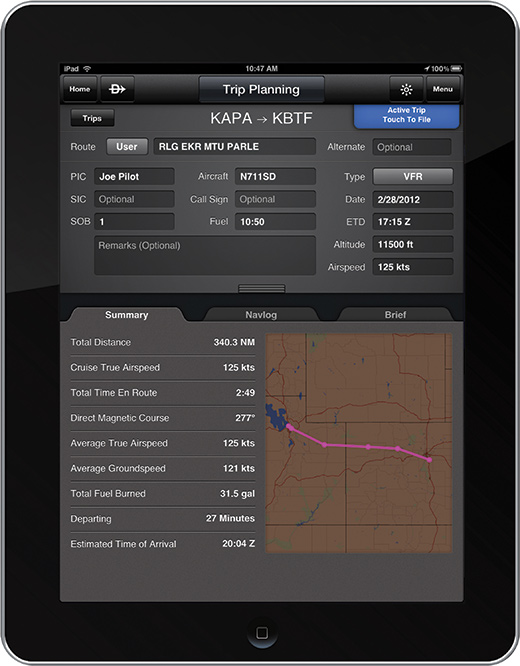
Programs such as Garmin Pilot’s navlog can help you acquire, retain and then analyze flight data after the fact using a portable device.
Stability and Control
Production aircraft will generally spend hundreds (if not thousands) of hours in stability and control testing, followed by tweaking to improve the airframe before reaching certification. Achieving a standard set of operating characteristics that are recognizable and acceptable to a wide variety of pilots takes time. But homebuilts are likely to be a bit quirkier in some respects, and most pilots don’t have the time to change tail-surface areas and the like. Stability and control testing for your homebuilt will involve handling-quality evaluations at various CG locations as well as flying stalls (and possibly spins) to find where the best places will be to establish the boundaries. Again, for a popular kit you’ll probably have a pretty good idea where these edges might be, but you owe it to yourself (and your passengers) to make sure that you have tested the airplane through its normal range of operations.
Stalls and spins at varying CG locations can be exciting. Most production aircraft are tested and modified to have benign characteristics in both regards, but the higher-performance homebuilts tend to have less aerodynamic warning of the stall and quicker spin rates. Getting the CG too far aft in either case can also be exciting (to say the least) and should quicken the heart rate of even the most dedicated adrenaline junkie. Spreading these tests out over the latter part of the Phase I period will give you time to develop a feel for the aircraft first, and a chance to relax with more benign testing in between these flights.
Aerobatics and Maneuvering
The operating limitations issued as part of your homebuilt’s airworthiness certificate are likely to require you to sign it out of Phase I with an explicit enumeration of aerobatic maneuvers for which it has been tested and found acceptable. Many builders ignore this requirement because they have not been trained for aerobatics, yet they eventually do them anyway. A far better plan (if you are not qualified for this kind of flying) is to ignore it during the initial testing, sign the airplane off into Phase II with no aerobatic maneuvers approved, and then put it back into Phase I (usually a paperwork exercise) to do the testing when you are ready for it. It is indeed rare when a person can feel fully comfortable with a new airplane in as few as 25-40 hours to go and explore the corners of aerobatic maneuvers, and it is a bad idea to “pencil whip” the approval when there are safer alternatives.
But for those pilots who are familiar with the type and experienced with aerobatics, this can be a fun series of flights. To add a little challenge, you can use the Cooper-Harper scale to rate the ability of the airplane to perform the maneuvers to an acceptable level (assuming that the pilot isn’t the limiting factor). Even if the airplane is not aerobatic in nature, checking the handling qualities (qualitatively) in steep turns and lazy eights can be both challenging and rewarding.
Avionics
The final category of flight testing is truly a product of the modern era, and can take the longest. Modern homebuilt aircraft often challenge production jets when it comes to the complexity and capability of their avionics suite and can require a great deal of testing to make sure that everything works as designed. Testing radios, GPS receivers and autopilots (not to mention primary flight displays, multi-function displays and engine-management systems) can take hours just to cover the basics. Frequently this testing serves not only to check out the equipment, but also to train the pilot, because few of the modern glass cockpits come with ground simulators. Having tested numerous modern glass cockpits, I can honestly say that it may take an additional 40 or 50 hours of flight testing to fully explore these systems.
The good news is that this testing can be done after signing the airplane out of Phase I, and there is no requirement to certify these functions as part of the aircraft’s basic airworthiness. I like to get the airplane though the formal test program, and then begin to work seriously on the avionics. However, some items within the avionics (autopilots come to mind) can be useful in flying precise performance tests, so some early work is beneficial. Eventually, of course, you’ll have to come back to test more than the “hold straight and level” mode, but knowing that the basics work early on is a good idea.
Wow! That’s quite a list, isn’t it? And that is just an outline of the kinds of tests that may be performed within a comprehensive Phase I program if you are truly going to know the airplane when you are done. I like to keep a spreadsheet, or at least a list on a whiteboard, that keeps track of what has and has not been completed during the test period. This is especially useful if you have multiple pilots conducting the Phase I testing. You can assign specific parts and tests to various people, and as they take their turn with the airplane, you can eliminate duplication. Parallel testing keeps things interesting, and it is “weather efficient” as well. With careful records, you’ll know when Phase I is done by what you have achieved, not by some arbitrary number on the Hobbs meter.


