Many people livein areas where they don’t have the room for a complete workshop. Many build in the garage, relegating their cars to the weather. It is not all that unusual for homebuilders to construct an airplane inside the house itself, with sufficient spousal tolerance and approval.
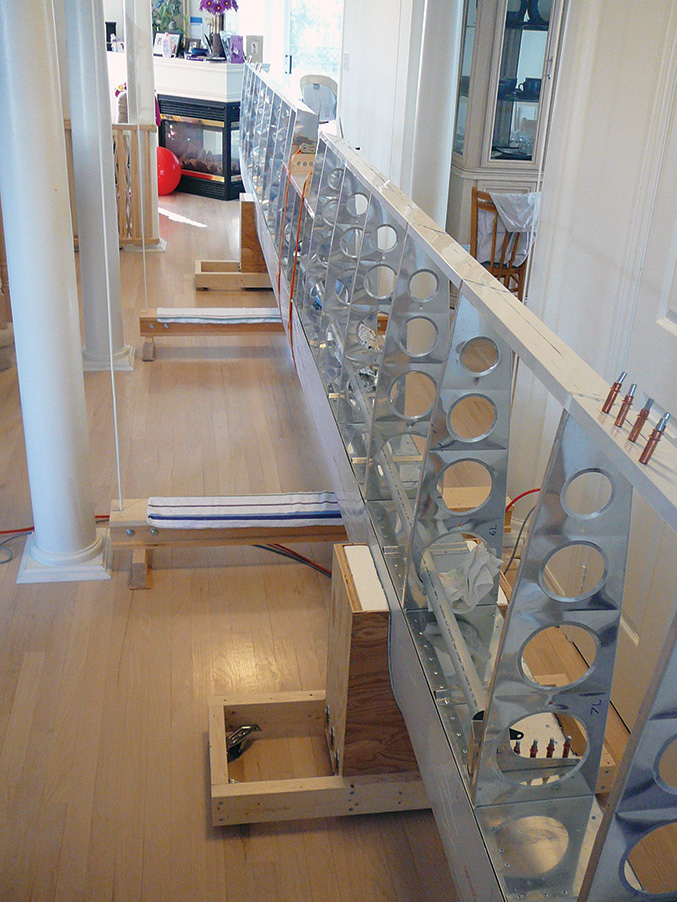
In our case, building an Earthstar Odyssey, there was just one big problem: The wing is all in one piece from tip to tip. The D cell is supplied as one piece with the kit. Mark Beierle, the designer and owner of Earthstar Aircraft, developed this ingenious method of constructing the D cell in a massive mold, and the builder carries on the building technique. Even with the fiberglass tips off, it is too long for my double garage, ruling out the garage option. So it not only had to be built in the house, it had to be stored in the house.
It’s not every household with a wing suspended over the main corridor, but for a homebuilder, it is just one of those things.
Finding the Space
Since the only way I could consider building is at home, I started looking for a way to make it happen. I thought about building a stairway and door to my basement, but that would’ve been a big expense, and I didn’t want to disturb a foundation wall. However, I quickly realized that the main hallway in my house could be long enough, but it would be a pain walking around the wing during construction. My hallway happens to have a set of pillars on each side, and it opens to the dining room on one side and the living room on the other. It dawned on me that I could potentially build a hoist mounted on the pillars to lift the wing out of the way when not working on it. The nine-foot ceilings on the main floor also would help.
It took a lot of measurements, planning and design work. I did a 2-D and 3-D drawing of it in an architectural CAD program I have called DataCAD. Then it was over a year of spare time to design and build it. (I really want to build this plane!) I also needed to make it aesthetically pleasing and as stealthy as possible, in case I were to find a wife. (In fact, I now have a wonderful wife, Annie, and a 20-month old daughter, Stephanie.) People have actually walked into our house and not noticed the wing overhead.

There are things far more precious than wings, and they need to be protected with redundant structure and good design.
Design for Minimal Impact
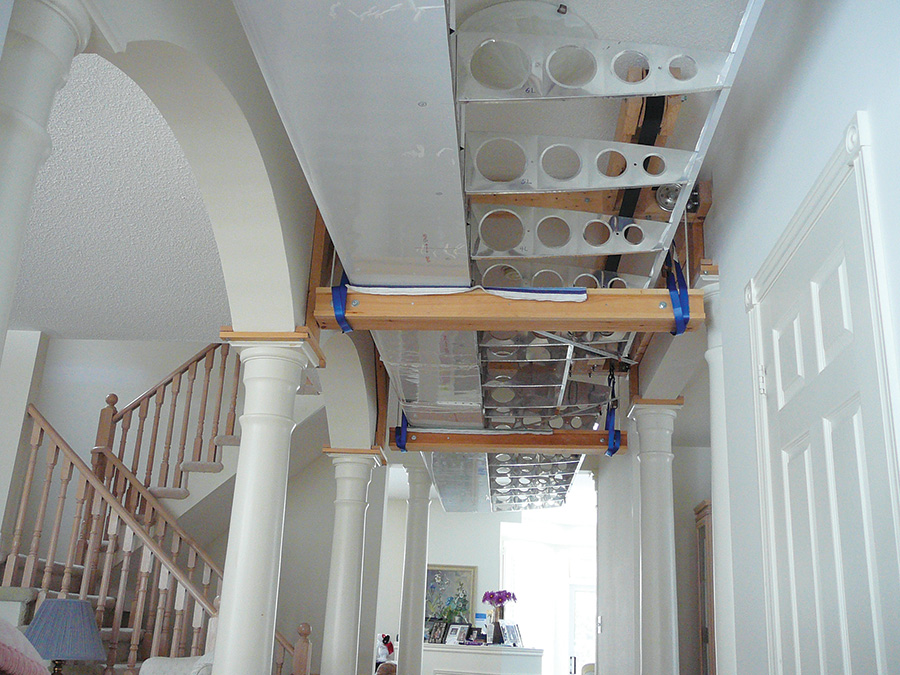
The hoist installs with no holes drilled in the ceiling or walls. It is supported vertically on four pillar caps. There is a wood locking collar that goes around each pillar cap to retain it. Laterally, it is constrained by the walls. Fore and aft, it is constrained by side supports.
There is a support on each side that is supported on two pillars and goes against the upper wall of the hallway. Each side support has two steel angle fittings that the upper hoist frame bolts into.
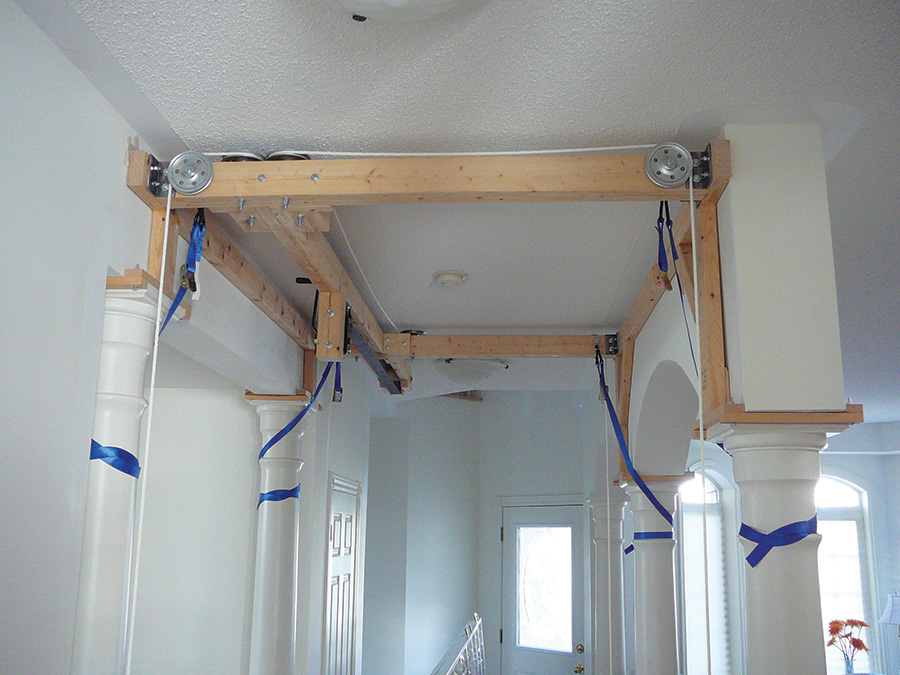
The upper hoist frame is an asymmetrical H-frame with a system of pulleys bolted to it. Two wing-support crossbeams are supported by four white nylon ropes at each corner of the H-frame. The ropes run through a system of 10 four-inch garage-door pulleys that gather them to one coupling point. They are joined through a steel plate and wood coupler to the grappling hook of a winch strap, above the middle beam of the H-frame. The winch strap goes out to an extension piece and around a roller pulley on the end. It’s made from an industrial caster with roller bearings. It comes around underneath and to the middle of the beam to a crank winch. The middle of the wing has a rectangular opening for the engine bay, which gives a place for the winch and clearance for the crank.
The cradle supports are designed to clamp to the home’s columns and don’t require bolt or screw holes.
Making it Happen
The upper frame is made of (supposedly) kiln-dried Home Depot spruce 2×4, which needs to be built into place without much delay before it warps. The H-frame is made of doubled-up 2x4s, which are epoxy-bonded together. To keep it coplanar, I clamped one end to an I-beam in my basement ceiling and constrained it on the floor on the other side with weights while the epoxy was curing.
The wing support struts are made of pine and are a double I-beam with a hollow area inside. There are three cross plates inside to maintain the cross section and give the I-beams lateral support. There is a wood cartridge that plugs into each end. The cartridge has quarter-inch plywood sides with two pieces of 13/4-inch hardwood dowels in between that act as capstans for the rope. A bolt passes all the way through the beam webs and dowels.

Safety straps make sure the wing and cradle stay up in case of a winch or rope failure.
The rope enters the cartridge through a slot in the spar cap and wraps around the dowels with many turns. There is an exponential relationship between the number of turns and the rope tension so that by the time the rope gets to the end, the tension is negligible. This end is tied in a hitch around a piece of one-inch dowel to secure it. This arrangement provides no weak spot for the rope and attains its full strength. It also makes the rope length continuously adjustable, which makes it easy to adjust for the elasticity of the rope. The rope is adjusted with the cartridge out and also with it partly plugged in. Then it is slid into place and secured with the two bolts.
Supporting the Wings—Safely
Earthstar supplies foam bases to support the wing vertically during construction. I built plywood boxes around these and mounted them on bases with hinges and clasps. The bases are on casters to allow the wing to be moved around easily. There isn’t enough room for the flaps and ailerons in the ceiling, so I had my hinges supplied with uncrimped hinge pins for easy removal between fitting sessions. The wing support boxes are hinged to make it easier to tilt the wing down flat.
The winch strap loading is well de-rated, but I hung cam lock straps from the pulley bolts to loop underneath the wing support beams so that if the stitching failed, the straps will hold everything up. This gives redundancy and extra safety, which is important with people living underneath, especially our little girl.
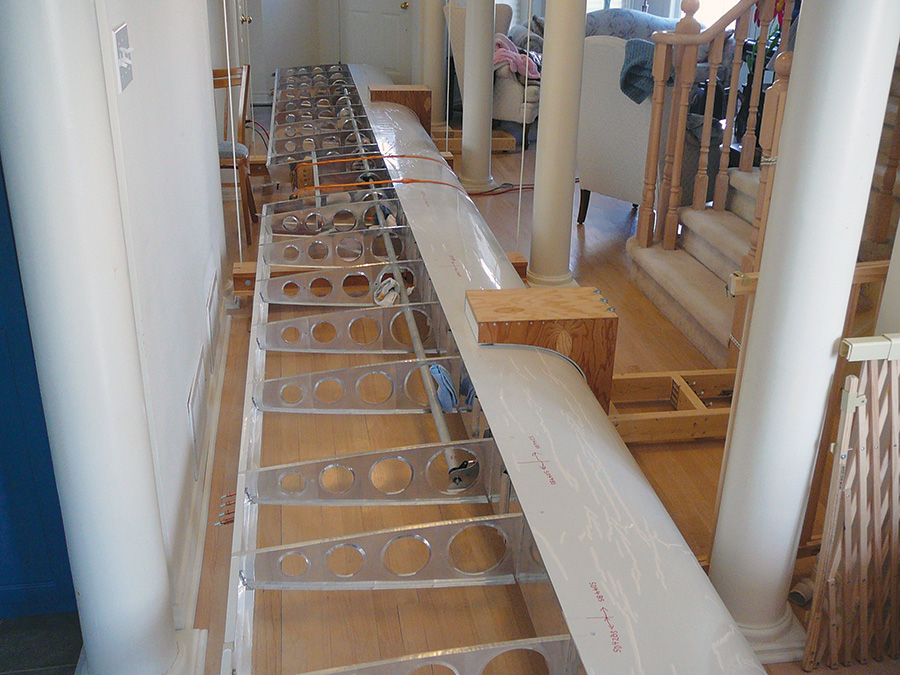
The size of the wing is obvious when lowered to the floor—it fills the space.
Making it Fit
The D cell can’t go through the front door because the garage wall goes out on a 45 angle. I have a dinette bay at the back of the house with a sliding door. The D cell comes in easily through the sliding door and enters the hallway with a slight turn. The completed wing will exit easily the same way. I have some Forearm Forklift straps that will make carrying the wing a breeze.
I work on the fuselage in one bay of my garage. I can actually bring the fuselage into the house by removing the stationary panel of my sliding door to make a wide opening. I will be able to place the fuselage from the dining room to the living room and lower the wing down to it with my hoist to trim the fuselage to match the wing.
I am fitting aluminum wingskins and have half the bottom done. I am hoping that I can finish the basic airframe soon, but it is difficult juggling family life, work and everything else.
Perseverance Pays Off
I never thought I would see the day when I would get a pilot’s license, let alone build an aircraft. The dream of flying and building that I have had since I was a boy was crushed when I was denied a pilot medical after finishing ground school in the early 1990s. I had endured three bouts of kidney stones, and one became stubbornly lodged. Still, I wanted to build a Christavia Mk 1 and even took a welding course.
In 2004, a new friend at work, Mike Lovell, and I started talking about his flight training, which once again stirred up the longing. Thanks to greater water intake, I was stone free and able to get a medical. I eventually got my Private license in 2006.
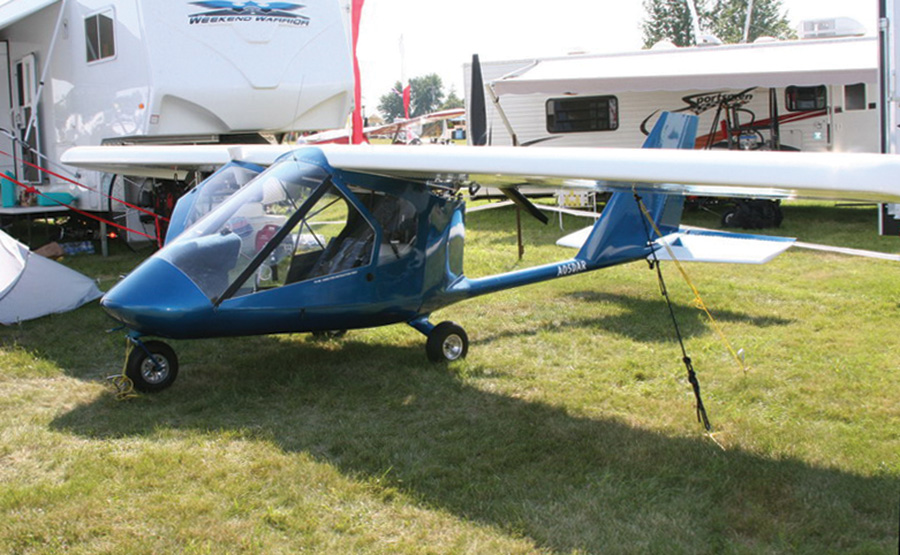
The author’s goal—an Earthstar Odyssey
Choosing to Build
I didn’t see myself renting indefinitely because I couldn’t afford to fly as much as I’d like with the high rental fees. I started looking for a less expensive way to keep flying. I don’t care about speed; in fact, I prefer as low a stalling speed as is practical to make emergency landings safer. I like pusher propellers, including canards and three-wing configurations, because the pilot is more out front for a better view. I also prefer high wings for an unobstructed view of the ground, because for me, it is all about seeing the earth from above. I also like to share the view, so two seats is the best compromise, given what I can afford. I also realized that scratch-built might be a stretch time-wise, and a simple kit would be a good alternative.
I remembered the Challenger ultralight from years before and looked it up again on the fabulous and addictive Canadian web site. The latest versions looked great with the new nose cone and full enclosure. I thought for quite a long time that I was heading in that direction. But I was never too keen on the fuel efficiency of the two-stroke Rotax engines (though the four-strokes have excellent efficiency), and that is all they had in that power range.
Then one day at the Canadian Aviation Exposition in Oshawa, Ontario, I saw a Flight Star aircraft with an HKS engine. When I discovered that it had a 60-horsepower four-stroke, I began my research. According to manufacturer’s curves, at the same power level, the HKS 700E has half the fuel consumption of a Rotax 582. I asked Dave Goulet, the Challenger designer if some day the HKS engine could be an option on a Canadian Challenger in the Advanced Ultralight category, and he said, “Not a chance.”
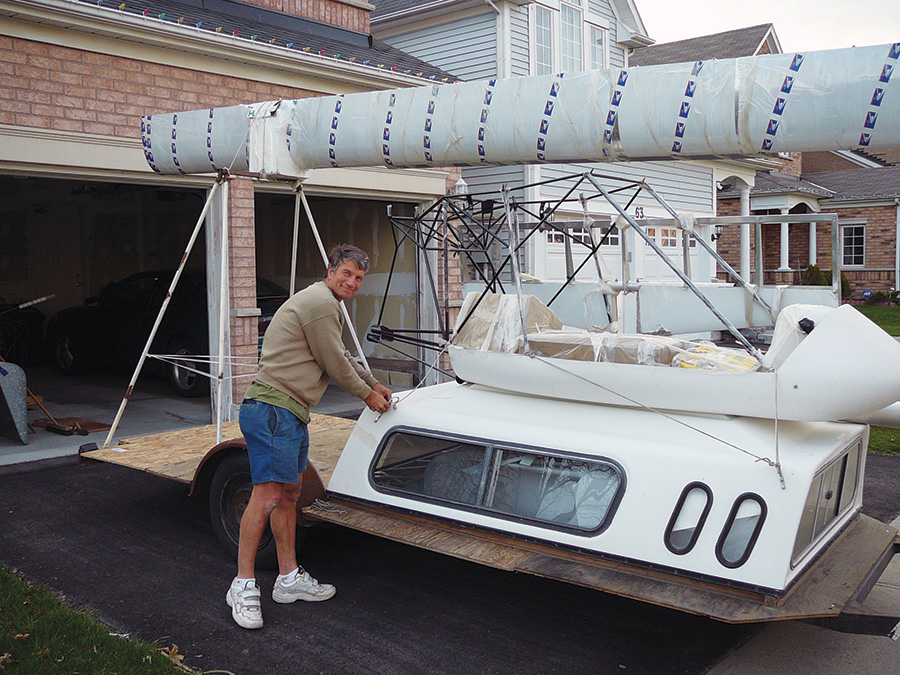
The Odyssey kit as delivered to the author—the long leading edge D-section presents a unique storage problem.
Beginning the Odyssey
Another aircraft that caught my attention was the Earthstar Odyssey. At first I dismissed it, because the wingspan is only 26 feet. Then I saw that the HKS web site showed it as being one of the aircraft using the HKS 700E. I came to realize that it was exactly the kind of aircraft I was looking for; it couldn’t be closer if I had designed it myself. I much preferred the full-depth spar with D cell construction, cantilever wing, full normal wing and tail ribs, and clean design. The standard 26-foot wing version has an 11.1:1 glide ratio with side-by-side seating. When I discovered there was a 28-foot wing option, that clinched it.
A builder not far away in Michigan named Dale Renouf, who built an Odyssey from a secondary supplier, DCC Corporation, was kind enough to let me visit his Odyssey and workshop. He even took me up for a flight. (His superb example won a Bronze Lindy award at Oshkosh.) He did stalls both power on and off, and it was amazing how tame and controllable the Odyssey is in stall, with no wing-dropping tendencies like Cessnas I have flown. The visibility is incredible with windshield and windows coming down low and no high-rising instrument panel blocking the view ahead. Egress is really easy.

The Odyssey’s fuselage is comprised of a steel-tube frame and a composite exterior.
Going Electric?
Mark Beierle has been building electric versions of his single-seat aircraft that fly for up to an hour and a half. This would be my preference for a powerplant. If battery technology keeps improving the way it has (or if they can make a long extension cord out of carbon nanotubes!), it will be possible. Otherwise, the HKS engine will be excellent. I am a power electronics engineer who designs switching power conversion circuits, and I have envisioned this sort of thing since the mid 1990s. In fact, I would really like to be involved with designing electric motor drives for electric aircraft.
I am the first Canadian to build an Odyssey, but not the first owner. Greg Evans near Montreal has one, and Fred Gayford near Cambridge, Ontario has a JT2, a tandem-seat predecessor to the Odyssey.
—J.F.


