For those of us using our aircraft for cross-country flights, having an O2 system can significantly enhance the pleasure and safety of the journey. Having oxygen on board offers three distinct advantages: 1. High altitude flight can offer fuel consumption and speed benefits—especially if altitude offers a better wind component. 2. Even if not planning for high altitude flight, the option to ascend in order to avoid bad weather can serve as a navigational safety feature. 3. Even well below the FAR-mandated altitudes for O2 (for pilots, greater than 30 minutes above 12,500 feet or anytime above 14,000 feet), many pilots and passengers suffer symptoms of mild hypoxia, which are easily alleviated with supplementary O2. Night vision also suffers significantly with even small decreases in oxygen saturation (a.k.a. SpO2), so using O2 at night is highly recommended even at lower altitudes. It’s clear then that O2 can benefit not only the “high flyers,” but nearly all pilots. In addition, spouses or family members will be more likely to come along on a trip if altitude-related discomfort can be avoided.
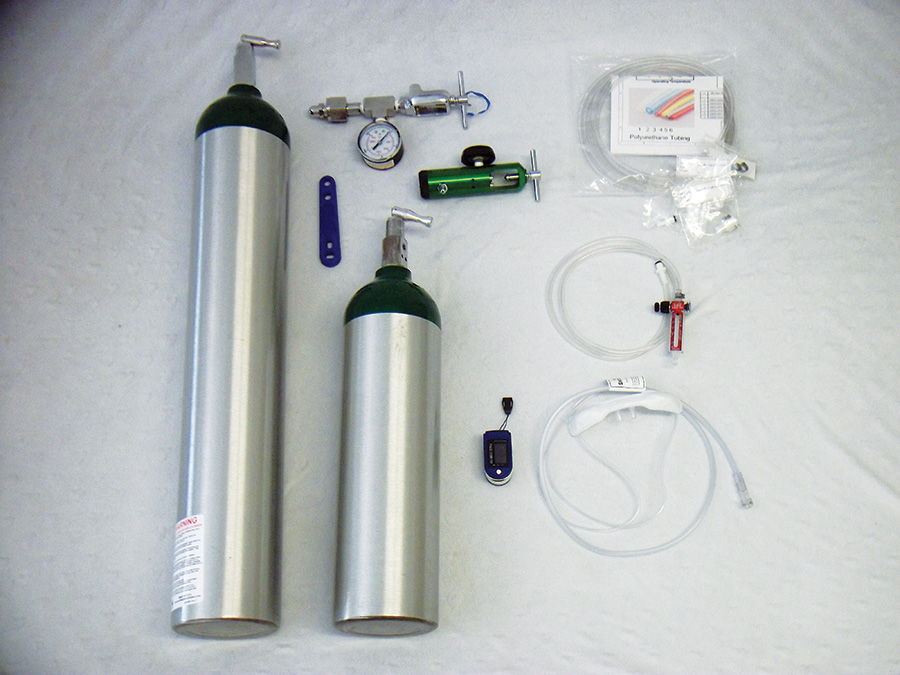
This schematic shows key oxygen system components.
A few months ago KITPLANES® looked at commercially available portable O2 units, but for those of you looking to maximize your budget, or who just enjoy extending the homebuilding experience to another corner of your plane, assembling your own O2 system is a fun and relatively simple project that can be easily completed in a weekend. The assembly I’ll be showing is fairly simple, yet functional, but be sure to visit the web sites of vendors listed at the end of the article and do a bit of research on the options available. I sourced my tank, regulator, and transfiller from eBay, while the flowmeter, Oxymizer, tubing, and quick disconnects came from Mountain High. This approach met my need for economy, while vetting my system design and hardware choices with Mountain High when ordering assured me that it would all go together smoothly.
System Architecture
This O2 system assumes flight below 18,000 feet. If you plan to fly above FL180, you’ll need to do additional research about O2 system requirements and design a system that adequately addresses the risks associated with potential O2 system failure at those altitudes. As with any critical area of your build, consider having someone else check over your work when finished. Oxygen failure at altitude can leave you quickly incapacitated—before going to altitude with your new system, consider reading Linda Pendleton’s excellent article When Humans Fly High.
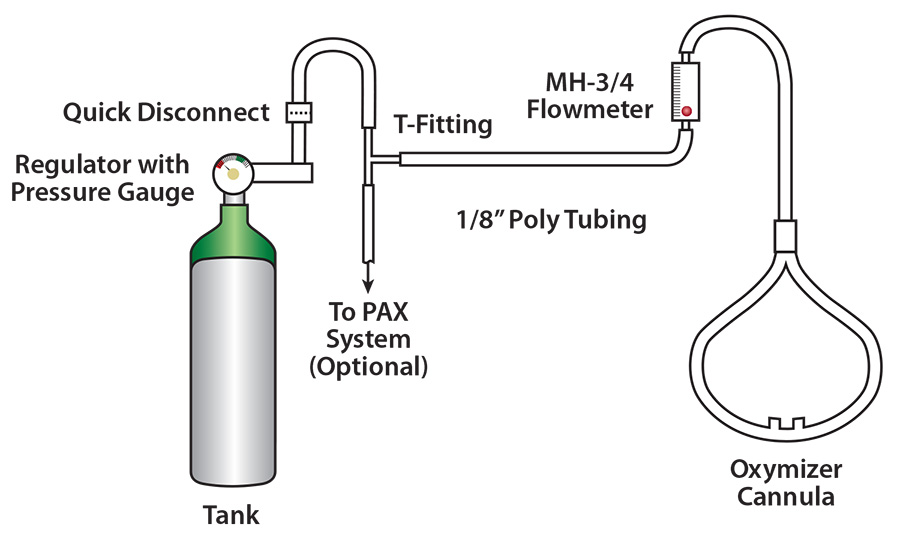
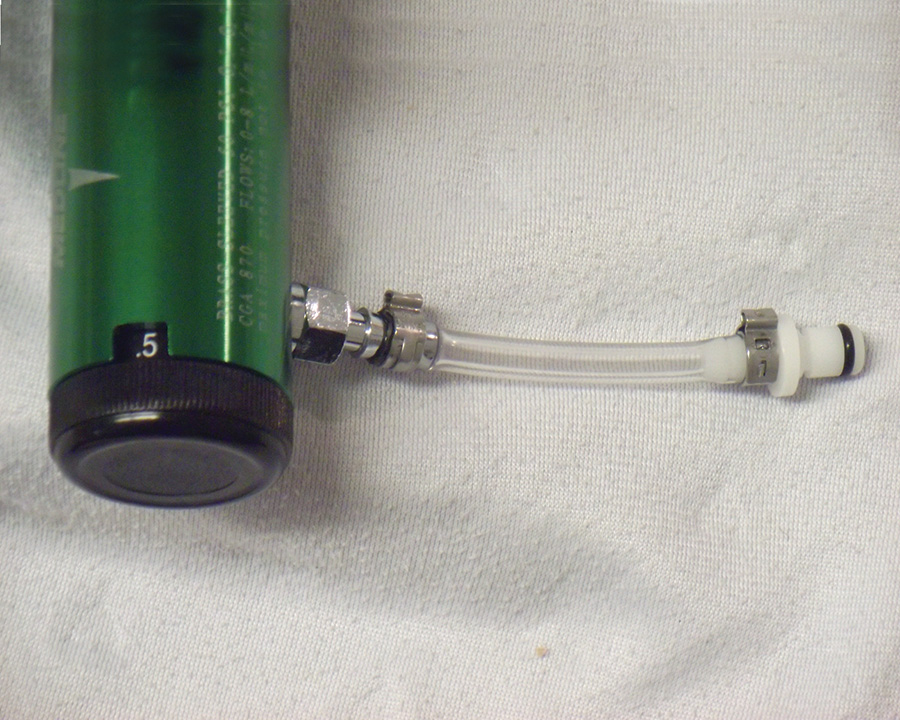
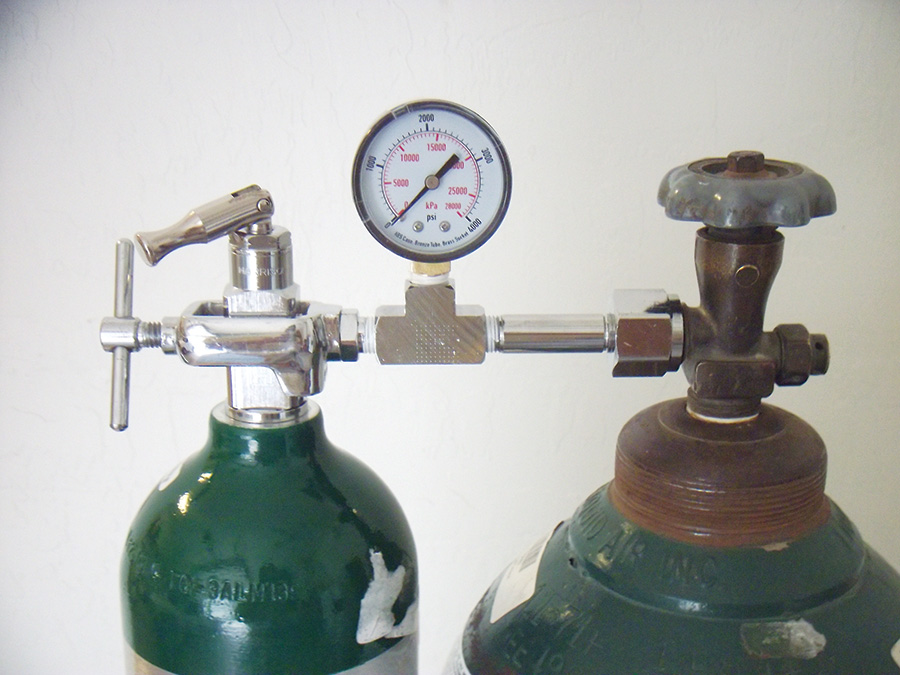
Toggle handle on top opens tank valve. Gauge shows tank pressure. Barbed fitting on left is for output line. Far left black knob allows flows of 0-8 liters per minute.
Oxygen systems remind me a bit of electrical systems, in that at first sight they can seem complex and offer a bewildering array of options. However, once you understand the architecture behind the systems (see schematic above), they are typically quite straightforward. At their very simplest, O2 systems consist of three components: 1. a storage unit (O2 tank); 2. a delivery system (tubing plus breathing apparatus); 3. a means of regulating flow between the tank and breathing apparatus (regulator and/or flowmeter). Additionally, each of these components will have their own fittings and mounting hardware.

Pulse oximeter showing a pulse of 92 and SpO2 of 93. Just holding my breath to take a steady camera shot was enough to drop my SpO2 and raise my pulse!
A pulse oximeter should also be considered an important element of any O2 system, especially given their low cost (less than $25 these days). This small device lightly clips over the end of your finger and, within seconds, provides pulse and oxygen saturation (SpO2) readings. For healthy individuals, SpO2 is typically 95-98%. Below 95%, judgment can be impaired, and under 90% is considered medically unsafe. Using the oximeter in flight allows you to monitor your SpO2 and determine two important facts: first, at what altitude do you need to (physiologically, not legally) start using oxygen, and second, (if using a flowmeter) the minimum amount you can flow and still maintain adequate SpO2.
Let’s examine each of the above three system components and then look at a sample installation.
1. Tank Selection
Tanks come in a variety of sizes and materials. Materials available are steel, aluminum, or composite. For GA/Experimentals, there is no advantage to steel tanks, so we’ll ignore those. Aluminum tanks have an unlimited service life and need to be pressure tested (called “hydrotesting”) every five years. In contrast, composite tanks have a 15 year service life, but similarly need hydrotesting every five years. If either the service life or pressure test period are exceeded, you will not be able to have the tank refilled commercially.
Composite tanks are quite a bit more expensive, but are typically half the weight of aluminum. (The table shows Kevlar-wrapped tanks, which are the lightest and most expensive composite tanks; carbon- and glass-wrapped tanks are also available). Size-wise, you’ll want to consider what will fit in your cabin and how often you want to deal with the hassle of refilling. My table only includes size D, M, and E, the three most popular sizes for small GA aircraft. Any smaller and the tank duration is just too short, while larger tanks may be unnecessarily bulky and heavy.

Tube routing hardware: hose clamps (Mountain Hardware), adhesive-backed nylon clips (WayTek), and plastic bushings (Aircraft Spruce).
Table 1 shows the cost of commercially available units, but since this is a DIY article, realize that you can purchase new aluminum tanks on eBay for less than $50. One thing you want to be absolutely sure of is that the tank is pressure tested and clean. You’ve probably heard tales of old air compressors exploding in someone’s garage and the damage inflicted—and they’re only at 100 psi or so. Imagine a 2000 psi tank exploding in the back of your plane, and you’ll see why pressure tests are mandatory. In addition, while oxygen itself is not flammable per se, when ignited in the presence of pure O2, most materials will burn with spectacular results. In particular, hydrocarbons (e.g. oil or grease) can actually self-ignite under the right conditions in the presence of O2. So, this is one area where a cheap, new tank (eBay or otherwise) is worth the small investment over that beat-up old tank in the corner of your shop of unknown provenance.

Table 1: O2 Tank Specifications
Besides volume, weight, and initial cost, one thing you’ll want to consider is how you plan to refill. We won’t go into O2 refill sources here, but options other than the local FBO are available, and many refill at their local welding/gas supply company. (I highly recommend John Deakin’s AVweb article Getting High on Welder’s Oxygen as an excellent in-depth primer on aviation O2). If welding O2 is your plan of attack, realize that you typically exchange an empty tank for a full one, and you’ll probably never see your original tank again. For a cheap aluminum tank this is no problem, but obviously if you’ve got an expensive composite tank, or just a new clean aluminum tank that you’d like to keep with the plane, you’ll need to either find a location that will fill your personal tank, or do refills yourself—which are not too difficult if you have a couple of large O2 tanks and a transfiller (see sidebar on page 37). Get a tank with a toggle handle on top, which will allow you to open and close the tank valve by hand rather than needing a wrench.
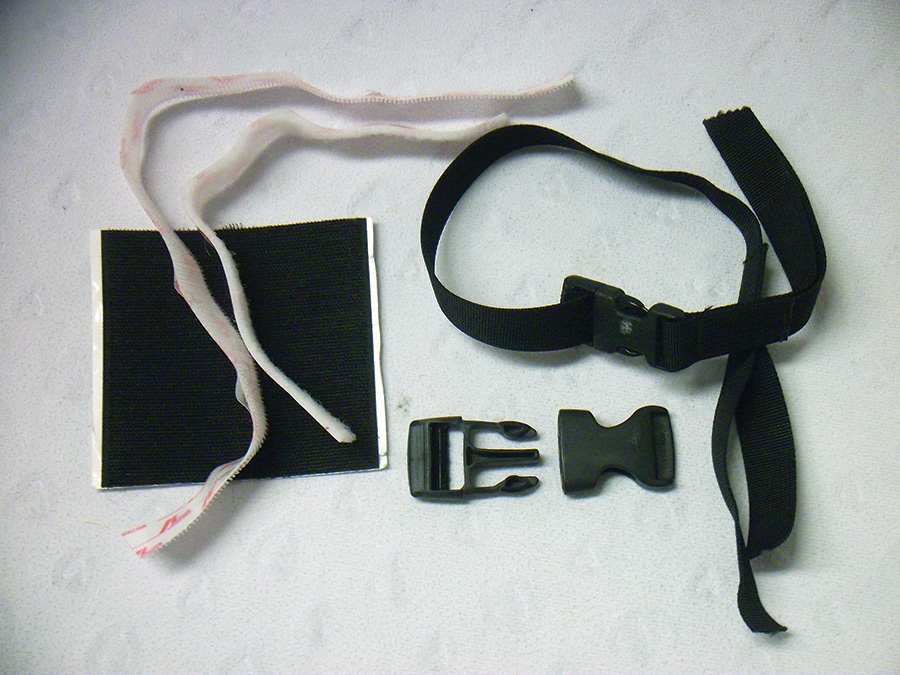
Mounting hardware: adhesive-backed Velcro (MH-3/4 Flowmeter and pulse oximeter mounting) and scrap webbing and clips from retired rucksack (tank mounting).
2. Breathing Apparatus and Tubing Selection
At the human end of the system, there are basically three options: a mask, cannula, or oxygen-conserving (Oxymizer) cannula. Masks are a bit unwieldy and as noted above, not usually necessary unless you plan to fly above 18,000 feet. (FARs require masks, rather than cannulas, above FL180.) Since our system doesn’t address the specific needs of a Class A O2 system, we’ll ignore masks. This leaves cannulas, which run about $8, and Oxymizer cannulas which run about three times that. However, due to the “rebreathing mustache” design, Oxymizers only use about one-third the O2 of regular cannulas and are thus the more popular breathing device.
I’ll make short mention here of EDS, or Electronic Pulse Delivery Systems. The above breathing apparatus are all constant flow, which means that even when you are exhaling, O2 is still flowing. A more efficient approach is to pulse flow in sync with inhalation, which is what an EDS does. These small, battery-powered boxes deliver altitude-compensated O2 in sync with your breathing, thus ensuring that very little O2 is wasted (1/6 to 1/8 the O2 use of a constant flow cannula, according to Mountain High). They have a variety of neat features such as programmable auto-flow at a preset altitude, auto-flow at nighttime, and a no-flow warning. Clearly, EDS is the cat’s meow of O2 delivery systems, but at a price of $600 for single or $800 for dual systems. You would have to do a fair amount of high altitude flying for the investment in an EDS to pay off, and since this is a DIY article where we assume you want the most bang for your buck, we’d recommend starting with a constant-flow Oxymizer.
Attaching male quick disconnect to regulator. Don’t forget to slide on the clamp before pushing the tubing onto the barb—once on, it is quite difficult to remove.
As far as tubing goes, since you’ll be regulating pressure at the bottle, low-pressure poly tubing will work fine. For a bare-bones setup (assuming you have an adjustable flow regulator), you can run tubing directly from your regulator to your cannula. A somewhat more complex and functional system would incorporate T-fittings, quick disconnects, and flowmeters (more on those in the next section). The T-fitting allows you to supply pax O2, while the quick disconnects allow you to route central tubing along inconspicuous or otherwise inaccessible routes, while allowing peripherals (i.e., tank and cannulas) to be easily removed for refill/replacement.
Although you can certainly find cheap tubing and hardware on the Internet, I found it easiest to just call Mountain High and place a single order for tubing, disconnects, and Oxymizers all at once. I’m a big fan of customer service, and the staff at Mountain High get two big thumbs up; they are super-friendly folks who are happy to help homebuilders. I explained I was assembling a DIY system and told them which components I already had. They told me what else I needed to complete the system and had a package heading my way the next day.
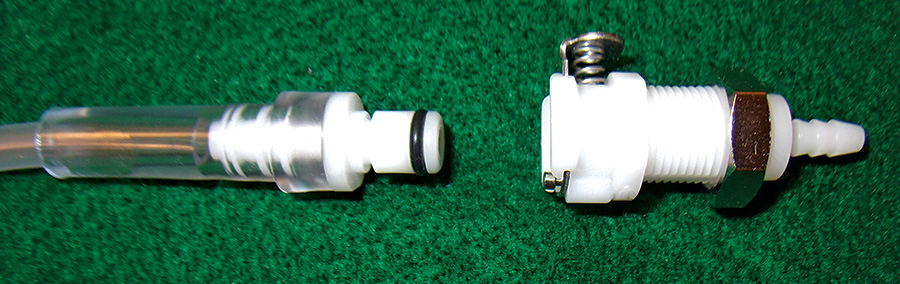
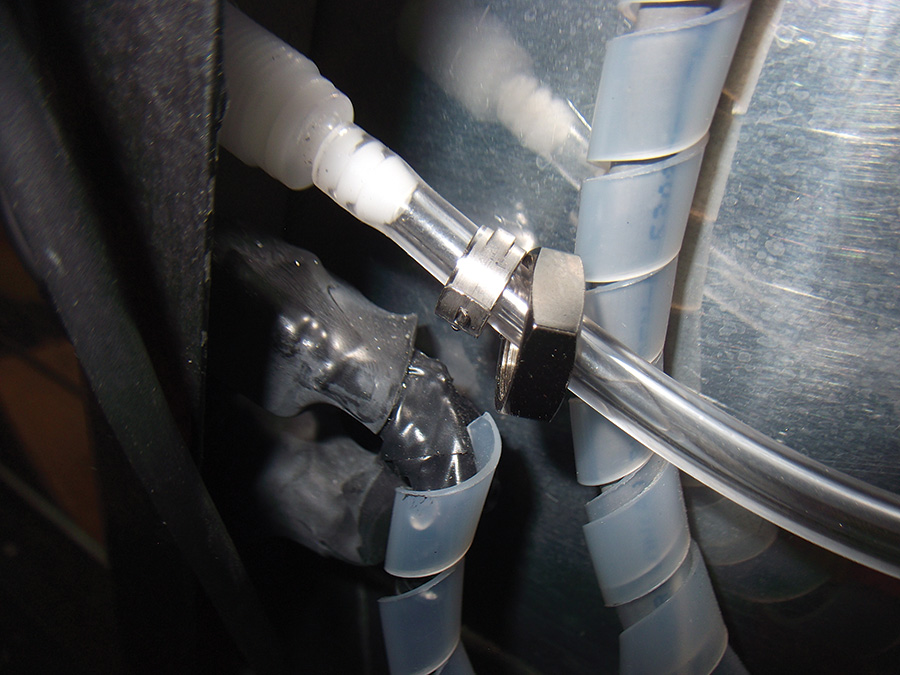
Bulkhead quick-disconnect fittings allow you to quickly remove either the cannula or tank for service or replacement. The male fitting on the left snaps into the female fitting on the right to make an airtight seal.
3. Regulator Selection
Finally, you’ll need to regulate flow between the tank and the breathing apparatus. A topped-off tank is about 2000 psi, so the primary regulator typically combines a gauge to show tank pressure and a valve to allow you to dial flow rate to some manageable pressure for the tubing and inline regulator. (Some regulators come without gauges, but wouldn’t you really like to know how much O2 you have left in the tank before heading up to 18,000 feet?)

Flowmeter may be plumbed in-line between the regulator and breathing apparatus to allow fine tuning of the flow rate (adjusted with knurled black knob). The black ball aligns with the altitude printed on the tube. Left scale is for Oxymizer, right scale for regular cannula.
Some of the fancy aviation regulators have multiple ports or can be remotely switched on and off; you’ll have to do your research to find what suits you best. For me, a plain-Jane $25 regulator from eBay did the trick. Note that with an Oxymizer cannula, your flow rate will be fairly low so you should try to find a low-flow regulator (pediatric regulators work well). My regulator flows 0, ⅛, ½, 1, 1.5, 2, 2.5, 3, 4, 6 and 8 liters per minute, so I’m pretty much covered, from low-altitude single user to high-altitude dual user volumes. (An oxygen cylinder duration chart with flow rate vs. altitude may be downloaded from Mountain High’s web site.) Be sure to get a regulator with a barbed fitting for the outlet.
Once you have the upstream flow dialed down to a reasonable pressure, a flowmeter is a great addition which allows fine adjustment of flow rate, and a visual indication, via a floating ball, that O2 is indeed moving through the line. With an inline flowmeter, you can dial O2 right down to the minimum necessary, based on the scale printed on the meter and crosschecked with a pulse oximeter. If you are really trying to do this on a budget, the flowmeter is not essential, but they do allow (especially when coupled with a pulse oximeter) maximizing O2 reserves and the fuzzy warm feeling that comes from seeing the ball floating. They also indicate if you’ve left the O2 valve open when you land. You’ll need to consider whether each pax should have their own flowmeter, or share (in which case you’ll definitely want to cross-check each user’s SpO2 with the pulse oximeter).
Go and Fly!
Many pilots east of the Rocky Mountains never fly high enough to need or want an oxygen system, but for those dealing with mountain terrain or weather, it is far safer to have it available—and easy to use—than to take the risk of hypoxia-induced problems because it isn’t in the airplane. One major reason pilots don’t have it is cost, so a do-it-yourself option is attractive—especially to the Experimental world used to rolling their own equipment. Hopefully, this article will get more pilots of high-performance homebuilts to think about carrying it. Initially, you might use it only for those “just in case” instances; but once you have seen the benefits in clear thinking and lack of fatigue, you might well find that your cannula becomes your best friend.
Assembly and Installation
Installing the system is mostly a matter of finding a good location for the O2 bottle and a route for running the tubing to the pilot and passenger. In this example, I show how the system was installed in my RV-4.
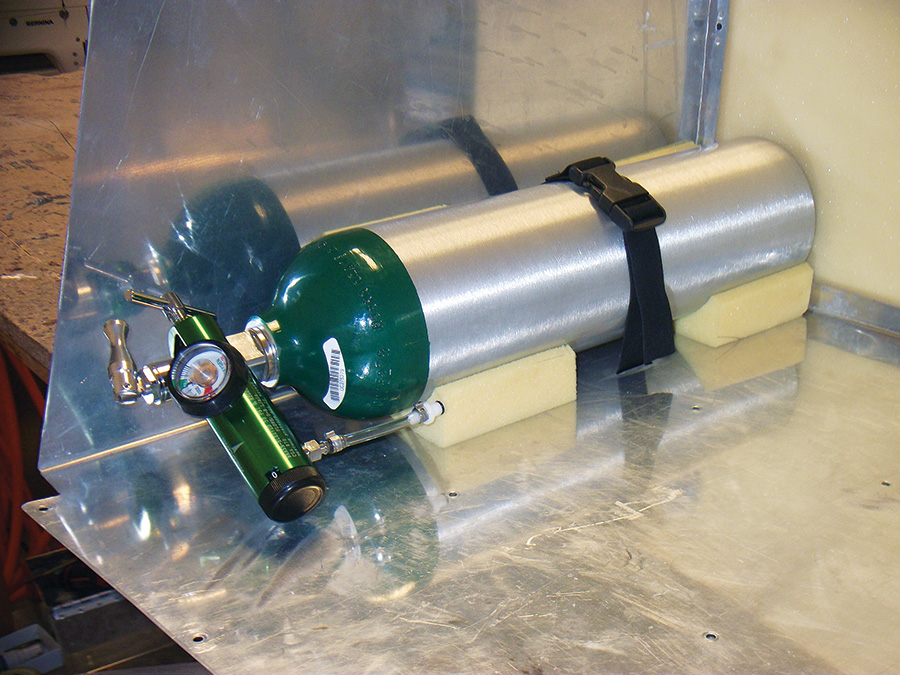
The first job was to locate and secure the tank. Since commercially available mounts were quite expensive, I decided to make my own with some leftover upholstery foam, nylon webbing, and fittings salvaged from a retired rucksack.

High density upholstery foam cuts nicely on a bandsaw and grips the tank well. The webbing goes through slots in the baggage compartment floor. The tank is quite secure, but comes out in seconds, thanks to the quick disconnects on both the tubing and webbing.
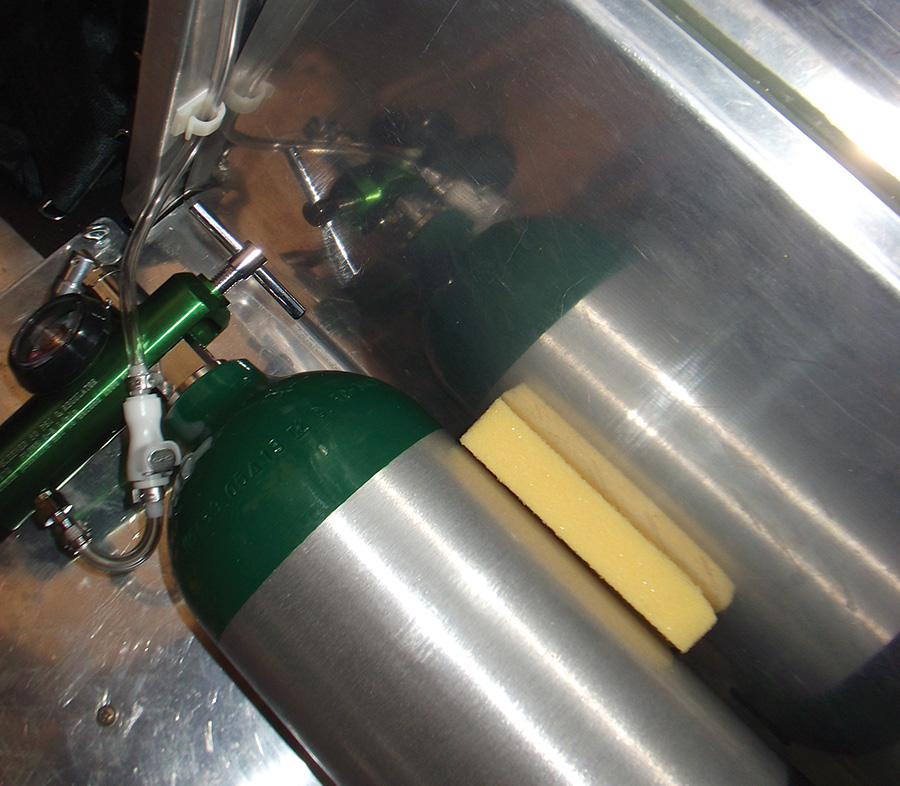
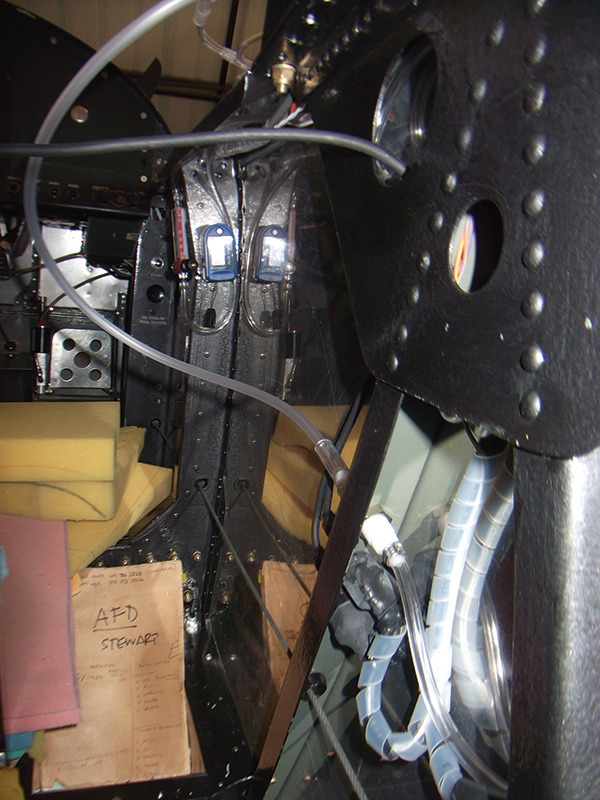
Here the tank has been mounted in the airplane baggage compartment and tubing connected. The O2 line runs up the rear of the baggage compartment bulkhead before heading forward under the right longeron.

The O2 line continues forward under the right longeron until exiting at the forward cockpit bulkhead, where it feeds into the bottom of the MH-4 flowmeter. It then reverses course to terminate at the mid-cockpit bulkhead quick-disconnect fitting.

The oximeter is mounted with Velcro next to the flowmeter for ease of use. Final check of the system shows O2 flowing sufficiently as evidenced by the ball floating at 18,000-feet flow for Oxymizer.
Rear view of quick-disconnect bulkhead fitting.
Be sure to have your clamp and nut threaded onto your tube before connecting to the barb.
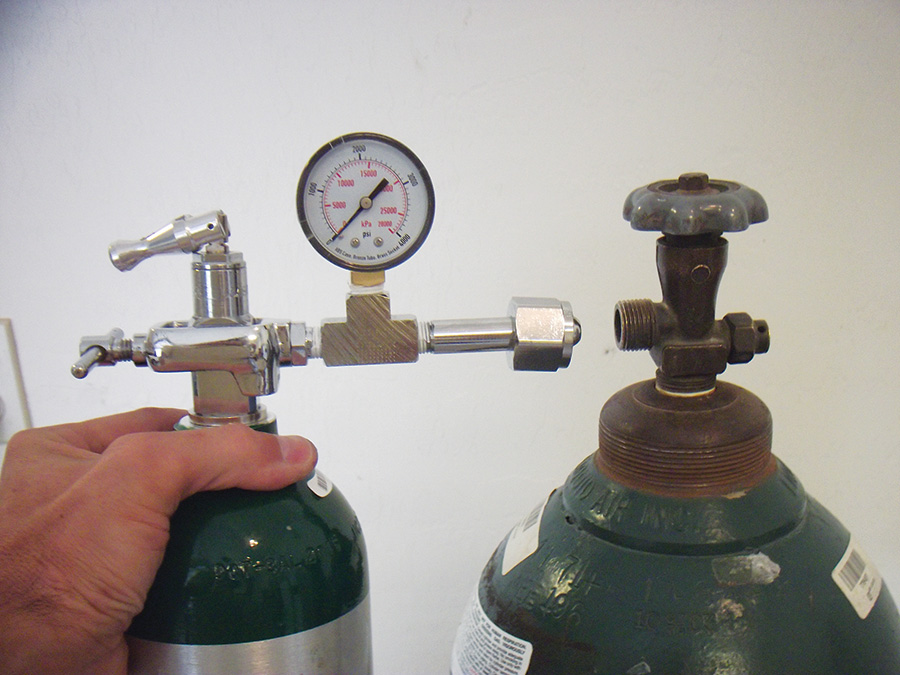
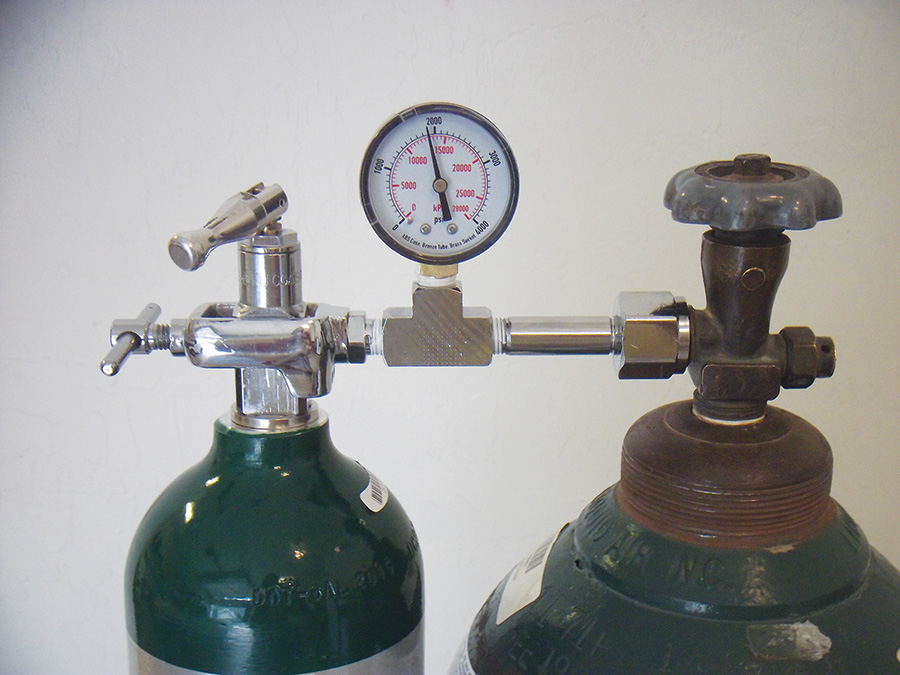
Transfilling
If you think you’ll be using a lot of O2, or just have trouble finding vendors willing to fill personal tanks without an exchange, doctor’s prescription, etc., filling your own tanks may be the way to go. Basically, you’ll need to either purchase or lease one or two large tanks (250 cf) and get them topped off. Bring them back to your shop or hangar, and fill your smaller aircraft tanks from the supply tank using a transfiller.
Using two (or more) supply tanks (known as cascading) allows you to maximize pressure (and thus O2 volume) of the aircraft tank; otherwise, you’ll get decreasing returns from a single supply tank as the pressure—and thus volume transferred—drops with repeated fills. Again, there are fancy (and expensive) aviation transfillers available, but I sourced mine on eBay from a veterinarian supply company for $75 and it works fine. Remember, you’re working with high pressure O2 here, so make sure your tanks and transfiller are clean—no grease or oil. (See Mountain High’s PDF on the hazards of high-pressure oxygen and transfilling.)
Here are instructions for transfilling:
- Check that the tank valve is closed. Connect the transfiller to the supply tank per the manufacturer’s instructions. (If cascading, the first tank will be the one at lowest pressure.)
- Remove the regulator from the portable tank and check that the portable tank valve is closed. Also, confirm that the transfiller yoke O-ring is installed. Then connect the portable tank to the other end of the transfiller and tighten the yoke screw.
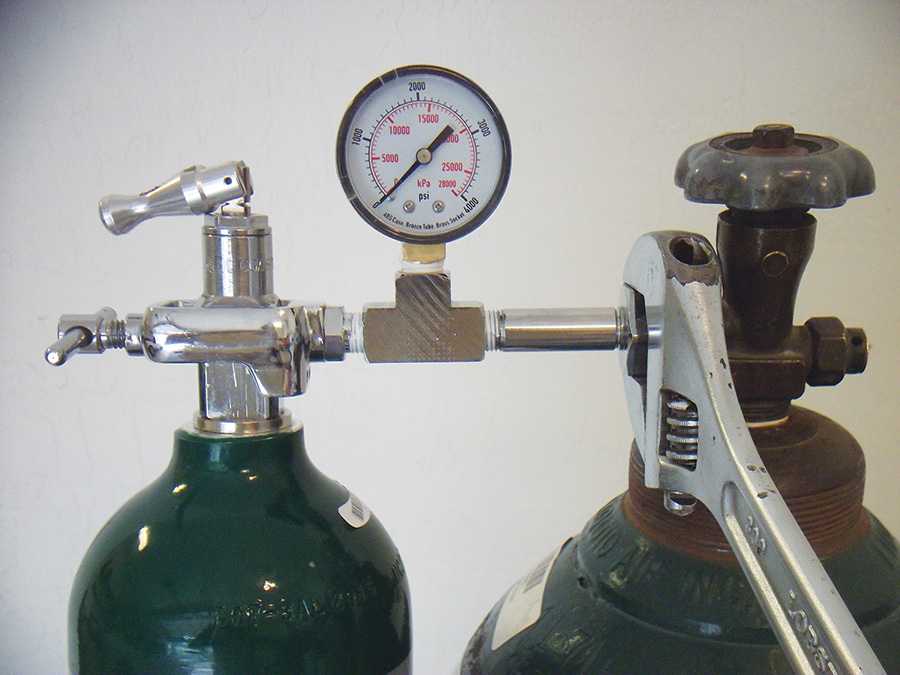
- Slowly open the supply tank valve. There will be a hiss as O2 flows into the transfiller. Then, slowly open the portable tank valve. After a few seconds, pressure will equalize and the transfiller gauge will show the pressure of both tanks. The portable tank may be slightly warm due to compression of any residual gas; this is normal.
- Close the portable tank valve, followed by the supply tank valve.
- Crack open the transfiller fitting at the supply tank to vent pressure still in the transfiller. Unscrewing the portable tank end first, while the transfiller is still pressurized, will damage the O-ring connection to the portable tank. There will be a hiss as O2 in the transfiller line escapes; you are then safe to disconnect the portable tank end.
- Repeat if cascading; otherwise reattach your regulator.
Well, that’s all there is to it! Hopefully we’ve demystified O2 systems. From the shopping list on page 35, you can see that installing your own DIY system isn’t that big of an investment, especially considering the returns on safety. Again, check out the articles listed in the reference section; they pretty much cover everything you’ll want to know from a pilot’s (vs. builder’s) perspective.
—E.S.


Thanks, Eric, great information, and great article!
One thing I suggest when building O2 systems is to replace the CGA-870 medical-type tank valve with a CGA-540 valve. You can get CGA-540 valves on eBay, and many if not most tank suppliers can supply and install those valves for you. The big advantage there is if you’re out in the field and you need a recharge. Most gas suppliers and welding shops will be glad to recharge a bottle with a 540, but few of them will touch a CGA-870 valve unless you have a medical prescription. Also, the 540 is pretty much the standard interface for airports that offer oxygen service. One downside to that is that you have to also buy a CGA-540-compatible regulator, but those are only a little less common than the CGA-870 units.