If your memory and subscription go back a year or so, you might remember the first episode of the Pudding River Bearhawk saga. (Just to refresh your memory, three Oregon neighbors, Phillip Groelz, Rion Bourgeois, and I, with occasional help from Rion’s son Elliot, combined our tools and energies to begin building a Bearhawk LSA. It’s a two-seat tandem design by Bob Barrows. It uses an all-metal strut-braced high wing and a steel tube fuselage and tail.)
Once we finished making parts for the wings and were ready to begin assembling them, we needed a really large table—and lo, the minute we needed it, neighbor Mary said that we could have the one in her hangar if we’d take it apart and take it away. Phillip and Rion disassembled the table, and we hauled it down the strip to Phillip’s hangar where the wing was to be assembled. We immediately found that the big crate containing our engine was taking up all kinds of space where the table needed to go.
We decided to move the engine, still in its crate, three doors down the strip to Rion’s place, known as the Taj Mahangar. It would be easy—Phillip’s shop has an overhead hoist, so we’d get my truck and Rion’s trailer hooked up, lift the engine, slide the trailer under it and move it three doors down to Rion’s. I’d get home at 5:00 p.m., we’d move the engine and have plenty of evening left to get some work done on the wing.
What followed would have made Dick Starks proud…
5:00 p.m.—I get home, but find that Rion has borrowed my little John Deere lawn tractor and is trundling back and forth, back and forth, across his backyard/taxiway/office lawn.
6:30 p.m.—Rion finally finishes mowing, and that’s when I realize his trailer is now full of the remains of a deck his wife insisted he tear off the back of their house last Saturday. Well, we have to empty the trailer because my truck has a canopy that won’t let the overhead hoist lower the engine into the bed. So we hook up the trailer and head off to the dump.
7:00 p.m.—We unload 1050 pounds of nail-studded rotten lumber from the trailer, stick by stick. On the way home, we realize that we don’t have a good way to get the engine off the trailer. For that we need my engine hoist, which is at Steve’s, up at the north end of the airstrip. Steve isn’t home, but Phillip has a key to his shop, so we pulled up at Phillip’s at 7:30.
Phillip finds the key, but there’s only room for two in the cab of my pickup, so Phillip follows us down to Steve’s on his bicycle. We maneuver the engine hoist around Steve’s RV-3, past his RV-4, out the door and manhandle it into the trailer. The hoist, of course, has to be at Rion’s before the engine arrives, so we drive down there (Phillip pedaling along behind), manhandle the hoist out of the trailer, gently, to avoid scratching Rion’s precious painted floor, drive back up to Phillip’s (Phillip pedaling along behind), hoist the engine, manhandle the trailer underneath it, lower it, and manhandle the trailer back to the truck.
8:45 p.m.—Drive back down to Rion’s (Phillip pedaling along behind), manhandle the trailer back into the hangar, hook the engine to the hoist, raise it, screw special rubber non-marring, floor-protecting casters to the bottom of the engine crate, lower it onto the floor, then manhandle the hoist back into the trailer.
9:30 p.m.—Drive back to Steve’s (Phillip pedaling along behind), maneuver the hoist back past the RVs, close the hangar, drive back to Phillip’s to drop off the caster-attaching tools (Phillip pedaling along behind).
9:45 p.m.—Rion walks home from Phillip’s, so Phillip hops into the truck, bringing with him three beers that have somehow escaped previous notice, and we drive down to Rion’s, detach the trailer and park it.
10:00 p.m.—Open beers, sit down in Rion’s man-cave (attached to the Taj Mahangar). Rion regales us with (completely fictional) tales of his recent feral pig-hunting trip to Sawth K’lina.
10:30 p.m.—We declare airplane building finished for the day and head home. Not one single thing had gotten done on the wing.
Finally, though, we had our workspace—the equivalent of a wide one-car garage with a little extra room at the head of it. The worktable running down one side was light and a bit flimsy, but it did give us a full 16-foot work surface.
We built a really flat, straight table to assemble the wing skeleton. It will also serve for the steel tube fuselage.
Spars and Ribs
Bearhawk mainspars are built from 7.25-inch wide channels of 0.032-inch aluminum. These are reinforced by layers of 0.125-inch aluminum bars riveted lengthwise along the top and bottom of the web and vertical stiffeners of aluminum bar at many of the rib stations.
With both main and rear wing components fabricated, we primed them before assembly using water-based primer from Stewart Systems. This worked pretty well. We washed all the parts in a light solution of phosphoric acid and rinsed them well in clean water. We dried them in the sun (yes, sun in Oregon!), blew them off with compressed air, and sprayed them with Stewart’s white using a simple deVilbiss gun. There are definitely differences in technique with the water-based primer—it is easy to get it on too thick and make it run. Once that’s conquered, the product is a delight to use. No toxic fumes, no clean air system for respiratory protection, and no solvents necessary during cleanup—just water. The result was a tough coating that is hard to scratch and held up well during assembly.
We assembled the primed spar components with 5/32-inch rivets, which we set on a big squeezer that was built in 1942 and is still setting rivets in a local aircraft manufacturer’s shop. They built tools well in those days…it’s set over a million rivets in its current employment and probably millions more over its lifetime. It didn’t even blink at our project, and in three or four hours, our spars were fully assembled. Of course, not everybody has access to a tool like this—we know we’re lucky—but the rivets could easily be set with a 4x rivet gun and a good bucking bar. Rivets aren’t very smart—they’d never know the difference.
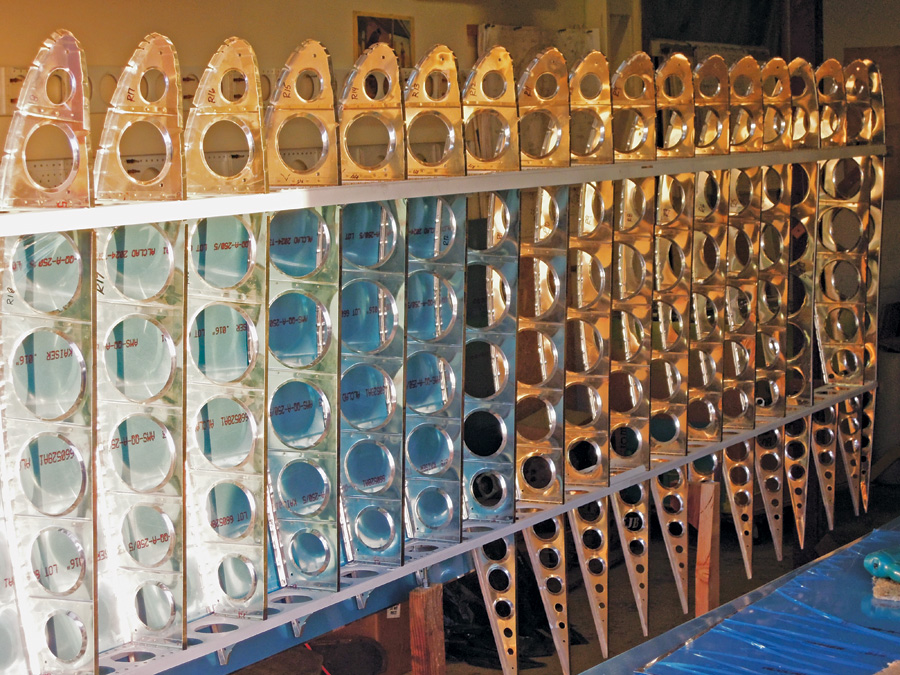
With the spars assembled, we began preparing the ribs. You’d think now that the ribs were cut out, formed, and the stiffener angles riveted on they’d be done. Oh, no…not even close. First all the sheared edges were deburred. A Scotch-Brite wheel mounted on a bench grinder did a good job on the flanges, and a smaller version on a die grinder took care of the lightening holes. This operation spread a lot of silica and aluminum dust around, so we were sure to wear good dust masks for the hours it took to deburr the hundred or so ribs.
Formed ribs are never straight, so they have to be adjusted by crimping the flanges—an operation known as fluting. A special set of pliers easily makes the small indentation—a “flute”—in the flange, and a series of these essentially shortens the free edge and pulls the rib straight. However, you can’t just put flutes anywhere you like. Rivets holding the skin to the ribs will be passing through these flanges as well, and you want them to fall in the flat areas between flutes. The plans give the minimum rivet spacing, but it’s the builder’s job to come up with a pattern that will meet the specs and end up evenly on the spars attached to the end of the rib. Once the rivet pattern is determined, the flutes can be placed in between. (Be careful not to put a rivet in line with a stiffener—it makes it very difficult to get a bucking bar on the rivet tail, so setting the three or four rivets near the stiffeners can take longer than the other 35 or so rivets on the rest of the rib. Trust me.)
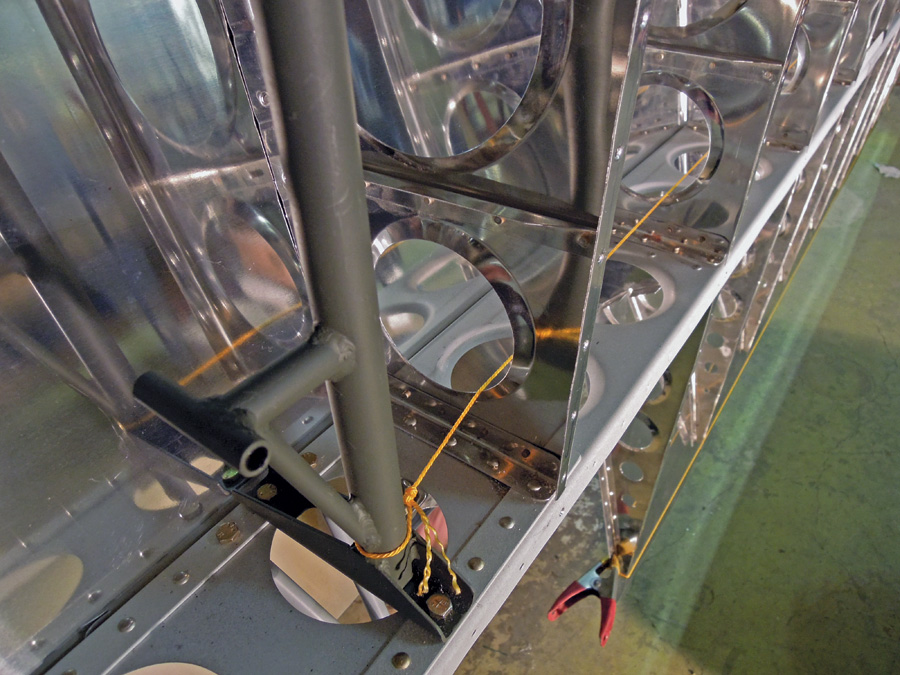
The aileron bellcrank weldment is fabricated from 4130 tubing. We installed it while drilling the wingskins, removed it to buck the skin rivets, then installed it again when the wing was finished. The string gives us a way to pull the control cables through the wing.
Wingskins
When it came to the skins, we made our first departure from the plans. The Bearhawk is designed to use 4-foot wide skins that wrap from the mainspar around the leading edge ribs all the way back to the rear spar. These are lapped from inboard to outboard to the tip rib. Simple rectangular skins, all shearable from 48-inch-wide aluminum sheets, cover the bottom and trailing edge of the wing. Given that the standard stock available to most is 12×4 feet, and the distance from the mainspar to the trailing edge is more than 48 inches, running the skins fore-and-aft makes perfect sense. However, we had access to unusual material: 0.020- and 0.016-inch aluminum sheet 51 inches wide—giving us just enough width to span between the mainspar and trailing edge with one piece. We made the decision to go with an arrangement similar to that used on the RV airplanes—separate pieces for the leading edge, ending at the mainspar on both the top and bottom of the wing, with big flat skins for the rest of the wing.
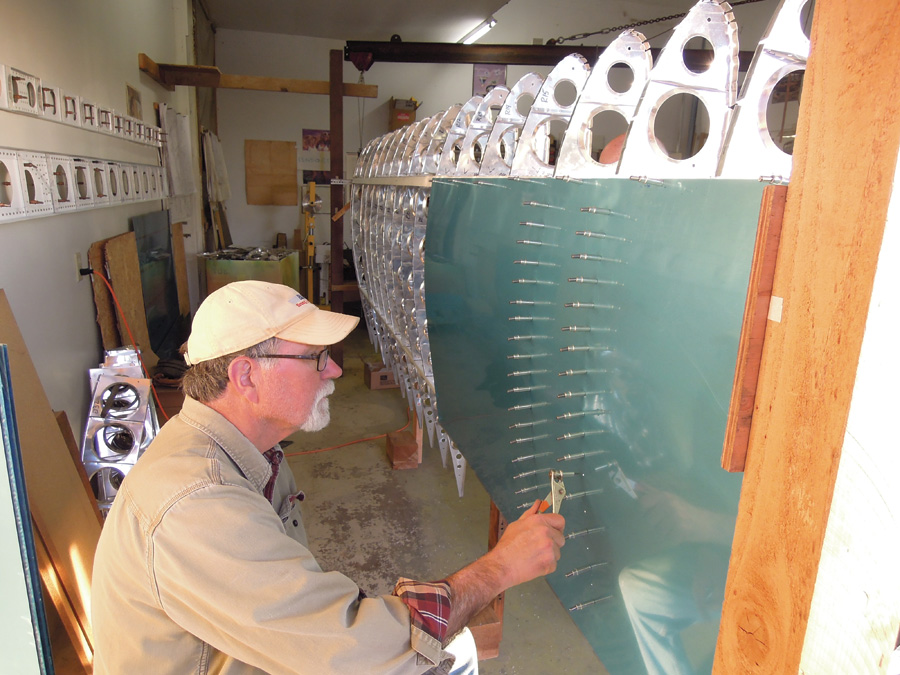
Rion begins skinning the wing.
We found reasons to question this decision later on…
While Rion trudged through the rib tedium, Phillip and I lathed and filed the steel tube components for the bellcrank supports and aileron hinge brackets. We were comfortable tacking these together, but chickened out on the finish welding and got Sterling Langrell—a really good welder—to do the finish welding for us. Sterling knocked that out perfectly in an hour or two, to a standard we couldn’t hope to match.
So, after seven months of part-time work, we finally had the basic components of a pair of wings: two mainspars, two rear spars, 36 main ribs, two full-length tip ribs, 40 leading edge ribs, 26 trailing edge ribs, welded steel components for the control system, sheared and formed wingskins, and partially completed fuel tanks (more about those later). We’d also made all the parts for—and assembled—the skeletons of the fabric-covered ailerons.
Now we had to build a structure that would hold the wing skeleton in the correct alignment while we drilled about 3000 holes to attach the skins—a step that fixes forever the shape and accuracy of the wing.
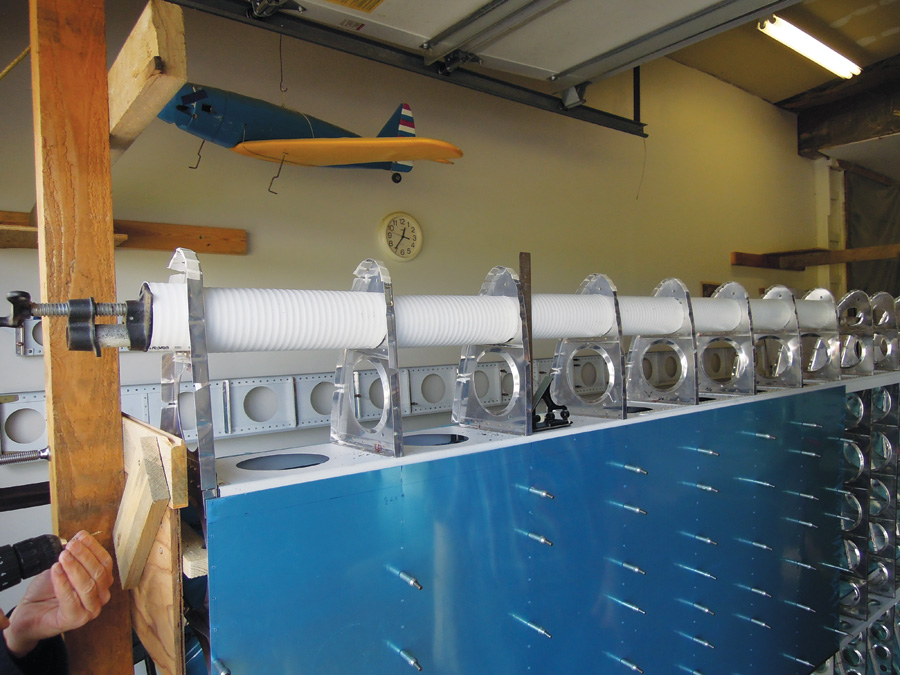
We used PVC pipe to hold the floppy nose ribs firmly in place while we installed the leading edge skins.
Oops!
Most untwisted metal wings are built in vertical jigs, so a couple of plumb bobs can establish the chord plane and the wing can be reached from all sides. To keep the wing from sagging, adjustable supports are inserted between the floor and the rear spar and twiddled until the wing skeleton is square and level. Here our decision to use wider skins reaching all the way to the trailing edge came back to bite us…
With the main skins in place, top and bottom, they met at the trailing edge and made it impossible to insert supports. If we’d followed the plans, we wouldn’t have had the problem. We decided to assemble the wing on the table and get at least the first set of skins drilled onto the skeleton. That would make the wing stiff enough that we could put it in a vertical jig without supporting the rear spar in more than one place.
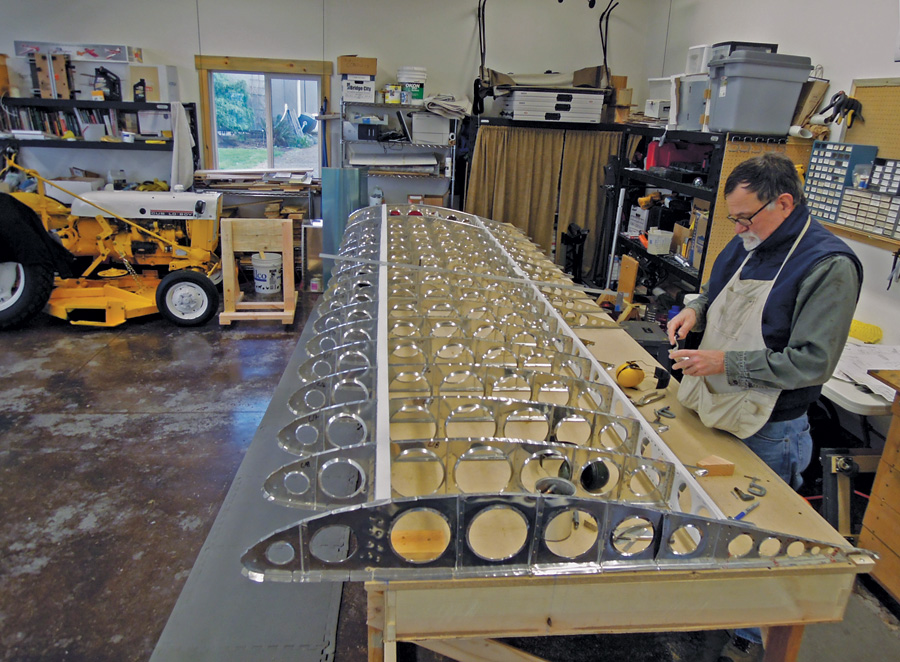
Of course, the floppy table we’d spent the evening moving was nowhere near accurate enough for this job, so we stopped working on airplane parts and did what we should have done in the very beginning. We built a very strong, very flat, 16-foot-long worktable and carefully leveled in every way we could think to do. This immediately started paying dividends, giving us a level reference we could trust. Later we can use it to build the fuselage. We set up both main and rear spars on it, blocking and clamping them down in the correct orientation and set about assembling the wing skeleton. There isn’t much to this except a lot of drilling and Clecoing.
The trouble came later when we were actually riveting the ribs to the attach angles on the mainspar. Every rib had a couple of rivets that defied our ability to reach them. At one point we had three experienced airplane builders, four rivet squeezers of different sizes, five squeezer yokes of different depths, two rivet guns, four differently shaped rivet sets, and half a dozen bucking bars, and we still couldn’t find a combination that reached these rivets. After some hours, we eventually devised and made tools that would set them, but several of them aren’t pretty. We’re going to live with it, because guess what—not one of the seven drills we own will reach them to take them out!
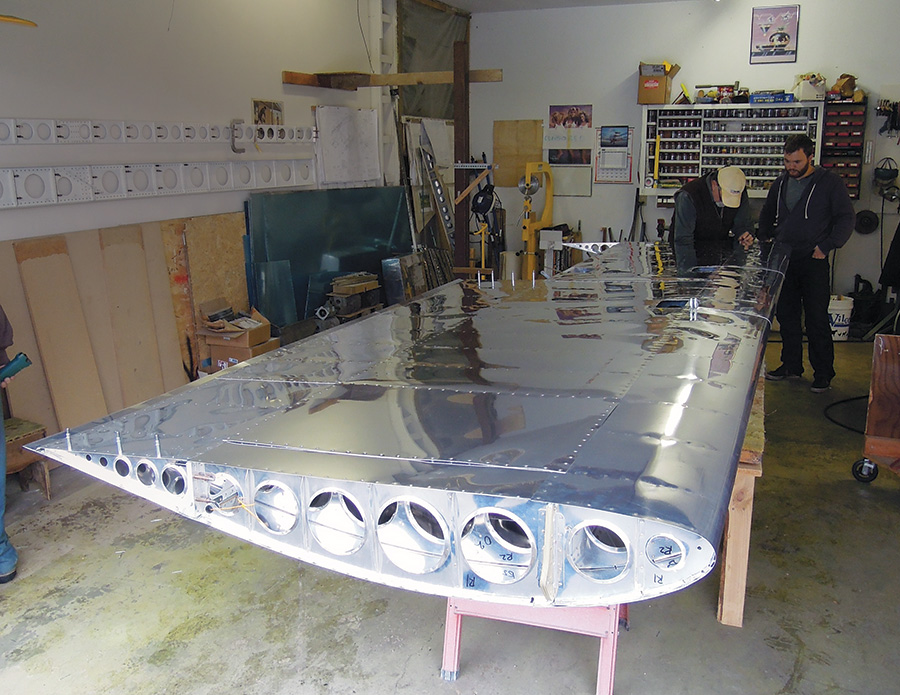
At last, the first wing is out of the jig. It looks finished, but it isn’t…there are still control cables, wingtips and fuel tanks to go.
Where Things Stand
Twenty months into the project, we have one riveted wing and one almost ready to finish. We’ve made most of the components for the shock struts on the landing gear (required a lathe and the guidance of a skilled machinist) and I’ve made all the steel ribs for the airfoil-shaped horizontal and vertical stabilizers. The steel tubing for the fuselage has also been ordered.
What have these last 20 months taught us? A scratch-built airplane is achievable, if you’re willing to do a lot of repetitious work and climb a steep learning curve. Achievable—but not necessarily desirable. We’ve realized that, as a way to acquire an airplane, scratch-building one makes no sense whatsoever.
The thing that makes building airplanes at home practical is kits. Kit manufacturers have all the advantages of scale, have generally worked out the rough corners that waste so much time, and provide accurate parts. No kit for the Bearhawk LSA existed when we started this project, but they do now. Kit components, including full quickbuild kits, are available. If you’re really interested in actually owning and flying one, buy the kit, get ‘er done, and go fly.
If your goals match ours—learn new skills, enjoy working together, and avoid television—then you’ll do fine. Just understand what you’re getting into. Even with a total of six finished airplanes between us, we underestimated the time involved.


I am interested in the LSA but I would want to fly one first to see if I like it or if it fits me instead of spending the money on making one to find out that I do not like how it flies. Do you know of anyone in New England that has one or just has one and is willing to show me and take me up to see if it is a plane worth the time and money to build?