When you get to the electrical phase of your Experimental aircraft project, you and maybe a few friends are going to strip, crimp, clamp, pull, push, route, bundle, trace, loop, unbundle, bundle again, and snap your way to a beautiful, reliable, and durable electrical system in your airplane. Here are 10 tips to speed you on your way.
1. Get the Book: Various tools, wire, connectors, clamps, clips, pins, and plugs can be debated, rejected, or selected for your project, but there is one book you will need: The AeroElectric Connection by Bob Nuckolls. This book is the bible of Experimental aircraft electronics. It includes everything from theory to practical application and best-practice rules for building a reliable system. From what wire to select, to what PIDG stands for, it’s all in this book. If possible, read this before you buy the first part of your electrical system. You can get it from many sources or directly from the author at www.aeroelectric.com. Search “AeroElectric Connection” on the web.
2. Photocopy Diagrams/Schematics: Photocopy wiring diagrams so you can make notes directly on them. If things go all wonky (a technical term), you can make a new copy and start again. Keep diagrams in a three-ring binder because the pages open flat.
3. Buy a Small 12-Volt Test Battery: Buy a low-cost 5- to 7-ampere-hour sealed lead-acid battery instead of buying the more expensive starter battery. This battery can be used for testing all your components (lights, radios, displays, etc.) as you install them. These batteries can come with many types of terminals, so be sure to get the F2 (.250) terminals so you can use standard Faston (push-on) connectors.
These batteries sell for under $20, and a charger costs another $20. Search “12-volt lead-acid sealed battery” from your favorite search engine.
4. Get Jumper Cables with Alligator Clips: These jumper cables are small-gauge color-coded jumpers with insulated alligator clips on both ends. Get 10 or so. Use these for tracing wire, hooking up test lights or meters, or making temporary connections. These are generally available for under $10 for 10 of them. Search for “jumper clips” on the web.
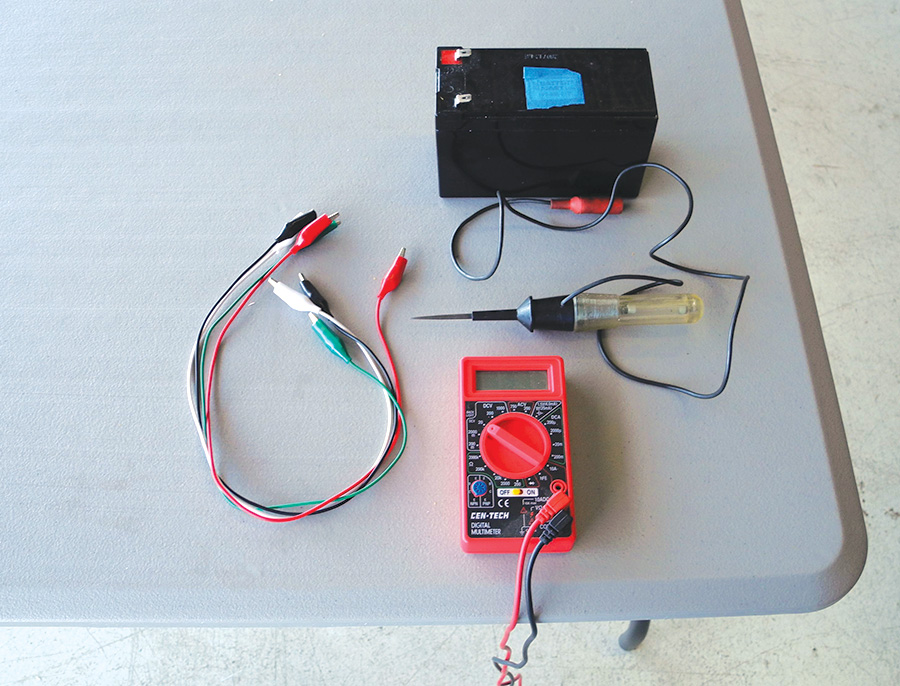
Important stuff for wiring (clockwise from top): 12-volt test battery, 12-volt automotive test light, low-cost digital multimeter, and jumper cables with alligator clips.
5. Get a 12-Volt Automotive Test Light: This tester looks like a screwdriver with a sharp tip and a light in the handle. The other end of the tester has a ground wire with a small insulated alligator clip. Plan to spend about $10 on this tester. Search the Internet for “12 volt automotive test light.”
6. Get a Low-Cost DVM/DMM Meter: A low-cost digital volt meter (DVM) or digital multimeter (DMM) is useful for measuring voltage, current, or resistance in your electrical system. Prices vary widely and can cost well over $200. For the basics, a $25 meter will work just fine. For you old-timers, the analog volt ohm meter (VOM) is still around for about the same price. Search the Internet for “DMM DVM meter” or “analog multimeter.”
7. Get a Basic Set of Wiring Tools: You don’t have to go nuts to get a good set of tools. Here are the basics of what you will need: an automatic wire stripper, ratcheting crimper with changeable jaws, jaws for Faston connectors (also called PIDG connectors), jaws for BNC connectors, four-way indent crimper for DSUB pins, insertion/removal tool for D-sub plugs, Molex crimper, and a new set of small flush wire cutters (also called diagonal cutters). You can get high-dollar versions of all these tools, but unless you are going to do this for a living, it would be a bit of overkill. A good-quality collection of these tools should cost less than $200.00 for everything.
8. Don’t Use Cheap Connectors: Most of these tips save you some money, but this tip saves you a lot of grief. Get good-quality aircraft-grade connectors. This is true for all connectors: BNC, Faston/PIDG crimp-on terminals, blocks, and any electrical accessory. Cheap connectors can degrade over time. Automotive connectors with hard plastic insulators are especially sensitive to the insulation cracking and falling off over time. Aircraft-grade nylon connectors install easier and last a long time.
9. Use Waxed Lacing Cord: Learn how to tie waxed lacing cord. This method of bundling wire is cheaper, lighter, and results in no sharp edges. It also looks much cooler! See wire-bundle tying techniques at www.aeroelectric.com or search for “waxed lacing cord” on the Internet.
10. Always Use the Pull Test: This is not my uncle’s “pull-my-finger” test. When crimping electrical connectors, you should always test the quality of the connection with a small pull on the wire and connector. The pull test or “tug test” can save hours of circuit tracing and testing later on. Connections can look just fine, but may not have crimped correctly inside. A small tug on the connector will let you know if everything is OK.
Conclusion
There are thousands of tips, tricks, and guidelines for electrical systems in Experimental aircraft. Many are in The AeroElectric Connection book, many are on Internet web pages, and Experimental aircraft discussion groups. The tips here are just to get you started. The electrical components of an aircraft project can be the most daunting phase of the assembly. But if you take your time, and perform one step at a time, you will be done before you know it.

![]()
David Boeshaar is a systems analyst for corporate Disney. A former mechanic, teacher, and computer help desk guru at a major university, he is now building a Van’s RV-9A for fun with his brother-in-law. As the new guy in aviation, Dave has learned lots, both good and expensive, and hopes to pass along a little help to the builders coming up behind him.


