
A flat (standard) tappet disassembled into its various parts. Note that the tappet body (shown on right) cannot be removed without splitting the case open.
Dry tappet clearance. What the heck is that, and why should I care? Dry tappet clearance is the gap between the rocker arm and the valve stem cap when the lifter (tappet) is dry and fully collapsed. When the engine is running, the hydraulic lifters found in most Lycoming engines take up that slack and keep the value train working smoothly and quietly. However, the lifters can only close up a limited amount of gap, so there is a minimum and maximum clearance that is required to keep the lifter within its operating range.
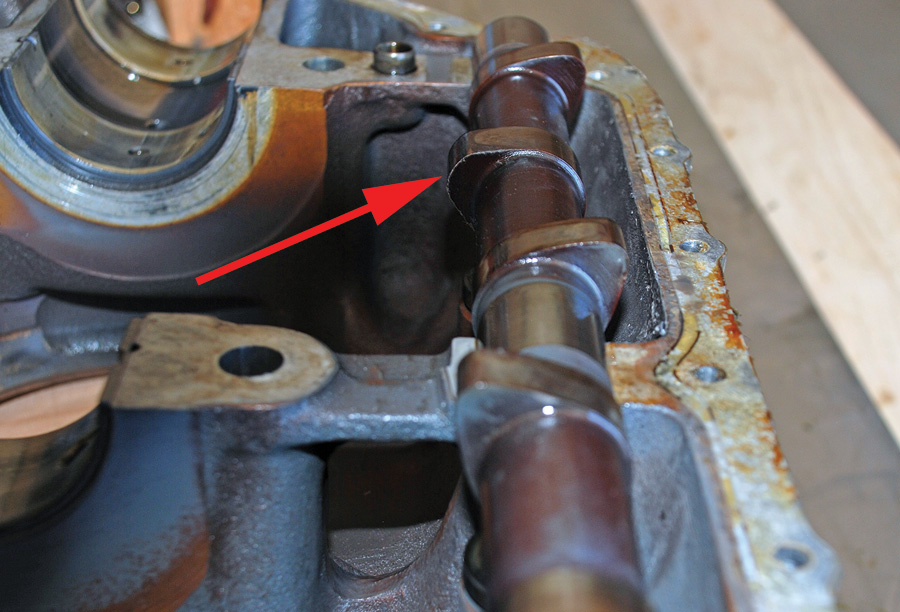
The second cam lobe from the top is very badly worn. This wear certainly would have shown up in a check of the dry tappet clearance before splitting open the crankcase of this O-320 engine.
If the dry tappet clearance is too large, the valve will not fully open and the engine will be noisy. At first the only damage will be loss of some power, but over time the hammering action of the valve train operating at excessive clearances will cause failure of important parts in the engine. At that point there may be a loss of more power as that cylinder fails. In addition, as the parts of one failed cylinder make their way into the engine, it is possible to cause a total engine failure. On the other hand, if the dry tappet clearance is too small, the lifter will not let the valve fully close, which can quickly lead to a burned valve and failure of that cylinder. For most Lycoming engines the dry tappet clearance is between .028 and .080 inches. That is a pretty wide range, but it is very important to stay within that range.
Most of the time the dry tappet clearance is of no particular concern to the engine operator. If the last person to work on the engine did his or her job, the dry tappet clearance is just fine and requires no further attention, unless more work is done on the engine or something goes wrong.
What Makes Dry Tappet Clearance Change?
The most common cause of a change of dry tappet clearance is the replacement or servicing of a cylinder, especially if the servicing of that cylinder involved any valve work. As a valve seat is ground to restore proper sealing the valve tends to move farther into the cylinder head, thus closing up the dry tappet clearance. If a valve is replaced, it would likely sit farther out from the valve seat and thus open up the dry tappet clearance. If a cylinder is replaced with a new cylinder assembly, the new valve is likely in a slightly different position in the cylinder head compared to the old one. The difference may only be a few thousandths of an inch, but it could be more. The only way to be sure is to check, which is why checking is a standard part of any cylinder service or replacement procedure. If you don’t check, you may be setting yourself up for a catastrophic failure.
Besides working on or replacing a cylinder, dry tappet clearance will change after extreme camshaft wear. The amount of wear it takes to produce a noticeable change in dry tappet clearance is very large, in essence camshaft failure. Such a failure should be accompanied by other signs of trouble such as a partial loss of power and excessive metal in the oil filter and sump screen. You would also expect to see lower EGT and CHT readings consistent with a valve not opening fully. A check of the dry tappet clearance in such a case would likely be the last step before opening up the engine. The next step would then be cylinder removal and a visual inspection of the camshaft. This would not be a happy time for the owner of the airplane, needless to say. On the other hand, finding an eminent engine failure just before it happens is much better than finding such a failure right after it happens.
How to Check Dry Tappet Clearance
Section 6 of the Lycoming Overhaul Manual is the place to look for information about tappets in particular and the valve train in general. For more information, you can also consult Lycoming Service Instruction 1011L, Service Instruction 1424A, and Service Letter 206A, but SI 1011L is probably the most useful of the bunch. In these references you will see that the O-320-H2AD engines and the O-235 engines have different clearances and/or procedures for dealing with dry tappet clearances. The O-235 engines have solid lifters that do not have hydraulic tappets at all. The 541-series engines also have different clearances, but it would be most unusual to find one of these engines in an Experimental/Amateur-Built airplane.
![]()
This drawing from Lycoming Service Bulletin 402 illustrates the dry tappet clearance in an angle-valve engine.
To check dry tappet clearance, you first need, as the name implies, a dry tappet. What that means is that the plunger portion of a lifter or tappet must be extracted from the engine, cleaned and dried, collapsed, reinserted into the engine, and the clearance between the rocker arm and the valve spring cap checked. Here are the basic steps to do that:
1. Remove one spark plug from each cylinder of the engine and rotate the crankshaft until the cylinder you wish to check is at top dead center (TDC). You can feel the compression coming up by holding your finger over the spark plug hole. Line up the “TC” mark on the ring gear with the split in the crankcase to be sure you are at TDC. In this position, there should be no pressure on either rocker arm of the cylinder being checked.
2. Remove the valve cover from the cylinder you wish to check. Then remove the rocker arms and set them aside, being careful not to mix up your parts as you do.
3. Next remove the locking clip that holds the pushrod retainer. This is located above and between the rocker arms. You will need to replace this clip when you reassemble these parts.
![]()
The pushrod tubes are held in place by a retainer and nut with a locking clip. The locking clip needs to be replaced whenever the pushrod tubes are removed and replaced. You will also need new pushrod tube seals and likely a new valve cover gasket after this work.
4. With the pushrod retainer out of the way, you can remove the pushrods and the pushrod tubes. Do not mix up the pushrods from one side to the other. The exhaust pushrod needs to go back in where it came out, and the same with the intake pushrod.
5. Now you can remove the plunger from the tappet with a slightly bent piece of safety wire. Resist the temptation to use a magnet to remove the plunger. Any magnetized plunger must be replaced as per Lycoming.
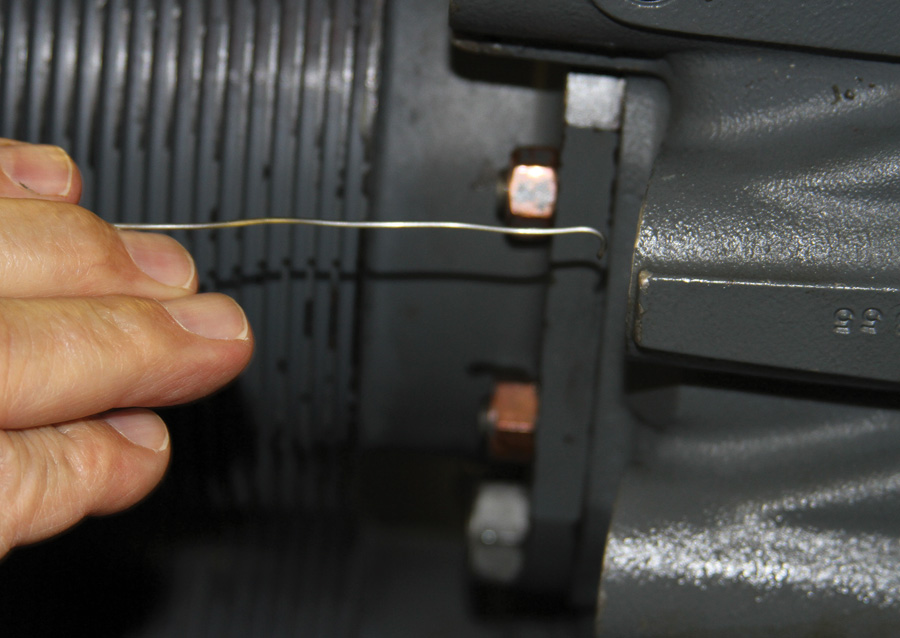
Remove the tappet plunger from the tappet body with a piece of safety wire with the end slightly bent. Do not use a magnet for this. In this photo the engine is being viewed from underneath, after the pushrod tube has been removed.
6. Visually inspect the plunger and the tappet body for any nicks, noticeable wear, or debris. If the plunger is worn or damaged it should be replaced. If the lifter body is damaged it too should be replaced, but that is a big project requiring the opening up of the engine.
7. With the plunger out of the engine, it should be cleaned with Stoddard solvent or something similar and then dried. The inside of the tappet body should also be cleaned and dried. Try to keep solvent out of the engine.
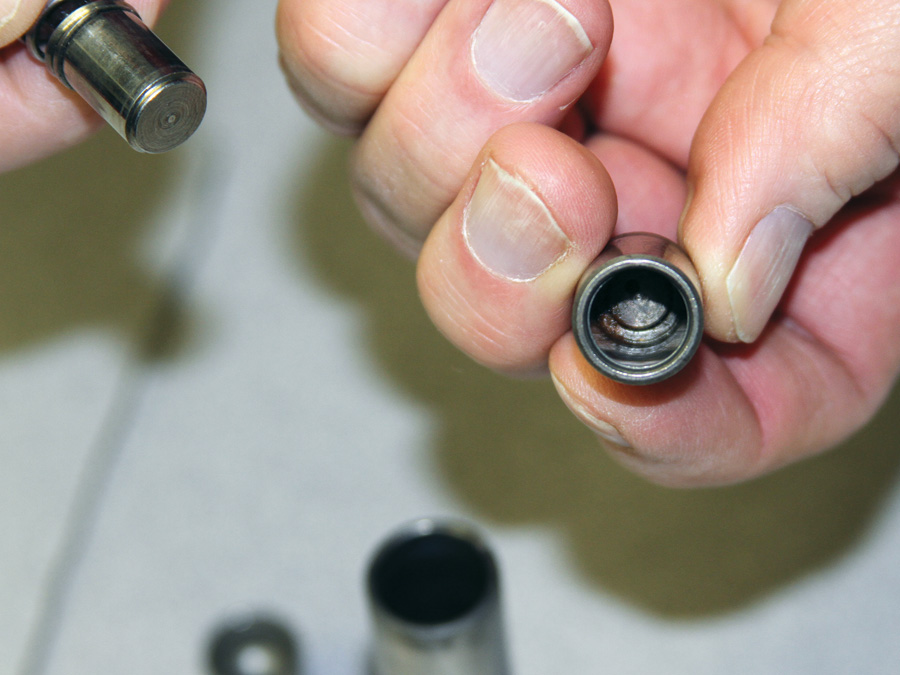
After removing the tappet plunger be sure to inspect the inside for any wear or damage.
8. With the plunger clean and dry, reinsert it into the tappet body, but before you do make sure that it is fully collapsed. To do this, insert a brass wire into the end of the plunger and press down until you feel it collapse.
9. After you have reinserted the tappet plunger, reinstall the pushrod for that valve and its matching rocker arm. Do not install the pushrod tube at this time.
10. Verify that the engine is still at TDC, and then measure the clearance between the rocker arm and the valve stem cap. This clearance should be at least .028 inch and not more than .080 inch. If the clearance is outside of this range, you will need to get a shorter or longer pushrod from a Lycoming parts dealer. Replacement parts from Superior or Continental Titan (formerly ECi) may also be used.
11. If you have more clearance than can be corrected with a longer pushrod, it is time to suspect a badly worn cam lobe. The cylinder will have to be removed to confirm this.
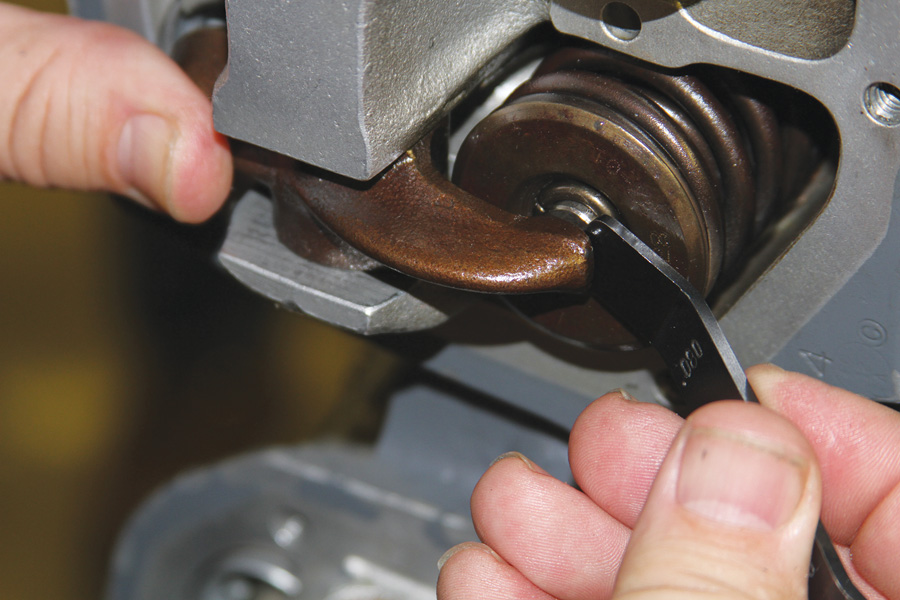
With the tappet plunger clean, dried, collapsed, and reinserted into the tappet body, the clearance can be checked by inserting feeler gauges between the rocker arm and the valve stem cap.
12. Once the correct clearance has been established, remove the rocker arm, the pushrod, and the tappet plunger. Before you reinsert it, check the plunger for proper action by pressing down on it. If it is working correctly, it should quickly spring back after being depressed. If it does not, the plunger needs to be replaced. Assuming the plunger works properly, oil it and put it back into the tappet body. Please note that plungers and tappet bodies go together. Do not mix up plungers if you are working on more than one lifter at a time.
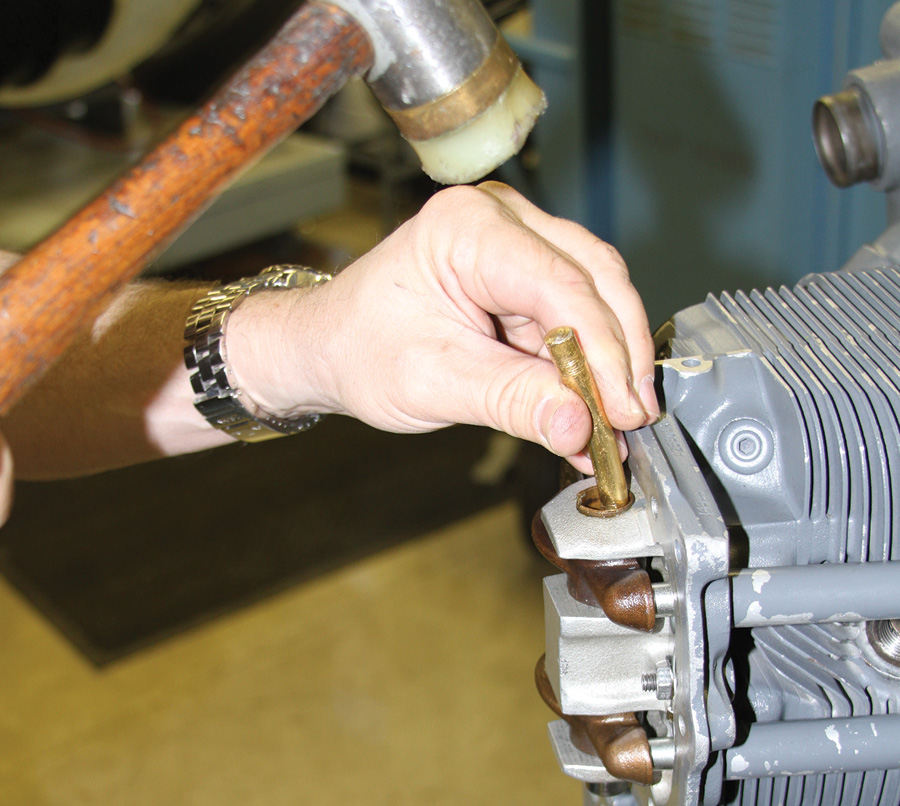
The rocker arm is removed by tapping out the shaft with a brass punch. Be sure to remove the plastic retainer plugs first to avoid damaging them.
13. If you have even the slightest reason to believe that the plunger may have become magnetized, be sure to check it with a compass. A magnetized part will pull a compass needle strongly toward it. As said before, magnetized plungers need to be discarded and replaced.
14. With all of that done it is time to reinstall the pushrod tubes with new seals, reinstall the correct length pushrods, reinstall the rocker arms and the pushrod tube retainer, put the valve cover back on, and you are finished.
If you are servicing more than one cylinder, this process will need to be repeated for each tappet in each cylinder. Of course, if you are assembling a new or overhauled engine from parts this same thing applies. Check the dry tappet clearance of every tappet in every cylinder.
You might think that the new roller tappet engines would have different clearances and procedures for checking dry tappet clearance, but that is generally not the case. It is always a good idea to double-check when working on a specific engine, but Lycoming says that for a flat tappet and a roller tappet version of the same engine model, the clearance and checking procedure is the same.


