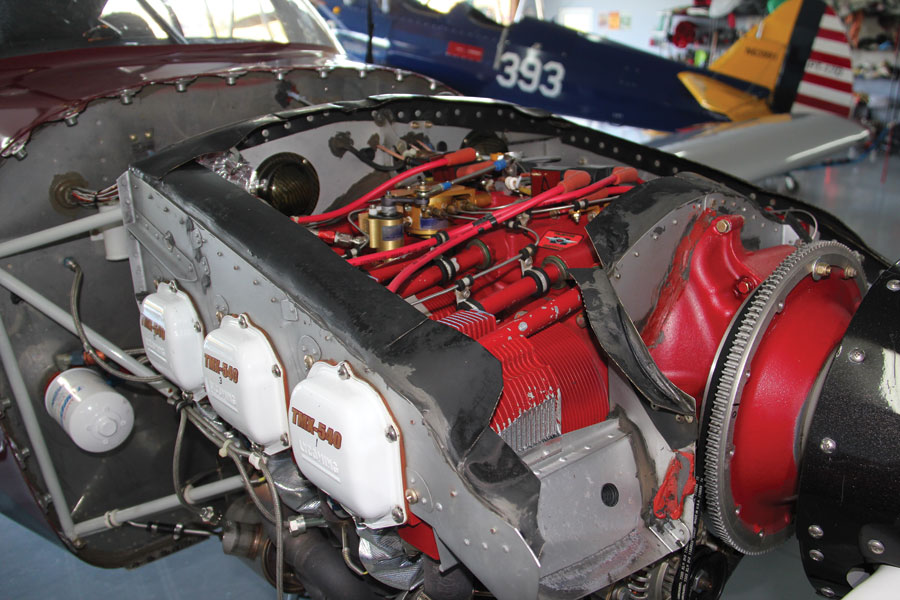
I have always heard that Lycoming engines carry a reputation of making it to TBO before any real attention is needed. So having to perform a top overhaul (TOH) on my Mattituck Red Gold IO-540 in my RV-10 at 930 hours seemed way out of line. I thought I would share the experience with you.
First, let me say that I have been very, very pleased with the overall performance of the engine. It has been really smooth, and has run fine since day one. In three trips to Alaska, it never missed a beat, except for a plugged air/oil separator. The only time it caught my attention in flight was with a “miss” on two back-to-back flights I traced to a cracked spark plug nose insulator. Replacing the defective plug corrected the problem. The one thing that was continuing to trouble me was that the oil was always dark in color. The oil was not the gray/dirty green I usually see, and it was getting really dark. It was now close to coal black in color after 10 hours post oil change. By the time 35-40 hours came around, it looked like tar. It had been doing that for the last 400 hours, and all of the oil analysis and commentary from Blackstone looked normal, except for high lead content. Everyone kept telling me that dark oil was good and that it meant the oil was doing its job of cleaning the engine. I wanted to believe them, but I inspect lots of airplanes during the year, and I never see oil as black as this. I was finding it harder and harder to believe I had the only airplane out there with oil that was doing its job. It was also interesting to me that about 400 hours ago, I had a blocked breather tube due to a particular brand of air-oil separator. Chicken and egg? I don’t know, but luckily for me, I caught it before any real damage was done, like a blown front seal. For most of its life, this particular engine has required one quart of oil every 6 hours, and recently started consuming one quart every 4 hours.
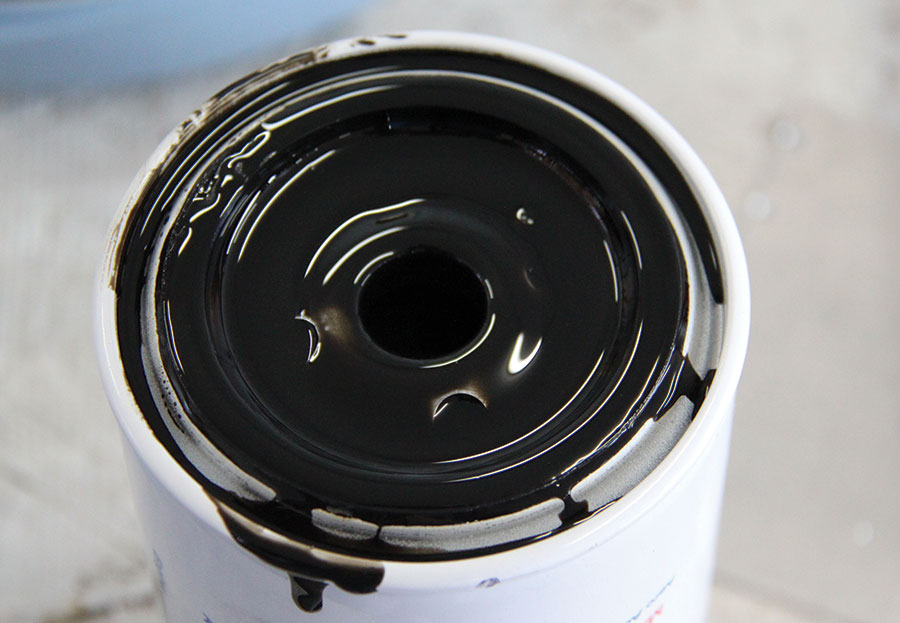
How’s this for really black oil? Oil analysis showed everything was good except high lead content (blow-by?). From time to time, I would find carbon chunks in the screen and the filter.
Engine History
During its life the IO-540 has flown regularly, amassing 930 hours in less than six years, and it’s always been hangared except when traveling. It was initially run in a test cell at Mattituck for almost 30 minutes. When I installed it on the RV-10, I broke it in per the recommendations with AeroShell mineral oil, as I have done on many other airplanes. I never run the engine lean of peak. I always set power at 75% or lower and 50-75 rich of peak, and leaned in the climb above 5000 feet. CHTs would only touch 390-400 in a climb to 10,000 feet, with oil temp hitting 199 at top of climb and then stabilizing around 186. In cruise, CHTs run 320-340 and somewhat lower in the winter. Since I first noticed the darkening oil, I’ve tried various brands, from AeroShell straight weights to the AeroShell multigrades and Phillips X/C, and added CamGuard at every oil change, to see if there would be any differences. I always use preheat below 40 when at home. It’s easy with an oil pan heater. Compressions have always been in the low 70s on a cold engine, and every once in a while, a lower spark plug would look oily, but never consistently on any one cylinder. Everyone did agree on one thing—the dark oil was caused by blow-by.

Here are the temps right after 1 hour at 75% power. They actually started to come down at 30 minutes and stabilized here. During the second hour at 65%, they all came down another 20.
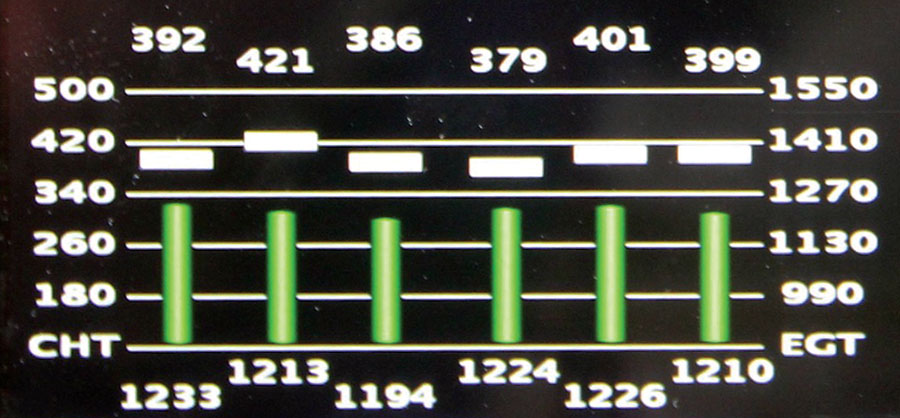
This was taken right after I pulled the power back to 75% at top of climb. I was very pleased in that only one cylinder hit 420 in a shallow climb above 110 KIAS, and they all immediately started down after the airspeed picked up.
Since I do fly at night and on instruments, and we go to places like Alaska (where an engine failure can put you in the food chain rather quickly), I was beginning to get a little uncomfortable. Again, everyone was telling me not to worry; it should run another 600 hours. Well, Carol finally found in writing another reason for a top overhaul—if the pilot is uncomfortable. Yes, I love the Internet—search long enough and you can find any answer you want! That was the last checkbox for me. I put my brain in TOH mode and started researching. Since Mattituck was no longer in business, I couldn’t turn to them. Kudos here go to Mahlon Russell, a former Mattituck employee and regular contributor to the sport aviation community. He has faithfully continued to answer all of my questions. In the end I decided on Superior Millennium cylinders, along with Lycon NFS 9:1 ceramic-coated pistons, including new piston pins. Superior seems to be building quite the reputation for their cylinders, and Lycon NFS sent me pistons balanced within 1 gram each.
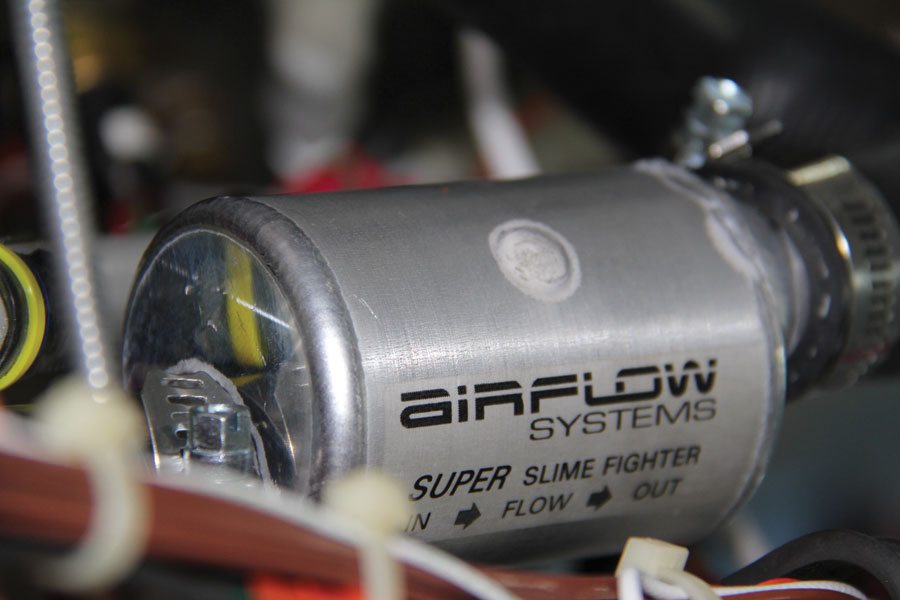
I installed an Airflow Systems oil separator in place of the Airwolf. The Airwolf separator somewhat pressurizes the crankcase, and I wanted to eliminate that.
Lots of Changes
When things don’t work right, it really bothers me. While I was not looking forward to doing this, I was really anxious to find a smoking gun, if there was one to be found. Unlike doing instrument panels and condition inspections, top overhauls are messy, complicated, and backbreaking at times. I know—I’ve been to the chiropractor a few times since I completed the overhaul, probably from holding the 30-pound cylinders with one hand while struggling to insert the piston pin with the other. It would be a great learning experience for me, as it is not something I do every day. Luckily for me, Benny Britt, a designated maintenance examiner resides in our community, so I knew he would keep me honest. In fact, I just mentioned to him that I was considering doing this and the next day a Lycoming overhaul manual was sitting on the horizontal stabilizer!
The Superior Millennium cylinders showed up in a few days from Air Power, Inc. in Texas, and I knew right away I wanted someone else to set the ring gaps. In fact, someone who did them every day would be a much better choice than me. I found that Graham Engines in Newnan, Georgia, has a great reputation, and I traded them the old cylinders for some ring gap setting and coloration of the new valve covers and pushrod tubes.
I hated to take it apart, as Mattituck really makes a pretty engine. I knew that the inside probably wasn’t going to be as pretty.
As with any aircraft maintenance project, organization from the start is paramount. To accomplish this, I make really good use of a roll-around container system. Everything that is removed from the airplane is placed into the containers, and when the project is completed, either the containers are empty or there is a reason for the part to be left off of the airplane. For this particular project, I labeled one side of the cart for cylinders 1-3-5 and the other side for 2-4-6. It was amazing to me how much stuff I had to remove from the engine in order to get to the cylinders. Yes, I know—the engine came with the cylinders attached and I added everything after the fact. It required about a day and a half just to get everything off: baffling, intake and exhaust systems, hoses, spark plugs, injectors, fuel lines, you name it. This time a couple of the plugs looked more oily than before, and a number of the lower plugs exhibited lead fouling, even though I had been recently using Decalin, and I always aggressively lean for all ground operations. I took the time to carefully inspect everything as it was removed and, in the end, I probably replaced a lot more than I needed, since I am not real good at rework and feel better just doing it once. To that end, I replaced all intake hoses, oil drain hoses, oil cooler hoses, oil cooler, valve-cover gaskets, exhaust and intake gaskets, and alternator belt. Since MT recommends an overhaul for both the propeller and governor at 72 months, and I was just one month short of that, I figured I might as well get it all completed at the same time. This decision caused a little extra stress and rework later on. I also wanted to get rid of any leftover black oil in the system outside of the crankcase that I could.
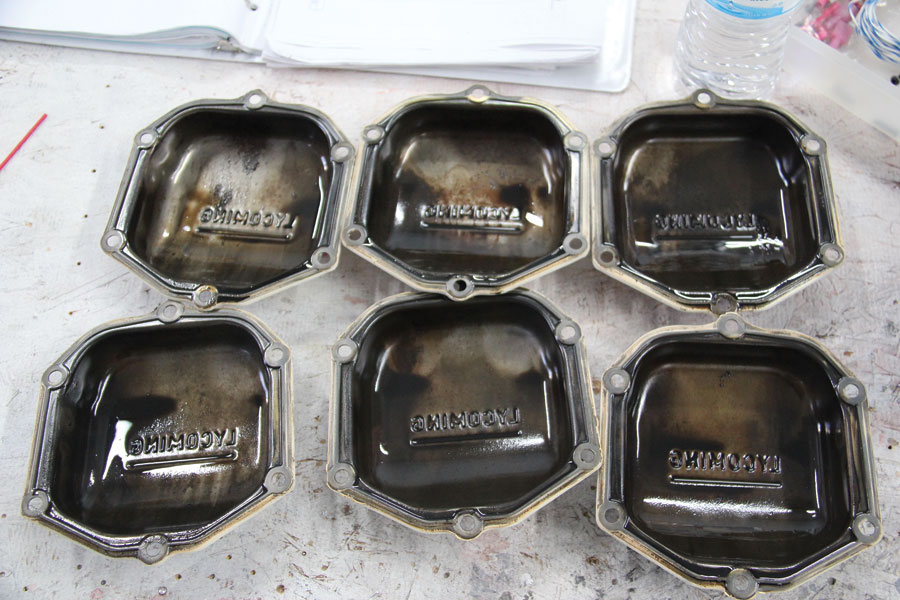
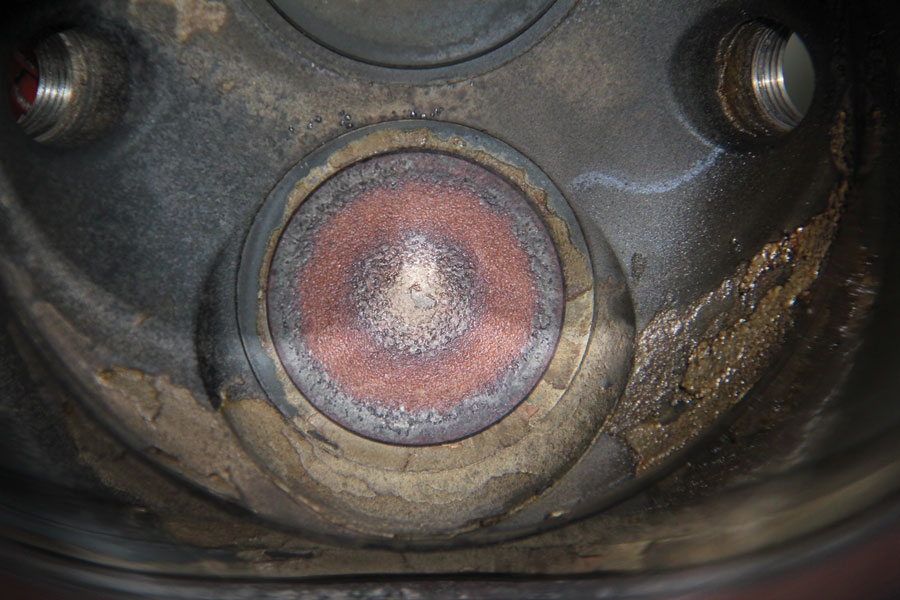
I’ve seen cleaner rocker covers, but these weren’t too bad.
I decided to overhaul the fuel flow divider as well due to an interesting discovery. On the second-to-last trip before I took it down, I smelled a whiff of fuel while climbing out. On some of the RVs this can be normal due to the location of the fuel vents, but not on the 10. When I got home, I removed the cowling and carefully checked everything firewall forward. The only thing I could find was a blue stain on the bottom side of the fuel flow divider. A quick call was placed to Don Rivera at Airflow Performance, Inc. and he indicated that it could be a leaking diaphragm. I immediately removed it and sent it to Don for a rebuild. Sure enough, he confirmed the diaphragm was leaking. One smoking gun found!
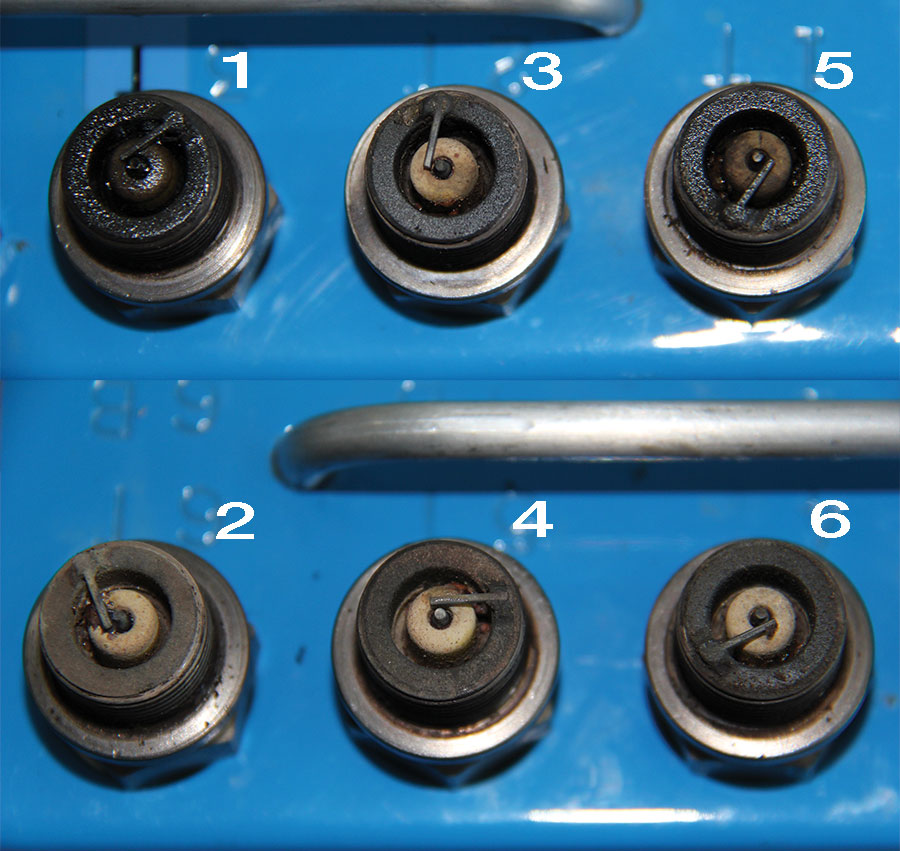
Plugs 1 and 5 showed more oil on them than I had seen before. I usually clean plugs every 40-50 hours. Since oil consumption recently moved from 1 quart per 6 hours to 1 quart per 4 hours, I kind of expected this. I was surprised at the lead, even with using Decalin and aggressive leaning on the ground.
Back to the Overhaul
The Lycoming manual recommends removing the cylinders in the normal firing order, which meant starting with cylinder number 1. So that’s where I started. Initially, things seemed to progress quite well. Even the piston pin pushed out with just my fingers. After that, only the number 2 cylinder removal would go as easily. I proceeded to remove and reinstall each cylinder one at a time. That keeps pressure on the engine through-bolts and hopefully keeps the main bearings in place. Cylinders 3 through 6 were a lot of work when it came to removing the piston pins. Each of them required the use of a heavy-duty pin puller, along with a heat gun aimed at the base of the piston. I am told that this is sometimes normal, but I didn’t expect it for a mid-time engine.
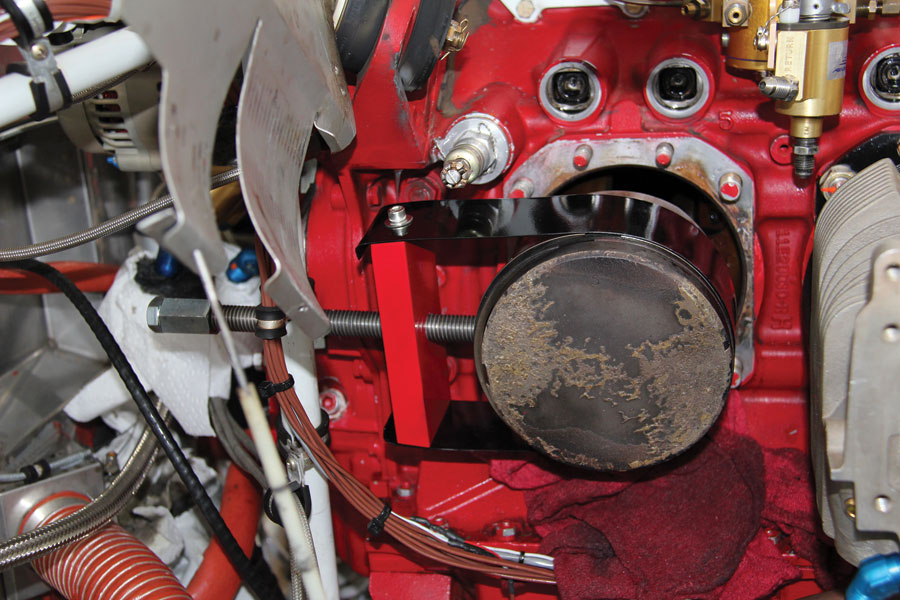
Using the piston pin puller from Aircraft Spruce. It worked really well and made small work out of the tight pins. Note the use of shop rags underneath the connecting rod to keep it from contacting the crankcase.
I didn’t really find the proverbial smoking gun. I did find a few interesting things though. All of the cylinders had some oil in them above the pistons when they were removed, the worst being about ounce. When I measured the cylinders using Lycoming Service Instruction 1047B, they showed 5.125 inches at 4 inches down, and on average about 5.133 inches at 2 inches from the top every once in a while. They are supposed to be choked .0045 inch. Mine were about .003 inch out. This could certainly explain the blow-by.
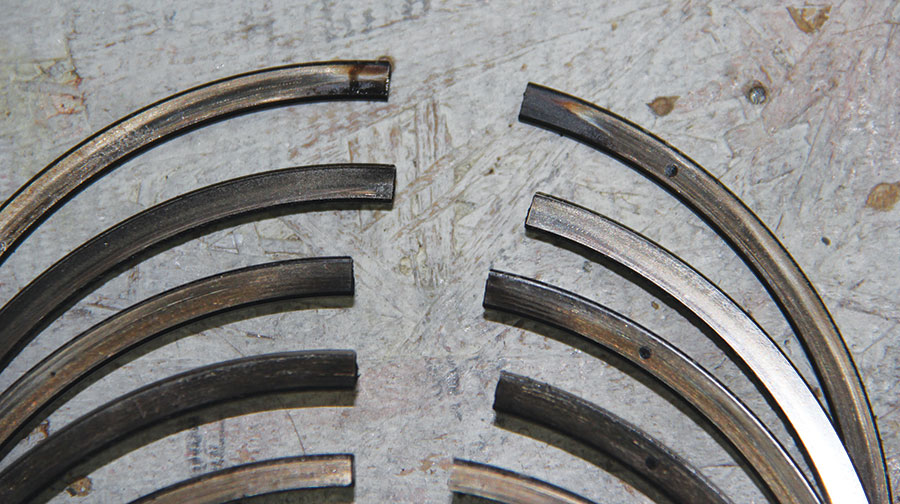
Close-up view of the ring gaps. A couple actually looked a little burned and may be normal. None were broken, and a couple were aligned within 10 degrees of each other on one piston, potentially contributing to higher blow-by.
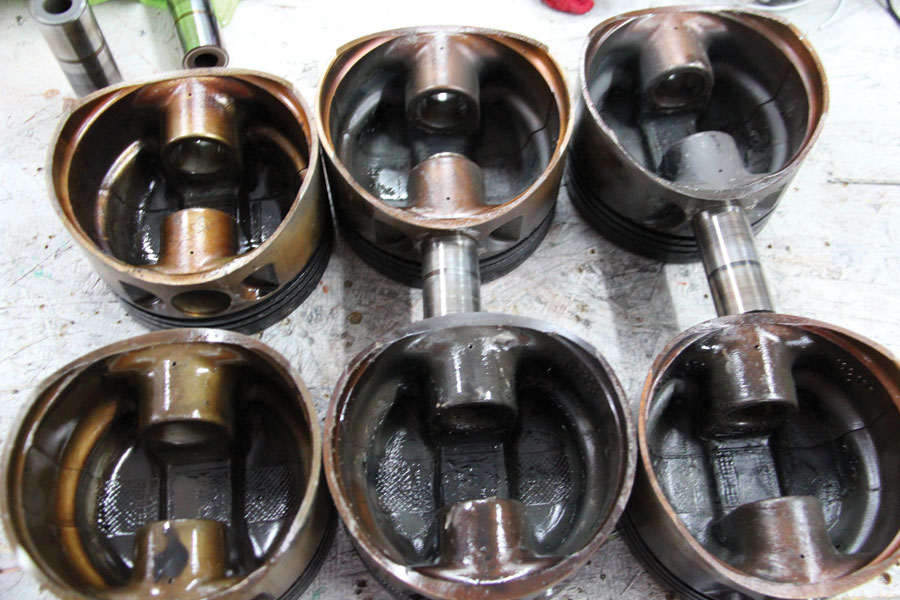
The pistons looked rather full of carbon and coked oil. The piston rings were all installed correctly, and in two of the cylinders, the top two rings were within 10 degrees of each other, rather than 120 degrees apart. Those cylinders did have more oil blow-by in them than the other four. There weren’t any broken rings, but the oil rings were really coked up. I wish I had taken a picture of the NFS pistons before I sent them to Graham for installation. They are a real work of art compared to the pistons I took out. It’s too bad they are installed where we can’t see them!
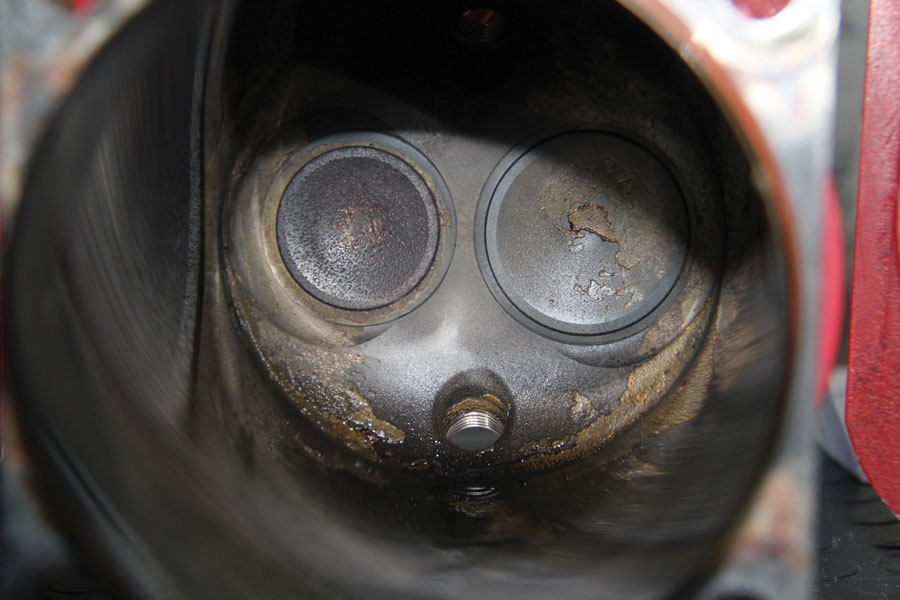
The worst cylinder was #3, with lots of oil in it. The rest of them had oil, but all of them had very healthy looking valves.
The inside of the engine looked OK to me, including the camshaft, although I wouldn’t think there should be cam wear with roller bearings. I didn’t see any “gunk” hanging out anywhere, just black oil. Again, as I removed each cylinder, I installed the new one, carefully inserting the new piston pins lubed with a mix of STP and engine oil. I torqued the new cylinder base nuts in the proper order and marked each one with orange torque seal. Once all of the new cylinders were installed, I proceeded to replace all of the other items, starting with pushrod tubes, rocker arms, valve covers, etc. The valve covers and pushrod tubes looked really cool with the carbon-fiber paint dip put on by Graham Engines. It took another two days to completely reinstall everything on the engine, including fabricating new oil hoses and installing a new oil cooler. I also took the time to install a Challenger Lifetime Oil Filter System. I figured with a top overhaul, I might want to look at the oil system a little more often early on, and this makes it easier to do. No more cutting messy filters open!
This looks like a perfect picture of a healthy exhaust valve.
I’ve always run B&C alternators on my airplanes, along with an SD-8 backup alternator on the vacuum pad. I’ve never seen a failure of the primary alternator, nor heard of one, but I also know the weak area could be the alternator belt, and that the SD-8 really won’t carry the full 25-amp steady-state load of a glass cockpit. A few hours in the clouds in Alaska gives you more time to think about failure modes! So, I took the time to upgrade the SD-8 to the newer BC-410H, which is good for 40 amps. Yes, I have since verified in flight that it does in fact continuously carry the full load. I also know that since I now have it installed, I will never need it. I also know I shouldn’t get stuck somewhere far from home without a working alternator.
After 55 hours of labor the RV-10 was ready for the reinstallation of the prop and governor. The propeller came back looking like new!
The old pistons looked a little worse than I thought they should have. I was able to easily remove the pins on numbers 1 and 2, but 3 through 6 required a piston pin puller.
Pre-Oil and Runup
With the newly overhauled prop and governor installed, alternator belt tightened appropriately, and lower spark plugs removed, it was time to pre-oil the engine. This was done by engaging the starter and watching for a rise in oil pressure. I had pre-filled the oil cooler prior to installation, as well as the hoses going to and from the oil cooler, hoping to lessen the amount of spinning without oil pressure. I put nine quarts of Phillips X/C mineral oil in the crankcase. Within 20 seconds, I had a very quick rise on the oil pressure, and stopped cranking at 30 seconds. I let the starter cool for a couple of minutes, even though it was really hardly warm to touch. The new lightweight starters are amazing. I then spun it one more time and had a reading of 43 pounds of pressure. Neat! Time to install the lower plugs and perform a thorough pre-start inspection.
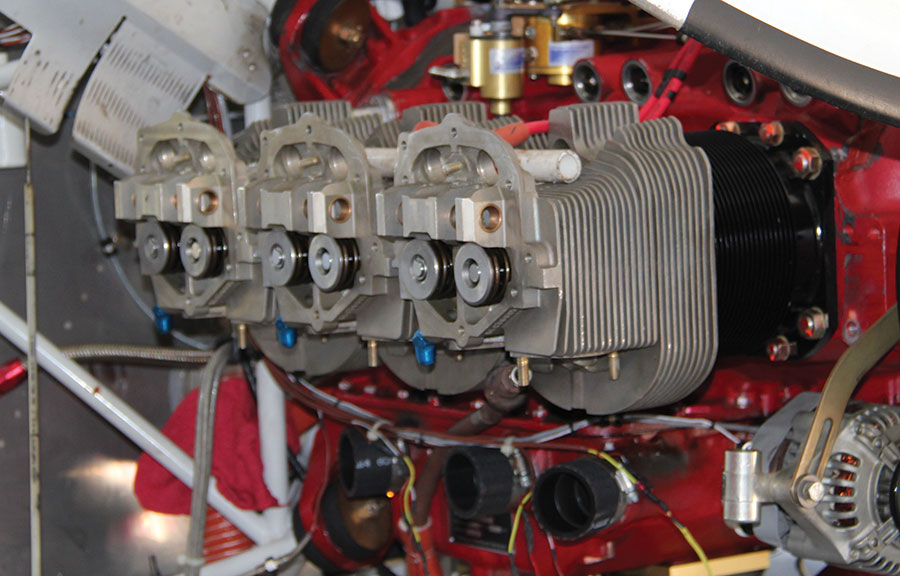
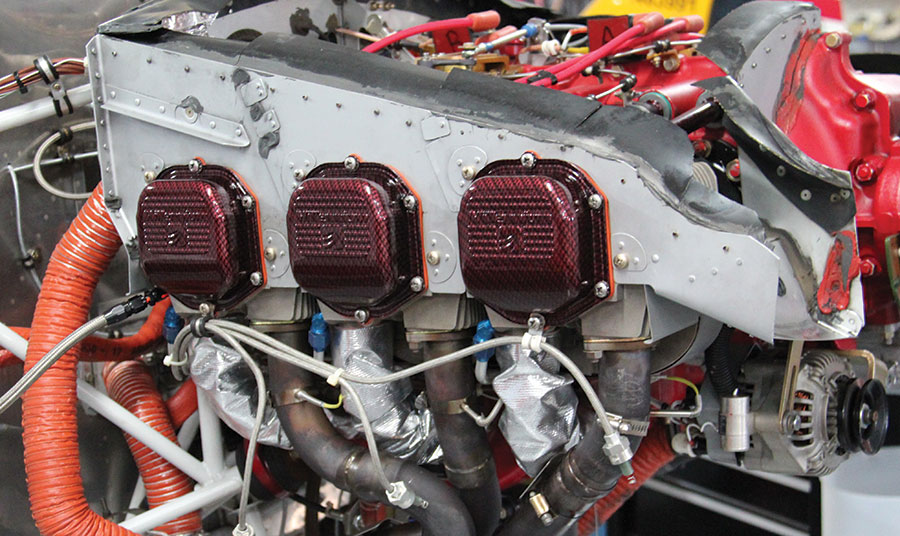
Right side of the engine with the new cylinders installed. Lesson learned—install the rocker arms and shafts on the middle cylinder before installing the others. As luck would have it, I was able to slide the rocker arm shaft right through cylinder 1 into cylinder 3. I really was amazed at the alignment.
Having Carol standing guard with a fire extinguisher, it started up right away, and I only ran it for a few minutes so we could check for any leaks, as per the Superior guidelines for breaking in new cylinders. Everything sounded good, although it did not quite feel as smooth as it did prior to the overhaul. A quick check of the ignitions showed they were both working. However, the electronic ignition was not quite as smooth as the magneto, which is opposite of my prior experience (and probably everyone else’s!). In my mind I attributed this to the new prop overhaul and the fact that I had removed the previous dynamic balance weights from the flywheel. Now it was time to reinstall the engine cowling, perform a normal run up, and go fly. But first we had to take time to go to lunch with our son and his family, as it was Carol’s birthday. Great timing in that it would let the cylinders cool down for the next run.
With everything installed, the engine was ready for a pre-oil. Notice the lower plug wires are disconnected. I had oil pressure at 20 seconds of motoring with the starter after having prefilled the cooler and hoses.
Once back, I preflighted everything and taxied out for a runup. This is where my erroneous “quick thinking” earlier regarding the rough electronic ignition told me to pay attention. At 1800 rpm the electronic ignition was too rough for me to proceed any further. Something was not right. I taxied back to the hangar and shut down, successfully not letting the cylinders get over 300. I went into troubleshooting mode and thought about what I had changed that could affect the ignition. The first thing that came to mind were the spark plugs, so I replaced them. No luck! Over the course of the next few hours, I replaced coils and wires, and verified I was getting sparks to the plugs at the appropriate time. All good. But finally, just by accident because I left one spark plug wire off of an adjacent cylinder, I happened to see two coils fire at the same time. No way should that happen! A phone call to Klaus Savier at Light Speed Engineering, and he said it was most likely a chafed timing wire from the crank sensor. Sure enough, I found it within 5 seconds. The flywheel was rubbing the computer-grade cable from the crank sensor and had broken through the insulation. I repaired the wiring, added some more supports for the cable, and the ignition was now smooth again. I really wish Klaus would start using some Tefzel shielded wire!
The initial runup was anticlimactic with no leaks. It started right up and, except for a roughness on the electronic ignition, all temps and pressures were normal. The cause and fix for the roughness was determined prior to first flight.
First Flight
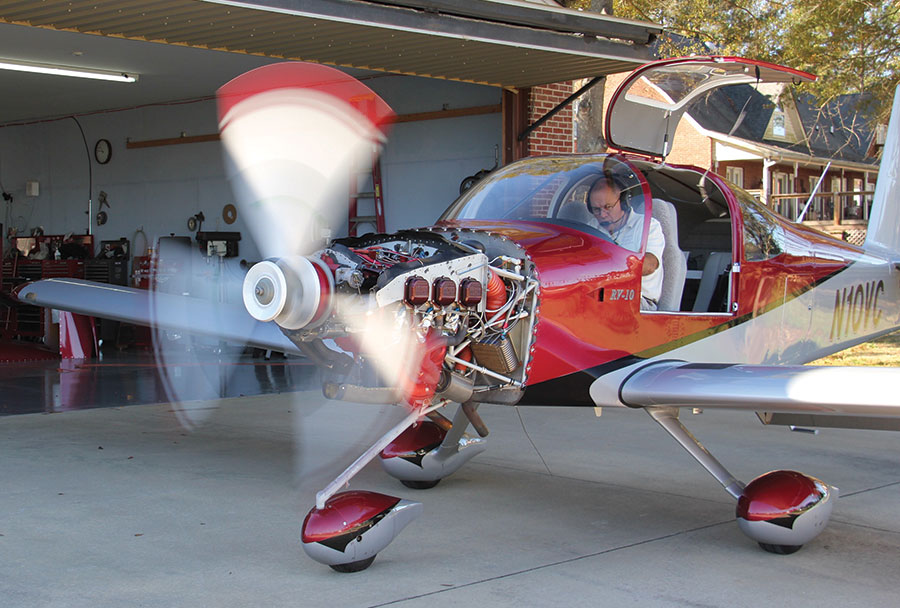
Time to try again. A quick engine runup with the aircraft pointed into the wind, wait for CHTs to hit 300, and I was off. Acceleration was very smooth, but the prop only achieved 2630 rpm at liftoff, even though I had asked the prop shop to measure my low pitch angles and reset them. Oh well, no big deal, as the RV-10 is no slouch performer, even when missing a few rpm at takeoff. I kept the climb angle shallow and it quickly accelerated to 110 knots with a 1000+ fpm climb. I leveled off at 2500 feet MSL, with the highest temp being 420 on one cylinder. All of the others were below 400. For the next 30 minutes I set the power at or above 75% and CHTs stabilized in the high 300s with oil temp at 182 (OAT was 64F). Right about 30 minutes into the flight, the CHT temps seemed to drop on all cylinders, with the lowest around 330 and the highest around 380. I had decided the first flight would be for an hour at 75% power, and it sure was nice to use the Avidyne IFD540 to place a hold right over our airport with 1-minute legs. I figured that if I got distracted with some engine anomaly and had my head inside the cockpit too long, I wouldn’t stray too far from the airport and would always be able to make a safe landing.
Over the next two days, I flew it for 3 hours, using 75% power for the first hour and then alternating every 15 minutes between 65 and 75% power during the second hour. The only thing that was really annoying was the propeller imbalance, and I started questioning my decision to overhaul the propeller at the same time as the TOH. The vibration wasn’t too bad at a cruise rpm of 2400, but around 900 rpm, when power was pulled back to land, it had a horrible shake. I removed the static balance weights and it measurably improved, but still wasn’t right. I didn’t think the indexing of the propeller on the crankshaft should matter; however, all indications from subsequent research indicated a bad static balance would cause vibration at specific rpm. Hmmm.
Prop Balance
After a couple of conversations with the prop shop, they agreed to redo the static balance. It was very interesting to me that after a complete overhaul, including bearing replacements, all new leading edges, and a complete paint job, that they would place the weights at the same location on the forward spinner bulkhead as they were prior to the overhaul. In my mind it was possible, but not probable. Sure enough, when it was rebalanced, the weights were different (6 grams more), and in a different location. When I reinstalled it, I indexed it 180 degrees from where it was the last time (even though I could find no information that indexing should make a difference) and it seemed much smoother on startup. It was still a little rough at idle, and my vibration analyzer showed it to be at .5 ips (inches per second). Since I now had 3 hours on the cylinders, I decided to go ahead and perform a dynamic balance. I figured if I kept the CHTs below 330 (I did) and let the engine cool between runs, I should be able to avoid any cylinder problems. Sure enough, I only needed 3 quick runs to achieve a final number of .02 ips at 2400 rpm and .08 at idle. I’m sure the idle will get better as I put more time on the cylinders, but I was really pleased with the result at cruise rpm.

After 930 hours the prop looked a little worse for the wear, and it was time for the MT-recommended overhaul. It came back looking like new.
Between the TOH and the propeller overhaul, I spent a lot more than I thought I would need to at this point in the life of the engine. Of course, we’ve joked at home that I’ve finally kept an airplane long enough to start wearing it out! In the not-too-distant future I will give an update as to how things are going. For now, I hope the fun meter can start again.


I have the same issue (black oil) on an O-320 with just under 1000 hours (on an RV-6A) and oil consumption has increased too. Nothing to report on oil analysis. Do you recommend a top overhaul or should I keep flying and monitoring it?
Did you happen to check cylinders #1 & #5 for stuck oiler rings? I have a Continental C-90 with 770 hrs in 9 years since complete overhaul, and my #1 & #2 cylinders have oily plugs at 10 hours. I’ve been told by my local A&P it is likely stuck oiler rings, and I am considering trying the Savvy solvent flush method to clean them out before pulling cylinders. Have you had any experiences with that method?
we have done that process on one IO-540 in an RV-10. So far the owner has had good results, with highrer compressions and less oil burn. We’ll see if it lasts. It’s a dirty, messy process.
Vic