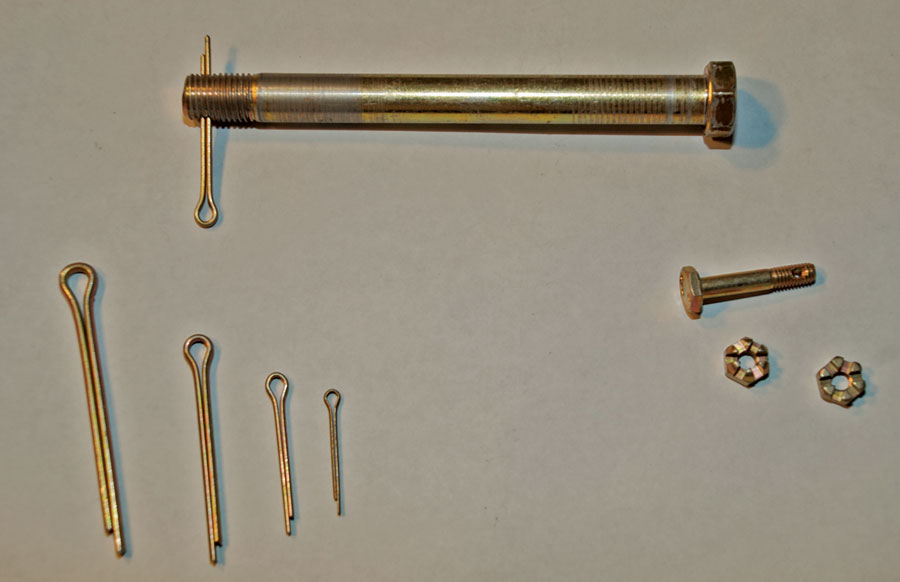
Shown above is an assortment of cotter pins and an AN3 bolt with both the standard and thin (shear) castle nuts.
In airplanes there are lots of parts that really, really need to be secure. If they aren’t, something vital might come apart and cause a crash. In many cases a nylon insert or all-metal stop nut may well provide the necessary holding power and peace of mind. But sometimes that just won’t work. For these situations we need safety wire, a cotter pin, or rarely but occasionally, a chemical thread locker.
Cotter Pins
Cotter pins are used in conjunction with drilled-shank bolts and castle nuts or with clevis pins. They are especially needed when there is rotation at the bolt or heavy vibration. Control linkages and the attachment of control surfaces to wings commonly call for drilled bolts and castle nuts with cotter pins. However, depending on the way the connection is assembled, a stop nut may suffice. Engine mount bolts are also good candidates for castle nuts and cotter pins to secure them from the heavy vibrations they typically experience. Even though it is sometimes inconvenient to use cotter pins in these instances, it is critically important that these nuts and bolts do not come loose in flight.
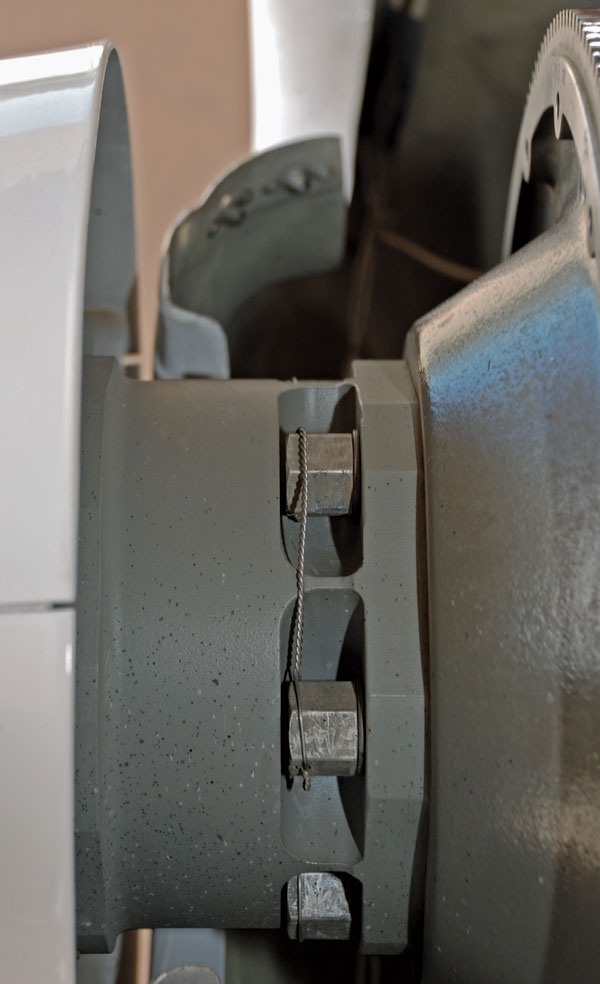
This alternative method of securing a cotter pin works well when there is poor access to the top of the nut or where snagging of the cotter pin is a concern. This idea was suggested by an EAA member in a Hints for Homebuilders video.
A properly installed cotter pin will be 1/64-inch smaller in diameter than the hole in the shank of the bolt and will be long enough so that when it is bent over, it will extend at least to the center of the bolt or clevis pin. For convenience cotter pins are usually longer than needed and then cut off.
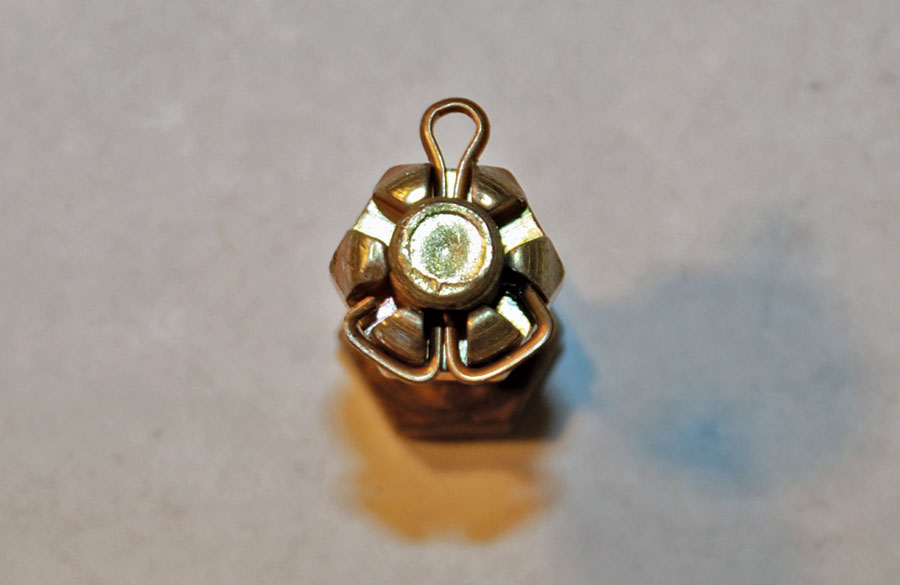
When using a castle nut, the slot of the nut needs to be lined up with the hole in the bolt. The nut may need to be overtightened a bit to achieve the proper alignment. This is generally allowed unless specifications say otherwise. Sometimes changing a washer from thick to thin will help get proper alignment. If the tail of a cotter pin sticks out in such a way that it may snag on shoes or clothing, it may be necessary to put some epoxy over the tail of the pin to keep it in place. JB Weld or a similar product will also work. This issue came up with the rudder pedals for RV-4s and resulted in a service bulletin. An alternate method of protecting the tails of a cotter pin is to orient the pin sideways and turn the tails into slots adjacent to the one through which the pin lies. A recent EAA Hints for Homebuilders video highlighted this method.
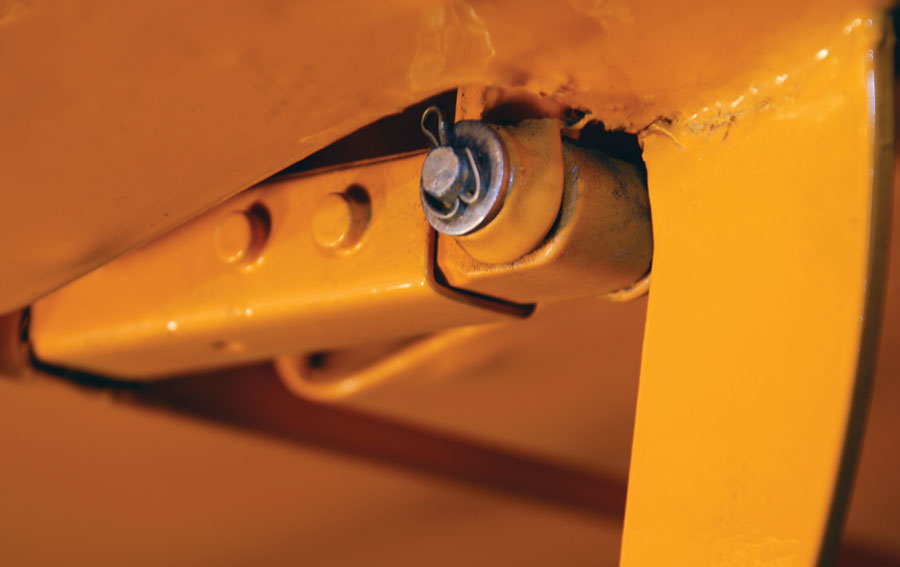
This cotter pin secures a clevis pin on this aileron attachment on a Legend Cub. Note the standard practice of using a washer under the cotter pin and folding the tails alongside the pin instead of over the end.
It is important to use the proper diameter cotter pin, which is based on the diameter of the hole in the bolt. A cotter pin that is too small will allow the nut to turn, and one that is too large simply will not fit. The length is unimportant as long as it is sufficient, because a too-long pin can always be cut off.
Always resist the temptation to reuse a cotter pin once it has been put in place and removed. Any cotter pin that is gouged or bent should be discarded. Cotter pins are very cheap, but the damage that can come from one failing may be catastrophic.
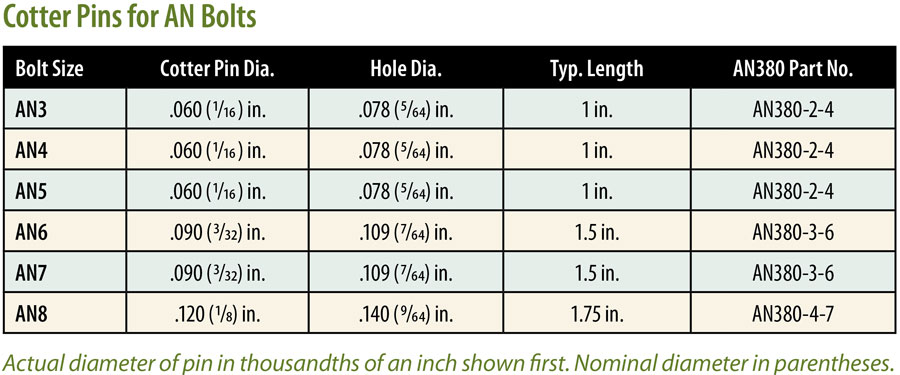
Cotter pins are listed with AN part numbers such as AN380 for cadmium plated steel and AN381 for stainless steel, or as MS24655, with suffixes according to diameter and length.
When using a cotter pin and castle nut at a rotating connection, such as a throttle connection at the carburetor, be sure to tighten the nut on the bolt to the torque listed in the standard torque tables (unless some other value is specified). Many builders fail to properly tighten these nuts and let excess movement occur in the joint. This can lead to excessive wear and ultimately failure of the connection. When a rod end is used, the idea is to force the rotation to occur in the rod end and not around the bolt. Only proper tightening will produce this result. Of course, when there is no rod end or other freely rotating bearing present, tightening the nut will not work if it is so tight that it stops rotation of the joint.

This RV-4 brake pedal is subject to a service bulletin because the cotter pin nearest the pedal face often got caught on the pilot’s shoe. The recommended fix was to dab some epoxy or JB Weld on the cotter pin tail so it couldn’t be pulled loose.
The concept of forcing rotation into the rod end rather than around the bolt underlies Van’s recommendation to use standard AN365 nylon insert stop nuts at most rotation joints such as aileron hinges and control push/pull tubes. Their vast experience with this arrangement makes it hard to argue against it, recommendations of AC43.13-1B notwithstanding. For firewall-forward installations don’t forget to use AN363 all-metal stop nuts if you decide to go that way. Never substitute a stop nut for a castle nut and cotter pin at joints where fully tightening the nut would stop the joint from rotating.
Safety Wire
AC43.13-1B goes into great detail on how to safety wire various nuts, bolts, screws, hose fittings, turnbuckles, and just about anything else you can imagine safety wiring. Whenever you have a safety wire project in front of you, it is a good idea to look up the proper procedure there. If you are using best practices, you already have this book, but if you don’t, you should get it. It would be hard for anyone to take you seriously as an airplane builder if you have never cracked open this book. By the way, the digitally inclined can also find AC43.13-1B online for free. Look in Section 7 for more information on safety wiring.
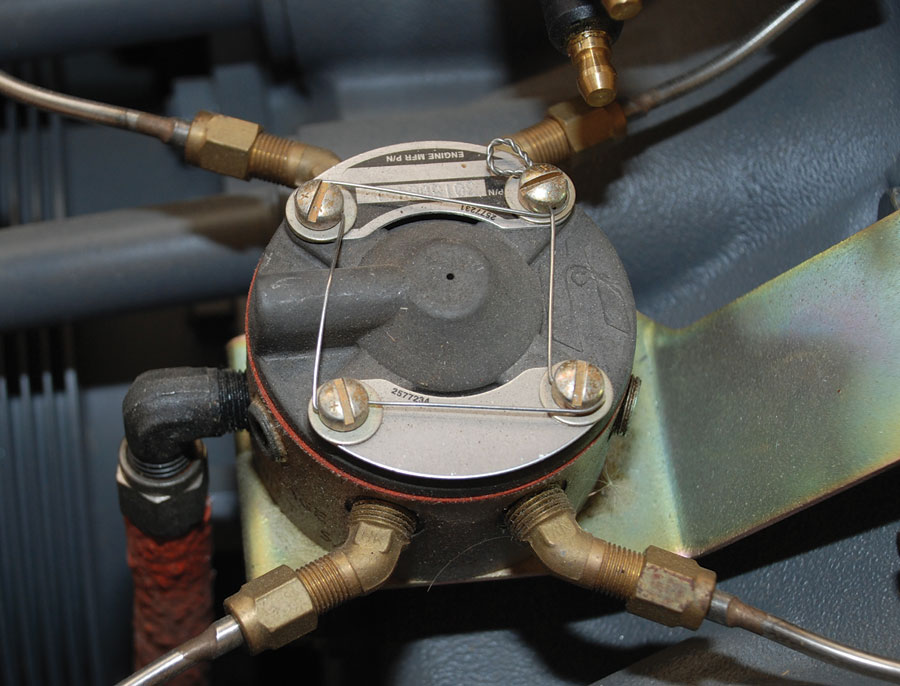
Small screws such as these found on a fuel distributor are typically secured with .020-inch safety wire. This unit is not usually serviced by someone in the field, so there is no reason to buy .020-inch safety wire unless you need it for something else.
Safety wire comes in stainless steel, brass, and aluminum, but most amateur airplane builders will only use stainless steel wire for their projects. Stainless steel wire comes in diameters ranging from .020 inch to .051 inch, but amateur builders will mostly use .032-inch wire. Smaller wire is typically used to secure screw sizes 8-32 or smaller. Larger wire is generally used for bolts sized AN8 or larger and turnbuckles. Most propeller bolts require .041-inch wire, as do most turnbuckles, except for very large ones that few amateur builders will ever encounter.
Best practices say that you should use the prescribed size safety wire for your job, but you will be sorely tempted to avoid .041-inch wire for anything after you have worked with it. Be patient and practice a few times until you get it right. It is possible to do a neat job with .041-inch wire, but it isn’t easy. Most propeller bolts will require .041-inch wire, but verify that with your propeller manufacturer before you buy it.
Since safety wire techniques were well-covered in a September 2015 KITPLANES article [“Maintenance Matters: Safety Wire and Cotter Pins“] and in AC 43.13-1B, I will not repeat that material here, except for a few brief comments. Safety wire should always be wrapped around the head of a bolt in a direction that would tend to tighten the bolt; in other words turn it clockwise as viewed from the head of the bolt. The connection to the next bolt should likewise pull in the direction of tightening the bolt. Safety wiring oil filters, oil temperature sensors, and other items works on the same general principle. Pull in the direction of tightening and route the wire to the closest convenient anchor point by the most direct route possible. Tighten the wire so it has six to eight turns per inch, and leave enough of a tail at the end to curl it around and protect the sharp, cutoff end.
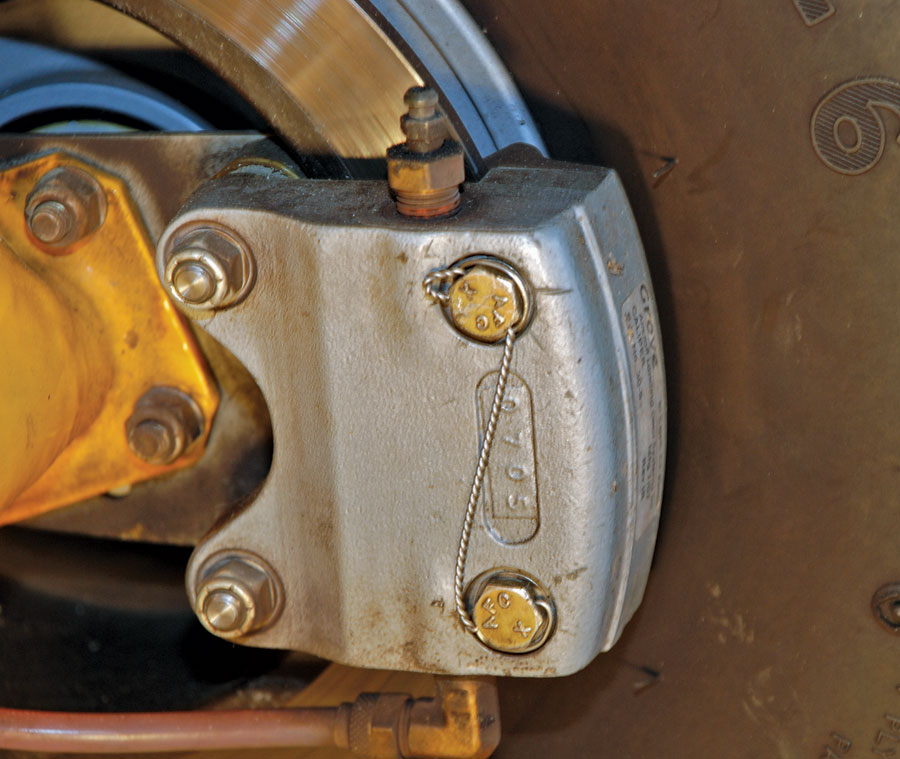
This is a typical safety wire installation using .032-inch stainless steel safety wire to hold the bolts secure on a brake caliper.
Lock Washers
Since we are looking at various ways to keep nuts and bolts from coming undone, lock washers deserve a brief mention. In all likelihood you will only encounter lock washers on the exhaust studs and small exterior case bolts of Lycoming-type engines. The 5/16-18 studs hold the exhaust pipes on with coarse-thread nuts, flat washers, and internal star lock washers. These lock washers should be replaced every time they are removed. They should not be reused. With that procedure and the proper torque, you are likely to have few problems with your exhaust system coming loose. By the way, the proper torque for these nuts is 204 inch-pounds. Best practice calls for a flat washer to be placed under a lock washer to protect the underlying material. Intuitively it may seem that the flat washer will make it easier for the nut to loosen, even with the lock washer in place, but it doesn’t seem to turn out that way.

Airplane builders are most likely to find a lock washer on a Lycoming engine. This nut, lock washer, and flat washer secure an exhaust pipe to an O-360 engine. As a rule, an alternate method of securing a nut would be preferred, but this method works if you are careful to tighten the nut properly and never reuse the lock washer.
There is really no other place to use lock washers on an airplane unless it is to secure some non-structural part such as an interior panel. Lock washers loose their tension over time and thus their ability to prevent rotation of the nut or bolt they are securing. They should not be used to secure structural aircraft parts. They are not a substitute for aircraft stop nuts or castle nuts and cotter pins.
Chemical Thread Lockers
Loctite makes some chemical thread lockers that may catch the eye of an amateur airplane builder. They seem to make a dizzying array of products with varying capabilities. Some are made for permanent installations and will require heat to break them loose, while others will succumb to firm mechanical force. Other are designed for high-temperature applications. What they all have in common is that they are rarely called out for use in airplanes. Loctite can be very helpful to secure a small set screw that just won’t stay in place, but airplane makers generally prefer to use visible, mechanical means of securing nuts and bolts. The problem is that there is just no good way to be sure that a thread locker has been applied once the part has been assembled. That does not mean that thread lockers do not work, because they do, but this inability to verify security has been their downfall when it comes to aircraft use.
Torque Seal
Torque seal doesn’t actually seal anything, and it doesn’t prevent a nut or bolt from coming undone, but it is a handy way to provide visual evidence that whatever you have put together is still secure. To apply torque seal simply squeeze a small amount out of its tube to bridge between the nut, bolt, or hose fitting of concern and the nut, bolt, or hose fitting to which it is attached. If the “stripe” of torque seal that you have applied later becomes disjointed, it is time to check the tightness of that connection.
Torque seal has value as a future inspection aid, but many builders also use it as a means to mark which fittings or connections have been tightened as part of final assembly. When building an airplane, it is common for parts to go on and come off more than once. This often leave some doubt about which parts are properly installed for final use. Torque seal can act as a visual means of verifying final installation.


