Last month I promised I would share some thoughts on first year maintenance. I honestly can’t believe another month has gone by already. It must be an age thing or something, as I never remember time going by this fast, especially when I was a kid and waiting for Christmas or my birthday. Now they both come too fast! But I do remember that they both had something in common that probably drives my approach to preventative maintenance on airplanes today—I hated it when I received something that either didn’t work or broke way too soon.
With that in mind I am proud to say that in over 35 years of flying the airplanes I built, I have managed to achieve a 100% dispatch rate. It’s a good feeling to have the airplane ready to fly whenever you are, whether it is for a quick morning breakfast jaunt or a 10,000-mile trip to Alaska and back. It makes the flying more enjoyable, and certainly less stressful, for any friends or family members that happen to tag along. There’s nothing like getting stuck somewhere other than the destination while on vacation because you didn’t take the time to check things over before you left. Or how about packing everyone up from the hotel (which happens to be overbooked now) and arriving at the airport only to see a puddle of brake fluid underneath the wheelpants? Ever get everybody packed into the hot airplane, only to taxi back due to a fouled spark plug? Kind of puts a damper on the whole island vacation trip, doesn’t it?
I’ve entitled this column first year maintenance, but in reality it’s all about the first 100 hours on the airplane. That’s the timeframe in which you should be able to determine the wear patterns on things like brakes, tires, spark plugs, and oil consumption. Some of the activities we performed during the Phase I testing will put a little higher workload on some of the items, such as plugs and brakes, and they should really be checked prior to heading out on longer trips.
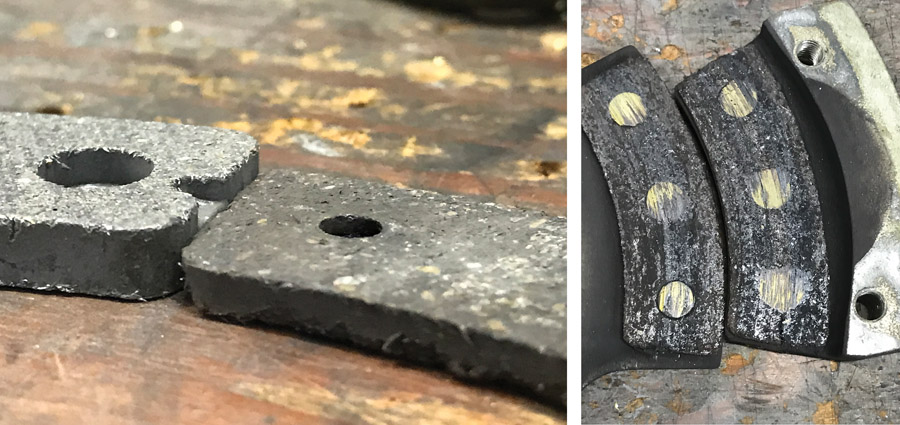
Don’t let the brake pads wear to or past the grooves. The rivets will begin to cause damage to the discs and increase the potential for the piston to come out of the caliper, spilling all of the brake fluid.
Brakes
Brakes are the first thing I tell everyone to check coming out of Phase I testing, especially for pilots who are new to castoring nosewheels. Why? Well, the ground steering qualities are a lot different than the “coupled” nosewheel steering most pilots are accustomed to in certified airplanes. The use of brakes to steer the airplane, rather than keeping sufficient airflow over the rudder, is common and causes extra wear on the brake pads. Many pilots new to the airplane will inadvertently use brake pressure upon the application of full power for takeoff to keep the airplane on the centerline, usually indicated by the pads on the right side wearing out before the left ones. Sometimes it is the geometry of the rudder and brake pedals that can cause the premature wear, too, so do check to see that in your normal seating position you aren’t “riding” the brakes. There are aftermarket kits for some homebuilt aircraft that address this potential problem, and sometimes it is just as simple as putting a piece of rubber hose on the rudder bar to keep your feet off of the brakes.

Be sure to install the rivets properly. These rivets are installed backwards, which will cause brake chatter.
So how do I know when the brakes should be replaced, you ask? Most of the brake pads today have a little groove indicator in them that you can see by looking down at the brake caliper where the pad touches the disc. It is best to replace the pad prior to it hitting the groove. Unlike your car, which has pieces of metal that rubs the disc and squeal really loudly when the pads are worn, aircraft brakes need to be checked visually. You probably wouldn’t hear the squeal over the noise of the engine anyway, and you certainly don’t want the brake discs damaged, which is sure to occur if you let the pads wear to the point of hitting the rivets that hold the pads to the pressure plate. Remember my comment about the brake fluid puddle? Well, that’s what happens when you let the brakes wear too much. The piston overextends from the caliper housing to the point that the O-ring lets the fluid drain out. Since it happened on the last landing, it usually isn’t noticed until the next flight. After all, everyone is on vacation and headed to the beach!
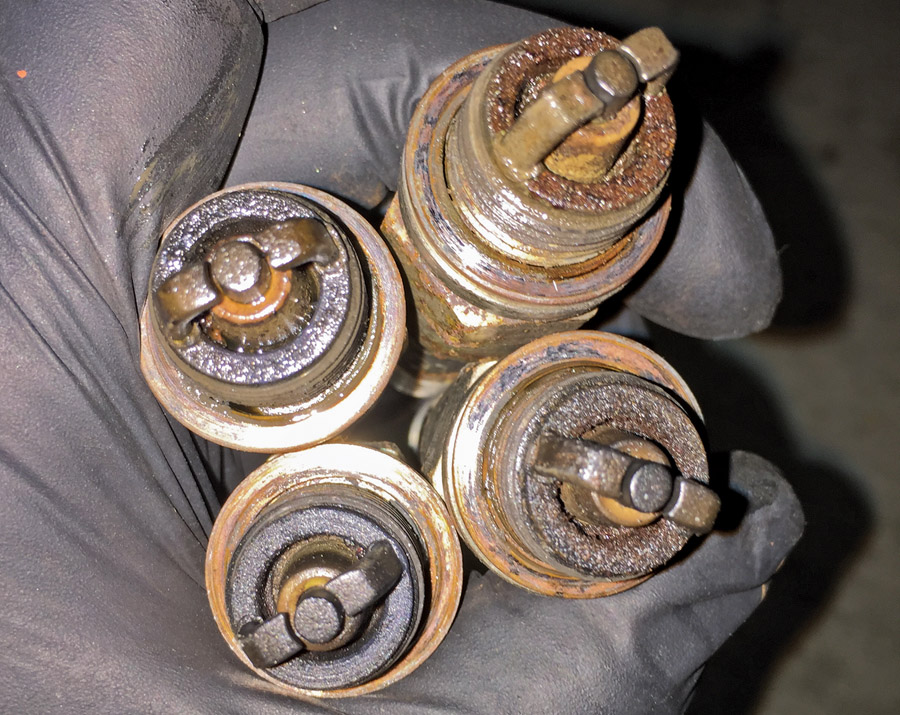
Phase I testing can put a high workload on spark plugs. These plugs should be cleaned and checked for proper gapping.
Spark Plugs
The next items that should get some attention prior to any long trips away from home are the spark plugs. During Phase I testing there usually is a lot of maneuvering with less than high power settings, which on new engines is a potential source of plug fouling due to inadequate lead scavenging in the cylinders. I recommend that all aviation plugs get pulled, cleaned, and checked for proper gapping. I say aviation plugs because, in my experience, the plugs used with electronic ignition seem to be much more resilient to lead contamination. If you haven’t cleaned aviation plugs before, don’t hesitate to find a local A&P at the airport who will probably be glad to show you how to properly clean and gap them. Since aviation plugs are much more expensive than your typical automotive plug, it really pays to handle them carefully, learn how to properly clean them, understand how to prep them for reinsertion with anti-seize paste, along with using the proper torque for tightening. Some of you will see for the first time that aircraft plugs have a copper washer associated with them, and many people aren’t even aware that the copper washer has 2 sides to it—a flat side and a convex side. The flat side faces the plug, with the convex side facing the cylinder, thereby creating a good seal and contact when it is properly tightened. Spark plugs have various temperature ratings, and it is important that they are properly tightened in order for the heat transfer to work properly.
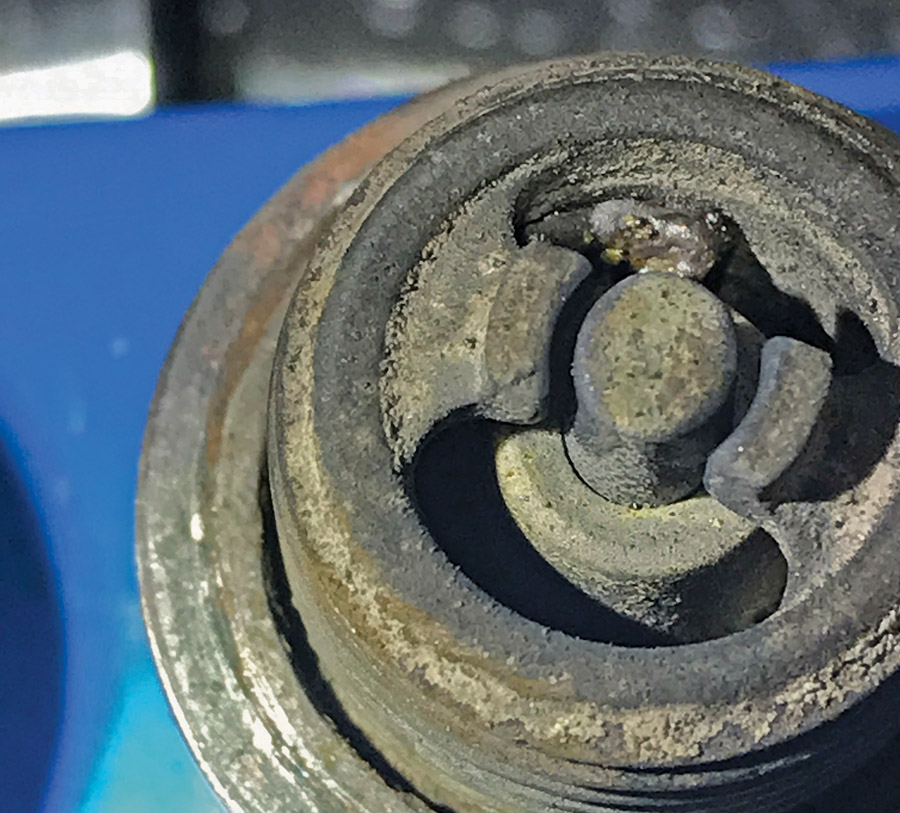
Lead buildup. If you haven’t cleaned aviation plugs before, ask a local A&P to show you how to properly clean and gap them.
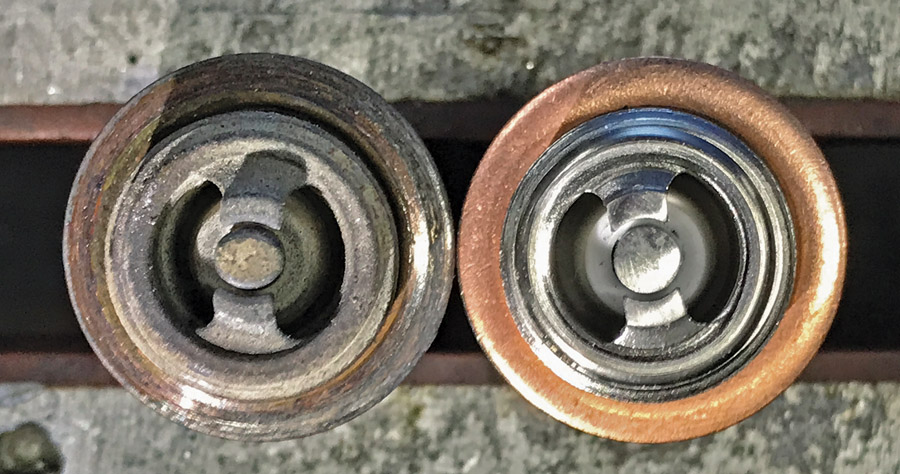
New and used spark plug. Note that the convex side of the copper washer faces the cylinder, and the flat side faces the plug.
Alternator Belt
Coming out of Phase I, the alternator belt has probably stretched to its final state, so make another check of it and be certain it is properly tightened. Unlike in our cars where you can hear the squeal from a loose alternator belt, it is not so in the aircraft due to engine noise. Premature alternator belt failure is no fun on an airplane, as it usually requires removal of the prop. The fun factor diminishes while everyone is standing on the ramp waiting to depart.
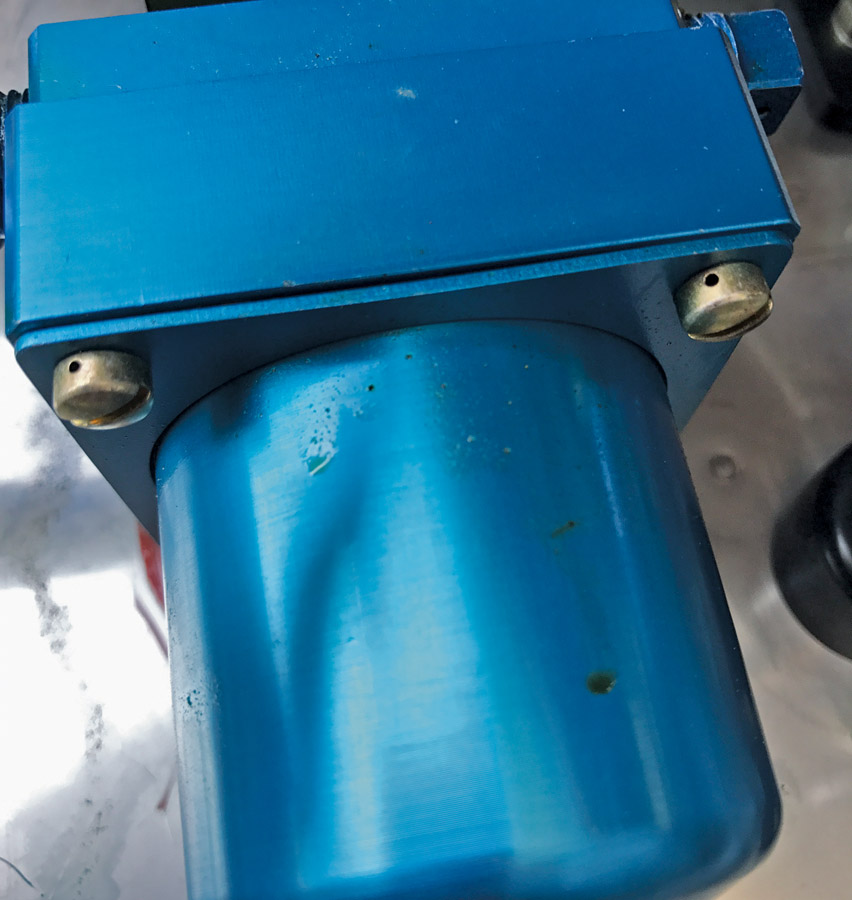
This is why we check the fuel system: this gascolator without the safety wire was on a flying airplane (the author’s, to be exact!).
Fuel System
Another area I feel needs some close inspection within the first year is the fuel system and all of its components. If you are a non-builder owner, don’t hesitate to ask the builder for the specifics on the fuel system, as many times the filters are in hidden places. It is during the first year that all of the “stuff” left in the system from construction will begin to work its way toward the engine. Things like metal shavings, goo, and fibers from fiberglass, thread sealant, etc. will go with the flow and start to get captured either by filters or other moving parts in the system. Fuel filters should definitely be cleaned or replaced, and any contaminants should be inspected to see where they might be originating. Metal shavings and other contaminants in the tanks have a way of settling into the fuel tank quick-drains, causing them to drip fuel. Sometimes checking the fuel for water on a preflight can cause the drain to stick open. I always carry a spare quick drain in the airplane for that reason.
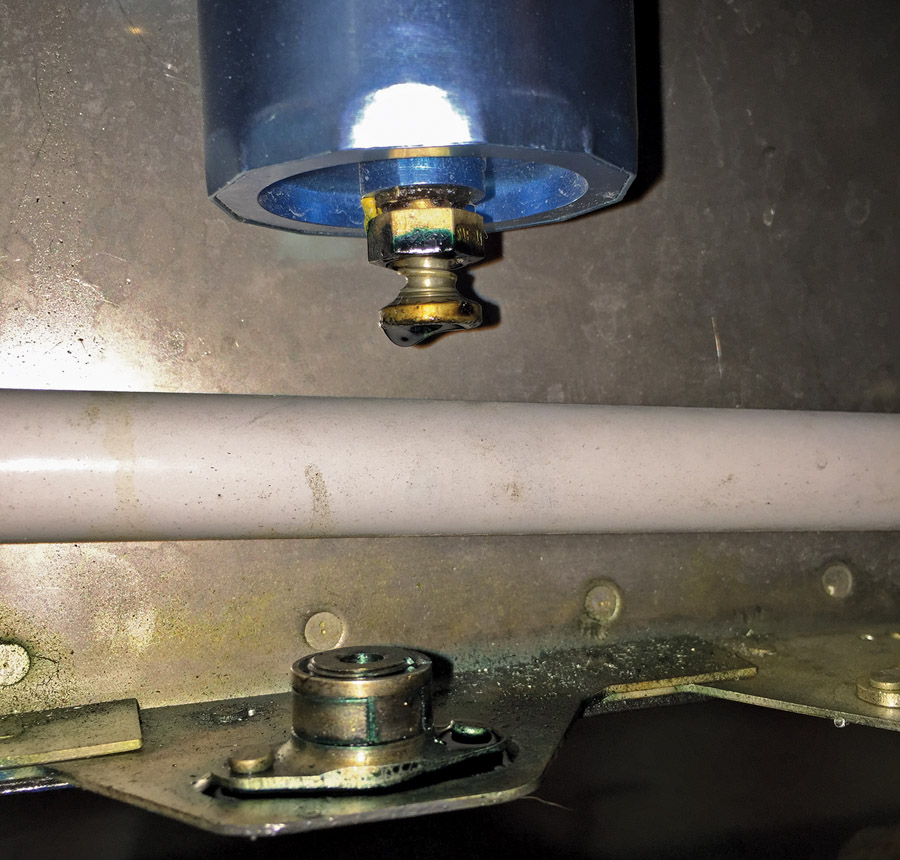
This quick-drain leak on the gascolator is right above the exhaust system and very dangerous.
Some fuel leaks can be so slight and insidious that you won’t even notice them without a thorough check of all lines and connections, but the telltale sign of 100LL dye around any fitting is a sure sign of a leak, and may even be the cause of that intermittent fuel pressure problem you’ve been having. An intermittent fuel odor in the cockpit can usually be traced to a leaking fitting.
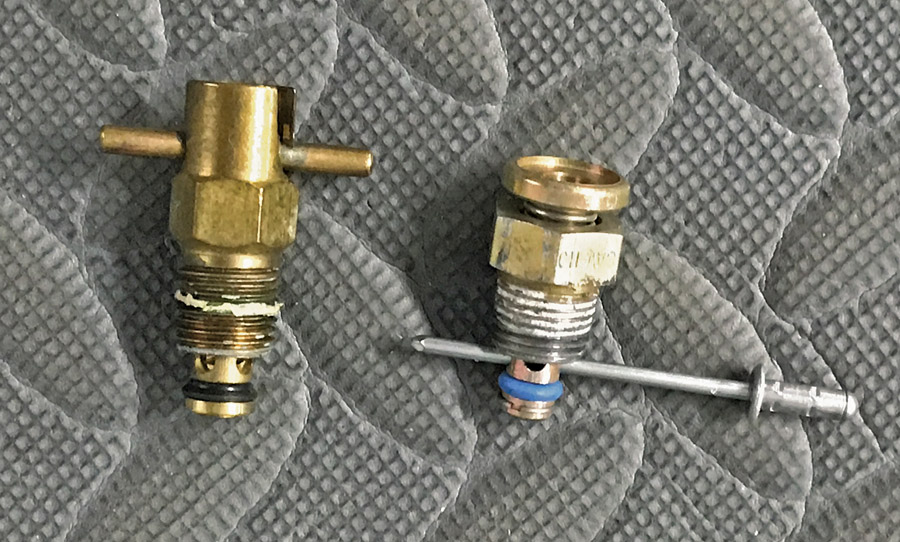
Always carry a spare quick drain, using a pop rivet stem to keep the O-ring fresh, or keep it in the locked-open position.
Safety Bulletins
The last thing I want to address is compliance with safety bulletins issued by the kit manufacturer and recommended overhaul periods of other components. Unlike the certified world where ADs (Airworthiness Directives) are issued and the owner/operator must comply with them (sometimes at a great expense), in the Amateur-Built world it is believed by some that they are not mandatory. We can all argue until the cows come home whether we have to comply with them, but I am a firm believer that to not comply could constitute reckless endangerment. Sounds pretty strong, huh, and no I am not a lawyer and don’t pretend to be one. Let’s think about this for a minute…
I, as a builder of one airplane, with no prior experience either in aircraft building or aircraft maintenance, can now decide that I know more than the designer or provider of a particular component. Take a propeller manufacturer for instance. They build and overhaul lots of propellers and decide that due to their experience, they recommend overhauling or resealing at a particular hour or age limit. We get the “right” to say we know better and load four unsuspecting people in our airplane and fly off into the wild blue. I guess I am OK if we decide to take the risk for ourselves, but when we start sharing the risk with others, I don’t think it is right.

Note the gap between the arm and the full-rich stop. This is a common cause of high CHTs on new airplanes.
Once a year someone has to make an entry in the logbook that says it is in a condition for safe operation. I am not certain how one signs his or her name to that statement knowing there is a potential safety risk. As an example, I’m aware of three RV-10s this past year that had prop governor failures requiring forced landings and engine replacements, resulting in SBs from that particular manufacturer. Yep, I think everyone should be required to comply with that SB. I’ve also performed pre-buy inspections on aircraft in the last year that have had the condition inspection signed off without compliance of an SB that was marked “prior to next flight.” Wow! That sure sounds like a serious one to me.
For me, the risk of non-compliance takes away from the fun factor, and we are supposed to be here for the fun of it.

![]()
Vic Syracuse is a Commercial Pilot and CFII with ASMEL/ASES ratings, an A&P, DAR, and EAA Technical Advisor and Flight Counselor. Passionately involved in aviation for over 39 years, he has built 10 award-winning aircraft and has logged over 8000 hours in 70 different kinds of aircraft. Vic had a career in technology as a senior-level executive and volunteers as a Young Eagle pilot and Angel Flight pilot. He also has his own sport aviation business called Base Leg Aviation.


