
A sling hung from an engine hoist and a friend to lend a hand make removing and reinstalling the prop easy work. Cloth straps prevent the prop from being damaged as it is being held. You can do it without the sling and hoist, but the prop gets heavy pretty quickly.
As our Experimental airplanes start to accumulate some age, it is time to think about the service life of various components. A few months ago, we looked at the service life of rubber hoses, but this time we need to take a look at something larger and more expensive—the prop. We all think of service life in terms of hours, but truth be told, almost none of us fly enough to get to the time-between-overhaul hours of an engine or propeller before we hit the recommended service life in years. This is especially true with a Hartzell prop that has a service life in years of only five or six. So, a 2000-hour TBO (time between overhaul) doesn’t mean much to the vast majority of us.
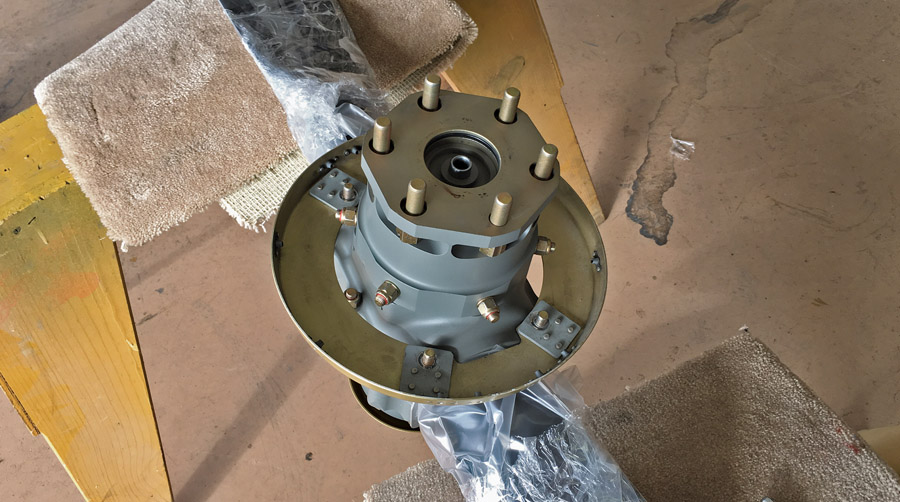
After you remove the prop, set it on some padded sawhorses to make it easy to remove the spinner backing plate. Be sure to protect the blades from damage, and note the position and number of washers and spacers as they come off.
Why Overhaul a Prop?
Damage is the reason most people would think to overhaul a prop. A nick in the edge of a blade that is more than -inch deep or a nick or gouge in the face of a blade that is more than 1/8-inch deep means the prop should go to a propeller repair facility to be repaired or possibly overhauled. Taking a piece off the end would also qualify, as would any bending or cracking of the hub or blades. Corrosion of the blades, especially near the hub, is another good reason to have a prop checked out. An Airworthiness Directive (AD) is also cause to consider an overhaul, even though ADs do not technically apply to Experimentals. After all, you want your plane to be safe to fly.
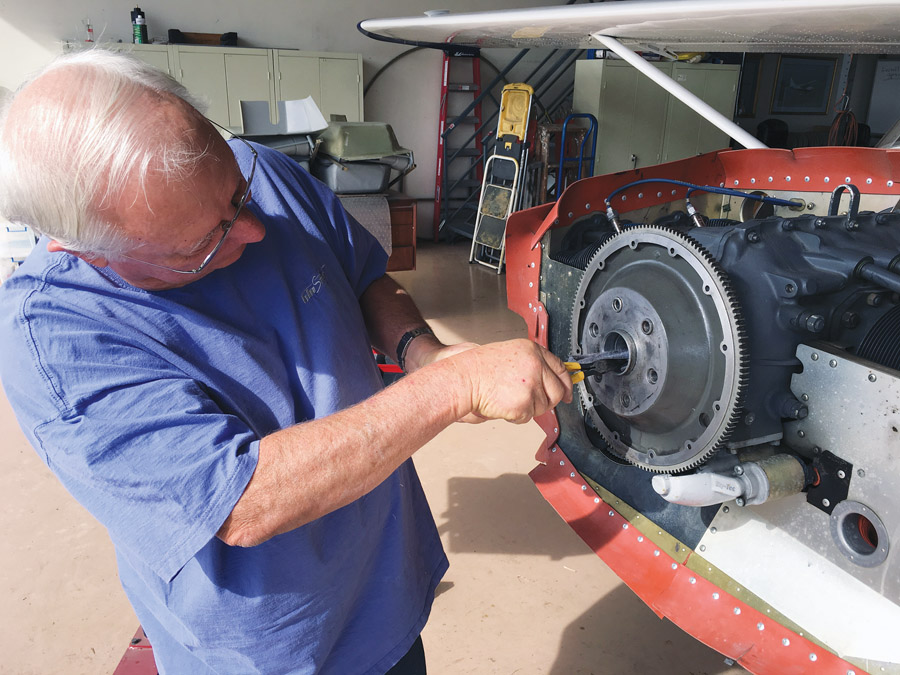
Once the prop is removed, be sure to clean out the hole in the crankshaft to remove accumulated sludge.
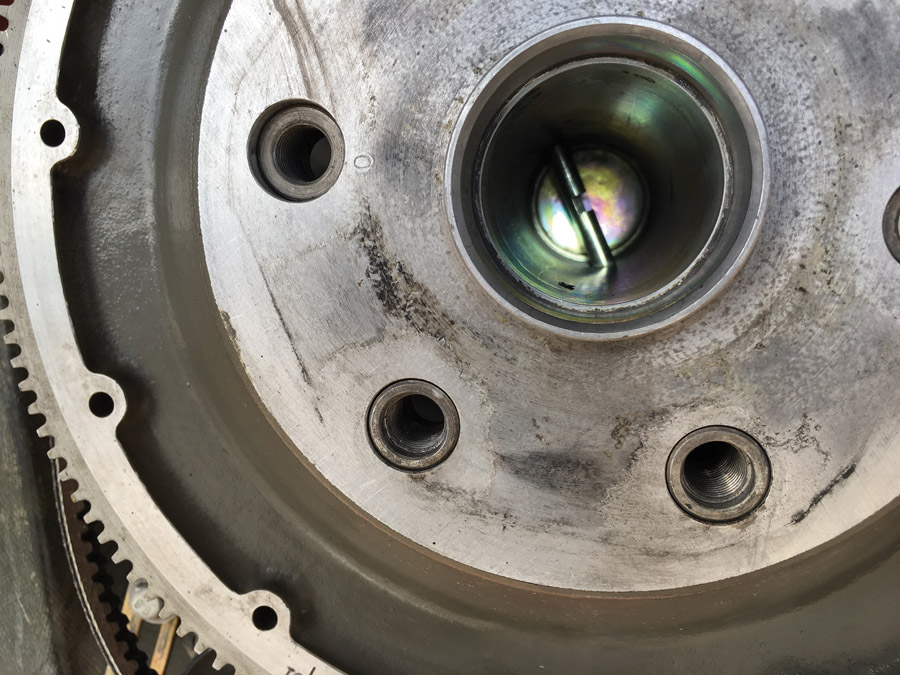
The crankshaft hole should be clean before you reinstall the prop. We started with popsicle sticks and then used a rag helped by needle-nose pliers to do this.
If none of those apply, there are still the service limits recommended by the manufacturer, which are typically 2000 hours or 60-72 months, whichever occurs first. For a complete list of service life recommendations, see Hartzell Service Letter HC-SL-61-61Y.
Hey, my prop looks fine. Why should I have it overhauled just because it has been 10 years since it was placed in service? I am not legally bound by a manufacturer’s TBO recommendation with my Experimental any more than I would be with a Cessna that was not used for commercial service. That’s a fine question, and none other than singer Neil Young has the answer: “Rust never sleeps.” Not all parts that can corrode on a propeller are made of steel, but you get the idea. Even aluminum corrodes over time, and that isn’t related to hours flown.
The bottom line is that this is something you need to consider. I finally did after 12 years, twice the recommended service interval according to Hartzell. As it turned out, I didn’t have much corrosion, but there were some items that needed to be replaced inside the hub. It was time, and I am glad I took care of it.
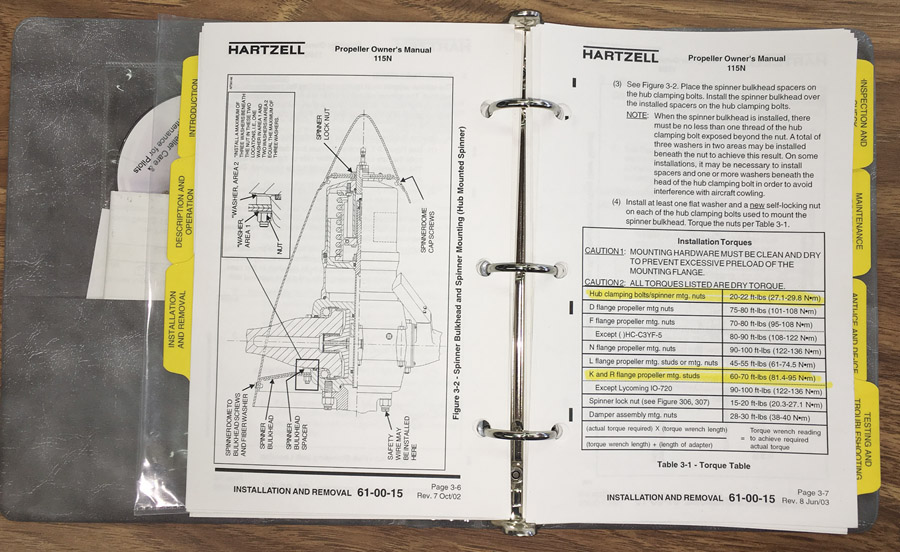
Your owner’s manual is the place to look for the proper torque values for your prop. It also contains valuable service information and a logbook in the back where your prop overhaul should be recorded.
What About the Governor?
The prop governor should be overhauled when the prop is overhauled as a general rule. The exception to that would be if the prop got overhauled early due to damage or an AD. I had mine overhauled at the same time, and again a number of internal parts needed to be replaced. I was reluctant to spend the extra money, but my rpm had been a bit unstable, so I decided to go ahead and take care of it. The bad news is that the cost to overhaul a McCauley governor is about the same as buying a new Jihostroj governor—$1200. I stuck with the McCauley because I didn’t want to deal with possible changes to the mounting bracket and control cable.
The Removal Process
Removing a prop isn’t too much of a problem if you have an engine hoist and a little help. You can do it by yourself, but a second pair of hands is definitely nice to have. Be prepared to deal with the weight and have a spot ready to put the prop once it is off. A Hartzell 2-blade prop will weigh about 55-60 pounds. Even composite-blade props will weigh 40 pounds or more. The best way to handle the weight of the prop is to use an engine hoist, and sling it to the hoist with some nylon straps that won’t damage the prop. Don’t put a lot of tension on the prop with the sling; just have it there to take some of the weight and as a safety precaution.
The spinner will need to come off first. Be sure to set it aside in a safe place. Next cut the safety wire from the prop bolts. You may have to loosen the bolts to get the safety wire out. You will need a 3/4-inch open-end wrench to loosen the bolts on most props. Get one for yourself and another for your helper if you have one. You will be using it more than you think because the bolts tend to bind up as you work them loose. This is because you can only move them about 1/8 inch at a time. You must work your way around the prop, loosening each of the six bolts a little bit at a time. If you have a helper, you can split the loosening up and make the job go quicker.
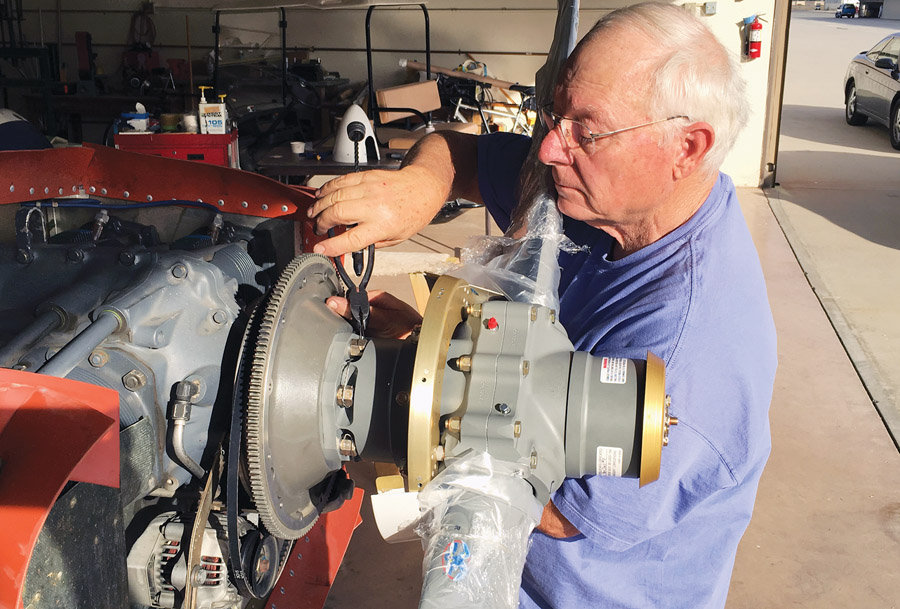
When all the bolts are loose, lift the prop clear of the engine and set it on a pair of sawhorses or some other supports that will hold it in a steady position. Once off the engine, you can then remove the backing plate for the spinner. Click a photo of the backing plate bolts and washers for future reference, so you get the washers and spacers back in the proper place when you reinstall the prop. This is also a good time to carefully inspect the backing plate for any cracks. Repair or replace parts as necessary. While you are at it, be sure to remove the front bulkhead, too. Put your parts in a safe place where you can find them later.
Off to the Shop
When I chose a shop to overhaul my prop, I had three main considerations: I wanted a factory-authorized repair station to do the work. I wanted to know something about them before I trusted them with my prop. I also wanted them to have a pickup and delivery service, so I wouldn’t have to deal with the shipping.
I used American Propeller in Redding, California, when I had an MT prop. I double-checked to be sure they were an authorized Hartzell dealer, and they were. They had performed well for me previously, so I didn’t feel like I needed to check references, but I would have if I had not had the prior experience to rely on. Lastly, I checked to be sure they still had their pickup and delivery service in place. This is so handy. American has a truck that makes the rounds of the West Coast, picking up and dropping off props on a weekly basis. With this service, the typical turnaround is two weeks. With all of my boxes checked, I set up a pickup time with them. Of course, I also checked the price and found it to be in line with other shops. It came to $3667 with tax. That included pickup and delivery to my hangar in Chino, California.
The overhaul process includes tearing down and inspecting all parts for wear, cracks, and corrosion. They will also do any work required by any applicable ADs, even if it is for an Experimental. The blades are recontoured, if they are within acceptable limits, or replaced at extra cost. The prop looks absolutely new when it is finished, right down to the Hartzell decals. The final step is a static balance. Dynamic balancing must be done on the plane if that is something you want to do, but it is not included.
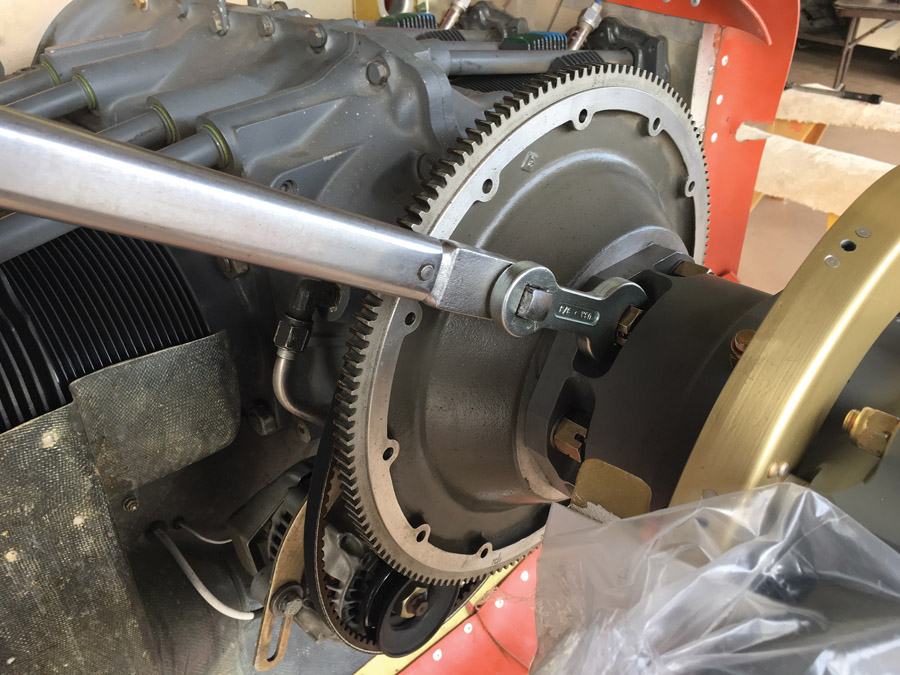
You will need a torque wrench and a Hartzell prop tool or extended crow’s foot to tighten the prop bolts properly. Be sure to make the necessary adjustment to the torque wrench to allow for the added length from the prop tool.
Reinstalling the Prop
Reinstalling the prop is not too hard, but there are a few steps that you should take care of first. Once the prop is off the engine, you need to look into that big hole in the crankshaft that lets oil flow into the prop. If the prop has been on the plane for several years, that hole is probably carrying a lot of sludge in it. Carefully clean this out before putting the prop back on. I used popsicle sticks to scrape out the sludge and wiped the last of it out with a rag held by a pair of needle-nose pliers. The crankshaft is made of fairly hard steel, but I didn’t want to take a chance of scratching it with a steel screwdriver or scraper.
Next you will need to reinstall the backing plate, making sure the spacers and washers go back on the same way they came off. Be sure to torque the bolts that hold the backing plate. The recommended torque values are in your owner’s manual. Remember, if you forget to install the backing plate now, you will have to remove the prop to do it later.
Safety wire the prop bolts after they are torqued to their final value. Hartzell recommends .041-inch safety wire for most propellers. Be sure to re-torque any bolts that had to be loosened to get the safety wire into position.
This is a great time to replace your alternator belt, or at least give it a close inspection. The only way to replace the belt is to remove the prop, so you might as well take care of it now. Be sure to take your old belt with you when you go to buy a new one so you can check the length. The standard Lycoming belt is too long for many aftermarket alternator pulleys. If you discover this after you have installed the prop, it could definitely put you in a bad mood. Guess how I know this? My advice is to go to the auto parts store and have them match your old belt. Aircraft Spruce only has the too-long belt, and it is twice the price.
The prop goes on as it came off except in reverse. Be sure to line up the bushings on the crankshaft with the corresponding detents in the prop hub. It is then just a matter of threading the bolts back on a little bit at a time. A sling and an engine hoist make the work easier and safer, as will a helper. When all the bolts are snug, it is time to torque them to factory specs. The required torque number is in the Hartzell owner’s manual. Expect something in the range of 50 to 70 foot-pounds. Many 3/8-inch torque wrenches will not go that high, so you may have to get a 1/2-inch-drive model.
I use a cross pattern to torque my prop and bring the torque up in two steps, starting with 25-30 foot pounds, then going to full torque. Use a cross pattern to ensure that the hub is tightened evenly as you go. Starting off with the top bolt, next tighten the bolt opposite to it. Then tighten the bolt next to the top bolt and the bolt opposite that one. Finally tighten the remaining bolts. You will need a crow’s foot attachment to tighten the bolts on an extended-hub prop, but the Hartzell prop tool or an extended crow’s foot can be used to torque compact-hub props. Don’t forget to allow for the extra length when you set the number on your torque wrench. Here is the formula:
Tw = Wrench torque setting
Ta = Torque to be applied to nut or bolt
L = Length of torque wrench
E = Length added to wrench by crow’s foot extension
Tw = (Ta x L) / (L + E)
Here’s an example. Suppose we wish to apply 50 foot-pounds of torque to a propeller bolt. What wrench setting should we use if our torque wrench is 18 inches long and our crow’s foot extension adds 1.5 inches to the length of the wrench?
Tw = (50 x 18) / (18 + 1.5)
Tw = 46 ft. lbs.
In other words, set your torque wrench to 46 foot-pounds to apply 50 foot-pounds of torque to the prop bolt. Be sure to use the same units for the length of the wrench and the length of the extension.
When everything is torqued properly, it is time to install the safety wire. For most props Hartzell recommends .041-inch safety wire. This stuff is harder to work with than the more common .032-inch wire, but it is best to follow Hartzell’s advice. You may have to loosen one or more of the bolts to get the safety wire pulled through. Just be sure to re-torque any loosened bolts.
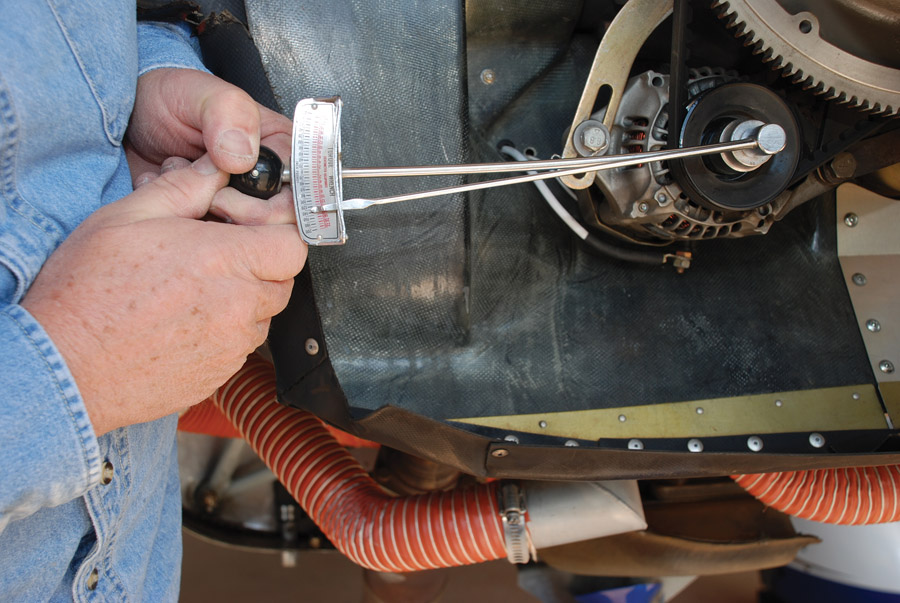
Set the alternator belt tension by measuring how much torque it takes on the pulley nut to get the belt to slip. It should take about 10 foot-pounds of torque to see some slippage. A beam-type torque wrench works best for this job.
Tightening the Alternator Belt
Use a torque wrench on the pulley nut to check the tension on the belt so that you get the specified torque just as the belt starts to slip. Turn the pulley nut in the tightening direction so you don’t risk loosening it (Reference: Lycoming Service Instruction 1129A). I find that a beam-type torque wrench is easier to use for this process. Here are the proper torque numbers:
New 3/8-inch belt: 11-13 foot-pounds
Used 3/8-inch belt: 7-9 foot-pounds
New 1/2-inch belt: 13-15 foot-pounds
Used 1/2-inch belt: 9-11 foot-pounds
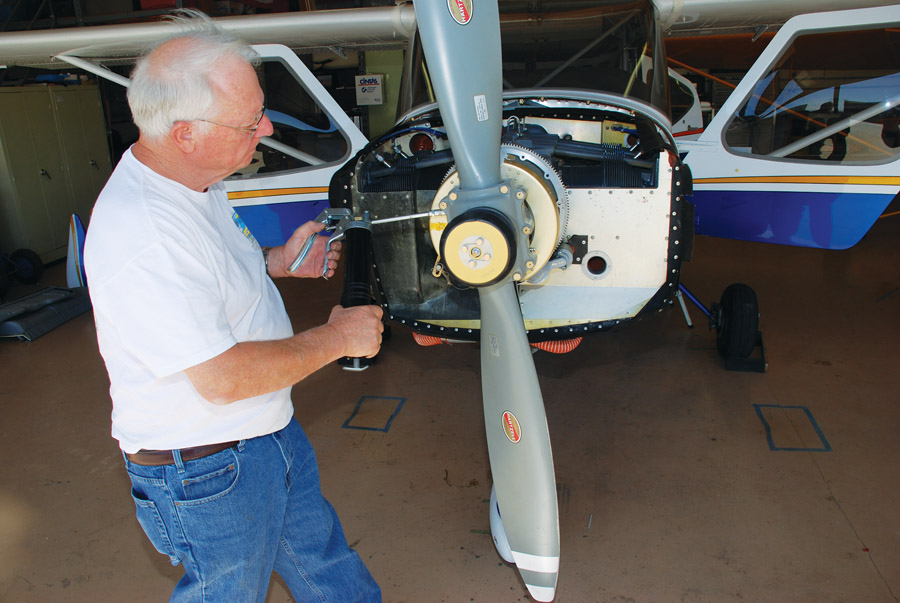
When everything is properly tightened, it is time to reinstall the spinner and go fly somewhere. Check to be sure you get the proper rpm on takeoff and that the rpm is stable.
Put five or six squirts of approved grease into each leading-edge fitting of your prop hub at each yearly condition inspection. This advice supersedes the recommendations in older Hartzell manuals.
Future Maintenance
Unless you get a nick in your prop or have some other mishap, propellers do not require much maintenance. At the time of your yearly condition inspection, you should lube the prop with approved grease. Your new prop was probably assembled with AeroShell 6 grease, so it is best to use that. Hartzell warns against mixing different greases in the prop hub. To be sure, check with the prop shop that did your overhaul to verify the type of grease they used.
To grease the prop, pump five or six squirts of grease into the grease fittings on the leading-edge sides of the hub. The previous recommendation from Hartzell was to remove the trailing edge grease fittings and pump grease into the leading-edge fittings until you saw grease start to come out the other side. They changed this after a King Air prop was ruined when a mechanic pumped two tubes of grease into the prop, waiting for grease to come out the other side.
Other than yearly lubrication, be sure to keep an eye out for nicks that can turn into cracks down the road, and dress them out as per Hartzell recommendations. Lastly, be sure to preserve the protective paint on your prop by touching it up at least annually. This is to prevent corrosion. This would preclude polishing your prop, even though it looks really nice. It is illegal to polish most props on certificated airplanes. It is only a bad idea on an Experimental.

![]()
Dave Prizio has been plying the skies of the L.A. basin and beyond since 1973. Born into a family of builders, it was only natural that he would make his living as a contractor and spend his leisure time building airplanes. He has so far completed three—a GlaStar, a Glasair Sportsman, and a Texas Sport Cub—and is helping a friend build an RV-8. When he isn’t building something, he shares his love of aviation with others by flying Young Eagles or volunteering as an EAA Technical Counselor. He is also an A&P mechanic, Designated Airworthiness Representative (DAR), and a member of the EAA Homebuilt Aircraft Council.


