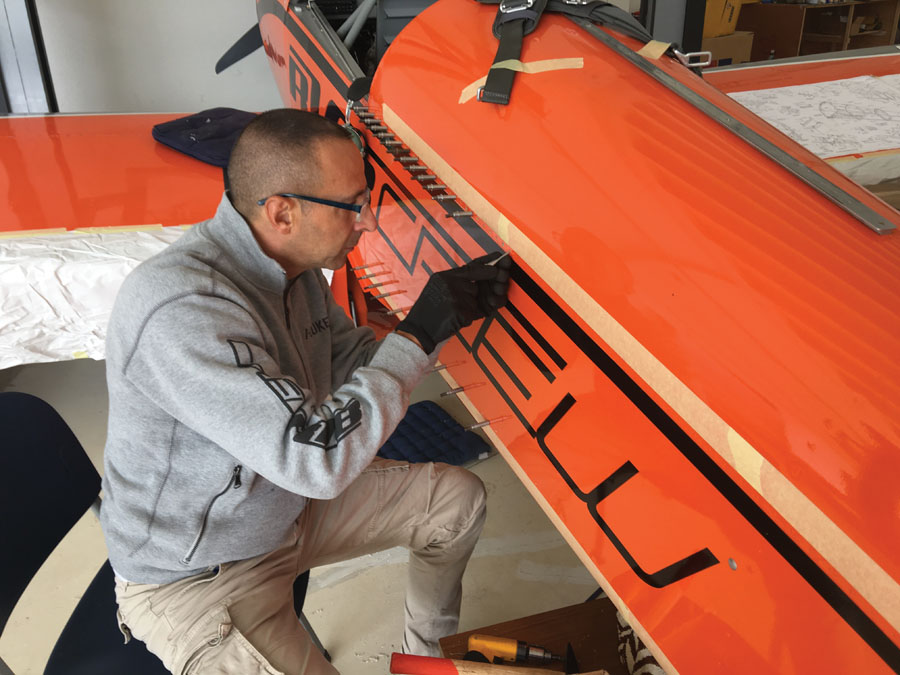
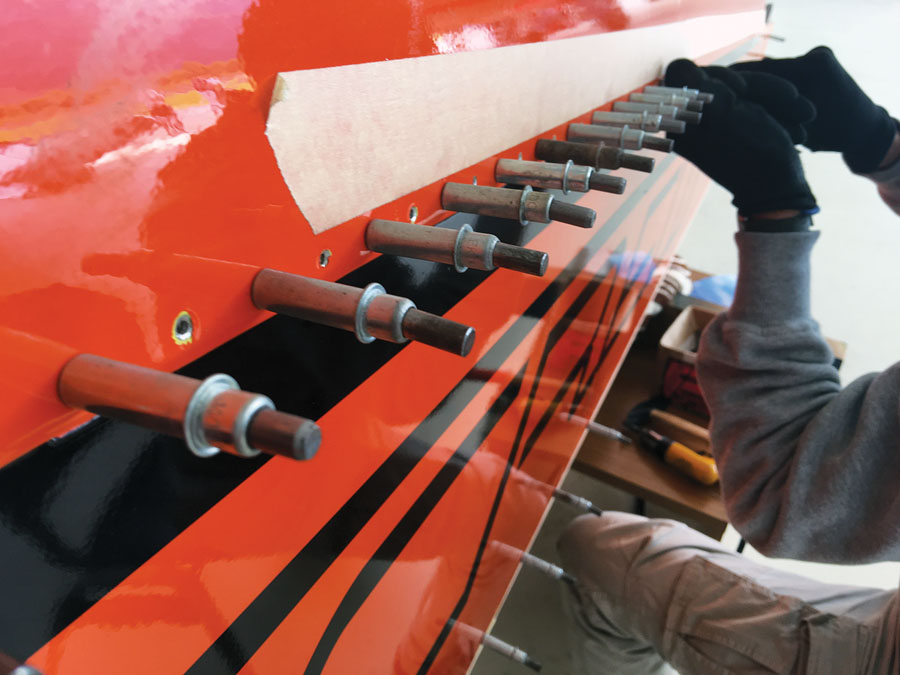
The author removing rivets from the damaged side skin. It’s a tedious process that requires precise technique and patience.
It was a calm Sunday morning in July at our airport. Friends and fellow aircraft enthusiasts milled around their airplanes, celebrating the joy of flying. An RV-8 taxied out and took flight. The pilot and co-owner (but not the builder) had a friend with him and was making his first flight with a passenger and only his second flight as PIC following his transition training.
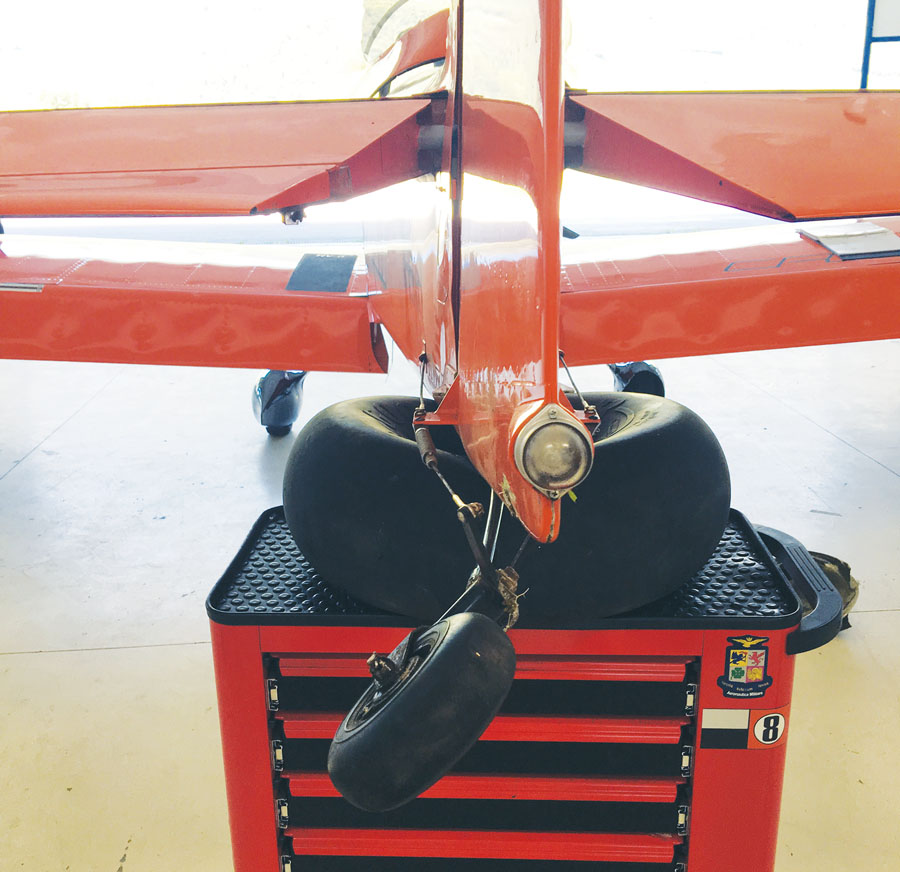
The tailwheel fork was rotated 45 degrees and had sheared off the AN3 bolts.
The airplane had 65 hours since its first flight, and I knew this baby very well. My friend, Francesco “Franz” Dante, bought and built the kit after seeing mine. Thanks to my “repeat offender syndrome,” I spent a couple of days helping him complete his beloved Van’s RV-8.
Franz had just supervised the preflight inspection before the plane took to the air. After 30+ minutes of uneventful flight with the usual RV grins, it was time to land. The mains touched first, then the tailwheel. A typical small bounce was followed by a slowing landing roll, with a little change of direction to the right, a correction to the left, then suddenly an abrupt left. Murphy’s Law kicked in, and the tailwheel went off the concrete, driving into the dirt and freezing the rotation of the aircraft. The pilot’s and the passenger’s RV grins went away. We rushed from the hangar to help these guys clear the runway, pick up some fiberglass pieces, and move the airplane to its hangar.
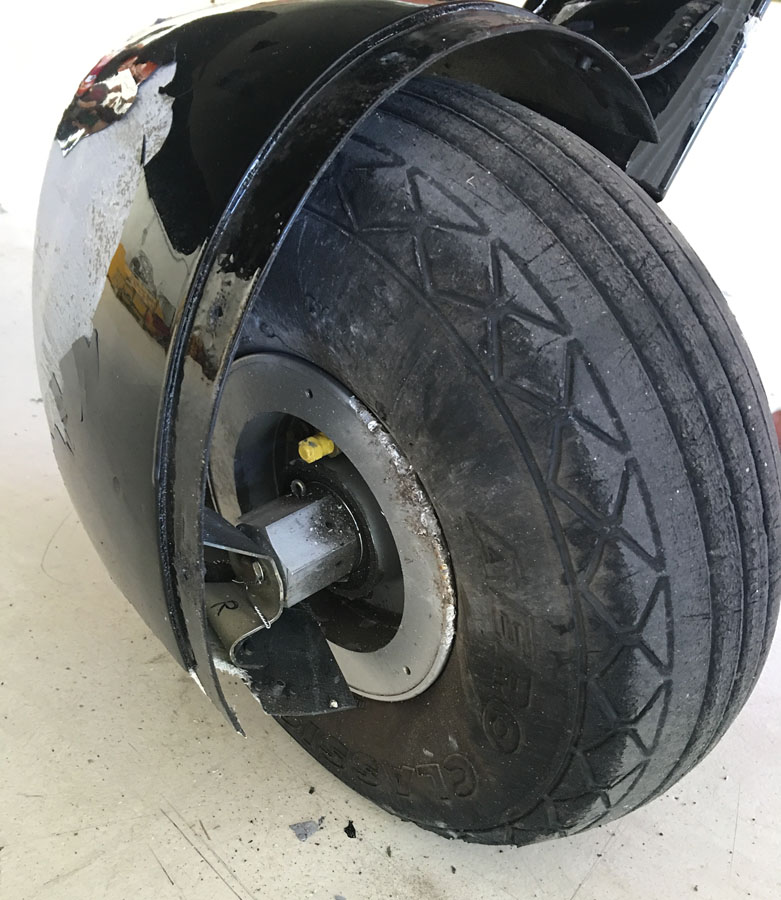
The aft cone of the right wheel pant was missing, the tire was worn-out, and the outer edge of the wheel was partially ground away. The fairing bracket was bent, too.
The Damage
Back at the hangar, the owners (Franz and the pilot) and I started to do damage assessment. We removed the tailwheel, which was deeply embedded in the dirt, and found that the tailwheel fork was rotated off the axis of the plane by 45 degrees; it had sheared off the fork’s AN3 bolt!
During the ground loop, the engine was running at idle, but the propeller didn’t hit the ground, nor did it stop during the aircraft excursion. The wings didn’t hit the ground either, so the wing tips and the ailerons were unharmed. The right main tire, the outside one during rotation, was worn-out, and the outer edge of the wheel was partially ground away, yet the tire had its original 40 psi of pressure. During the rotation, the tire bent so severely that it destroyed the fiberglass wheel pant and left the edge of the wheel and brake assembly exposed to the concrete. Then the tire went back to its original position—incredibly without losing any inside air pressure.
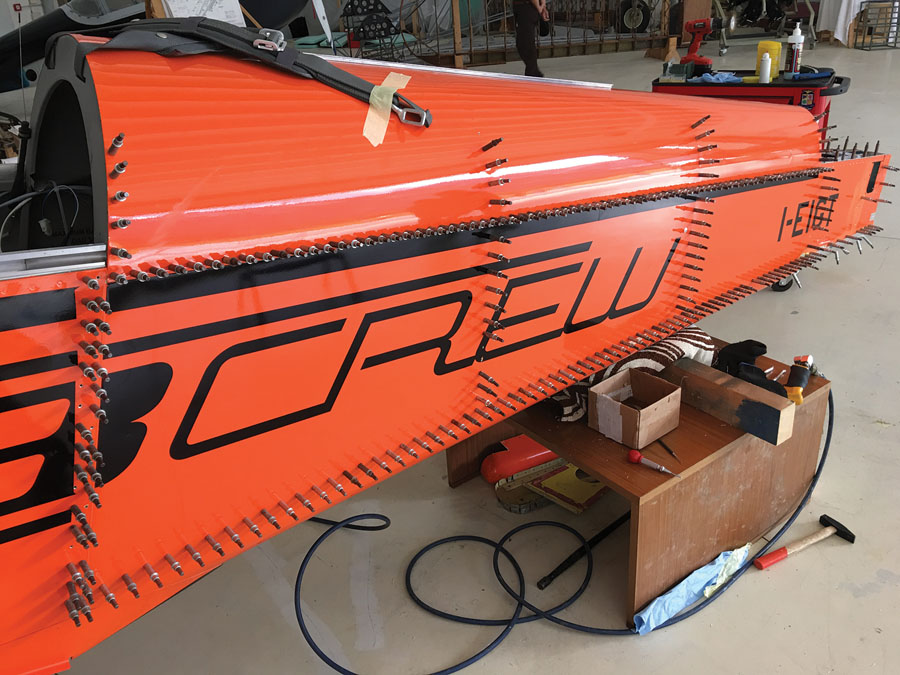
With the broken parts removed, the tension on the skins was released.
The main problems were, obviously, in the fuselage tail cone. The instant stop of the tailwheel digging into the dirt bent all the rear parts of the fuselage, stretching the right fuselage skin and compressing the left one. The forces from the tail spring into its internal fuselage welded support were transferred to the bulkheads and onto the external skins. The lower rudder fairing had been broken by the tailwheel fork.
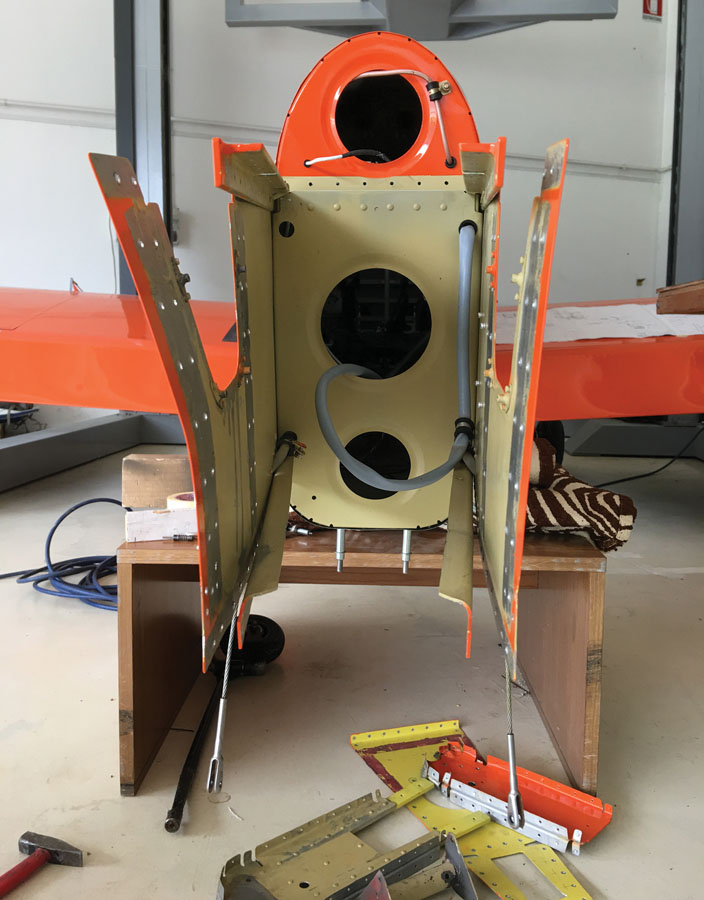
Aft left skin distortion was easy to see with parts from the tail cone removed.
I immediately suggested releasing stress on the stretched sheet metal by removing the rivets, which we did. We took off the elevators, the pitch trim, and taillight wiring connectors, the rudder links, the rudder, and the vertical and horizontal stabilizers. In a couple of hours, the fuselage tail cone rivets were removed. I was worried about the condition of the underlying J-stiffeners and fuselage longerons, but after removing the parts they returned to straight and appeared in good shape.
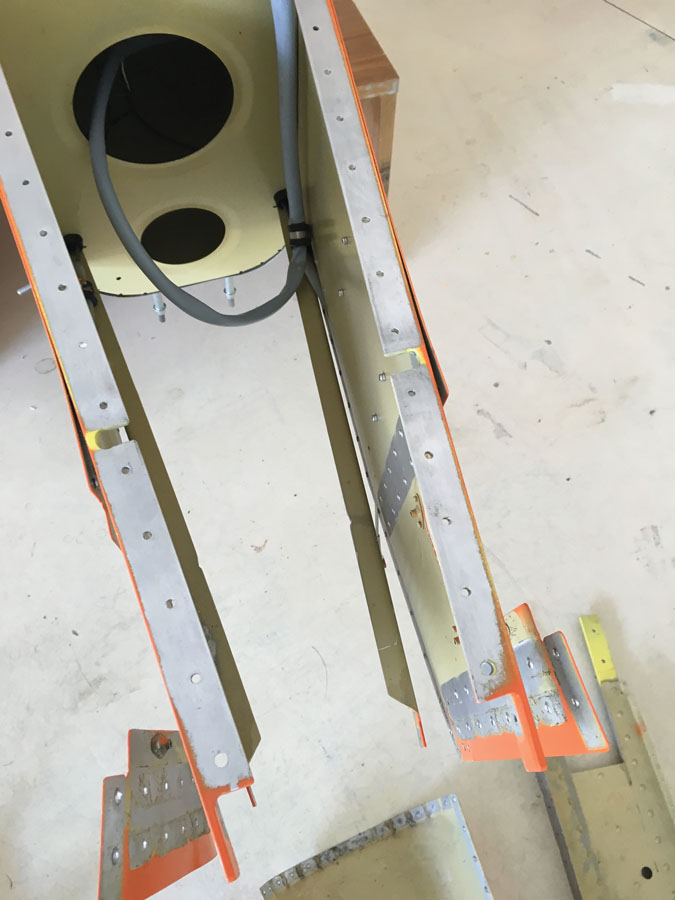
Fortunately, the J-stiffeners and fuselage longerons were straight.
Support from Van’s
It was time to get serious about making the repairs. The pilot (and passenger) were really upset—and Franz was, too. All three are Italian Air Force pilots, and the owners of the RV-8 are military instructors. They were behaving professionally but were clearly disappointed and concerned. As they serve in the Air Force far away from the RV-8’s base, they asked if I could help resolve the problems, and I accepted. The first order of business was to contact Van’s support to learn the best way to repair the aircraft.
In this type of situation, human nature prefers to minimize the problem—and the work—so the owners’ first thoughts were to exchange the broken parts and splice on a replacement portion for the bent left fuselage skin. I was not of the same opinion. An email exchange with some photos sent to Rian Johnson, Van’s chief engineer, confirmed my reservations. After the initial shock, the owners decided to move forward as Rian advised:
“If at all possible, avoid splicing the skin. The aft region of the tail cone experiences high ground loads from the tailwheel and high flight loads. Are the skins stretched and permanently deformed? Was this a newer RV-8 with the fully prepunched fuselage? If so I would simply remove the entire skin and replace it. It sounds like you are very skilled at RV construction and would do a quality job removing the rivets. Once you get going, it is an easy process, and when all is placed back together, you have a stock aircraft again built per the plans. This is truly one of the great advantages of matched-hole construction. Parts are relatively cheap.”
This RV-8 has a pre-punched fuselage, so we proceeded as advised.
During the skin removal process, Clecoes kept the skin and structure in position.
Repair Work
Our airplanes are protected with “kasko” (comprehensive) policies, so the first action was doing the insurance claim. We had the opportunity to meet a very professional German insurance adjuster, who built a Lancair years ago, so he knew exactly how many hours we needed. I composed the Van’s parts list, and the owners ordered the materials, which arrived in a couple of weeks. (Between our passion and Van’s, there is always The Pond!) We started to prepare all the new parts that would replace the broken ones. It’s completely different dealing with a repair instead of building a kit the first time.

The rivets for the side skin stiffeners were hidden by paint, so it was scuffed away with a die grinder pad. The row of rivets at the top of the side skin had to be replicated in the new skin.
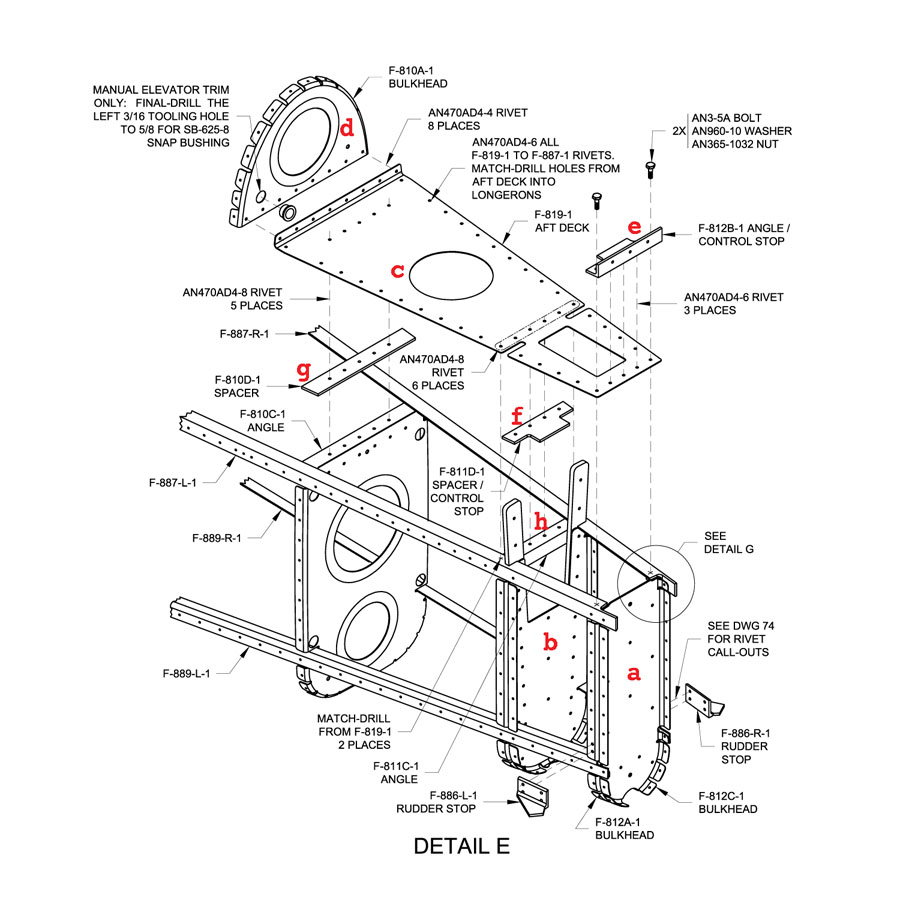
Despite the easy path offered by the prepunched parts, I still had to put things together as they were before. After match-drilling the bulkheads (“a”/”b”/”d”), the aft deck (“c”), control stops, spacers, and angle (“e”/”f”/”g”/”h”), shown on RV-8 Construction Drawing 71, it was time to spend a full day removing the side skin 3/32-inch rivets.
RV-8 Construction Drawing 71.
I used a center punch to mark the middle of the rivet head, inserted a new #40 drill bit, and drilled into the dimple very carefully to a depth of about the height of the manufactured rivet head. Then I stuck a 3/32-inch pin punch into the hole and used that to snap off the manufactured head. I used the same pin punch to punch out the rivet body through the rivet hole; if you are precise you won’t enlarge the hole at all. KITPLANES explained this process in the shop tip, “Drilling Out Rivets,” May 2017. The rivets of the side skin stiffeners were hidden by paint, so I scuffed it away with a die grinder pad.
Even with all of the side skin rivets drilled out, it was still necessary to remove some of the top skin rivets to check the condition of the left main fuselage longeron.
During the removal process, I worried about what would happen to the fuselage after taking off the side skin, so I replaced the rivets with a Cleco in every second hole. This postponed what could be a potential problem. To remove the RV’s side fuselage skin (and check the fuselage longeron), I had to drill out some of the top fuselage rivets, too. Clecoes helped, as usual.
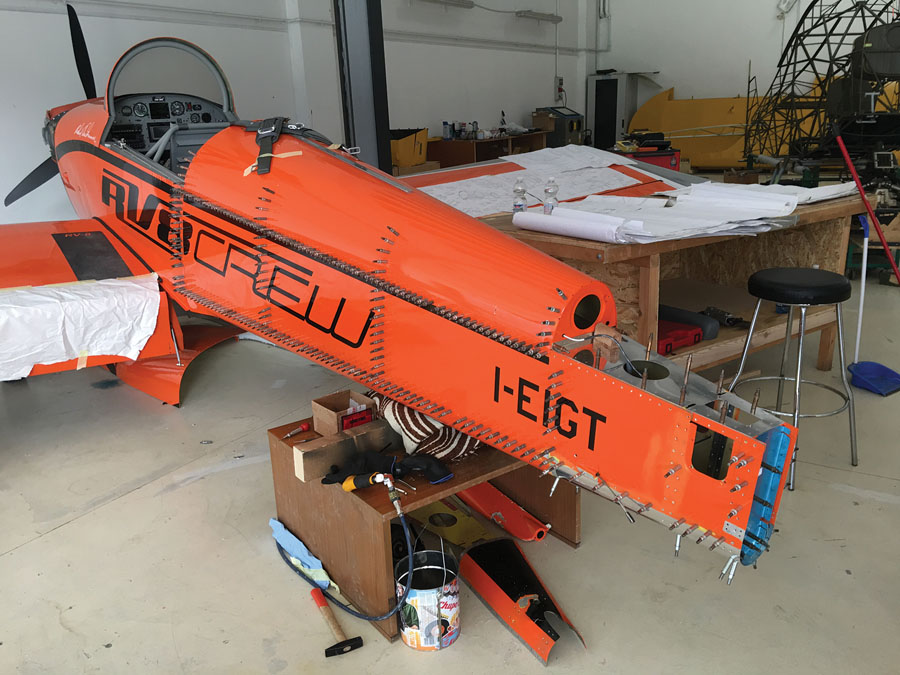
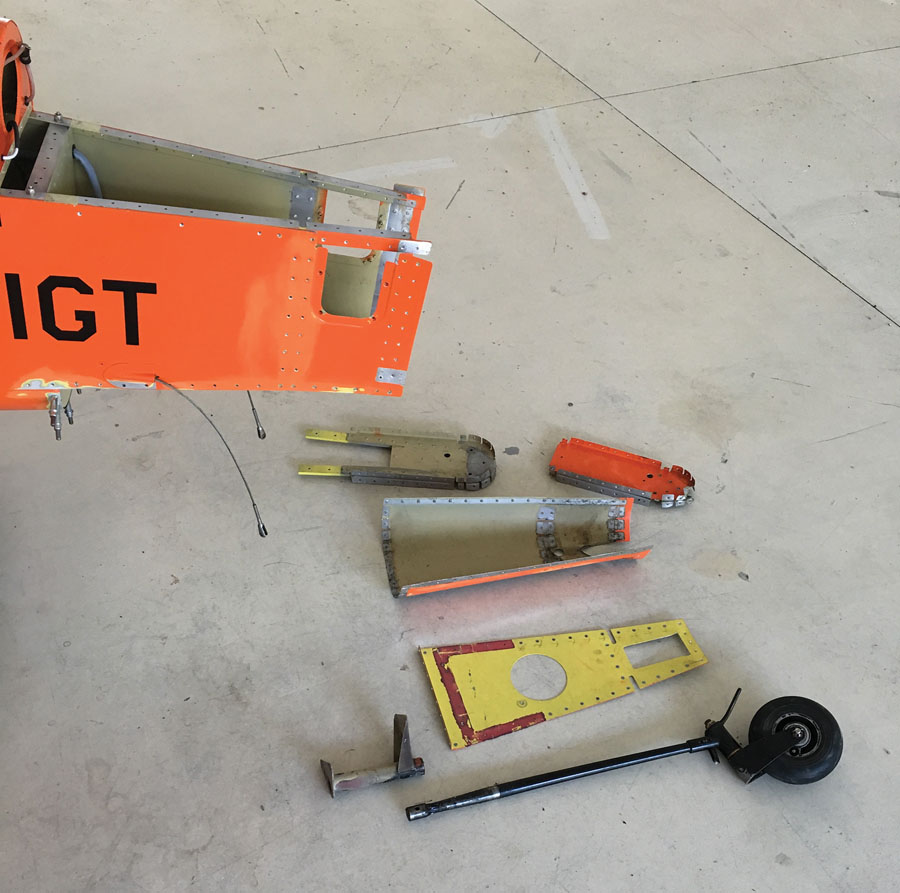
New parts for the aft tail cone have been fitted and are ready for match-drilling and priming.
Before starting work on the big new skin, I focused my attention on the tailwheel system. The Van’s tail spring mount “i” (squeezed between “a” and “b”) and full-swivel tailwheel spring (“m” and “n”) received a brand-new Screaming Eagle retrofit tailwheel fork, a lightweight tailwheel tire, and the double-sided control arm with tiedown ring from Flyboy Accessories. (Having some budget control without spending my own money is really nice!) Now we had solid aftermarket “p”/”q”/”r” parts to replace the standard parts shown on Construction Drawing 73.
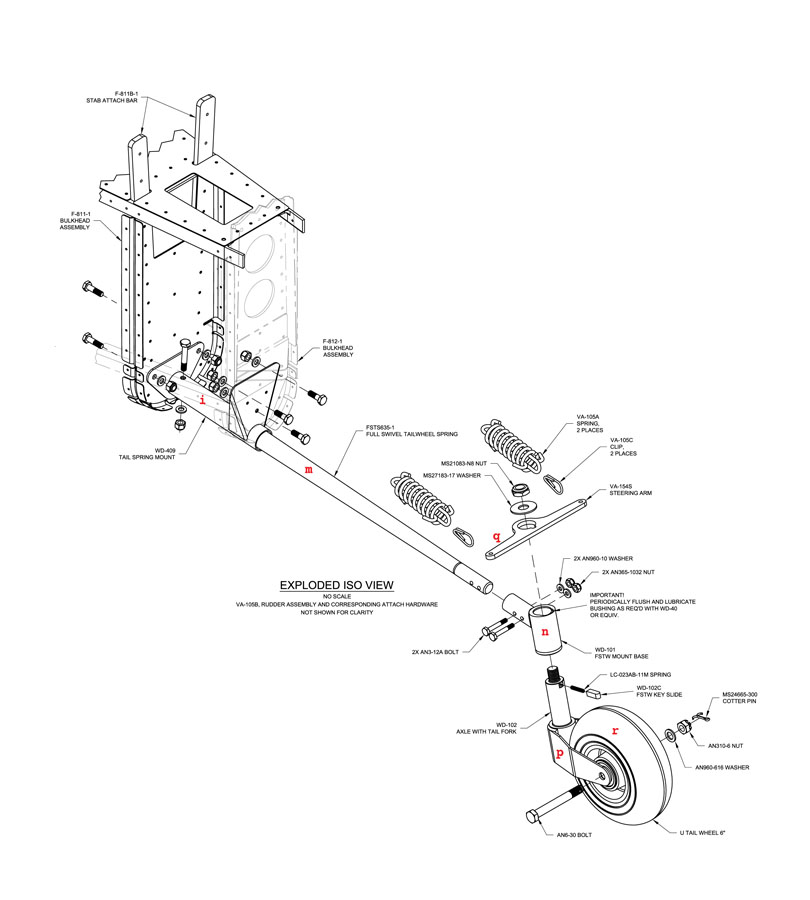
RV-8 Construction Drawing 73.
The difficult part about matching the steel tailwheel spring with the full-swivel mechanism was mounting it perfectly perpendicular to the airplane; working on steel is “other stuff drama.” I built a drill jig to complete the task, taking the idea from another KITPLANES article, “Finding Hidden Holes,” August 2015.
New Skin
At this point, it was time to install the new fuselage skin. Everything was ready, so I just took the Clecoes out and removed the old skin. I was scared but nothing happened—the fuselage longerons maintained the structure in position. I had supported the aft fuselage using blocks under every bulkhead with proper weight distribution.
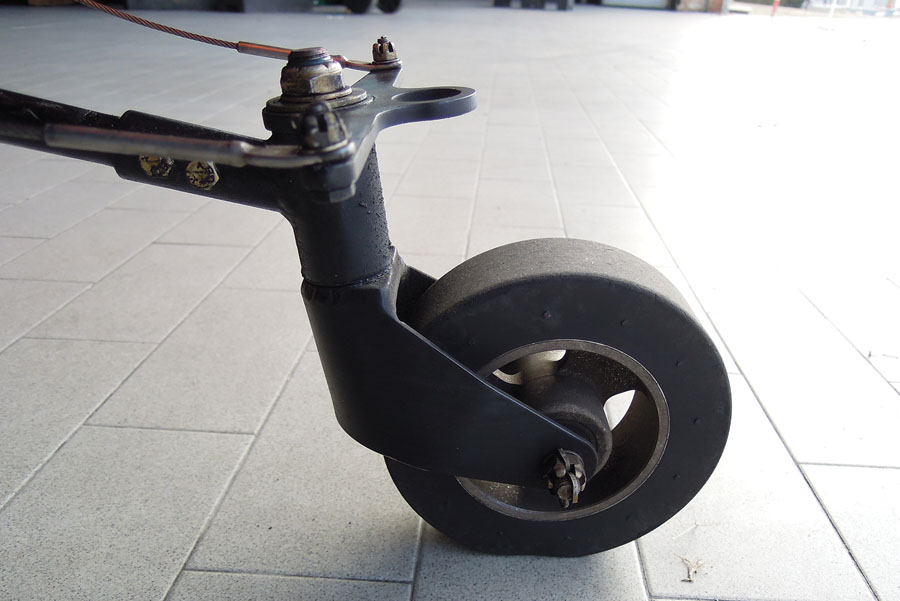
Lightweight tailwheel tire and double-sided control arm with tiedown ring from Flyboy Accessories.
The new skin “s” was prepunched, but a row of holes needed to be matched with the old ones. I removed the dimples from this row in the old skin with a rivet squeezer and two flat dies, then Clecoed the old and new skins together and match-drilled the holes. (Yes, I ordered two new skins, just in case; remember “The Pond” factor?) I matched the hole for the outside air temperature probe (placed under the horizontal stabilizer) and the static-port hole, then I recovered the left rudder cable fairing. The rear lower cone of the fuselage “t” needed only dimpling, and it was ready to be installed. I cleaned, match-drilled, dimpled, and primed the parts, as usual, with AkzoNobel Epoxy Primer 37035A. I was ready to rivet it all together (again) per Construction Drawing 74.
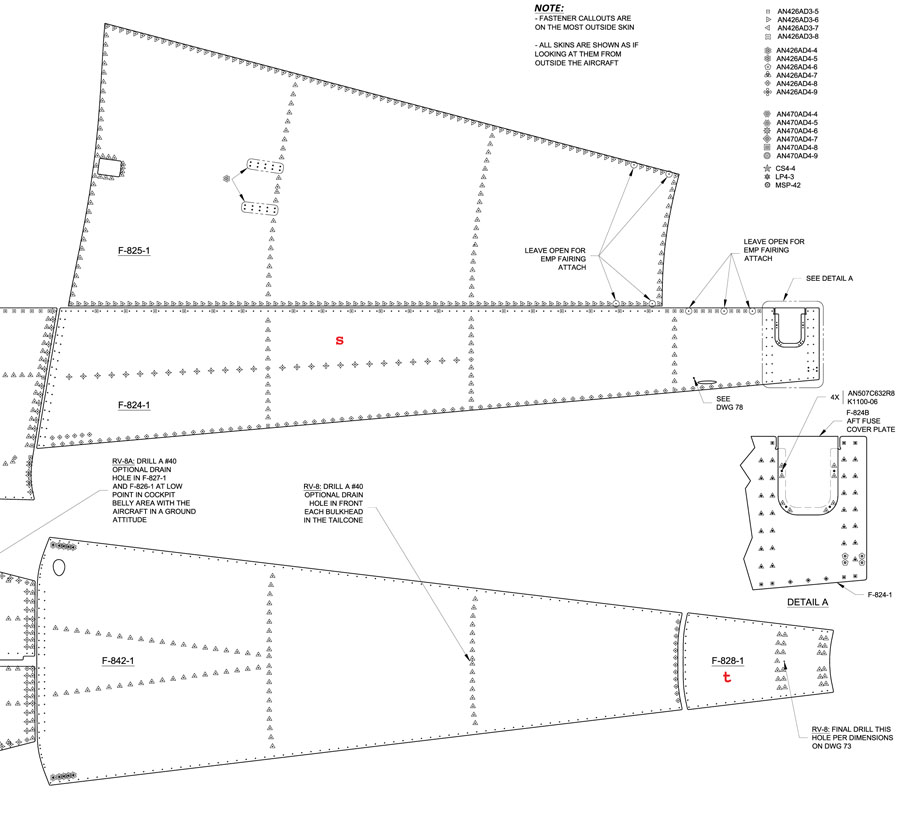
RV-8 Construction Drawing 74.
Starting with the rear part of the structure, the process was standard except for some rivet modifications, including length changes (compared to the drawings) and a couple that I installed as “oops” rivets. (An “oops” rivet is a solid rivet with a 3/32-inch head and 1/8-inch shank. I used them to replace drilled-out rivets where the holes were oversized.) Franz and I did the skin riveting work together. We’re builders and friends, and we knew what we needed to do—and we did it. Riveting with a friend is like flying in formation together, but that’s another story. The fun observation came after finishing the job when we triangulated the fuselage to compare it to the original building measurements, and we found that the plane was just a little bit straighter (in eighths of an inch).
The right wheel and brake had substantial damage, thus I replaced both with new parts, and I decided to change the axle, too.

Wheel pant repairs had to wait for warm spring temperatures before they could be completed.
At last, it was time to prime and paint the external parts. We asked for professional help from a friend to match the color coat because of the difficult shadings, and this was—for him—a piece of cake. We used a two-component polyurethane coating for the plane. It required no transparent coat, was easy to apply, and durable (albeit maybe not so light). The vinyl of our formation team logo and the Italian mark were then easily applied. Once more, it was looking like new.
The wheel pant repairs (as many of you know) are another world; I started to fix them, but the dropping temperatures of fall dictated that we wait for spring (and 68 F) to return. Despite that glitch, the airplane was in flying condition.
Paperwork and Flight Testing
Paper procedures are a little different in Italy. The airplane repair was followed by a DAR visit, who checked the plane and signed off the work as completed. The owners asked the National Aviation Authority (NAA) to issue a new permit to fly for the aircraft in order to complete the flight tests, which would be restricted in scope to verifying the original aircraft characteristics. Reporting the incident had caused the previous permit to fly to become invalid, in compliance with Italian rules.
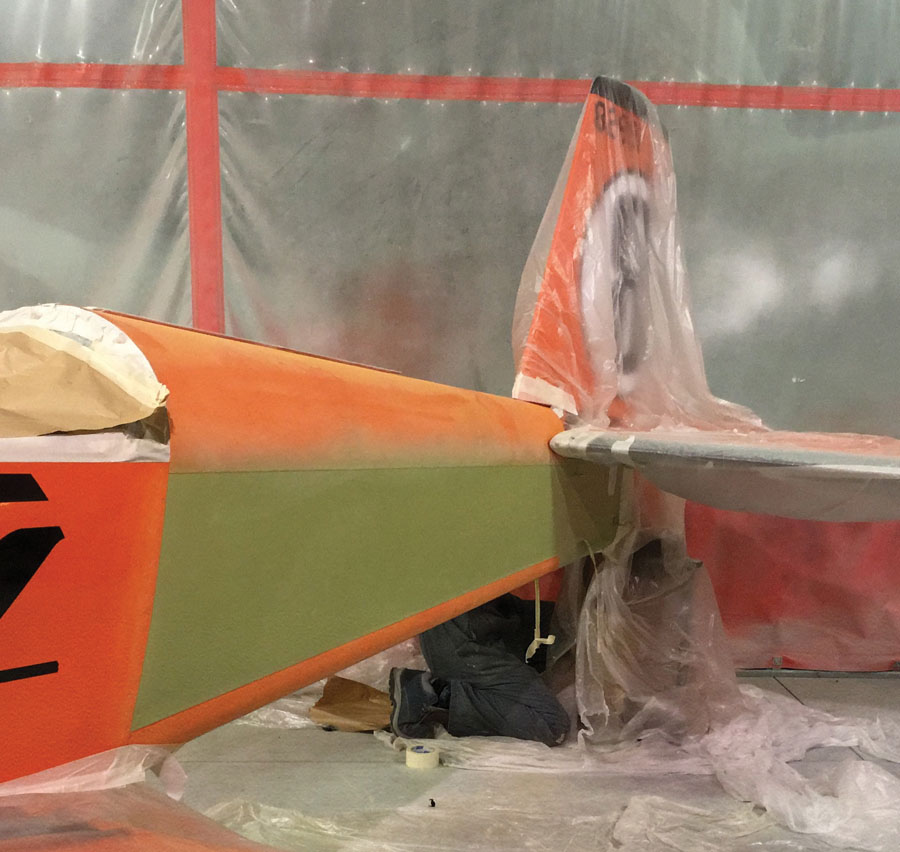
The top skin was shade painted to match the existing paint scheme.
Franz did the test and noted no change in flight controls. He reported a little better ground control after the new tailwheel fork installation, as we expected. After that, and quite a lot of papers, the owners asked for a final permit to fly from the NAA.
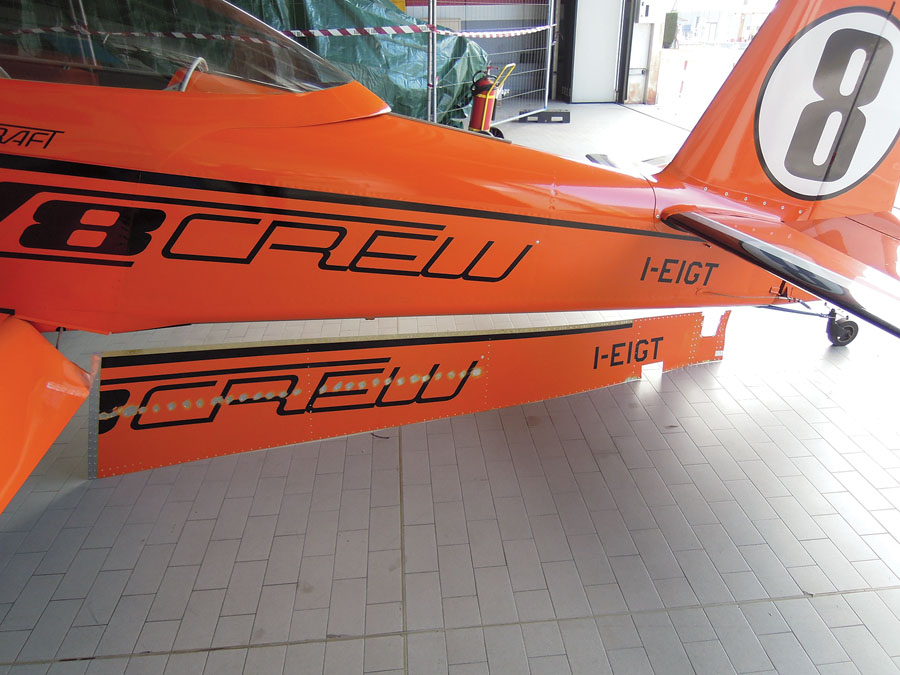
he new skin painted and installed. Note the old skin below the fuselage
Conclusion
We spent about nine months restoring the RV-8 back to flying condition and more than 300 man-hours. A tailwheel airplane is not difficult to land and control, but you need to pay more attention and increase your situational awareness when you’re rolling on the ground. Proper training is crucial. Without it, all pilots—bubbas, airline, military, and commercial—magnify the risk of a ground loop or off-runway excursion. A relaxed mind during landing roll is never permitted, and you are only safe when you remain engaged and focused.
Last but not least…a tailwheel airplane looks hot!

Close-up of the aft fuselage. The outside air temperature probe is located below the horizontal stabilizer.


