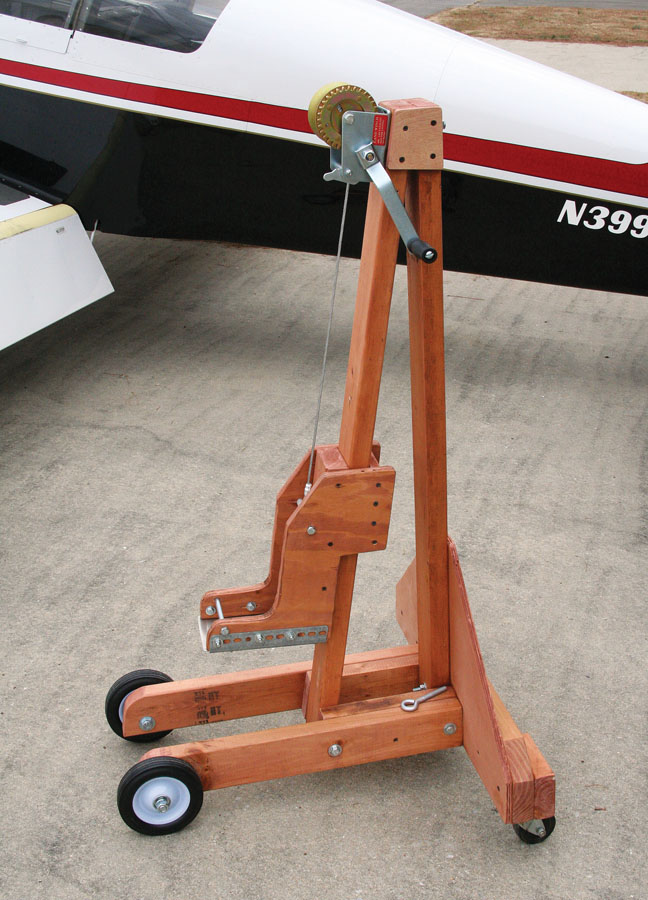
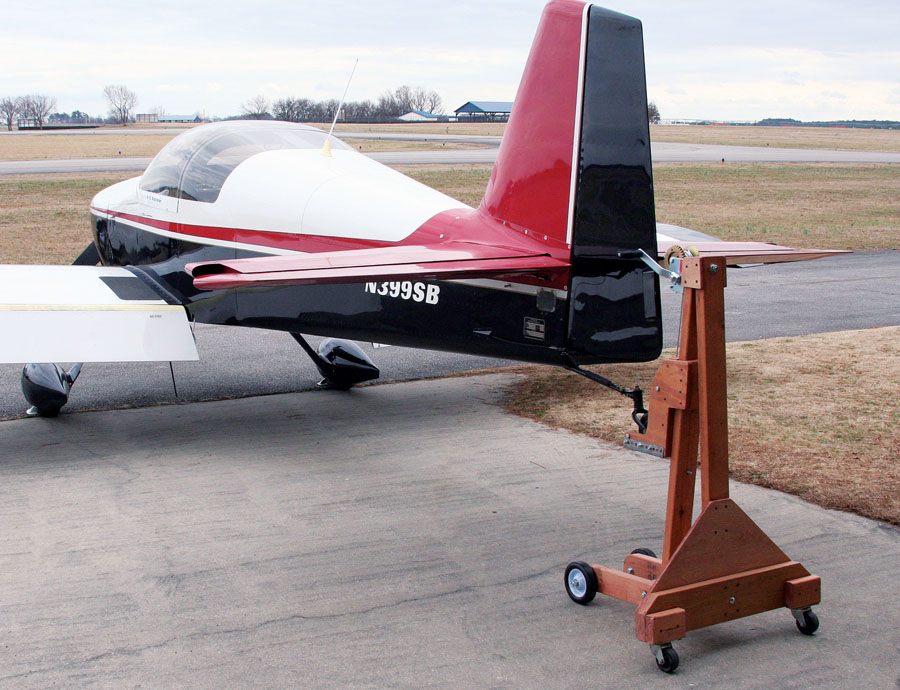
The primary components of the tailwheel lift are a simple boat trailer winch and a dolly that slides on an inclined ramp.
Those of us flying aircraft equipped with a tailwheel occasionally find reason to hoist the tail of our steeds for routine maintenance. Oil drains from the engine more effectively when the engine is level, and access forward of the firewall is enhanced by raising the tail of the plane. A level aircraft also reduces the likelihood of enjoying a dousing of solvent spray while cleaning the belly of the plane.
An item on the condition inspection checklist for my RV-6 is lubrication of the tailwheel yoke and bearings. The RV-6 carries considerable weight on the tailwheel, but I’ve always just grabbed the tailwheel spring with two hands and squat-lifted it up on a prop. But with advancing wisdom (some refer to it as age), I am less inclined to put my back at risk by lifting the tailwheel while in an awkward position.
A 3/16-inch spacer between one plywood side of the dolly and the 2×4 allows the dolly to slide smoothly up the ramp.
Various schemes have been used to get the tailwheel in the air, but one of the more clever ideas was a jack incorporating an inclined ramp that was marketed several years ago. I wanted to fabricate a steel knockoff of that no-longer-available device but decided to mock up a version of it with wood prior to going to the expense of purchasing and welding steel. However, the wood device works so well I have shelved plans for the steel version. Details of the wood tailwheel lift are shared in this article, so pilots who want an inexpensive yet highly functional means of raising the tail of their aircraft can fabricate a tailwheel lift that will add a measure of convenience and safety to their tool set.
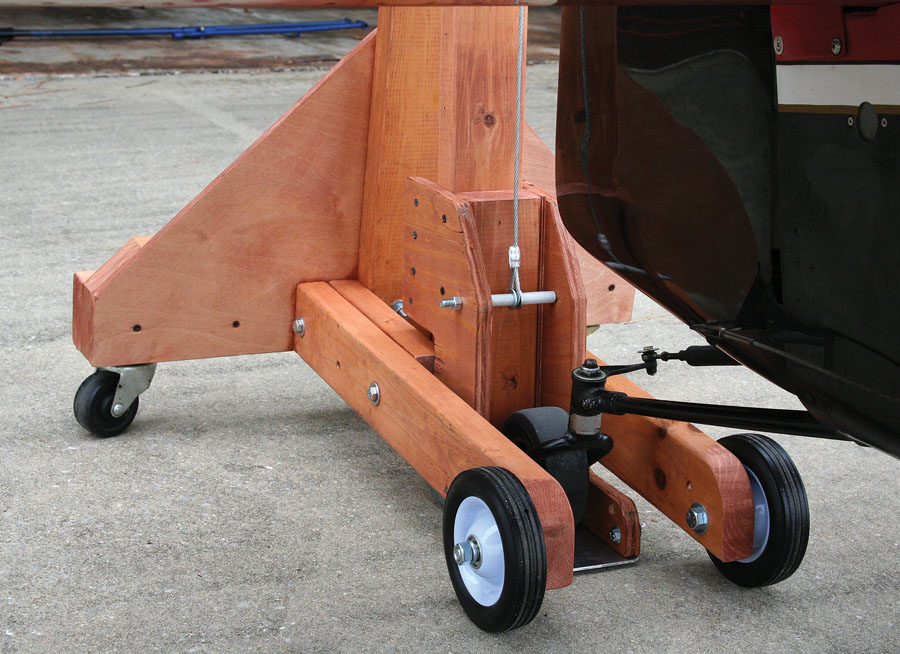
The tailwheel rolled into position and ready for hoisting.
Dimensions are not provided because the final size of the tailwheel lift will be dictated by the weight of a particular aircraft and size of the tailwheel. The weight on the tailwheel of my RV-6 is less than 100 pounds, so a lift constructed primarily of 2×4 common lumber stock is more than sufficient to guarantee a safe hoist. Aircraft with more load on the tailwheel and larger pneumatic tires may dictate a more robust structure constructed from 2×6 stock. In either case the photos show the basic design and features of the lift, which can be modified to fit many different aircraft.

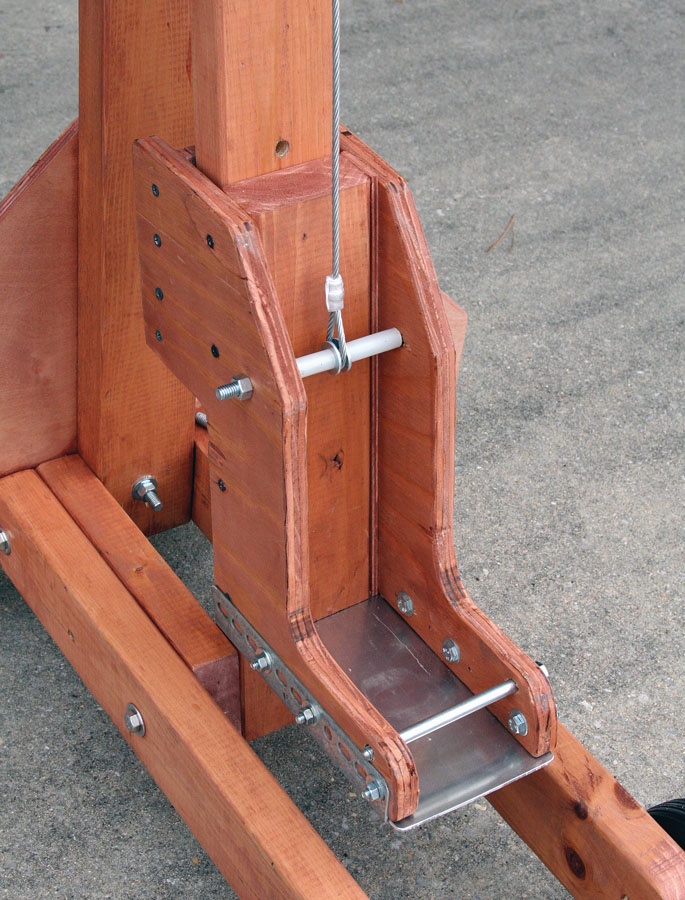
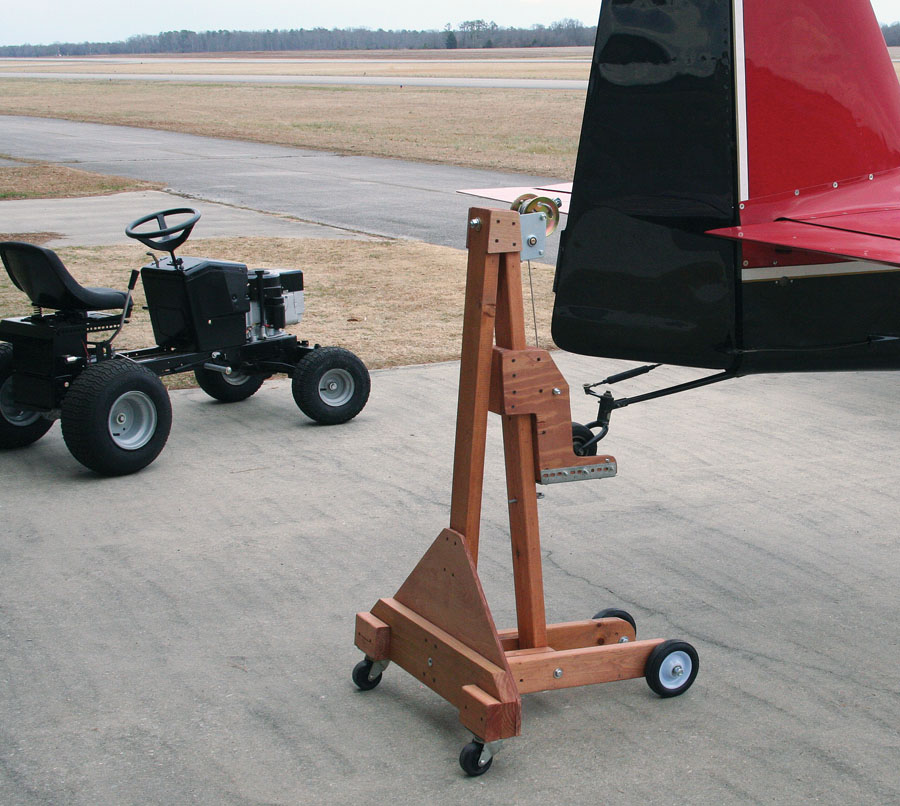
Notice the eyebolt that slips into a hole below the aluminum floor. It serves as a safety in case the winch cog slips.
The primary components of the tailwheel lift are a simple boat trailer winch and a dolly that slides on an inclined ramp. I purchased the most inexpensive trailer winch I could find on eBay, and the wood stock came from scraps stacked in the corner of my shop. A pair of casters and 6-inch lawn mower wheels, along with a handful of drywall screws and hardware, comprise the materials list for the lift. The overall height of my version of this device is 40 inches, and it is capable of raising the RV-6 tail past the point of the fuselage longerons being level. The design of the sliding dolly is dictated by the size of the tailwheel and shape of the tailwheel yoke.
The aft upright is braced with -inch plywood, resulting in a very sturdy design. Also visible is the eyebolt safety inserted into the ramp.
The dolly is constructed of 3/4-inch plywood and 2×4 studs. My first iteration used a 2×4 bottom, but I modified it for a metal floor, so the tailwheel can be easily rolled into position. Steel angle from the scrap box is bolted to the plywood sides to support the floor, which in this case is 1/8-inch 6061 aluminum. A combination of nylon tubing and washers keep the steel winch cable centered on the 3/8-inch bolt. After the tailwheel is rolled into place, a -inch bolt is inserted to capture the wheel and prevent it from rolling out of the dolly. Notice there is a 3/16-inch spacer between one plywood side of the dolly and the 2×4. This is necessary to prevent the dolly from pinching the ramp when the drywall screws are driven tightly. There is also a 1/16-inch gap between each 2×4 block and the ramp, so the dolly will slide smoothly. Lag bolts (1/4 inch x 4 inches) attach the wheel supports to the aft upright and ramp.
The wheels and casters not only facilitate moving the lift around the hangar but also allow the device to move fore and aft as the lift is operated. The angle of the inclined ramp may need to be modified for a particular aircraft to provide adequate clearance for the rudder. In my case an angle of ten degrees proved to be satisfactory.
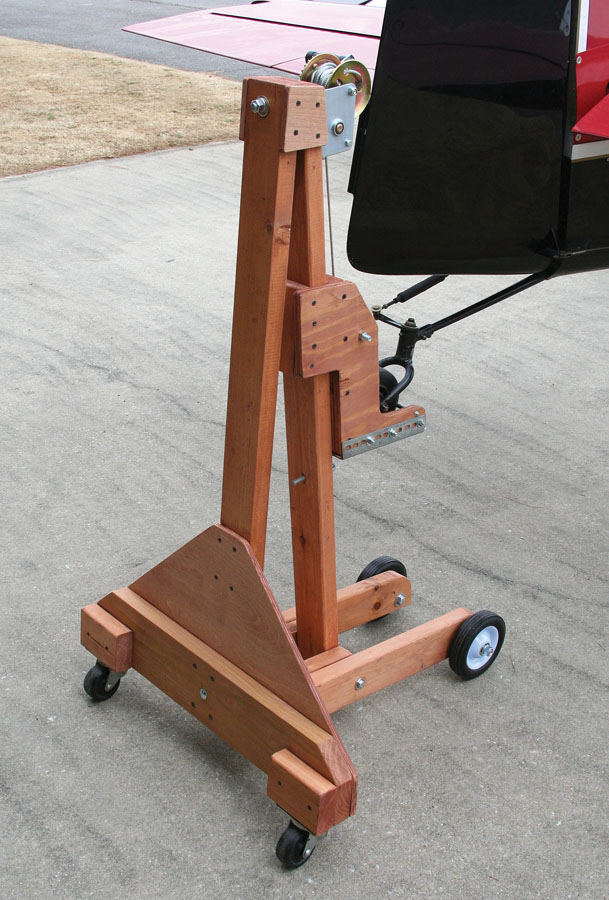
The lift can position the fuselage longerons in a level attitude with room to spare. Don’t forget to securely chock the main wheels.
If you look carefully at the photo, you’ll see an eyebolt has been slipped into a hole on the ramp to serve as a safety in case the winch cog slips. Also note how the 2×4 slipper on the back side of the dolly is tapered, so the dolly can be pulled completely up the ramp. A 1/4-inch bolt prevents the tailwheel from exiting the dolly.
The aft upright is braced with 1/4-inch plywood (because that is what was in my scrap box), which results in a sturdy design. However, this device is merely for lifting the tail of the aircraft—a padded sawhorse or other substantial prop must be placed under the tail cone if anyone is going to enter the aircraft in the course of maintenance.
This lift can position the fuselage longerons in a level attitude with room to spare—but don’t forget to securely chock the main wheels. Be advised that the higher the tail is lifted, the lighter it becomes. Aircraft with a forward CG may have a tendency to tip forward if the tail is lifted too high. Weight may need to be added to the lift base and the tailwheel tied to the dolly. Caution is prudent during the initial test flight of a new tail lift!
The tail lift doing its thing. In the background is an ancient Murray lawnmower that was overhauled and modified to serve as a very efficient tug.
While this project may be superfluous for some planes (the tailwheel on my Fokker D.VII replica is light enough to easily lift with the armstrong method), it is a good example of a useful tool that can be constructed with inexpensive materials while contributing to personal safety and enjoyment during maintenance ops. Some chiropractors may not be a fan of the tailwheel lift, but those of us with high-mileage personal airframes can appreciate the elimination of potential spine distress. I can also no longer find an excuse for not keeping the belly of the RV-6 clean!


