People build (or buy) airplanes for a variety of reasons. For many, they don’t really have a plan for what they’ll do with it when it is done—merely creating a machine that gets off the ground is their biggest goal. Others like to go to the airport, chat with friends, take the plane up for a little while, and sit by the runway as the sun sets, talking again with friends. Still more love the hundred-dollar hamburger, rarely venturing more than 100 miles from home and usually in company with other planes whose owners (and builders) they know. All are great uses for airplanes and good reasons to own or build.
But there are those who have bigger horizons; they intend to use their airplane to cross vast distances, jump a continent in a day, and really put on the miles. If that is your intention, there are a few things you should consider when building that you might not have thought about. Sure, you will have picked the airframe, powerplant, and avionics to match the mission, but have you thought about the maintenance details of the airplane? By details, I mean all of the little things that are often used to customize a machine during the build process—things like cowl fasteners, accessories, and methods. All of these can affect the ease of maintenance of the plane, and that is important if you’re going to be traveling. Why? Because the farther off of “normal” you go in your build, the more likely you are to be stuck with a maintenance headache far afield.
If you made clever design decisions when building your plane, did you make sure it can still be maintained away from home without special tools?
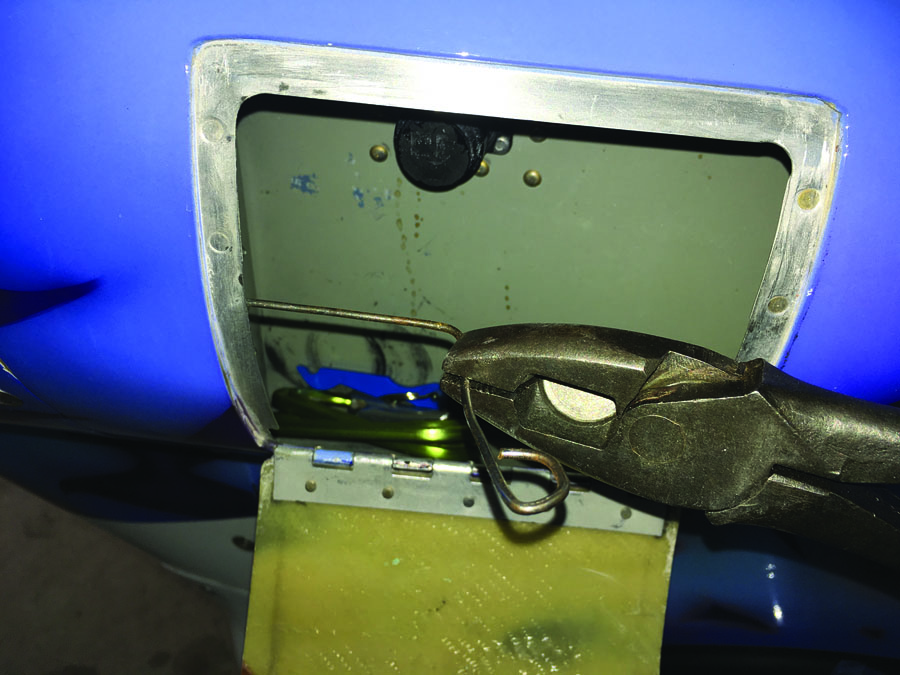
Let me give you an example. The RV-3 was a very early kit airplane, and a lot was left to the builder’s imagination. When building ours, we decided on a slightly different cowl attachment scheme than what was outlined in the plans. Having dealt with multiple small, fiddly hinge pins on the RV-1 prototype before we got to finishing our -3, we decided to go with hinge-pin attachment on the sides and quarter-turn Camlocs on the firewall. This made for a very clean attachment that looks and holds great. But we wanted to hide the hinge pins from view. Since we had built little storage compartments into the cheek cowls, we were able to hide the “handle” ends of the pins by tucking them inside the storage compartments. What this unfortunately left us with is the need to grab those pins with a hefty set of pliers in order to remove them. So in order to get the cowl off, we need lineman pliers as well as a #2 Phillips.
Equally unfortunately, on my first long trip with the airplane at a deserted fuel stop, when I wanted to take the cowl off to check on something, I realized I didn’t have such a tool. I had the Phillips—but no big pliers. That meant bumming a ride to a hardware store to pick up what I needed. Needless to say, they became a permanent part of the airplane’s traveling kit.
Let’s take another look at those screw fasteners. Many people who work on metal airplanes dislike Phillips-head screws because they can easily strip out—particularly if the factory steel screws have been replaced with stainless. Stainless steel is better, right? Not necessarily. It doesn’t rust, but it is actually softer, so it strips out more easily.
A lot of builders throw all Phillips-head screws away and substitute Torx screws or something else exotic. They actually work great—but are you likely to find the correct Torx fastener on the road in a mechanic’s toolbox? Very likely that answer will be “no.” Phillips rules the aviation world. So again, carry it with you or build to “standard” if you want to fix something away from home.
But how about more expensive items? Let’s talk alternators. There are a few common choices for alternators on Lycoming engines these days. Most are based on Nippondenso bodies and cores. There are, of course, many folks who simply install an internally regulated ND right from the auto parts store and report that they run for a thousand or more hours without trouble. There are also those that do the same thing and have a failure in less than 100 hours. But if they have a failure on the road, they can run down to the auto parts store and get a free replacement.
Many aren’t satisfied with the auto option, of course, so they go with a “purpose-built” Experimental aircraft alternator. Most of these are externally regulated, so if they do have a failure, they have to find a supplier of a specialty part. If they were wired for an internally regulated unit, they might be able to drop in an auto part in a pinch. But very few automotive alternators use an external reg anymore, so they might be stuck until a replacement unit can be shipped to Podunk, where they happen to be stranded. Hotel and food bills while waiting for a part can add up—even in Podunk.
There’s nothing wrong with these units, of course. They are high quality, and people (including myself) have great luck with them. But if you do get unlucky and have a failure away from home, be aware of the consequences.
By the way—those guys with automotive alternators (including myself) might not always be so lucky either. I have had an identical part number come with different mounting ears, requiring some grinding and cutting to make them fit the attachment bracket. Do you carry cutting and grinding tools in your kit bag? I sure don’t. Hope you can find a machine shop in Podunk!
Planning for maintenance on a trip means looking at all of the items in your airplane and understanding the pros and cons of each choice. You are likely to find a mechanic at some small field who knows how to work on a Slick or Bendix mag for instance. You are far less likely to find someone who knows how to work on your choice of electronic ignition—if they even know what it is. Carburetor and fuel injection systems, experimental fuel pumps, and even automotive spark plugs can all be foreign to a mechanic if you are looking for help…or tools.
Experimental aviation is about experimenting, and I don’t intend to imply that we should all fly airplanes that only have tried and true hardware and design elements. Life would be pretty boring if we did. But designing for on-the-road maintenance is simply something to be added into the trades when making choices about your build. Dedicated aerobatic or racing aircraft can be notoriously difficult to work on—but they have specific jobs to do, and the trades are worth it. The same can be said when it comes to heading out far away from home.
The good thing is that with so many homebuilders these days, you might just find one who has exactly what you need when you find yourself stuck in Podunk.


