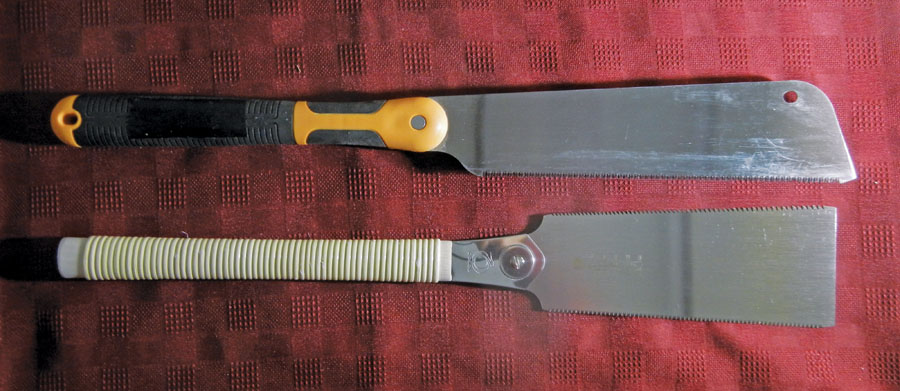
Japanese saws: The kataba (left) is for deep cuts, and the ryoba is for shallow cross or rip cuts.
Along with the flying machine, a great outcome of your homebuilding project is the collection of tools that can dwarf what you started with. Building does give a person some license to expand the number of implements hanging on the pegboard, so along with that, one should take advantage and seize the moment to invest in the exotic as well as the practical. This can make tool acquisition a quite satisfying by-product of the build.
Somehow the kit manufacturers seem to want to downplay this subtle but ever so important aspect of having a Y chromosome. We’ve seen the ads that claim things like, “…and best of all, you can build it with tools you have right around the house.” Really? Well, what’s the fun in that?
So when in the store or thumbing through woodworking catalogs, I’m always looking at unusual tools. Not because I have a need for them, but more often because I want a need for them.
This is especially true for hand tools. In my experience, power tools only help me make mistakes faster and more unrecoverable. I especially loathe powered saws—such as the table saw. This finger- and hand-seeking contraption is to be truly feared. While you can’t be thought of as a serious woodworker without a passion for spending endless hours building jigs to make the perfect cut on one of these, critical woodworking and constructing a wooden aircraft are not necessarily the same thing.
Enter the Japanese pull saw. These have intrigued me for years. How can something so odd shaped be so precise?
I have never made a straight cut without a jig, so looking at the shape and flimsy nature of the blade made me wonder, where can the accuracy possibly come from? A bit of research led me to believe that these saws really can be employed for accurate sawing. Figuring that someday my Fisher Celebrity project would nominate a candidate for this ancient looking tool, I patiently waited…and then one day it hit.
It seems that every aircraft build has at least one of those “uh-oh!” operations where there is no opportunity for practice, and the penalty for failure is severe. Get it wrong and we’re not talking rework of a part or small assembly. No, in these cases the setback could be significant enough to terminate your morale and maybe even the project itself.
On the Celebrity, the joining of the fuselage sides to form the surface for mounting the tail post is such an operation. In Fisher designs, fuselage sides are constructed as mirror images of each other. They are framed on the worktable, then covered with plywood.
To assemble the fuselage from the sides, the builder works firewall to tail, installing cross members that form the basic box structure of its body. When the tail is finally reached, the two sides are pulled together, bonded, and then trimmed for a flat, rear-facing surface on which to mount the vertical stabilizer.
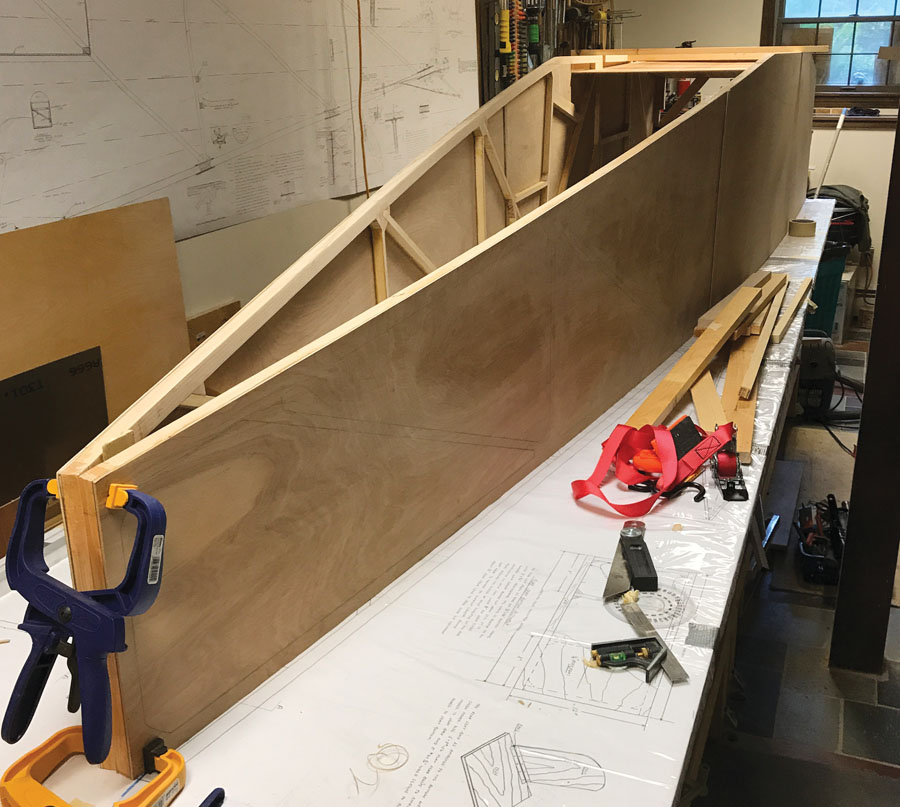
Celebrity fuselage sides are pulled and glued together at the tail, but the aft end isn’t perfectly even. It needs to be even and smooth for the tail post.
There are two problems with this operation. First, the rearmost vertical member of each fuselage side is rectangular in cross section. When pulled together, these blocks will only meet at the corner edges. They must be planed to the proper joining angle, allowing for enough bonding surface from each side to be in contact. By using a hand plane and taking slow and careful slices, the builder can slice, push together, separate, and repeat, in effect, “sneaking up” on the structure to get the surfaces planed just right.
The second problem is a bit more daunting: Once the two sides are pulled together and glued, the outer, rear-facing wood forms an “M” when viewed from above. Getting this shaped down to a flat and even surface is the challenge.
Some builders have sanded or planed this part, but the thought of doing that struck me with nothing but fear. For me, sanding wood into shape is a last resort—it creates a lot of dust and is inaccurate at best. The hand plane works well to finish wood or get it dimensionally accurate when the surface is in a horizontal position, but in this case the fuselage tail area is vertical and downward strokes are just not advised when accuracy is demanded.
Slicing off the “points” of the “M” seemed to be the best way, but the awkward shape of the fuselage rear prevented any kind of saw-guiding jig construction. It was a perfect opportunity for the Japanese pull saw.
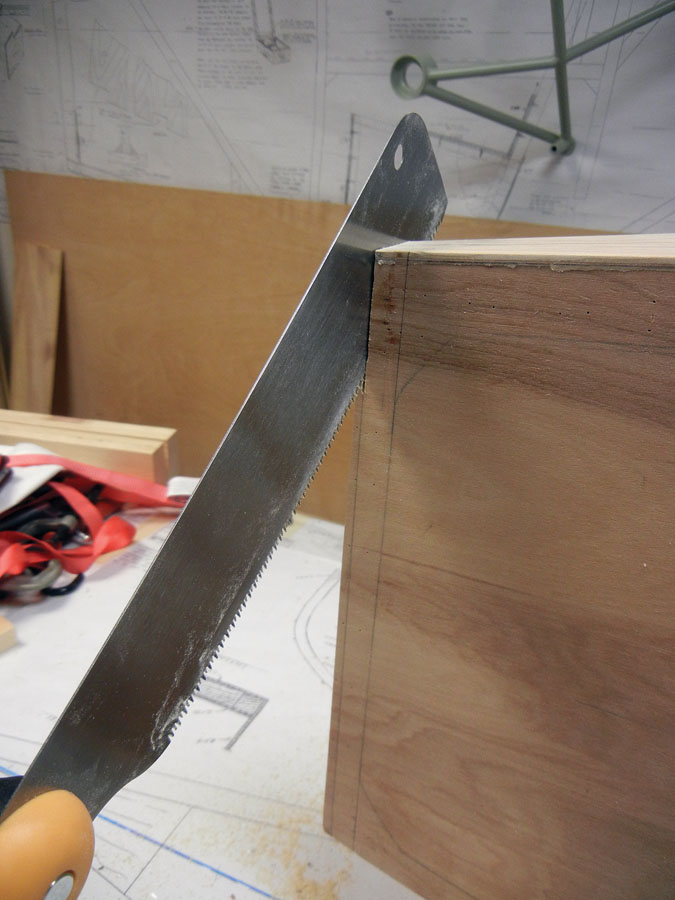
Begin the cut with the blade high, and push the blade into position for the pull stroke.
Pull, Don’t Push
Having seen The Samurai Carpenter videos on YouTube and having been curious about how much skill it takes to achieve the quality this guy gets, the time had come to dive in and get one of these unique tools for myself and join the ranks of the samurai builders!
Japanese pull saws work just like their name implies: They only cut on the pull stroke. There are several types. The most common are the ryoba, a two-sided saw with one side having coarse teeth used for rip cuts and the other side’s finer teeth used for crosscutting; the kataba, a one-sided saw that has no teeth or spine on the other side; and the dozuki, another one-sided saw that has a spine similar to an American backsaw used with miter boxes. This stiffer saw is used for making shallow straight cuts.
As for brands, the Gyokucho (pronounced Guy-yo-coo-cho) saws are very popular and can be purchased from Woodcraft or other woodworking outlets. The saw you see in action in this article is from DeWalt, which recently introduced a line of Japanese hand saw-like products. Both brands have replaceable blades, which come in handy because the teeth are quite delicate.
Concentrate! The penalty for failure is severe.
The saws come in varying lengths, with shorter saws having finer teeth. My ryoba saw is 210 millimeters (8.27 inches) and works well for most standard cuts while the kataba shown here is somewhat longer at 250 millimeters. (9.84 inches). Its extended length gives a very good range of pull so you never have to worry about getting too close to the handle, or at the other end, finding the saw slipping out of the workpiece.
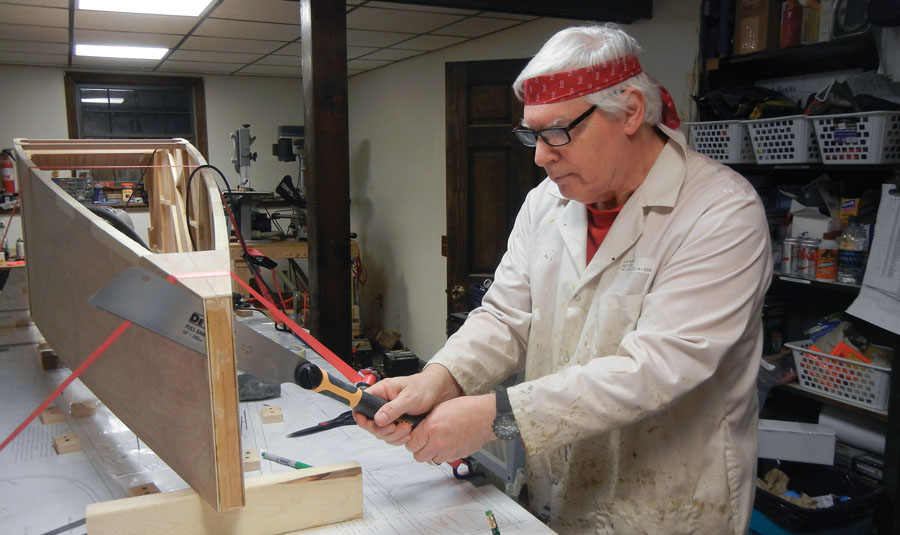
Another secret of these saws is the handle. Unlike the common saws that you probably have at home, the Japanese pull saw is used with a two-hand grip. By doing so, you keep the blade better aligned and the pressure more even.
The kataba was the choice for slicing my fuselage’s tail end because the cut requires going completely through the wood. The saw’s smooth, non-tooth side is slightly thinner and allows it to pass through the structure easily so that it does not mar the cut.
When sawing with standard handsaws, the tool is held downward and the push-pull motion goes from down to flat cutting on both the push and pull parts of the stroke. The Japanese pull saw is just the opposite: You start with the saw in an upward position, followed by level or upward facing strokes, and it makes cuts on the pull only. In many ways, the upward motion and transition from the push portion of the stroke is used to get ready for the pull.
And again we see the beauty of hand tools—there is no time pressure. You can spend the moments steadying and orienting yourself to make sure that the pull stroke is just what you want.
Preparing to make another cut. Always show respect for the vanquished.
Making the Cut
With saw in hands, it was time to make some sawdust and challenge the awkward rear of the fuselage. To make sure I had some kind of guide, a cut line would have to be drawn on the wood. Not so easy. The fuselage was no longer a square box from which simple and consistent measurements could be taken. Cut lines on the tail would need to be exactly the same distance from the firewall to ensure that the rear ends up parallel to the front. At the same time, only the smallest amount of wood should be removed. We want the slice deep enough that the points of the “M” are cut off but still shallow enough that the tail strength is not compromised.
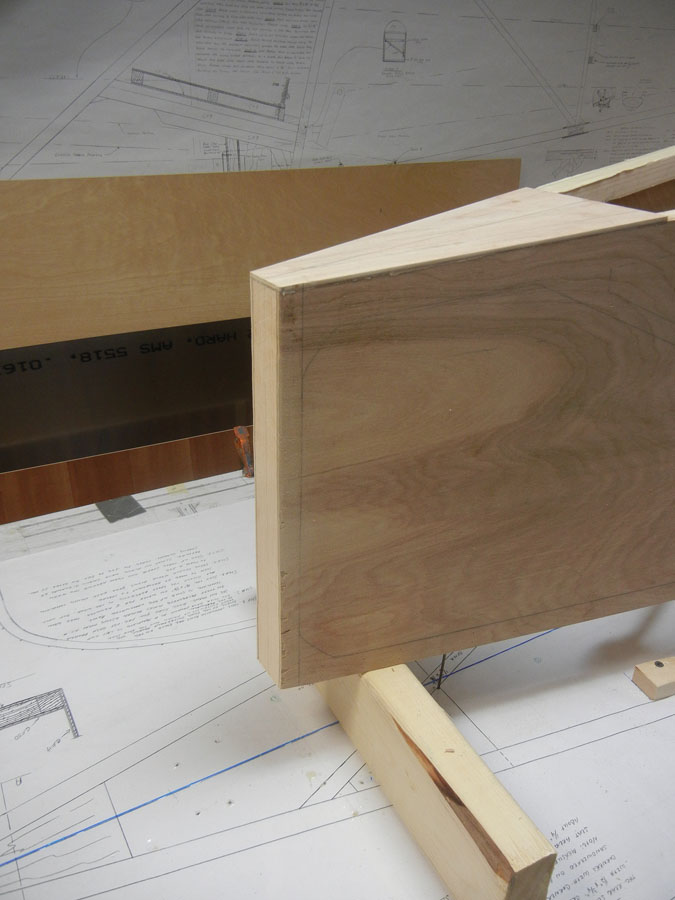
The completed cut—smooth and accurate.
Using the firewall as a reference, careful stretching of a tape measure determined the start points for the guide lines at the top of the tail on both sides; then careful parallel lines were drawn vertically, forming the guide.
The time had come. With cut lines drawn it was a real “no guts, no glory” moment. Or put another way, to mess this up equals rework—lots of rework!
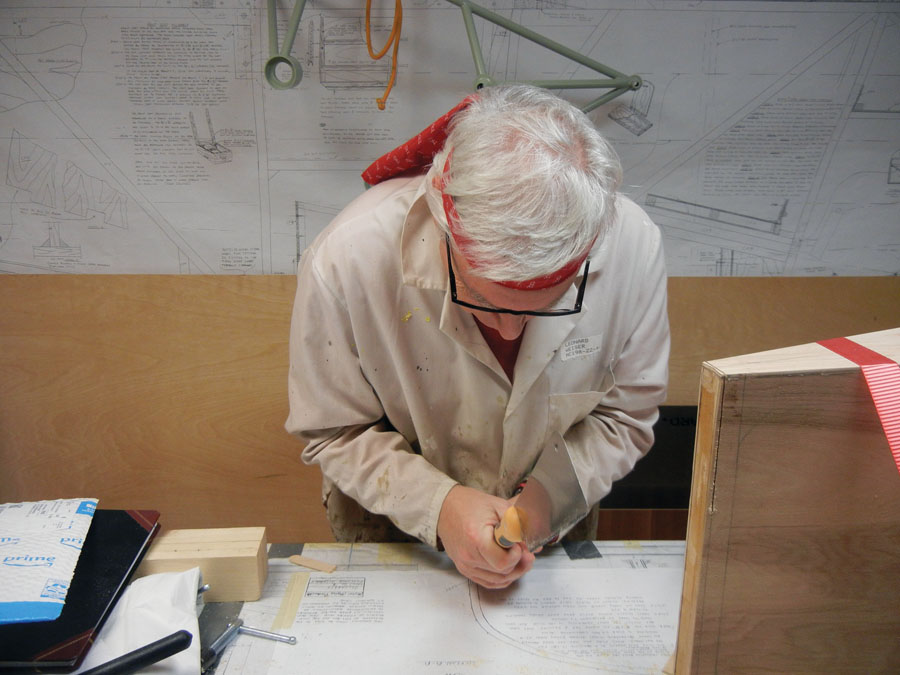
I read somewhere that samurai wore kimonos for everyday events, and they donned armor for battle. My white and very used lab coat would have to satisfy for this critical slice.
Textbook like, I began with the saw in both hands, blade end oriented upward, light touch, using only the weight of the saw to cut the initial valley in the wood. I took a breath.
OK, so that first stroke worked, then another, and another.
Alternating, I took the saw and made a cut from the left side, then went around the table and made one from the right. To my surprise the saw tracked right in line with the cut guide. In fact, the deeper it went into the wood the easier it seemed—almost as if it was steering itself.
Counting times to breathe, reposition the saw to make the next cut and, yes, admire the work, it took the better part of an hour to get through the nearly 12 inches of tail mounting structure. At the end the result was remarkable. The wood was cut smooth, accurate to the line, straight, and with little sawdust.
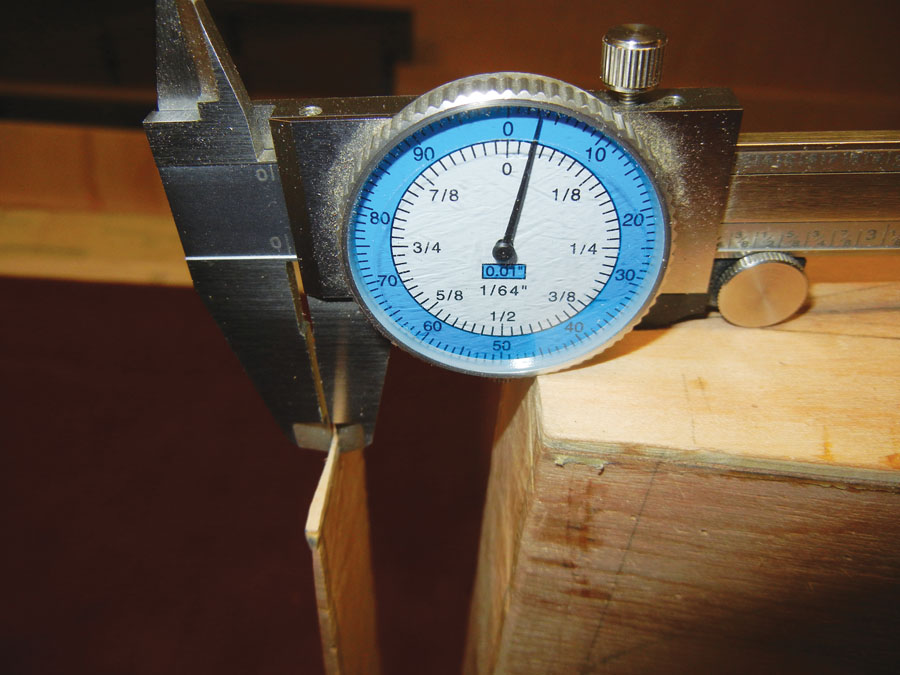
You can see in the picture that the saw cut away material to within 1/32 inch of what used to be the rear of the fuselage, and this was consistent throughout the entire length. Standing over the now vanquished tail structure, I could not help but think I scored another victory for hand tools.
The sliced away wood. The cut was amazingly thin, consistent, and accurate.
Since this encounter with the kataba pull saw, I have used it numerous times and ventured into the world of the ryoba in other places on the project. The saws have proven excellent for preparing structures with precise cuts or complex notches. This aircraft requires several of these, including creating an opening for the front cockpit entry door, notching joinery on aileron bay fabric stiffeners, and removing the ailerons themselves from the wing panels they are initially built into.
These are great tools that take a bit of patience to learn and courage to use at first, but with time and discipline, they yield power tool-like accuracy. For this “hand tool guy,” they’ve become necessary items in the implement inventory.


