I keep getting asked how our Tundra repair project has been coming along, and since I’ve talked about it here before, it is only fair to update the one or two folks that are interested in the progress. The problem, if you don’t recall, is some buckling of the belly skins near the gear box. We’ve decided to address it in similar fashion to what has been experienced by a couple of other owners – that is with a skin doubler, adding a sheet of .032″ to the existing .020″ sheet metal. Although the wrinkles we saw were between the gear box and the firewall, the factory came out with a doubler for the skin behind the gear for the trikes and float versions – so since we’re in there, we figure it wouldn’t hurt to stiffen that up as well.
We’ve been waiting on the Dream factory for firm commitments on production and pricing for the skins and shipping now for over three months, and finally decided that heck, we’re sheet metal builders – we can do this. All it really required was to drill out the existing rivets to create a smooth surface, and a sheet of drafting Mylar wrapped around the belly and taped carefully in place. Since the skins are all single curves (nothing compound), it was easy to get it to lay flat – then we simply marked the location of all the holes very precisely with a fine pencil, measured for the edges, and transferred all those marks to our sheet of aluminum.
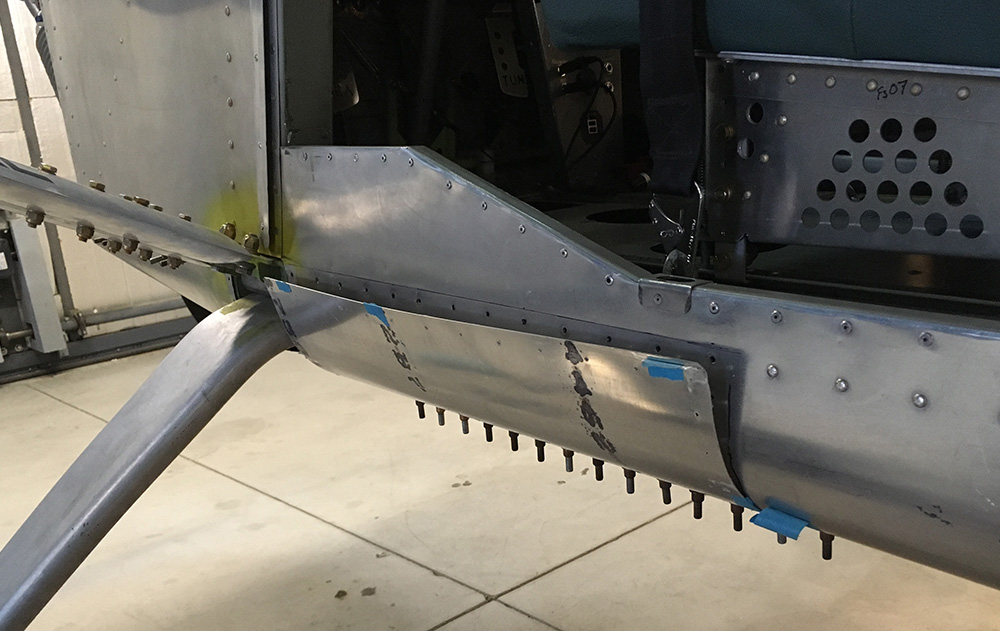
Last week, we drilled all of the holes to #40 size, then match drilled a couple to he final size of #30 under the center of the belly. Clecos could then hold the skin in place as we up-sized the rest of the belly holes, matching them to the existing holes in the skin and substructure. We stopped up drilling where the skin was going to have to make the curve up into the sides of the fuselage. We then used a slip roller to add the necessary curve to both sides, and put it back into place. The final job will be to use cargo straps to hold it tightly in position for final match drilling of the holes that run up the side. So far, everything fits – and we’ll keep our fingers crossed that this trend continues.
Knowing that many of the holes have gotten slightly oversized from drilling out the existing rivets, we plan to use oversized rivets in most holes for the final fastening. But we won’t do any of that until we have made the forward skin doubler – since it shares many holes, overlapping the new aft skin under the gear box. Remember the old rule – never rivet until you have to, never drill until you have to , never cut until you have to.
We’ll keep you updated – minor upgrades and repairs are just part of the process of homebuilding, especially with a low-volume kit like the Tundra.


