
Figure 1: A generic contactor. The coil draws a little bit of current, but it allows you to switch very high current loads like the starter.
This month we’ll discuss battery and starter contactors. Contactors are used to switch high-current loads on the aircraft. Think of them as a big relay. A coil, when energized, creates a magnetic field and pulls the mechanical switch closed. The coil only draws a little bit of current, but allows you to switch very high-current loads like the starter. Figure 1 is a diagram showing a generic contactor. Figure 2 shows how the contactors are wired in a typical electrical system. There are two types of contactors generally used in Experimental aircraft:
Battery Contactors
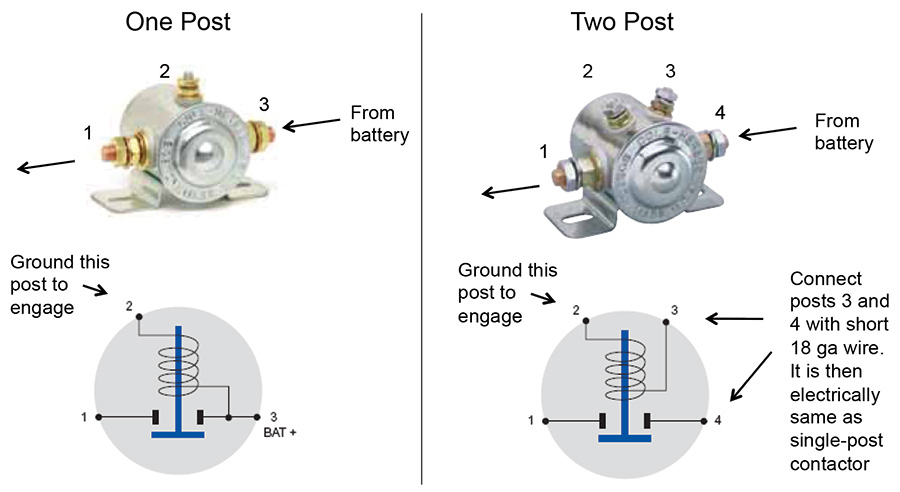
The battery contactor (also known as a master relay, master contactor, or master solenoid) is a continuous-duty contactor, and it does become quite warm during normal operations. It comes with either one or two posts for the coil. It typically draws about 0.7 amps at 14 volts. This contactor is switched with a wire that comes from the master switch in the cockpit. The master switch is wired to ground. When you turn on the master switch, the wire to the battery contactor becomes grounded and then the contactor closes, which then provides power to the bus and starter contactor.
The battery contactor is used to isolate the battery from the rest of the aircraft. Shutting it off (via the master switch) generally removes power from the aircraft and cockpit in case of an emergency.
Starter Contactors
The starter contactor (also known as a starter relay) is an intermittent-duty relay that is designed to operate for only short periods of time. This contactor draws about 4 amps at 14 volts.
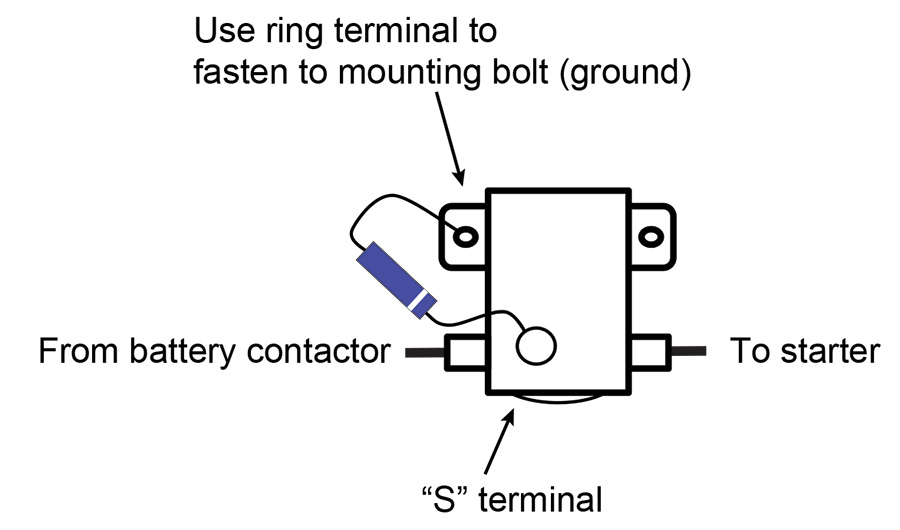
You’ll see in Figure 4 that the contactor coil is grounded via the bracket on the back of the contactor. The starter coil is energized when +12/24 volts is applied to the “S” post (which controls the coil).
The starter contactor provides power to the starter cable and starter only during start. This way, there is not an immediate problem if the starter cable shorts against the engine during flight. Additionally, the starter contactor is designed “upside down” so that the internal contact stays open during high positive-G maneuvers.
I recommend installing a diode across the coil on each contactor used in the aircraft (master, starter, landing gear, air conditioning, etc.). You can use a common 1N5400 diode available from any electronics supply house.
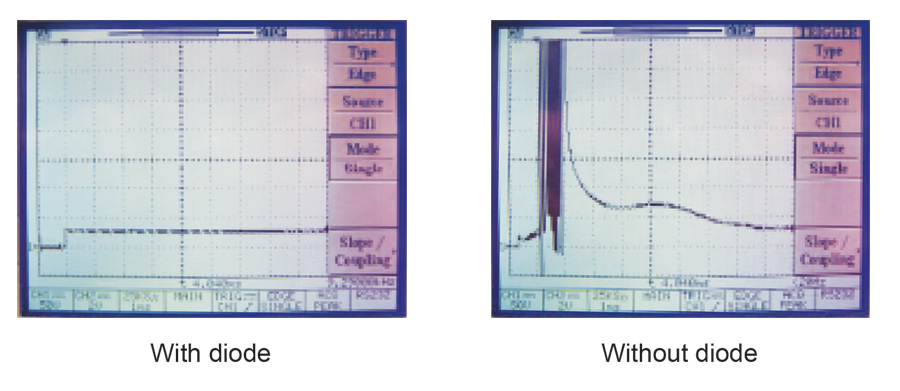
Why is it best to install a diode across the contactor coil? Doing so minimizes arcing across the control switch contacts (master and starter switches), extending switch life. All of the energy stored in the coil has to go somewhere when the coil is de-energized, and the diode provides a way to bleed off the excess energy. Figure 8 shows the effect of mounting a diode on contactor coil.
Contactors are also used for air conditioning systems, hydraulic pumps, and to tie buses together. Since these are seldom used in Experimental aircraft they are not covered here.
Starter Annunciator
If the starter welds itself closed, the starter motor can remain engaged to the crankshaft while the engine is running. You can’t hear when this happens, but you may see a big repair bill in the future. It can be useful to wire a starter indicator lamp on the panel that lights while the starter contactor is closed.
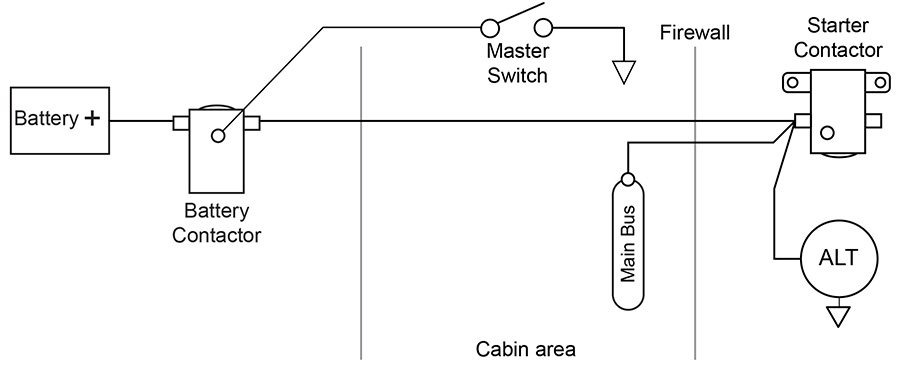
Figure 9: Layout of rear-mounted battery and contactors. Fuse and shunt not shown on alternator b-lead.
Rear-mounted Batteries
Electrical considerations for rear-mounted batteries are minimal, but important. Be aware of the following:
• The battery contactor should be mounted near the battery itself. If there is a short on the main power cable that runs to the front, it can be corrected by turning off the master switch.
• The starter contactor is typically mounted on the firewall in the engine compartment.
• Attach the alternator b-lead and the main bus cables to the un-switched side of the starter contactor (where the cable comes forward from the battery contactor). The main bus is then run back through the firewall to the bus bars or Vertical Power system.
Read the Book
Hopefully this article has helped you understand electrical system contactors. It is an excerpt from my new book entitled Aircraft Wiring Guide. For more information, or to order a copy, visit www.aircraftwiringguide.com.

![]()
Mark Ausman currently flies an RV-7 that he finished building in 2006. He was founder and president of Vertical Power and has served as an EAA Director since 2011. He flew with the U.S. Navy as a Naval Flight Officer on board the P3-C Orion. He lives in California with his wife and three children.






Hi Mark,
I have an automotive ISKRA IA O 0507 alternator for my RV8 Lycoming O360.
This alternator is internally regulated, and has D+ connexion, no Field .
I have vertical power, and field is requested to manage alternator .
Do you thing there is way to modify alternator to get field connexion?
Great thanks
Best regards
Dominique
Just wondering, Fig 5 and Fig 7 show the diode for a single post battery contactor reversed. Is this accurate or an oversight? Thanks.
Fig 5 is a master contactor which is activated by switching to ground. Fig 7 is a starter contactor, which is activated by switching the + wire. So both are correct