KITPLANES is the leading independent voice of kit and amateur-built aircraft construction. As such, the magazine isn’t written just by professional journalists, but also by actual aircraft builders and recognized experts who are active in the field.
To help cast a wider net, KITPLANES accepts freelance articles on all phases of aircraft construction, from basic design, to flight trials, to construction technique in wood, metal and composite.
Query First
If you have in mind an article for KITPLANES, please query us first and we’ll advise you on how to tailor the article to our editorial needs. Articles can be of any length, but the typical major feature runs 2000-2500 words. Articles on narrower topics, however, are often shorter. We’ll direct you on what length we need and how to focus your article. Short, focused technical articles are always welcome.
Note: We do not accept AI-generated stories, which we recognize easily. Nor are we interested in overly broad, “look how cool kit aircraft are.” We, and our readers, already know this.
For actual human writers, we buy first world serial rights and the right to use the article on our web site and in promotional material for KITPLANES.
What Are We Looking For?
One of the most valuable contributions you can make as a kitbuilder is to pay your experience forward. What have you found in the building process that you think you could make easier for the next builder? How have you conquered challenges in your kit- or plansbuilt aircraft? What do you wish you knew before you started? What’s more, in the process of building a kit aircraft, every homebuilder comes up with some ideas that work great and some that turn out terribly. Share them with us!
A few sample topics include:
- Engine selection and installation
- Choosing the right kit
- First flights
- Maintenance
- Annual inspections
- Financing your project
- Dealing with insurance companies
Flight and Kit Review
Since our readers are interested in airplanes and the kits sold to build them, we frequently publish flight reviews. In addition to the basic flight report on an aircraft, our readers need to know something about the kit and the company with which they will be investing their time and money.
Because of this, we consider airplane reports to consist of three parts: The flight review, a detailed description of the kit and a report on the company itself. The flight review should discuss flight characteristics, performance, special features—everything that pilots expect in a pilot report. As for the kit itself, tell us about materials used, the degree of finish of kit components, tools and techniques required and options such as owner assist or quick-build programs. These are things that a potential buyer might consider when shopping for an aircraft kit.
Last, because a builder is effectively married to the company that produces the kit or plans during the build phase, a brief profile and history of the company and its facilities will help buyers make decisions.
While we might like all of the coverage of an aircraft to come from one author, this is not always practical. Talk with the editor if you need a partner to write a portion of a report on a subject aircraft. We might have someone familiar with a particular company or close to the factory location that can help with coverage or assist in article preparation.
Photos and Illustrations
Aircraft building is obviously a technical process and one that benefits from good photography. We strongly encourage authors to provide these photos and we’ll need quite a few shots to pick from. You needn’t be a professional photographer to produce publishable photos for KITPLANES. All you really need is a good-quality point-and-shoot camera capable of no less than 5 megapixel resolution. Most smartphone cameras are capable of much more than that, so feel free to use your phone if the image quality (including exposure and focus) are good.

Lighting in most shops and hangars is some combination of fluorescent and incandescent lighting. If your camera’s white balance is settable, you can use its automatic white balance setting to get the color close enough. If you’re comfortable with discrete settings, most cameras have dedicated settings for fluorescent, incandescent and daylight white balance.
Show Us Process
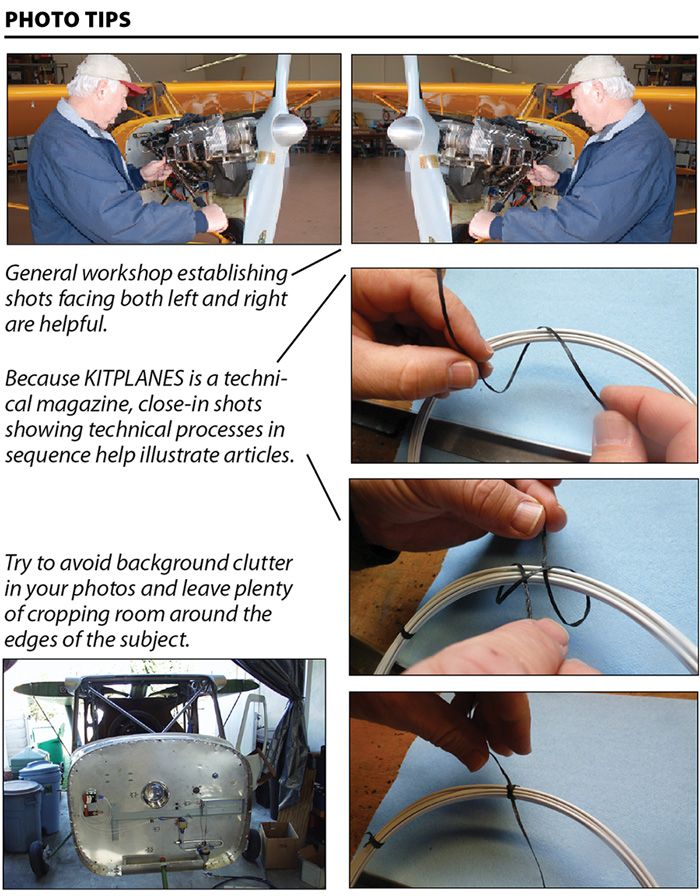
Because KITPLANES is a technical magazine, we want photos that show technical processes clearly, especially sequential processes. For example, we would want not just a picture of the completed countersunk rivet hole, but also the raw hole, the tool itself and the tool in action. This sequential requirement applies to all kinds of processes, from crimping a wire lug to cutting foam for composite work.
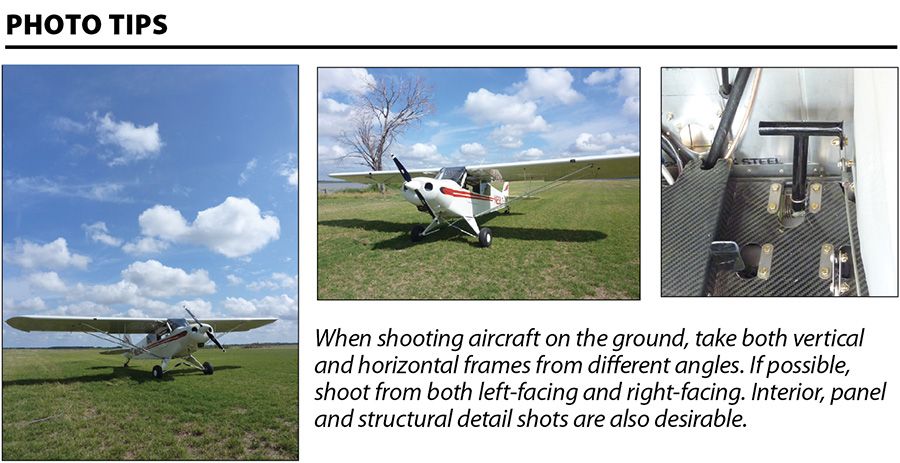
Where possible and practical, we would like to have wider, establishing shots showing a person at work and also detailed shots showing the work in progress. It’s helpful to shoot both in the vertical and horizontal format and, if practical, with subjects facing left and right. These choices improve the magazine layout immeasurably.

It’s best to shoot in the early morning or late afternoon to get the most pleasing light, although we realize this isn’t always possible. Try to frame the aircraft in various dramatic angles, for example low from the front or a low, three-quarter shot. (See the examples provided on the previous page.)
How many shots should you take? That depends on the subject, but for most topics, 50 to 100 frames is not too many. Even though we won’t publish that many photos, it’s helpful to have wide choice when producing the magazine.
And, of course, as with the text, if you have questions or need clarification, don’t hesitate to contact us by e-mail. We’re happy to provide specific guidance to authors and photographers.
Submission Methods
For text alone, you can simply e-mail us the article draft. We prefer MS Word. We’ll evaluate it and either return it with suggestions for revisions or accept it and provide a general plan of when we intend to publish it. Fair warning, though; the magazine’s content is often in flux and your story might get temporarily “bumped” for reasons totally unrelated to your narrative or photography skills. Please bear with us.
IMPORTANT: Do not insert photos into the document, but do include captions and the image filenames to which they relate.
When it comes time to send images, please either send through a third-party file transfer system like WeTransfer, or query us and we’ll send you a link to upload directly to our photo-file server.
Get Your Airplane in Completions
If you’ve built a plane and flown it, please send us a submission for our Completions section. Completions remains one of the most popular departments in KITPLANES, and we want your plane there! Every kit-built and plans-built plane that’s flown will be included in the order they are received. Send the original digital file of your image to [email protected]. Include a description (200 words maximum) of the project and the finished aircraft, and send us your contact information and whether we can publish your e-mail address in case other builders would like to contact you.
Here are some elements that we think are necessary for a good photograph:
- Focus—the main subject (your airplane) must be entirely in focus.
- Exposure — don’t send us a photo that’s underexposed or overexposed — we can’t fix that here.
- Color—make sure the photo’s color is true to what the airplane looks like.
Here are some tips for making your airplane look good:
- Walk up to the airplane until it takes up the entire frame in your camera’s viewfinder. Photos that are taken from 100 feet away diminish in quality when they’re enlarged.
- Avoid people and/or objects that are not relevant to the photograph.
- Take your photos early in the morning or late in the afternoon. Avoid the middle of the day, when shadows tend to hide details.
- Make sure the background is acceptable and clear of objects that might degrade the photo. Reduce clutter.
Contact us: [email protected]


