Most of the hard work of fabric covering has been completed once you begin spraying chemicals on the fabric. As you may recall, the first coat of chemical used with the Poly-Fiber covering system is called Poly-Brush. This is initially brushed on the fabric to provide the base for all subsequent coats. Two additional coats are then sprayed onto the surface to further build up the layers of chemicals necessary to provide protection and smoothness for the final finish.
After spraying on two coats of Poly-Brush, we now must spray on a coating that will protect the fabric from the ultraviolet rays of the sun. Polyester fabric, like most fabrics, will deteriorate in sunlight if not properly protected, and this will occur within a very short time-perhaps six months or less. Polyester fabric is not as susceptible to this problem as cotton; however, if bare polyester is left in direct sunlight for 12 months, it will lose more than 85% of its strength. Cotton fabric exposed to the same sunlight for the same period of time will deteriorate almost completely. Polyester is protected from the UV rays of the sun by applying chemical coatings containing aluminum pigment. Application of the recommended number of aluminum silver coats will provide adequate protection for a number of years. In the Poly-Fiber system the chemical used to block the suns UV rays is called Poly-Spray, and its application is the subject of this last installment of the fabric series.

Make sure that the conditions are right for spraying. Too high temperatures or too much humidity can adversely affect the drying process.
Applying Poly-Spray
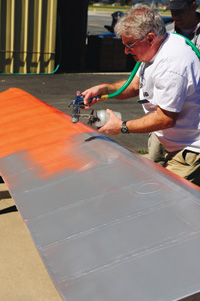
After allowing the last coat of Poly-Brush to dry for at least a day, you are now ready to apply the Poly-Spray. These coats are often referred to as the silver coats. You need to apply enough Poly-Spray to prevent any light from shining through the fabric. Three cross-coats are generally sufficient, but this depends on the amount of sanding you do between coats. A certain amount of Poly-Spray will be removed when you sand, and it will need to be replaced to ensure proper protection of the fabric.
Before we go any further, lets explain the term cross coat. A cross coat is defined as moving the spray gun north and south followed by east and west-hence, one cross coat. This means you will paint a surface moving the gun up and down over the item and then immediately go back to where you first started and move the gun from side to side as you spray. This process ensures total coverage over the area you are spraying. So, in effect, you are actually putting two coats on the surface during a cross-coat application.
Now, lets discuss a few basics. First, Poly-Spray is always thinned, using one part of reducer to four parts of Poly-Spray. The type of reducer will depend upon the temperature where you are spraying. If the temperature is above 85 F, you should use 8500 reducer; below 85, use 65-75 reducer.
The aluminum pigment in Poly-Spray settles to the bottom of the can quickly. This means that when you first open the can you must stir it completely. The best thing to do is to take the can to a local paint store and have them shake it for a few minutes. Even if you do that, you must still thoroughly mix the pigment just prior to spraying. Failure to do so will lessen the protection the chemical provides. Often you will find the pigment has settled to the bottom of the can to the extent that it feels like a hard layer. You must use a stirring stick or some other means to break that loose and mix it throughout the can. This must be done just prior to spraying.
After thoroughly mixing the Poly-Spray you should pour it through a paint strainer as you fill your spray cup. A 60 x 48 mesh strainer is best. This is a necessary step. Otherwise, particles of the silver pigment will pass through your spray gun onto the surface, requiring additional sanding. Don’t use anything finer than a 60×48 mesh or you will strain out part of the silver pigment.
Next, make sure the surface is clean and free of lint and other contaminants. The best way to ensure this is to wipe the surface down using a paint cleaning solvent such as Poly-Fibers C-2210. This will remove skin oils and such that may be on the surface. Then, just before spraying, wipe the area using a tack cloth to remove fine particles of dust.
Choose the Time and Place
Be sure your conditions are right for spraying. The temperature should be between 65 and 90 F. If the temperature is high or the air is humid, you may need to add a retarder to slow the drying process. BR-8600 Retarder is the product to use. You will know that retarder is needed if the Poly-Spray has a rough appearance or feel. If it looks or feels like sandpaper, it is drying before it reaches the surface. Add the retarder as directed in the manual. (This assumes you have properly thinned the Poly-Spray. Failure to thin it will also cause this problem.)
Poly-Spray should go on easily. You can see how much and where it is being applied. As you spray you will also notice every imperfection that begins to appear on the fabric. This coat will help you find problem areas that may need attention. It is simply the result of a darker color being applied to the surface. Again, spray one cross coat and then allow it to dry. You should give it at least 3 to 4 hours.
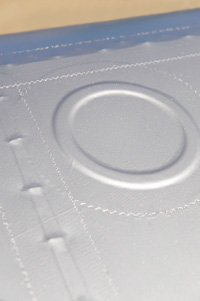
When the imperfections are highlighted, this is a good time to fix them. You may notice that some of the edges of your pinked tape are curling up. You can use your iron to melt these areas down. It does, however, require careful attention. Your iron must not directly touch the Poly-Spray. You must use a thin piece of Teflon, an oven-cooking bag, or bakers parchment paper as a shield to protect the silver. You must also be sure the iron is calibrated to a temperature of 225 F.
Dealing with Pesky Pinholes
If pinholes appear, you will need to fill them. (Pinholes are tiny little areas that have the appearance of a small hole. Insufficient filling of the fabric or tape weave during the initial brush coat of Poly-Brush may cause this problem.) The only way to fix pinholes is to fill them. This is done with Poly-Brush (not Poly-Spray). If you continue to spray over the pinholes, they will simply appear to deepen. Mix three parts Poly-Brush to one part reducer and add a small amount of retarder. Sand the affected area using 400-grit sandpaper. Wipe the area with paint cleaning solvent, and then brush the Poly-Brush into the area to fill the pinholes. Once it has dried, you can then apply more Poly-Spray over the area. Let it dry, and then sand it smooth.
Drying Time Between Coats
A good rule of thumb is to apply one cross coat in the morning followed by another in the afternoon, but you can allow the Poly-Spray to dry much longer if you desire. If you do not apply the next coat within one week, however, you will need to lightly sand the surface before applying the next coat. I recommend that once you begin applying Poly-Spray that you continue until you have the required number of coats on the surface.
After fixing any imperfections that may have appeared, you are now ready to spray on the second cross coat of Poly-Spray. After spraying the second coat you may notice more problem areas similar to the ones we just discussed. If so, now is the time to fix them. After this second coat of Poly-Spray you should have a fairly good buildup of silver on the fabric. It is now time for the fabric coverers favorite activity-sanding. Unfortunately, no matter what type of fabric covering system you decide to use, you will be sanding if you want a nice finish. No system provides a smooth finish without this step.
Sand, Sand, Sand
Be sure the Poly-Spray is dry before sanding. The best way to sand is to wet the area with water and use wet or dry sandpaper, starting with 320 grit. You can use a bucket of water and dip the sandpaper in the water frequently to wet the area. A word of caution: Sand only the large open areas of fabric. You must be careful not to sand over rivet heads or rib laces. Anything that protrudes out of the fabric should be avoided. Sanding over the top of ribs will cut the fabric over rib laces, screws or rivets. Avoid the area. Use of a sanding block is often helpful. Also, protect your fingers when sanding or the sandpaper will abrade your skin. The other area to concentrate on when sanding is the pinked edges of tapes. If any of the edges continue to stand up, simply sand them down at this point.

Its OK if the pinked edges of the fabric tape show in some areas.
After sanding you will need to remove the sanding residue. This is best done with a wet sponge, or simply get out your hose and wash the area completely with clean water. Remember, the Poly-Spray that has been removed must be replaced to ensure adequate UV protection. You can check for this by using a 60-watt light bulb held inside the wing or fuselage. If you have adequate UV protection you will not be able to see the light on the surface of the fabric. You must be very careful when accomplishing this test. Solvents exist inside the wing or fuselage, and if the bulb accidentally breaks, it could cause the fumes to ignite. To prevent this, be sure the bulb is protected. A protected droplight works well for this purpose. You can also do this test by cutting a small hole in an inspection hole area and looking through it while holding the light above the surface. If you see light with either of these tests, you do not have adequate UV protection.
One More Coat or Two
Regardless of the outcome of the light bulb test, you should apply a third coat of Poly-Spray to the surface. This cross coat will ensure that you have an adequate amount of coverage. You may want to spray on an additional coat. Some people sand after the third coat and apply a fourth. This will sometimes result in a smoother surface to which the topcoat is applied. But do not continue to build up the Poly-Spray beyond four coats, because it will reduce the flexibility of the chemicals and may cause a cracking problem in years to come. Understand that you will see the pinked edges of tapes and you will see the weave in the fabric. To hide those areas requires too many coats and may result in cracking of the coatings. Only the old covering method of using nitrates and butyrates will hide the weave of the fabric, but the price paid for hiding the tapes is a heavy airplane that has excessive coats of chemicals on the fabric.
The bottom line is this: Check for proper UV protection using the light bulb test. This is most important, and it should occur after three cross coats of Poly-Spray have been properly applied. You are now ready to spray on the color coats, so get to work and have fun finishing your fabric-covered airplane.


