The next step in our ongoing discussion of fabric covering is to shrink the fabric to its proper tautness. This is a critical step in the covering process. Proper shrinkage is essential to a long-lasting covering job. Polyester fabric will shrink approximately 10% to 12%. When using the Poly-Fiber covering system, and all other covering systems except nitrate and butyrate dope, the tautening process ends after you shrink the fabric with a household iron. Covering an aircraft using Ceconite fabric along with nitrate and butyrate dope is a different story. Nitrate and butyrate (even the non-tautening variety) will continue to shrink fabric throughout the life of the airplane, with both Grade A cotton and polyester fabric. As the dopes shrink, they tighten the fabric they have encapsulated. Proper heat-shrinking procedures for Ceconite fabric may be found in the Ceconite covering manual.
When using Ceconite fabric, use only non-tautening dopes to cover your airplane even though they will shrink (to a lesser degree than regular dopes) with age. When using this process, you will not shrink the fabric to its maximum prior to applying the dopes, because you must allow for the resulting shrinkage caused by the dopes themselves.
There are several reasons why an aircraft has to be re-covered before the full life of the covering system has been achieved. One of them concerns improper tautening of the fabric when it is placed on an aircraft structure. If the fabric is too loose, it will create a drumming effect in flight, causing the chemical coats to crack and peel. If the fabric has been tightened too much, structural damage may result. Either of these problems will contribute to having to prematurely re-cover your aircraft. This in mind, it is important that you use the proper procedures to tighten the fabric.
The fabric tautening process is much simpler today than in the days of Grade A cotton fabric. Cotton has to be initially shrunk with water and then allowance made for the fabric to continue to tighten through the years as a result of the shrinking of the dopes that are applied. Attaching the fabric properly prior to the tightening process is essential. If it is too loose when attached and glued, you will never be able to achieve the desired tautness. If it is too tight when attached you will risk damaging a structure from the subsequent tightening through the years.
Todays polyester fabric is shrunk to its optimum tightness by applying heat with a regular household iron. Any additional tautening is not only unnecessary, but it may be harmful to the underlying structure. Too much tightening can distort or damage the components of the airplane. We will use a regular household iron to shrink the fabric to proper tautness, using the Poly-Fiber covering system for our illustration. With any system, be sure you follow the procedures that are outlined in the manual.
The initial tautness of the fabric prior to the shrinking process was discussed in a previous article. As a brief review, if you are covering a wing, the fabric should be attached loose enough to allow you to pull the fabric above the top of the structure about 1 inch. As
you gain experience you will be able to properly judge the amount of tautness prior to shrinking.
Iron It Out
The iron you use must be properly calibrated prior to using it on your fabric. You will want to calibrate and mark at least four temperature settings: 200, 225, 250 and 350. Your iron should be of a high enough quality to hold the desired temperatures within +/-10.
Lets look at what actually occurs when you tighten polyester fabric. Once again, the fibers have the capability of shrinking about 10% to 12%. This will occur at a maximum temperature of 350 F. At 250 F the fabric will shrink about 5%. At less than 250 F (200 to 225) the fabric will smooth but shrink little. At a temperature of 370 F the fibers will actually begin to loosen. At 425 F the fibers will melt. As you can see, it is extremely important for you to know the temperature of the device you are using to apply the heat. The household iron you use should have a rating of at least 1100 watts or it will not reach 350. Never use a heat gun to shrink fabric. You have absolutely no idea what temperature is being emitted and furthermore, the temperature being applied will vary according to how far away from the fabric you hold the gun.
The Calibration Process
Obtain an accurate thermometer with a stem that can be placed under your iron. The best thermometer is a glass bulb type that is pre-marked for the temperatures outlined above. This is available through all Poly-Fiber distributors.
Purchase some silicone heat-sink compound.
Build a half-inch-thick stack of dry paper towels. You will use this as a heat sink on which to place the iron while calibrating it.
Next, place a small amount of heat-sink compound on the bulb of the thermometer and lay it in the middle of the paper towels.
Place your iron on top of the thermometer that is on the paper towels.
Turn the iron on, advance the heat control to the wool setting, and watch the temperature rise. Let it stabilize and then vary the control to reach a temperature of 200.
Using a piece of masking tape, place a mark over the temperature dial at the 200 setting. Vary the temperature until you have the iron calibrated and marked for 200, 225, 250 and 350.
Turn the iron off and allow it to cool. Then thoroughly remove the silicone heat sink on the bottom of the iron.
Shrinking the Fabric
After attaching the fabric to the structure and prior to shrinking the fabric, you must allow the fabric cement to completely dry. Failure to do so will often result in the fabric being pulled loose from the structure.
Normally, you will do two separate iron passes on the fabric. The first ironing is done at 250, followed by a final ironing at 350. If you are covering an ultralight or a lighter structure aircraft, shrinking beyond 250 could result in structural damage. Also, if you are using nitrate and butyrate dope then you will only shrink to 250.
If you have used a fabric envelope with sewn seams, you will want to shrink the area immediately along the seam first. Failure to do so will cause the seam to be crooked. You will want to be sure that the seam is perfectly straight. Otherwise, you will have difficulty placing a finishing tape over the seam.
As you begin the shrinking process, the fibers of the fabric will shrink uniformly and evenly. If you are doing a large surface, such as a wing, begin in the bay near the wingroot. Shrink that at 250 and then do the bay at the wingtip. You can then work your way toward the middle of the wing. This will help prevent any warping of the airframe. Let the iron glide over the surface-no pressure is necessary. Do not worry about leaving the iron in one place temporarily. It will not scorch the fabric, nor will the fabric get any tighter. The amount of shrinkage is due totally to the temperature, not the pressure or time. Don’t worry about removing all of the wrinkles on the first pass. They will come out with the higher temperature setting you will use on the next pass. Iron over the hard surfaces such as the leading edges. Realize these areas may act as a heat sink and require a little extra time to properly shrink. Be careful not to allow the tip of the iron to penetrate protrusions or rivets and cut the fabric. Also, and this is important, do not place the iron over cemented seams. A temperature of about 250 will loosen fabric cement.
After shrinking the fabric at 250, you will then turn the heat up to the 350 setting and iron everything again. Be sure you shrink all of the fabric at this setting. The 350 setting will shrink the fabric to its maximum of 10% to 12%. Failure to shrink to this setting on most airplanes (other than ultralights) will cause the fabric to be loose forever. When you pass the iron over the fabric at this temperature you will often see steam rising off of the fabric. This is normal. Moisture from the fabric is escaping. Also, it is a good idea to mark each wing bay or area that has been shrunk to 350 using a pencil, not a pen. That way, if you are distracted, you will know which areas are completed.
You will want to purchase a small heat-sealing iron in addition to your regular iron. This smaller iron will be used in some of the non-load-carrying areas that are inaccessible with a larger iron. Use this type of iron only in areas where exact fabric tension is not critical. Removal of wrinkles and smoothing of tapes can be accomplished this way. Calibrate the smaller iron just as you do the larger iron.
If you are a beginning fabric coverer, I recommend learning the techniques on a small surface such as an elevator. Perfect your procedures before going to the wing or fuselage. Ideally, learn the basics from the EAA SportAir workshop, or the company manuals and videos. The video and DVD provide an excellent visual image of the procedure discussed in this article.
Stewart Systems
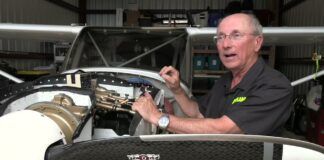
A tour of the displays at the Golden West Air Show in Northern California in early June gave me a chance to interview Doug Stewart, President of Hangar 21. You might be more familiar with the company under the name of Stewart Systems, maker of eco-friendly fabric coverings and paint for aircraft.
Stewart was demonstrating the company’s fabric covering system and started by handing a bottle of the adhesive around as he described it as non-flammable, non-toxic and sufficiently non-aromatic that, It can be applied in the bedroom with no outside ventilation. A sniff of the bottle bore that out. In addition to keeping the neighbors and spouse happy, these benign characteristics mean that it can be shipped UPS/FedEx with no additional HazMat expenses.
The product is supplied in plastic bottles and requires dilution with distilled, not filtered, water. Stewart was clear about this: Filtration devices are not all the same in what they remove, and with age they may change in their effectivity. You only need a gallon bottle or so to do an entire airplane, so thats not a big expense, he said.
Application was equally easy. After cleaning the tubing, you need only brush a liberal coat on. There’s no need to rush, as you could come back the next day to apply the fabric.
After coating a length of tubing, Stewart simply draped some fabric across it. The glue is tacky, so you can lift the fabric and adjust out the wrinkles. Once it was smooth, he applied a hot iron to activate the glue. As it soaked through the fabric, a simple wipe with a rag was sufficient to remove any excess.
Gluing the tapes and rib-stitching, if needed, is done on bare fabric with no preparatory coatings required. Stewart pointed out that, You can paint the glue onto the tape and lay it on the base fabric, then apply the iron to activate it. He added that the glue doesn’t stick to the iron, so it makes a very smooth edge.
The last step is to apply a second coat of the glue, wipe off the excess, and call it done. No secondary hot iron is needed.
Stewart was also happy to point out that the fabric system is approved by the FAA under STC SA01734SE.
Stewart Systems is located in central Washington, Cashmere to be precise, right on the Cashmere Airport (HS2). Drop by to see us, he said. Its a short field, so if you prefer to land at Pangborn, well come pick you up. Stewart Systems also has an eco-friendly group of paints to finish off your project. Look for a lengthy report on it in an upcoming issue.
For more information, call 888/356-7659, or visit http://www.stewartsystems.aero/.


