One of the traditional advantages of building your own airplane—whether from a kit, plans or from scratch—has been the builder’s choice of modifications, minor or major. Because the builder listed on the FAA-required affidavit is considered to be the manufacturer, pretty much anything goes, at least if the airplane is modified before the FAA airworthiness inspection. After receiving the pink airworthiness certificate, major mods such as engine, propeller or aerodynamic changes are likely to require a reinspection before flying can continue.
For those of us building an FAA-approved Experimental Light Sport Aircraft (ELSA)—the Van’s RV-12 being the primary example—we expected to be limited always to factory-approved additions and modifications. Changes to my RV-12 (the 10th one to fly) were initially limited to picking one of several Garmin GPS receivers and adding a Dynon autopilot. (Since my plane was completed, Van’s has authorized and offered a longer list of options, including cockpit finish packages, external lights and a wheelpant set.)
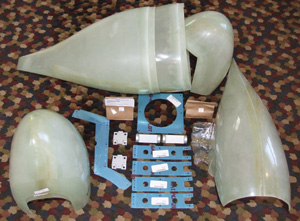
Here’s what comes in the RV-12 wheel fairing kit. Parts fit and finish are excellent.
Most RV-12s are being built as ELSAs, perhaps because unlike Experimental/Amateur-Builts, original and subsequent owners can take an FAA-approved 16-hour inspection course that allows these owners to complete the annual condition inspections. (The repairman privilege for an E/A-B is limited to the original builder/owner.)
Now there’s a new wrinkle relating to ELSA projects: The FAA’s interpretation of LSA rules is that after a successful airworthiness inspection, any change may be made to the aircraft. No factory approval is required.
The Wheelpants Decision
None of this background has any bearing on my considering whether to add wheelpants to the RV-12, but the details are worth knowing if you are thinking of building anything that offers a choice of licensing in either the E/A-B category or as an ELSA. At this point, only the RV-12 kit offers that choice; the FAA has agreed that the kit qualifies for Experimental/Amateur-Built, and the kit may also be built as an ELSA based on the company having licensed the RV-12 prototype as a factory-built Special Light Sport Aircraft (SLSA).
Almost three years ago, RV-12 design committee chairman and chief engineer Ken Krueger mentioned that wheelpants were considered early in the design. They were expected to add 3 knots to the indicated airspeed at sea level and maximum continuous power (5500 rpm engine speed geared down to 2263 rpm prop speed for the Rotax 912S). Because the level full-power speed for an LSA is limited to 120 knots, the slightly ground-adjustable Sensenich propeller was to be set for no more than 117 knots IAS.
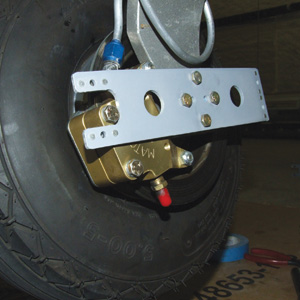
The inboard attach bracket is bolted through a machined bracket mount, the gear leg and into the brake plate.
Believing that a 3-knot speed advantage at full power (less than that at a slower, more efficient cruise power setting) made it difficult to justify the expected cost of the wheelpant kit ($600+), I initially decided to pass on the option.
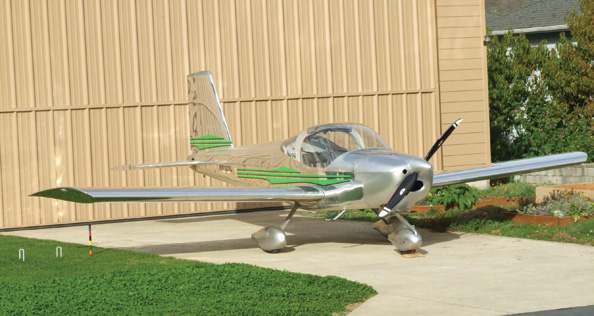
But that was before seeing the red prototype with its pants on. My first look was at our local airport, where the Van’s Aircraft annual homecoming has been held for the last three years. The wheelpants really set off the appearance of the RV-12, maybe even more than on the other RVs. My wife, Lois, agreed that our RV-12 needed wheelpants.
Maingear Fairings
A few days after placing the order, our wheelpants kit was ready for pickup, and a 40-minute drive to Aurora, Oregon, had all but a few parts tucked in the family wagon. A few small things came later in the mail.
Construction begins with trimming and fitting the six well-made fiberglass wheelpant parts, using molded-in scribe lines. The rear pants are joggled to accept the front part of these fairings. Perma-Grit tools and a small sanding drum powered by a flexible-shaft rotary tool speed the process. Rectangular holes cut into the mainwheel pants accommodate the gear legs. I always don a dust mask and wear shop goggles for this kind of work.
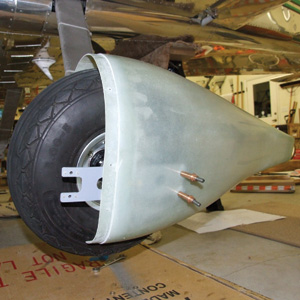
With the gray fairing brackets bolted in place, the aft mainwheel fairing is screwed in place.
After the four heavy aluminum wheel-bearing brackets are prepared, the fiberglass fairing parts are taped together. The wheel-bearing brackets are positioned inside their fairings, and a light is placed inside to locate drill holes in the fiberglass parts for eventually screwing them to the brackets. I managed to mismark and therefore misdrill two of these screw holes slightly, but postage-stamp-size pieces of light fiberglass cloth placed inside, a bit of filler and a few drops of resin mixed with catalyst allowed starting over and getting it right. A surprising amount of hardware is required, and it comes with the kit. Included are beautifully machined axle extensions and bracket mounts.
All three wheels and both brakes must be removed. The RV-12 is light enough that appropriately strong and properly sized sawhorses and two or three people can elevate the aircraft without using jacks. I had to remove the transponder antenna to get the plane positioned right on the front sawhorse.
The original brake and axle bolts go through the new inboard bracket mounts and reattach the brakes. Long bolts secure the new outboard axle extensions. Two screws outboard and two inboard fasten the rear fairing to each leg, and wheel clearance is checked before screwing the front fairing to both the new wheel brackets and to the leading edge of the rear fairing.
The Front End
Because the nosegear swivels, the front wheel fairing fabrication and attachment are entirely different from the maingear pants. The two fiberglass nosewheel parts are trimmed to molded-in scribe lines, but unlike the maingear fairings, there’s no molded-in joggle in the front set. Instead, two factory-cut sheet aluminum splice strips are prepared by bending them to shape, attaching seven nutplates on each side, and drilling for flush riveting to the lower/forward fiberglass fairing. Rivet holes are accessible with a rivet squeezer. The aft fairing has dimples that are drilled with a #40 bit to locate the screw holes that attach it to the forward fairing. Also, a ¾-inch hole is marked and drilled with a step drill. Left and right ¾-inch holes will accommodate a tow bar.
Factory-formed left and right attachment brackets come as one piece that is cut apart, and holes are deburred for rivets and nutplates. With the left and right attach brackets fastened to the lower/forward nosegear fairing, a supplied aluminum drilling template is used to get the holes in the right places to mate with nutplates and screw holes on the nosegear fork. With the airplane on sawhorses, the nosewheel is removed easily for this process.
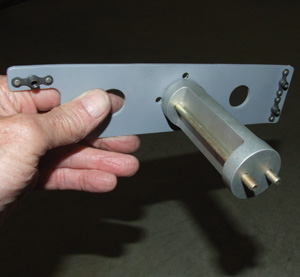
The outboard gray wheelpant attach bracket is held by bolts through a machined axle extender.
The nosegear fork comes with a ¼-inch pilot hole on each side, several inches forward of the nosegear axle. These holes are final-drilled to 5⁄16 inch. An AN5-7A bolt on each side is placed with the head inside the nose fork. Seven AN-5 thick washers are stacked outside the fork on each side, and the bolt is secured with a locking nut. The bolt, washers and nut align with the ¾-inch hole in the fiberglass forward fairing and become the attach point for a tow bar. (I’ve seen the prototype of a combination folding tow bar and rudder lock that Van’s Aircraft may market.) Checking clearance of the nosegear fairing and the nosewheel and the strut itself completes the nose fairing process.
But Wait…There’s More
A seventh fiberglass piece that comes with the kit is the nose strut fairing. After cutting a slot in the forward end of the fairing, it fits snugly over the angled nosegear strut. The fairing is curved to match the forward bottom of the nosegear strut.
The strut fairing comes with wide flanges on the aft/bottom that are spread apart to fit the fairing over the strut. One hole on each side, drilled through the fairing and into the steel strut, allows tapping the strut for a pair of screws that will keep the fairing in place.
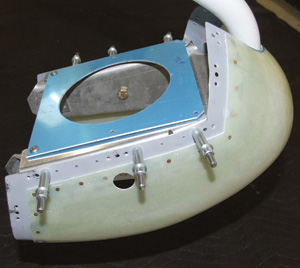
The lower nosegear fairing is Clecoed to the nosewheel fork. Note the blue drill template.
A piece of piano hinge is cut to length and positioned inside the pointy/trailing edge of the fairing. I found that clamping the piano hinge inside the fairing well enough to drill holes and then squeeze-riveting the piano hinge halves to the inside of the fairing was the most challenging part of the entire project. Grinding the end of the piano hinge wire to the proper shape to allow pushing it inside the hinge halves was also somewhat difficult. I removed the trailing edge flange with a hacksaw and smoothed it with a Perma-Grit bar and sandpaper.
The final construction task was to get an appropriately shaped tip on the piano hinge wire and then bend the wire slightly so it would get past the nosegear strut and into all the hinge holes.
The Finish
Some months before we decided to invest in the wheelpant project, a neighbor known for his expertise in aircraft finishes suggested that he help me attack my worse-than-mediocre attempt at a good finish on the RV-12’s few fiberglass parts: top and bottom cowl and tail stinger parts. Henry Bartle honed his finishing skills first on his highly competitive high-performance radio-controlled racers and then on refinishing Chevy Corvettes in Southern California. Since then, he has painted a lot of airplanes including his own Lancair IV-P.
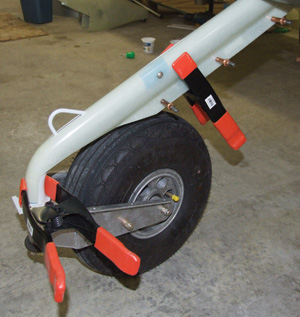
The fiberglass nose strut fairing is clamped and Clecoed over the strut. The lower flange will be cut off.
For my part, I might have done better original paint work with a bucket and a whisk broom, but I used rattle-can primer and automotive “chrome” spray. Not good. Anyway, Bartle and I spent a considerable part of two weeks preparing the wheelpants and the other fiberglass parts for a good finish, concluding with nearly a liter of professional quality silver-like paint and clearcoat. Painting the wheelpant parts was relatively easy, as they had not been mishandled with rattle cans. The airplane looks really fine now. I owe Bartle and his wife a couple of really good dinners.
In the Air?
Taxi tests were followed by airborne tests. Van’s reputation is to be slightly conservative in published performance data, and I found that to be the case with the wheelpants.
Before the wheelpants, indicated airspeeds at 2000 feet (close enough to sea level) were 98 to 99 knots at 5000-rpm cruise and 105 to 106 knots at the maximum allowable 5500 engine rpm. Tests were done in smooth air, mostly with the autopilot on altitude hold while I sat and watched.
With the pants and nose strut fairing, speeds were 104 to 105 knots IAS at 5000 rpm and 112 knots at 5500 rpm. Our project was primarily for the improved aesthetics, but a bit more speed or greater range sure doesn’t hurt.
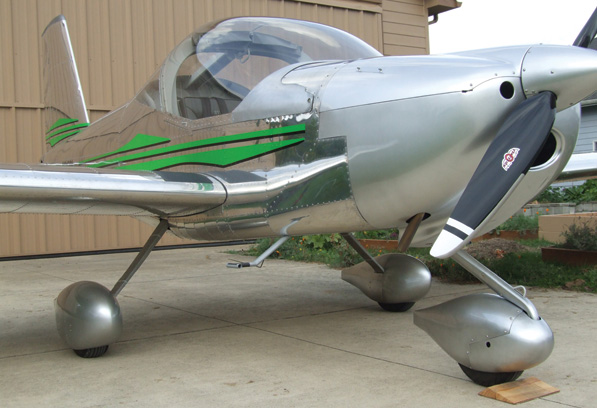
Wheel fairings add both airspeed and cosmetic value.
For more information on Van’s Aircraft, call 503/678-6545 or visit www.vansaircraft.com.

![]()
Dave Martin served as editor of this magazine for 17 years and began aviation journalism evaluating ultralights in the early ’80s. A former CFI (airplanes, gliders, instruments), he’s flown more than 160 aircraft types plus 60 ultralights (including a single-seat, no-basket hot air balloon). Now living at a residential airpark in Oregon, he flies his new Van’s Aircraft RV-12.


