 You’ve spent years building your dream airplane—finished and outfitted exactly the way you want it. The aircraft is a statement—everything you ever wanted in a flying machine. What better way to memorialize your hard work than a miniature of your very own airplane?
Most anyone that has attended a major fly-in has seen the booth for Factory Direct Models (FDM)—a brightly lit display area filled with models of civilian and military craft of all eras, shapes and sizes. The company specializes in custom models—each one built to a customer’s exact specifications—rather than stocking generic models for sale. FDM was founded years ago by Americans stationed in the Philippines who realized that the many U.S. pilots and crewmembers who worked on and flew military aircraft would love to have a model of the planes they were involved with. Coupling this desire with the knowledge that the Philippines had workers who could produce these models with excellent quality and for a price no American factory could touch made it a natural business endeavor.
FDM builds everything from custom, one-off models for individuals to quantity-produced models for major aerospace companies to distribute to employees or special recipients. They still do work on wooden models, carved, shaped and finished by hand, but also have invested in CNC and 3D printing technologies to produce popular models in quantity. While each finished model might be unique due to paint and marking differences, a Cessna 172 airframe certainly doesn’t need to be custom carved each time. Neither, now that we think about it, does an RV-7.
About the Build
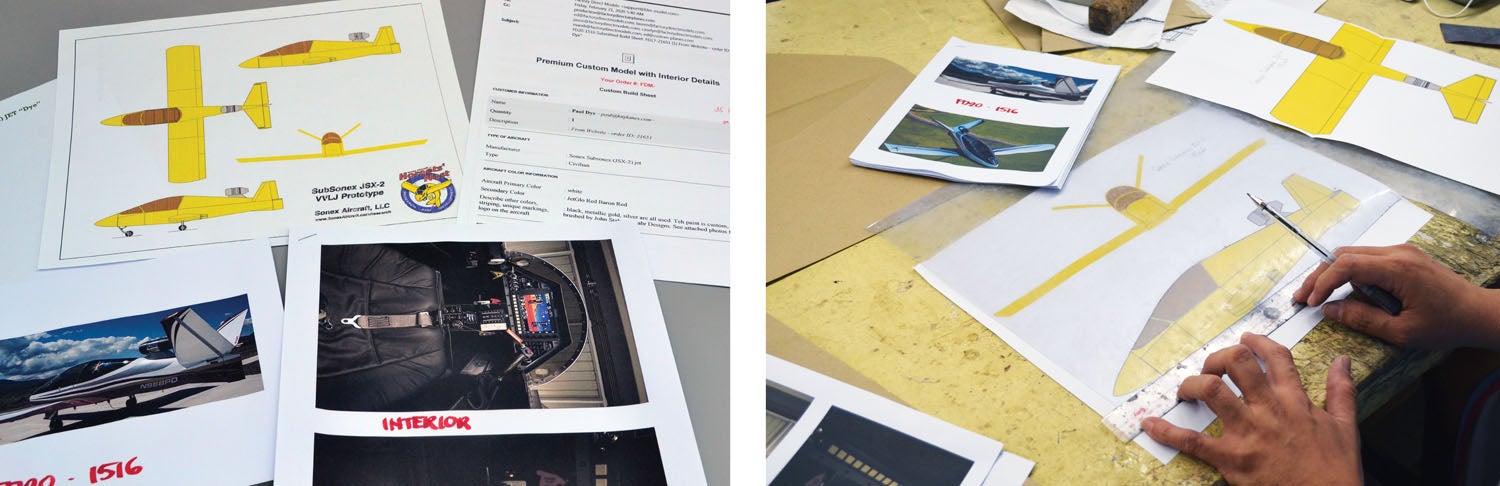
You begin an order with FDM by going to their website. But before you do that, I’d suggest pulling together a collection of photographs and any drawings that you might have that detail your paint scheme. The builders and painters at FDM are good—very good. Antennas, fairings, drain tubes—they are all going to be on the model if you give enough detail in your package. Provide enough views of the paint scheme so that any questions about where lines cross and how the shapes transition from one surface to another are fully answered. Note your antenna locations, and if they are painted to blend in, make sure that you have pictures that show them—if they are well enough hidden, you might not get them on the model.
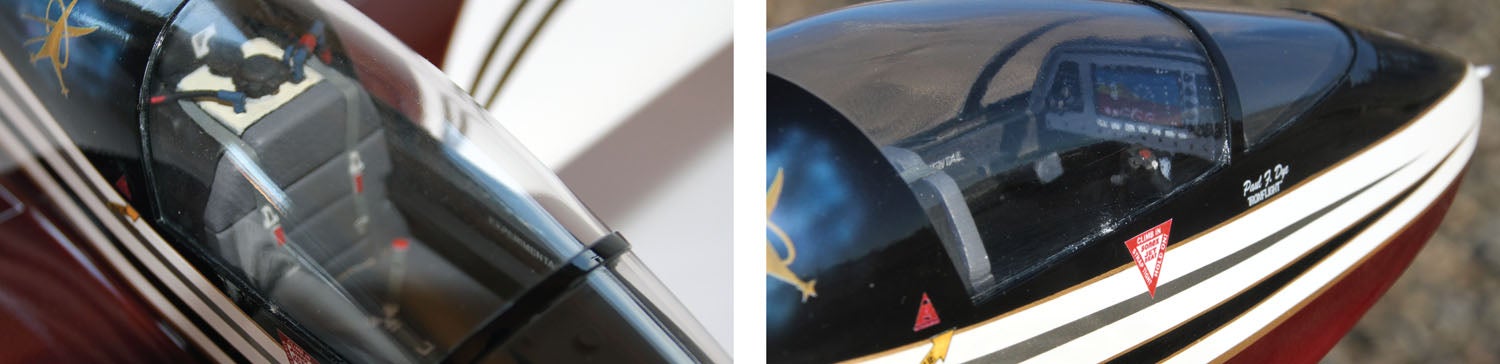
If you’re doing a detailed interior, take plenty of pictures there as well. The modelers will do their best to give you exactly what you show them! On our SubSonex, for instance, we have a cue card with the quick pre-takeoff and pre-landing checks Velcro’d in place on the center console. It was there when we took the pictures—and it is there on the model, exactly as it appears! I haven’t gotten out a magnifying glass to read it, of course—but it sure looks authentic from a few inches away. Switches on the grip, panel toggles—they are all there, so make sure you cover everything. The modelers want to do a good—no, a great —job, but they can only work with what you give them.
If the model you are having built is a unique type of aircraft, one that FDM might not have built before, be sure to find and provide a dimensioned, three-view drawing. They might already have one in their files, and yes, the internet does work at their factory—but why take chances? Factory three-views are generally a good bet—or if you built from plans, a good photocopy of the overview would do.
With all this together, go to the FDM website, where you’ll start the process of giving them all your information (including, of course, payment information). Once they have confirmed the type of model and options, they’ll give you a price and ask to charge half of that up front. They will then direct you to a page where you can uplink your photos and drawings. In our case, with a unique paint scheme, we had quite a few pictures to send—but their system took everything without a glitch, and they had plenty to work with.


Feedback Loop
If your paint scheme is really unique, expect a message back that they are going to need extra money for custom painting. This really only makes sense—it is one thing to paint a three-color set of stripes and completely another to duplicate an airbrushed scheme with art and emblems. For us, this added about $85 to the finished price of the model.
Once you have everything in, you simply sit back and wait—on average, about three months—more if you have an interior and an unpredictable amount more if a worldwide pandemic breaks out. In our case, we placed the order in February of 2020 and received the model in December.
Following the Breadcrumbs
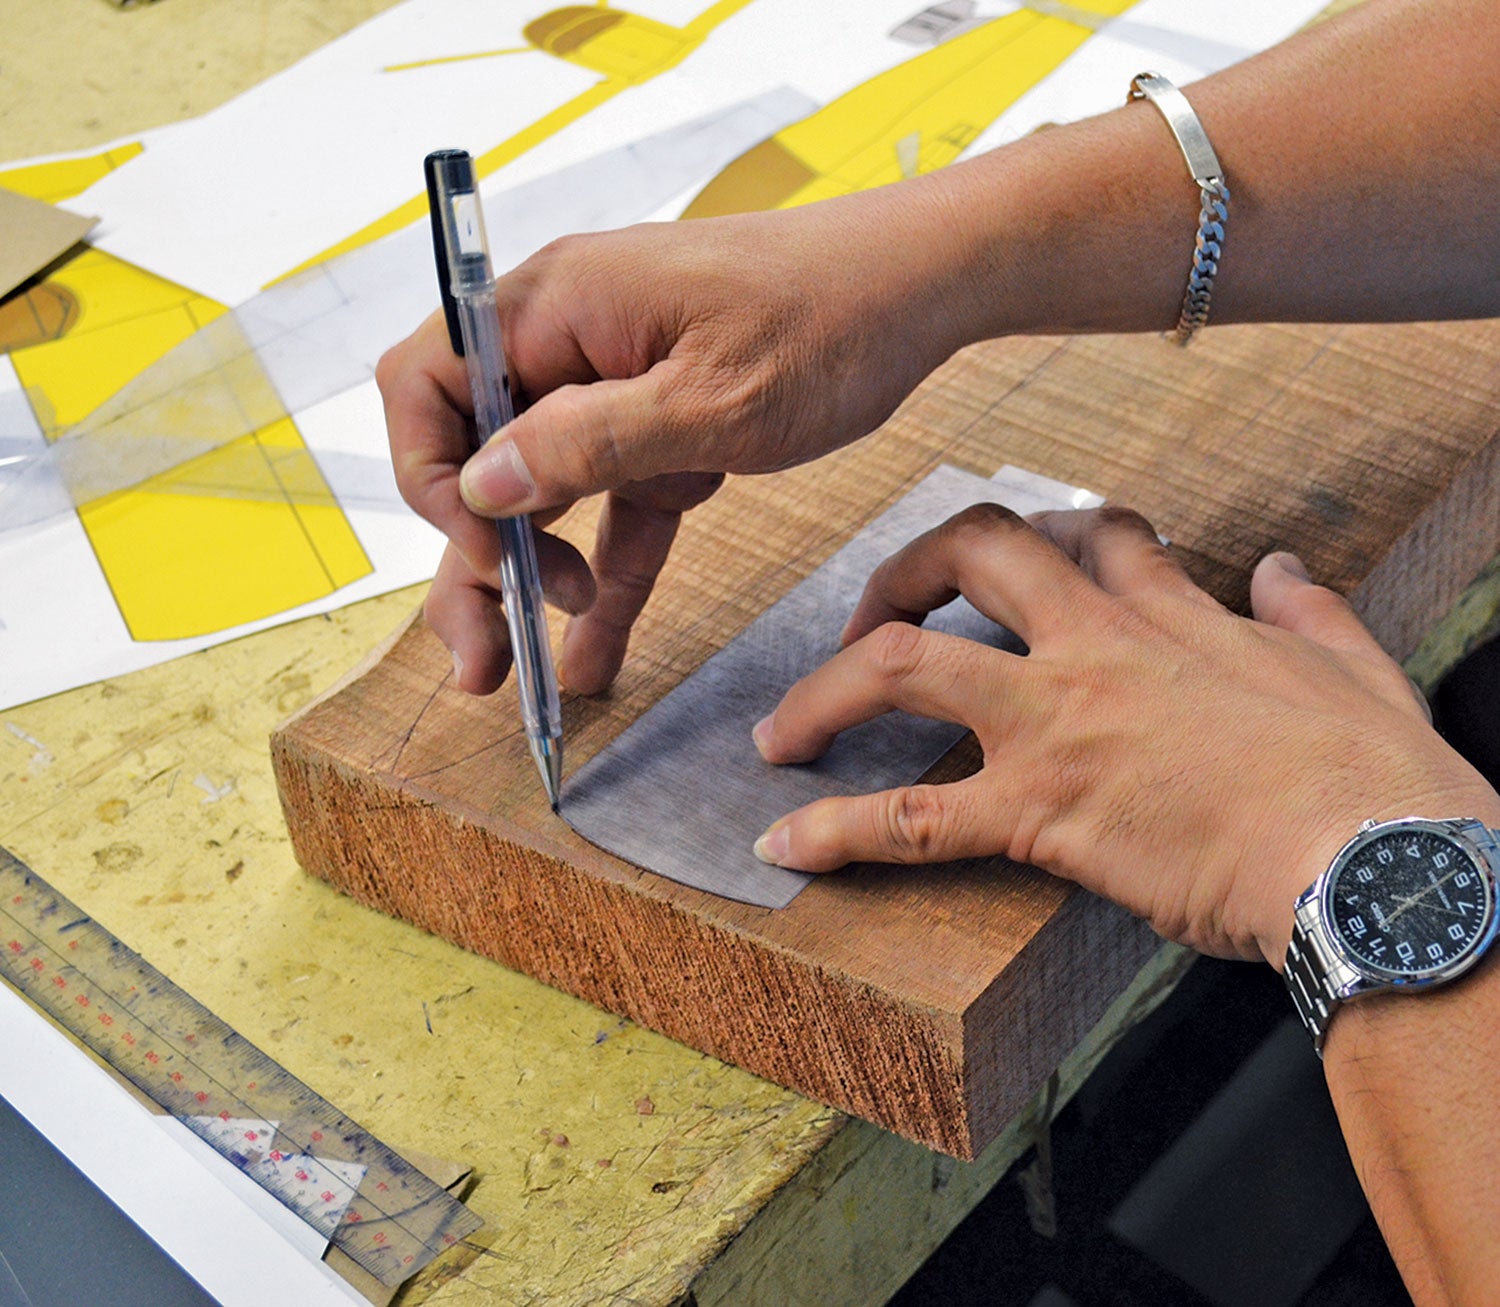
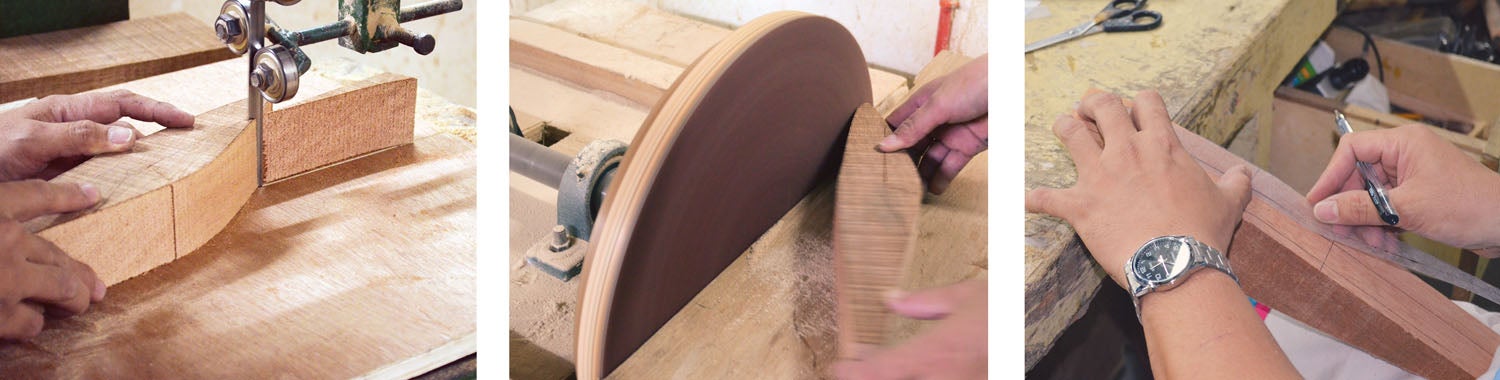
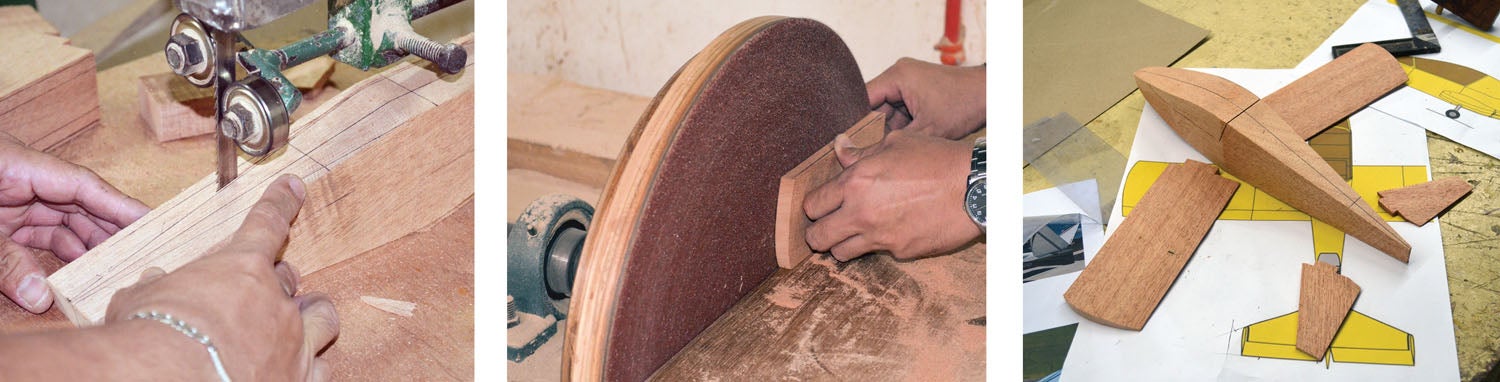
Despite the COVID delays, we watched eagerly as our model worked its way through the system, following along virtually through pictures sent on the web. The first step was for the model builder to transfer the basic outlines of the craft from a carefully scaled three-view drawing onto a block of wood. The marked block then visited a band saw so that the basic outline (side view) was created. A combination of sawing and sanding on a belt and disk machine trued the outline until it was close to what was desired.
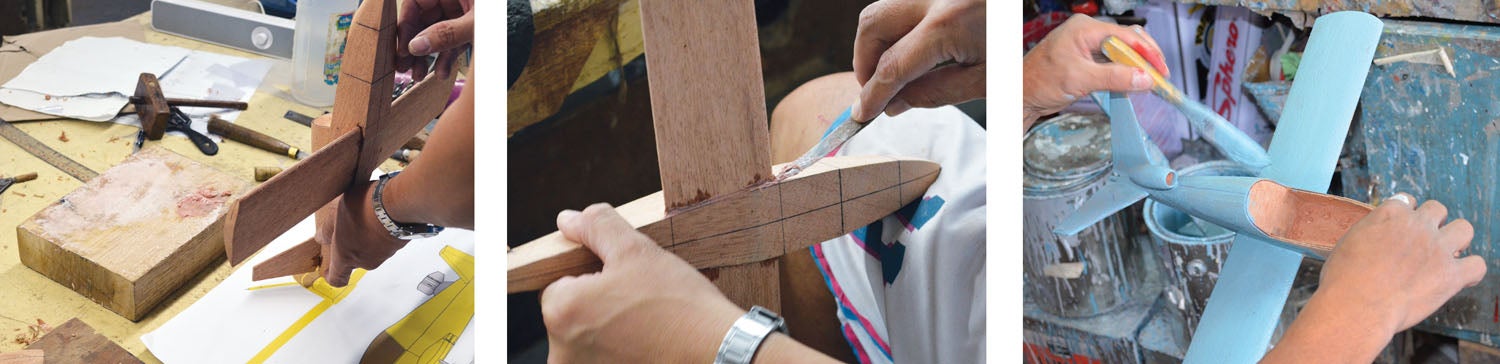
The modeler then returned the block to the drawing table, and the top view was transferred to the wood—after which there was more cutting and sanding. After the basic side and top views are transferred to the block, the modeler starts hand carving, using a variety of tools to shape the curves of the model’s fuselage. Using an assortment of wood files, scrapers, knives and sandpaper, the final shape of the fuselage takes form, compared frequently to the three-view drawing.
Wings and tail surfaces follow a similar path, with airfoils and tips shaped using disk sanders and other tools for symmetry and uniformity. Eventually, the components reach a point where the wings and tail are joined to the fuselage so that shaping can continue. In the case of our model, with a detailed interior, the canopy area was cut out at this point, and the cockpit hollowed out for the detailed miniatures that would be inserted. Components like the external jet engine were shaped and attached, and wing/fuselage joints were glued and filled. At this point, the modeler had a mahogany SubSonex on the workbench, ready for details and the beginnings of the painting process.
What’s Inside
In the case of a wooden model like our SubSonex, they started with a carved model with no interior—then cut away the canopy area and hollowed out the space for the interior. They later formed a canopy to match the shape of the airframe and glued that in place over the finished cockpit. This took time and considerable skill. Each piece of the interior was hand-built and finished, then glued in place. From the EFIS to the switches and controls, every detail was duplicated. As any old modeler might imagine, this has to be a fun (if tedious) job for the builder!
For some unknown reason, the original drawings and pictures confused the model maker, and when we saw the “final” product, the fuel tank—which forms the seat back of the SubSonex—was extended much too far into the cockpit. It was a very pretty model—but it wasn’t accurate. The model was sent back to the builder, where the canopy was opened up, the interior rebuilt and then the model closed up again. In the end, the only noticeable impact was the time it took—the finished model showed no signs of the rework.
Paint Makes the Model
If it is true that “clothes make the man,” then a quality paint scheme really makes a custom model. I have numerous generic model airplanes in my office, presents from various flight programs I have been involved with. None of those is custom, however; they were done in number, all identical, on a production line, to be given or sold to many people.
Custom models are different—each one needs to reflect a particular aircraft in as detailed form as possible. Paint lines and colors have to match, or the effect is ruined.
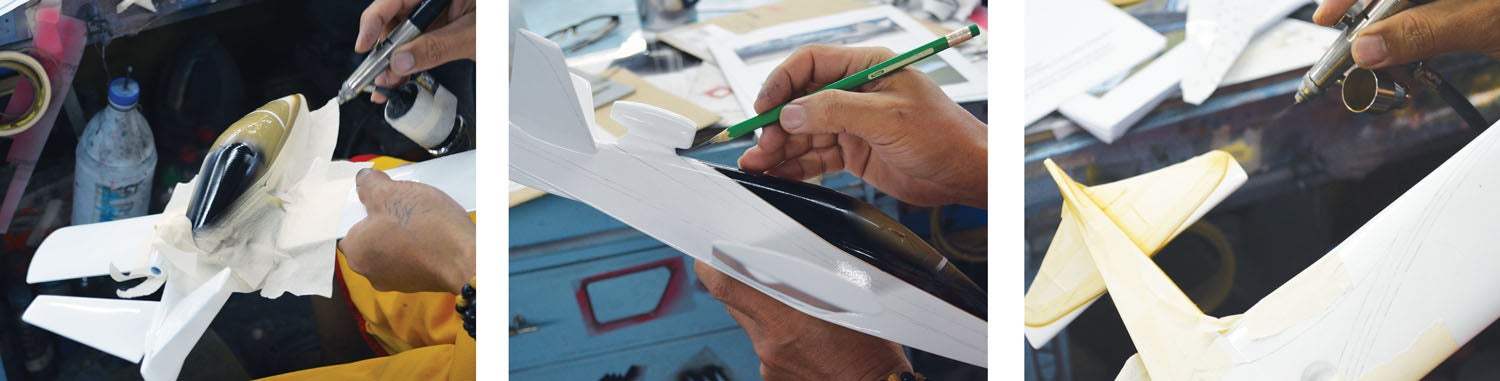
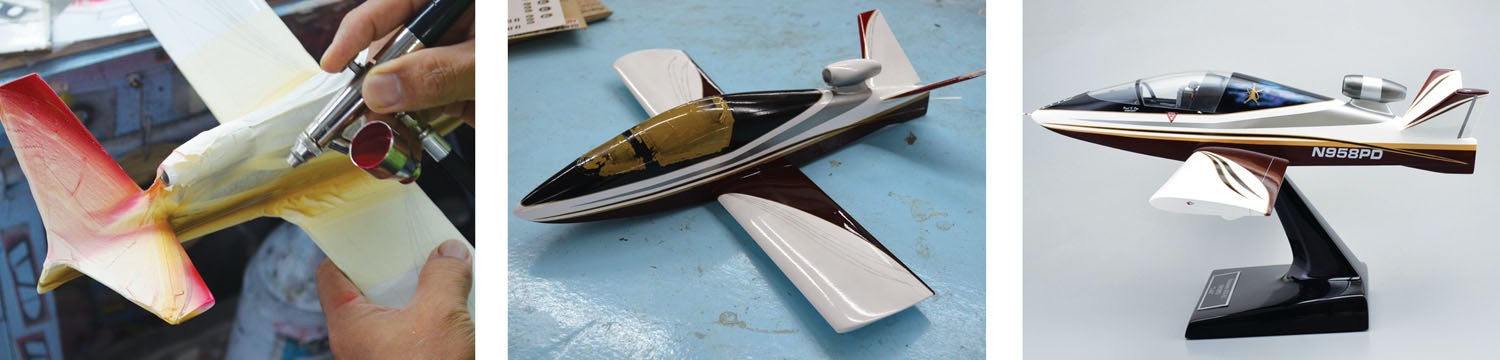
But colors and finish can’t start without priming. The entire model was primed in blue, and various defects visible through the priming process were fixed before an overall coat of white was applied. The real airplane was painted with a process where all colors were applied directly to the primer, without an overall layer of white, as is the case in most airplanes. But since the model didn’t have to fly, weight was not a factor, so overall white it became, and then it moved on to the airbrush artist.
The artist proceeded to paint the model the way most of us paint airplanes—masking and shooting, masking and shooting. The SubSonex required red, black, gold and silver in addition to the white to lay down the basic color scheme. The pictures we sent were referenced in order to make the lines the same as they are on the real airplane.
After the basic colors were applied by airbrush, the detail artwork was done, also by airbrush. Items as small as pilot name and call sign were duplicated using reduced templates and decals. When the entire paint job was finished, photos were sent to us for approval before a final clear coat was applied and the airplane polished for delivery.

The Finished Product—Almost Real!
After we gave the final approval using FDM’s online process (pictures from various angles are delivered via email), we sat back and watched the tracking messages as the boxed model made its way across the Pacific and to our home. When it arrived, we couldn’t wait to see it—but it takes a little time to remove the carefully packed foam from the box. This just heightens the anticipation of the reveal, of course, but it also gives you an appreciation for great packing!
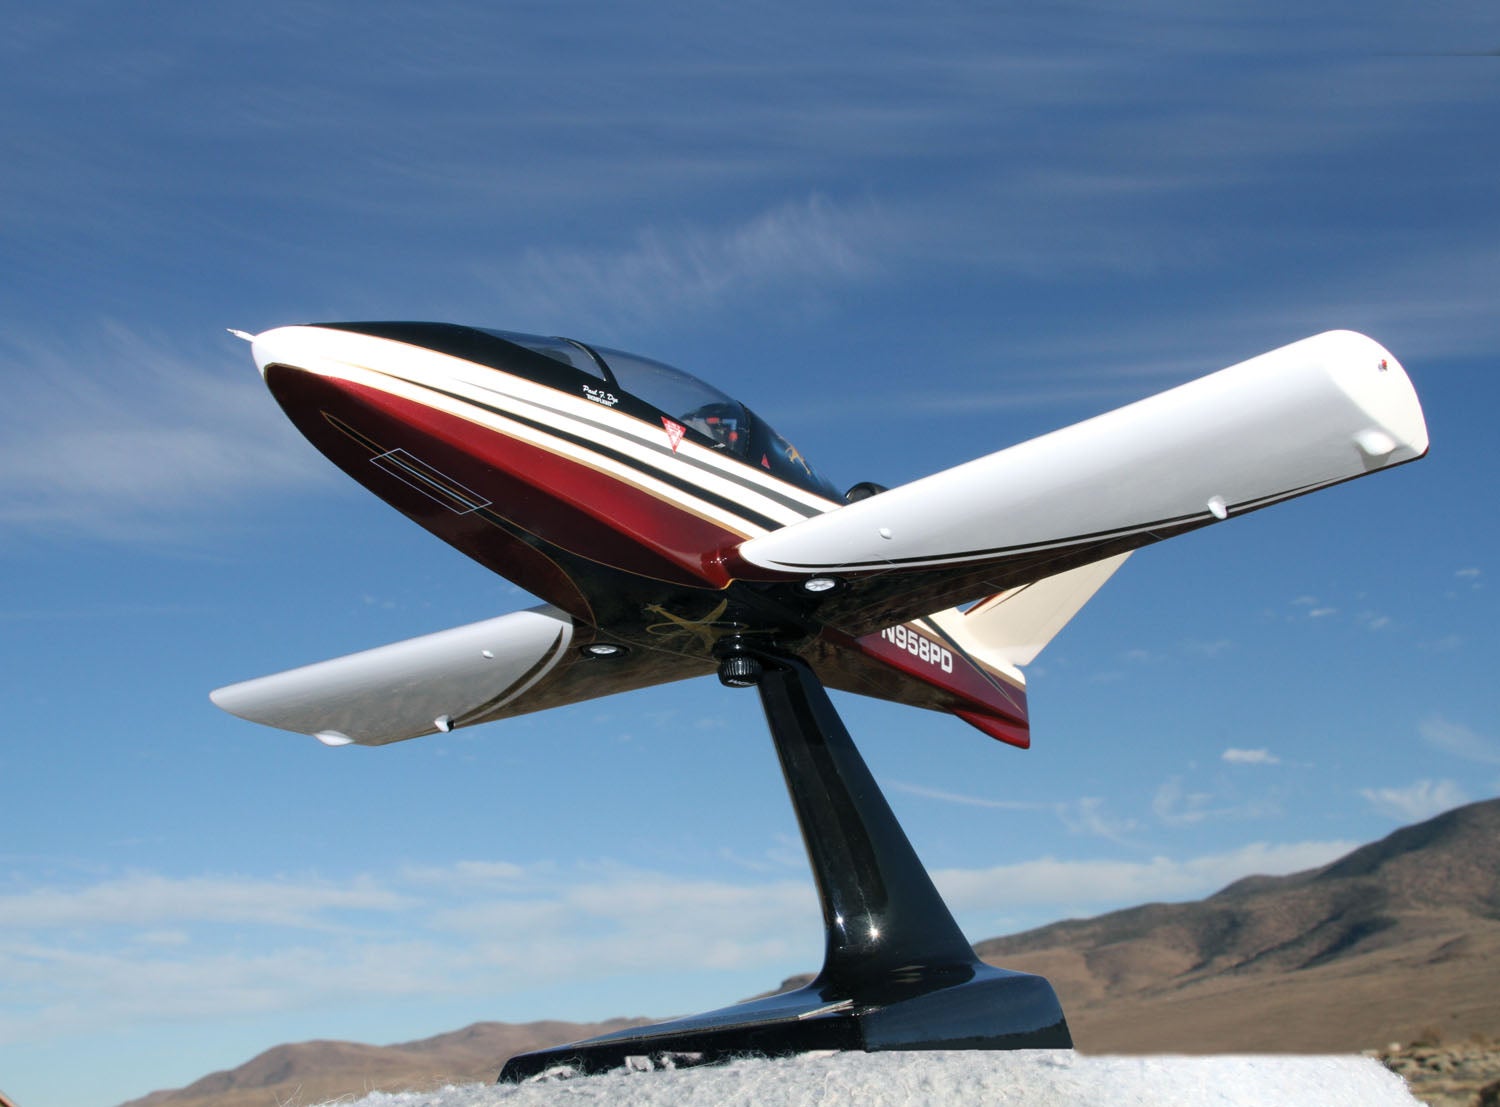
The model lived up to our expectations in every way! The details of the cockpit and the paint scheme were astounding, and even the hand airbrushed placards on the actual jet were rendered in miniature.
Lights, landing gear and antennas are in the correct places, and the cockpit detail goes right down to the cue cards on the instrument panel and the repacking date placard on the BRS ’chute. We had to get out a magnifying glass to verify that, yes indeed, even the “SubSonex” decal on the ruddervator tips was accurate.
The only thing we noted that didn’t seem quite right was the color of the red in the exterior paint scheme, with the model looking more burgundy. We had noticed this in the pictures but had assumed that our computer’s color balance wasn’t quite right. Interestingly enough, when we went to take pictures for this article, the red came much closer to the actual airplane’s color when we used a pure white flash, and it looks that way in sunlight as well. The actual airplane’s red is deeper and darker in the hangar as well. Our recommendation is to provide actual paint samples or color codes to FDM to make sure that there is no mistake in this regard.
Overall, we’re very happy with the model. The process took considerably longer than anticipated (see sidebar) for a number of reasons. It’s amusing that the actual airplane took approximately three and a half months to build, whereas the model took more than twice that long. But the only rush we were in was to get it done for this report—so it didn’t really matter in our case.
If you’re looking for a wonderful memento of an airplane that you’ve spent years pouring your skills and heart into building, one of these models might be an answer. It is a bit of an indulgence to buy one for yourself, admittedly. So maybe FDM needs to figure out how to market directly to spouses of builders rather than the builders themselves. A model of an important airplane makes a wonderful gift.
Photos: Courtesy of Factory Direct Models and Paul Dye.


Very nice report. Thanks, Paul!
Excellent review and similar to my experience. I even have headsets on the seats of my Glasair, ah but the the wiring is coiled in the model of my David Clarks!
They repainted part of my very complex paint scheme and got every detail that I gave them. And the belly is finally clean!
If you own a plane that you are proud of, this is a necessity on your Christmas list, similar but even better than the half hulls of my boats even. And if you built a plane don’t wait for any holiday.
Comments are closed.