A few months ago, we visited our friends at the Tempest Aero Group and watched as they made hundreds of oil filters and spark plugs every hour. Watching filter production (in the post-COVID world) was like watching wartime production in action; it was all hands to the pumps, getting as many out the door in as short a time as possible. The spark plug area was more sedate but equally interesting—a mainly automated process with a large machine centered around a carousel where the plugs grew before your eyes as components were added. As I said, very interesting…but at the same time, amusing because while there will always be a great demand for the products in the certified airplane world where aviation spark plugs are mandatory, the Experimental world is quickly leaving them behind in exchange for the ubiquitous BR8ES automotive spark plug because so many builders and owners are switching to electronic ignition systems and leaving their old Slick and Bendix mags behind.
The NGK BR8ES (or DENSO W24ESR-U) can be purchased in quantity from many sources and in a couple of different flavors. First tip: The BR8ES (also search for as BR8-ES, BR-8ES or any other variation of where the dash goes) comes in two different types—one with a screw-on tip for the spark plug wire and one with a solid tip. The first has a part number of 5422 and is very common. The other has a part number of 3961 and is less common, but it is the one you want for your airplane. Why? Because some folks have reported that the screw-on end can get loose and cause RFI that shows up as radio noise. The solid tip can’t do this. Whether this is true or just an old wives’ tail, it is not that hard to find the 3961s (as I write this, www.rockauto.com has them for $1.88 each), and there is no disadvantage to the solid tip so, why not?
Of course, you can use aviation plugs with some electronic ignitions, but with aviation plugs going for north of $30 each, it’s hard to pass up those $1.88 plugs and throw them away each time. I personally have four Lycoming engines, all with electronic ignitions, so I buy several dozen BR8ES plugs at a time and keep a bunch on the shelf. All my wonderful aviation spark plug tools (used for cleaning and gapping) sit in a drawer, used only when I have to work on someone else’s plane that still has mags. The NGKs are so cheap that while you can clean them, it is simply easier to throw them away every couple hundred hours and drop in new ones. It’s just economics.
Adapting
Of course, automotive spark plugs don’t just screw into a Lycoming engine—they are too small. Automotive plugs screw into a 14mm hole, whereas aviation plugs traditionally are 18mm. That means you’ll need an adapter for each plug, and these are usually supplied by your electronic ignition provider. They are generally made of brass, but some have been known to be steel. We’ve used both, but generally use the brass sets because they are more generally supplied.
Using an adapter means that there are two seals for every spark plug: one that seals the plug to the adapter and one that seals the adapter to the cylinder head. The first comes on the automotive plug and is generally a crush washer—hollow soft steel that crushes down when you torque the plug in place. While most mechanics will remove a plug and put it back in place again, the engineer who designed them probably considers these crush washers to be single use. I haven’t heard of problems (such as leakage or a plug backing out) from reusing them; I generally will only put one of these plugs in and out a couple of times. Again, they are cheap to simply replace.
The seal between the adapter and the cylinder head is accomplished the old-fashioned way—with a copper gasket. These gaskets come with aviation plugs (and can be bought separately by the thousands) and when new are in an annealed condition, which is to say “soft.” Using them properly (with a torque wrench) crushes them, providing a seal and adding tension that prevents the spark plug (or adapter) from backing out. Many mechanics routinely reanneal old gaskets and use them over, while many others declare that those who reuse them are just cheapskates—so why not use new ones every time? I personally reuse them sometimes because I enjoy the process of heating them up with a torch, watching them change color and then letting them cool down. Of course then you have to clean them to make them pretty…the whole process taking more time than simply buying a bag of new ones from Aircraft Spruce. It’s a religious argument; do what you’d like!
The Torque Problem
Automotive spark plugs get torqued to 18–25 foot-pounds. Aircraft spark plugs get torqued to about 35 foot-pounds. The difference is in the size of the thread (14mm versus 18mm) as well as the type of gasket used that provides a sort of spring retaining force. This means that to make everything happy in your Lycoming installation, you have two different torques in the assembly. If you torque both the plug and the adapter to 18 foot-pounds, you haven’t preloaded the copper gasket on the adapter sufficiently. If you torque the assembly to 35 foot-pounds, you’ve crushed the heck out of the spark plug’s built-in gasket. So what to do?
The answer is to torque them both separately, in series—but to do this, you need a couple of different wrenches. One thing you don’t want to do is torque the brass adapter in place without a spark plug screwed in; the soft adapter can be twisted and crushed out of true if there is nothing in the hole. The different electronic ignition builders have different techniques they recommend, but surveying the various options and simply looking at the joints has helped us build this procedure. The advantage is that it gives each “joint” the proper torque (not over, not under) and allows for easy removal of the plugs for maintenance. Ideally, once you have used this method, the adapters will stay in the engine—and we find that works about 70% of the time.
The Process—and Tools!
The way we do it is this: Take a new plug out of the box and screw it hand tight into the adapter using the appropriate anti-seize (which is the topic of an entirely different article!). Now screw the assembly finger-tight into the cylinder (same comment on anti-seize). Now take out your automotive spark plug socket, slide it on the plug and torque it to 18 foot-pounds. The net result is that both the plug and the adapter will be torqued into their holes at 18 ft-lb.
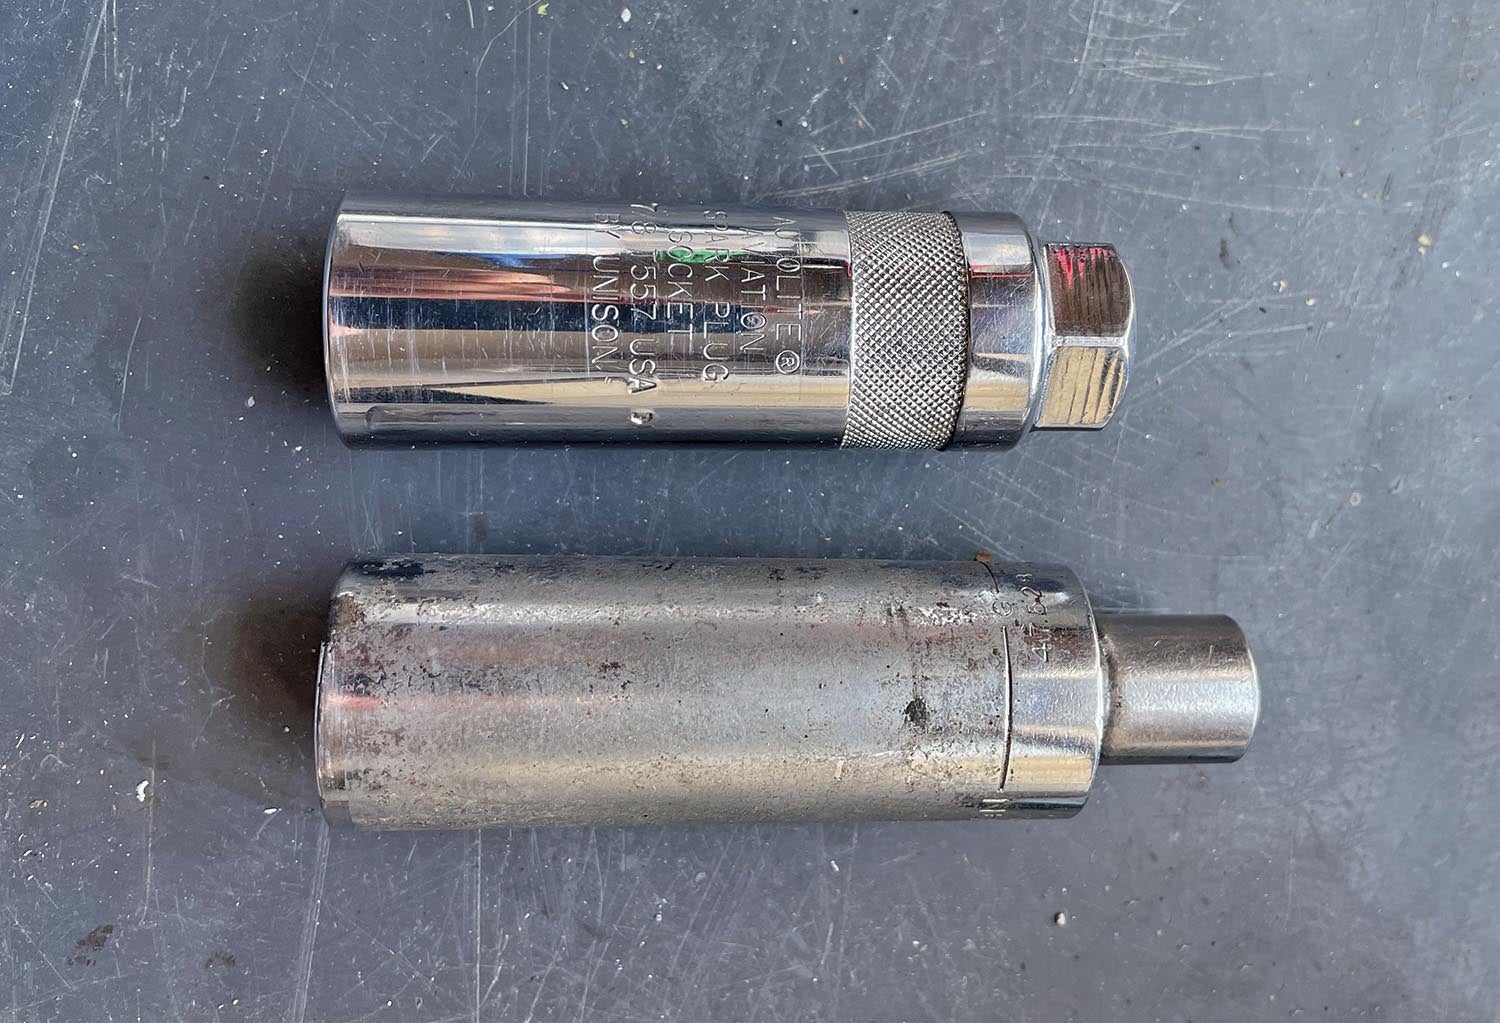
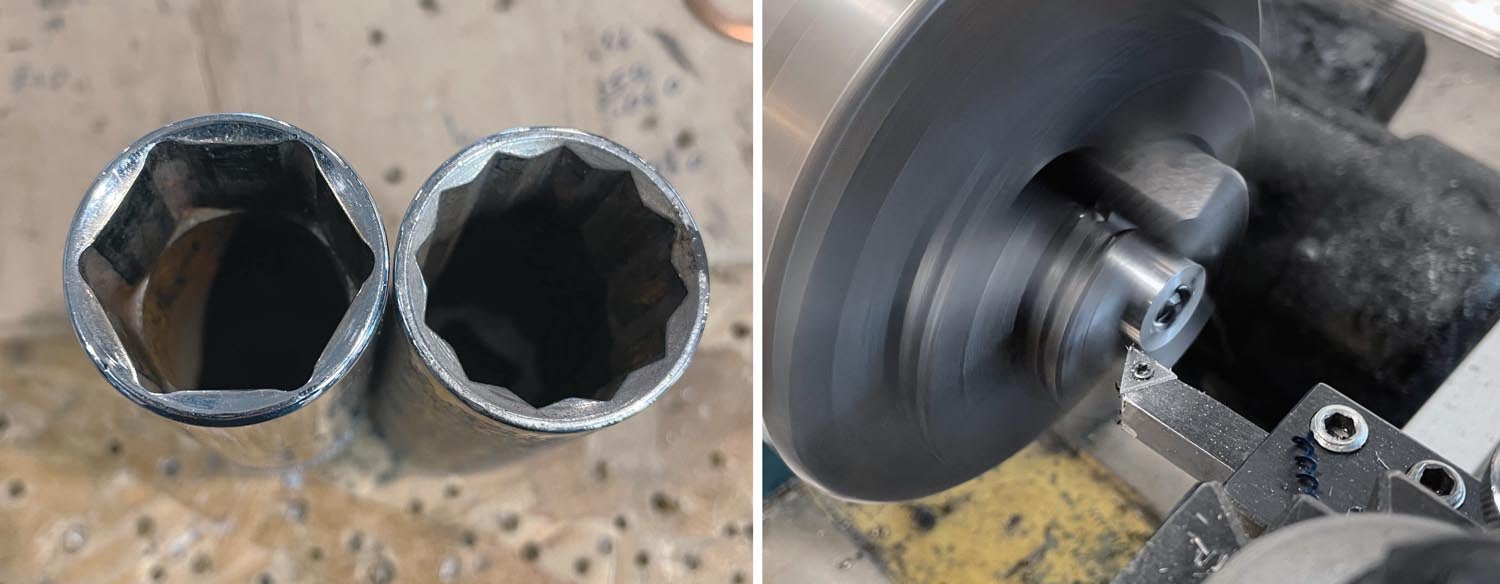
Next, take that automotive socket and put it aside. What you want next is a 7/8-inch deep socket that is long enough to allow it to fully cover the “flats” on the adapter, yet let the spark plug nest inside. The socket we have found that does this is a Craftsman 1/2-inch drive deep socket—ours is probably 40 years old, but it appears they still make the same thing. Note that a standard aircraft spark plug socket from Champion, Tempest or Autolite doesn’t work because it has a shoulder about 3/4 inch inside that will interfere with the automotive plug and not let the socket sit full down onto the adapter. You need a 7/8-inch socket that has “flats” all the way from the mount to the top (see picture). Now you probably don’t have a 1/2-inch torque wrench—or if you do, it will not work down at 35 foot-pounds, as it’s designed to work on big tractors—so find a “cheater” adapter to fit your ⅜-inch drive wrench onto the 1/2-inch drive socket.
Now you can slide this deep socket over the plug and onto the adapter and torque the adapter to the appropriate 35 foot-pounds to crush the copper washer properly—and you’re done. Next time you pull the plugs, you should theoretically be able to use an automotive plug socket and simply remove the plugs since they are torqued to a lower value than the adapters. This means you’re going to need a 14mm compression tester spud, of course. And as we noted, sometimes the adapters will still come out—so you’ll need both spuds for compression testing…maybe.
The Baffling Question
OK, so the process described above works fine until you get to a spot where the baffles (think top plugs) get in the way of that long 7/8-inch socket. Sure, it fits in place, but you don’t have room to put the torque wrench on there! What you need is a much “shorter” way to drive the big socket—and for this, you can make a special tool—if you have a lathe and welder (or know someone with the right skills and tools). The idea is to make something short that plugs into the ½-inch drive and allows you to use a crowfoot on the end of your torque wrench.
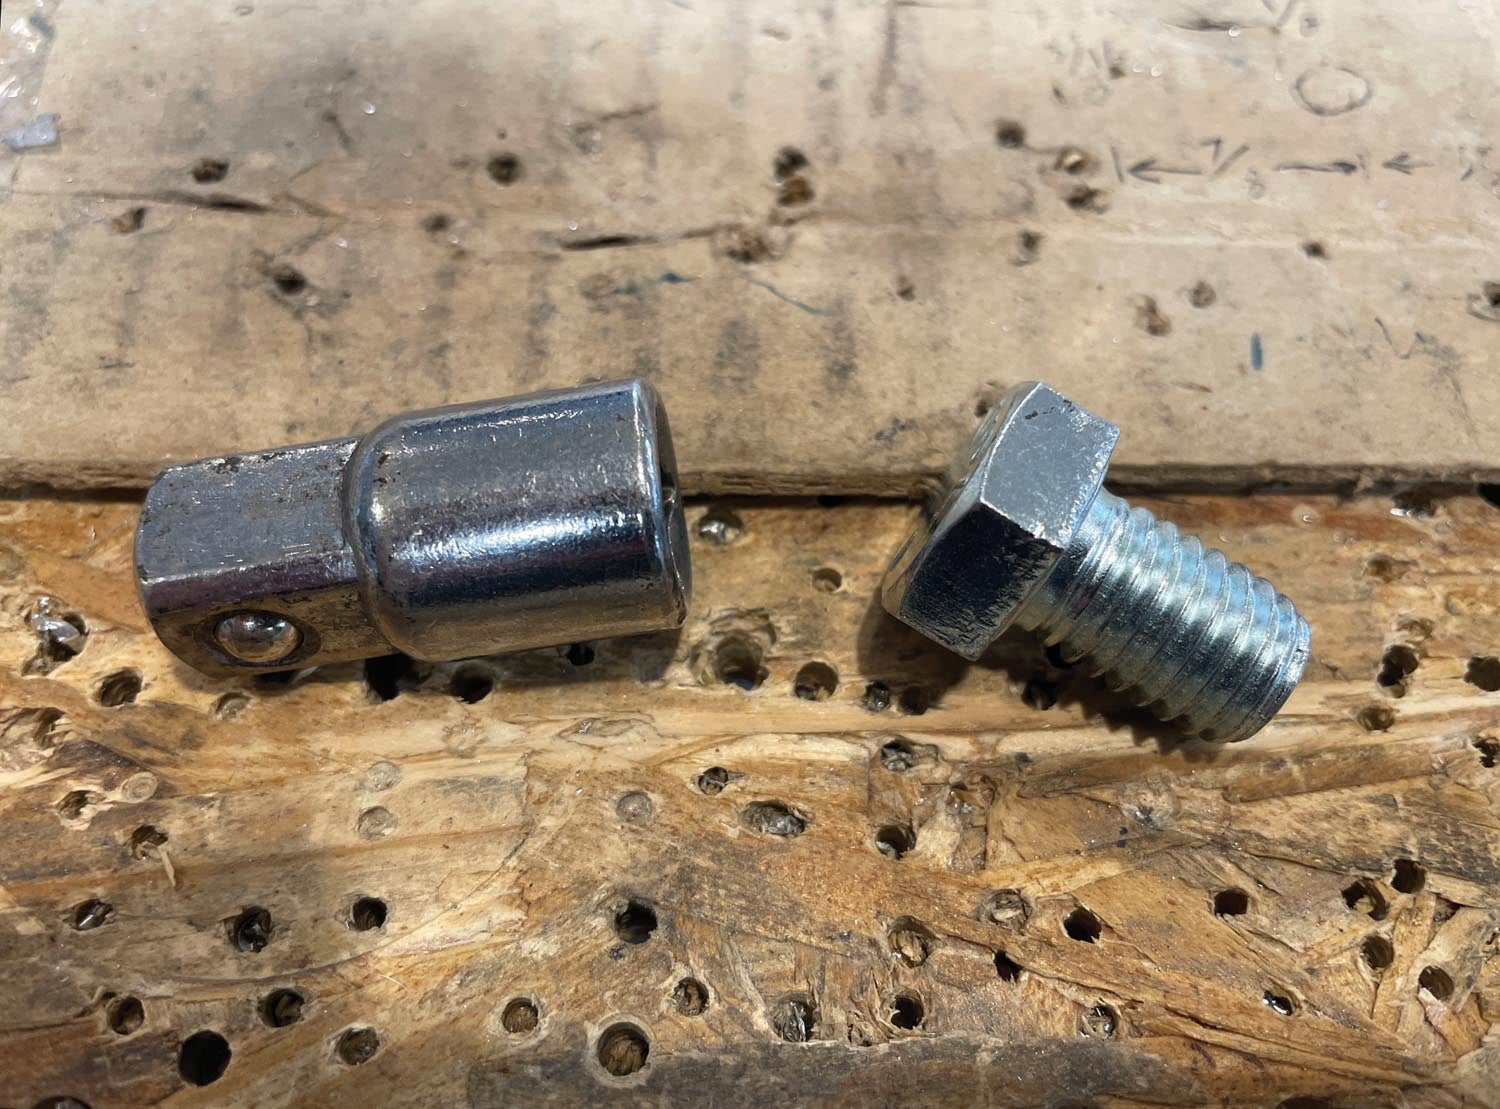
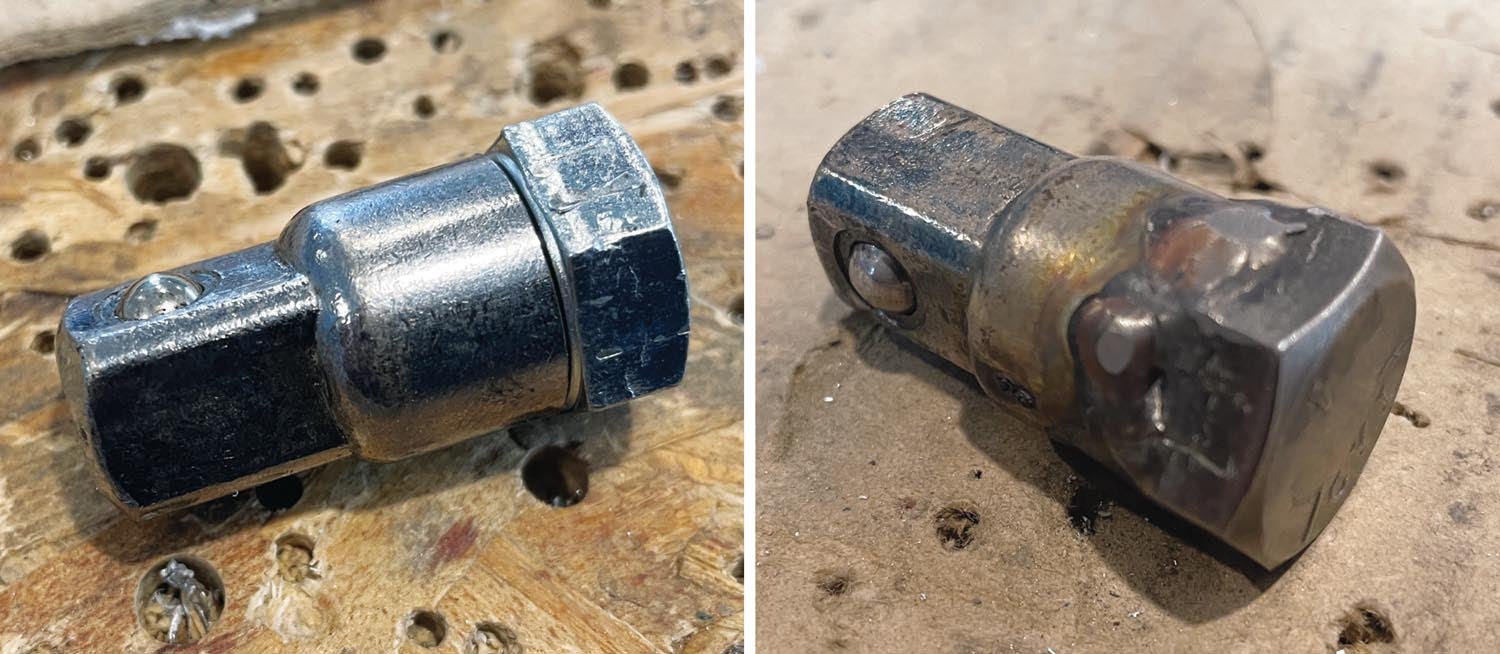
What we did was take a cheap 1/2-inch to 3/8-inch drive adapter and a short 1/2-inch bolt from the hardware store. We chucked the bolt up in the lathe and cut off all the threads, leaving a 3/4-inch hex head with a cylindrical 3/8-inch diameter shaft. We then chucked up the adapter and drilled out the inside about 1/4 inch deeper using a 3/8-inch drill bit. We cut as much off the open end of the adapter as we dared while leaving enough material to create a sturdy assembly, then cut enough of the “shaft” off the ¾-inch hex head so that it nested fully down into the adapter. Then it was a simple stop at the TIG welding table to join the two things together, and we had a 3/4-inch hex head to pop into the big socket. Use the 3/4-inch crowfoot on your torque wrench, and you’re ready to go.
An alternative is to use a mill to put “flats” on the end of the big socket and use the appropriate (larger) crowfoot directly on the socket. Essentially, it duplicates the configuration of a standard aircraft plug socket wrench that has both a ratchet drive socket and a hex head (usually for a 7/8-inch wrench) as well. This is easier if you don’t have access to a welder, but you have a friend with a mill—or you have a vise, a mill bastard file and some patience. You can start with a Craftsman CMMT47528 (1/2-inch drive, 7/8-inch deep socket—available at Ace Hardware or your favorite online retailer) and use a carbide end mill to do the work. The socket is very hard and it simply laughed at our regular (cheap) end mills that we use for aluminum. This solution gives you the best fit for top plugs where cooling baffles might be in the way, while also preserving the option of using a 1/2-inch-drive torque wrench directly. The spark plug and adapter fit snuggly inside this particular Craftsman socket.
One final solution is the cheapest (but won’t always work with baffles). Harbor Freight sells a set of square-drive socket caps (part number 67011) that give you the same thing as the welded adapter we described above—but where’s the building fun in that?
The Simple Solution
Automotive plugs are a simple solution for experimental Lycomings when using any of the popular electronic ignition systems. They fire great with a factory gap of about 0.032 inch, and they are cheap so that you will never worry about maintaining them. I have heard less discussion about lead fouling with these plugs than in the old days, when everyone used massive-electrode aviation plugs. I don’t know if this is because people do a better job of leaning on the ground, the plugs are less prone to fouling or people just throw them away before fouling becomes an issue!
It’s hard to break the habits of decades of aircraft maintenance, but not having to clean and re-gap plugs is a boon to those of us that have spent years of our lives digging out little lead balls and sandblasting expensive plugs. I first used the BR8ES in two-stroke jet skis, where the tuning process was to run the engine hard, then pull the safety lanyard off at high rpm, killing the motor instantly and preserving the combustion signatures on the plugs. You pulled the plugs, looked at the color of the deposits, threw the plug away, retuned, put in a new plug and did it over. Yeah, we went through a ton of plugs, but they were even cheaper back then.
Experimental aviators now have the option of using and throwing away plugs the same way—but we should always remember that the consequences of a blown-out plug in an airplane are much more dire than having to swim your jet ski back to shore or coast your late-model car to the side of the road. So use proper techniques and torques when installing plugs, and enjoy the convenience and savings of the modern ignition world!
Photos: Paul Dye and Marc Cook (sidebar).


It might be worth noting that the manual for P-Mags (model 114) tells to tighten both the adapter and spark plug to 18 ft/lb through the spark plug only. My brand new Lycoming XO-360 came from the factory this way.
The manual cautions against installing and torquing the adapters separately, as it would concentrate stresses at the adapter’s neck.
From the PMAG manual:
IMPORTANT: Remember to FIRST install each spark plug in the adapter (fully seated and finger tight). THEN, insert the combined plug/adapter assembly in the engine and tighten to 18 ft/lb (standard auto plug torque) through the spark plug ONLY. Do NOT torque the adapter itself. If you torque the adapters directly, stress will be focused underneath the adapter head, and it can fail during installation – not covered under warranty. Use anti-seize (sparingly) on the outer/engine side of adapters. Auto plug manufacturers do not recommend anti-seize on their plugs.
Thanks for the comments, guys. We did say: “If you torque both the plug and the adapter to 18 foot-pounds, you haven’t preloaded the copper gasket on the adapter sufficiently. If you torque the assembly to 35 foot-pounds, you’ve crushed the heck out of the spark plug’s built-in gasket.” And that’s the WHOLE reason for this article, to provide a better way to properly torque both the spark plug and the adapter, with the goal that the properly torqued adapter stays in the engine during plug replacement. And, in fact more importantly, so that it isn’t under torqued and prone to loosening over time.
Can you give some examples of the electronic ignition systems that expermental aircraft are using to replace the magnetoes
Examples include Lightspeed, EMagair, SDS, EFII, and several others.
What about Autolite 386, Bosch M8ACO or other 18mm plugs that don’t require and adapter? I have not had any problem using them in Lycomings.
We know of a number of folks who use those plugs, and if they meet the heat range for your engine, they are a good option – no adapters required. But they don’t match the heat range for alll the engines we fly, so choose carefully to see if they are right for your application.
Another option is to spec your engine to have 14mm spark plug holes. This is what I did on my ECI engine.
This article assumes two things that may not be correct:
1) The torque requirement for a brass adapter is the same as an 18 mm steel spark plug.
2) The soft copper washer will not do its job when the brass adapter is torqued to 18 ft-lbs.
The soft copper washer, used primarily to improve heat conduction and electrical interface, likely does its job adequately with either 18 or 35 ft-lbs.
Also, the torque specs for brass are roughly 2/3 that of steel. However, the 18 vs. 35 ft-lbs torques are likely derived from differences in washer requirements of crush vs. soft-copper.
If the adapter were to be made from steel, this article might be correct. As it stands, however, using a steel spark plug torque spec is likely not correct for a brass adapter. Doing so may unnecessarily stress the narrow-neck brass adapter, likening the possibility of adapter failure.
At least two manufacturers of electronic ignitions that use brass inserts recommend the procedure of separately torquing the adapter and the plug.
I’ve used PMAGS now for 13 years, always using the recommendation from the manual. However, after reading Paul’s article, the idea to use a higher torque for the adapter made sense.
So I tried it the other day with less than perfect results: I intentionally broke an old BR8ES plug at the base of the ceramic to allow plenty of room for my adapter size socket to clear this modified plug. Inserted the modified plug into the brass adapter and then torqued the adapter to 35 ft lbs. Backed out the modified plug, then inserted the real spark plug and torqued that to 16 ft lbs. This worked fine on 2 plugs.
But, on the third cylinder the adapter broke off prior to reaching 35 ft lbs. This left most of the adapter firmly in the spark plug hole. Since I was hoping to fly the next morning, this was a real disappointment. Fortunately, a local mechanic had the appropriate easy-out and was able to remove the broken adapter.
My torque wrench had not been recently calibrated, so maybe I was using too much torque. Also, my brass adapters were all 13 years old. As luck would have it, I intended to replace all adapters at next condition inspection. My take is that while aviation plug torque may be fine for steel adapters, I think it’s too high for brass, particularly old brass.
I hope my experience may prevent someone else from having a similar problem. For me, I’m going back to the Emagair recommended method that has worked so well for 13 years.
So many people are changing plugs and are using only the EMAG-recommended setup. After 440 hours on my engine, it still works flawlessly. Also, there was not a single leak around the copper gasket. So why change an approved system? Why risk the adapter?
There are numerous VAF threads on this topic … Once a year it pops up, and interestingly after mani pages with answers, it ends up all the time with: Stay with the manual, and all is fine. Maybe use new copper gaskets every time, or at least anneal the used one.
Glad you have a system that works for you Dominik. The thing is, I personally know of two cases where adapters have backed out of the cylinder when only the plug was torqued to 18 ft-lbs. Of course, we don’;t know if the torque wrenches were calibrated properly (probably not) or if the owner got distracted and forgot to torque them…. So they are anecdotal, but interesting.
The other thing to note is that while P-Mag has one recommendation, other EI’s, using the same plugs and adapters, have different instructions, so which is correct? We’re just providing information (and a method) for those who want to torque both interfaces to their design loads.
Comments are closed.