I fly an Experimental Pitts S-1S, and this past summer I had some problems with my IO-360 that eventually led to an engine rebuild/replacement question. As most builders know, once you start down the new engine line, the upgrades start popping up and this statement comes to mind: “Well, if I’m going to put in a new engine, I might as well put on a new exhaust–a better one.”
Until that point I had the standard two-stack Pitts S-1-style non-crossover exhaust, which is known for its lack of performance enhancement and being prone to cracking over time. I have always wanted the nice crossover exhaust that all of my RV friends had on their planes.
The most popular RV exhaust is built by Larry Vetterman, so I called him. It turns out Vetterman used to make custom exhausts, but because of the success of the RV market, he stopped making custom systems to keep up with RV demand. I asked him who else made custom exhausts, and he said to call Rich Lopez at Aircraft Exhaust, Inc. in Princeton, Minnesota.
Honesty Is the Best Policy
I spoke with Lopez for a half hour about commissioning him to build a crossover exhaust for my plane. He said he could do that “no problem” but told me that a crossover system wouldn’t offer the most performance I could get. At first I figured he was doing the salesman thing, and as an aeronautical engineer I wanted facts: dyno tests, reports, whatever I could find.
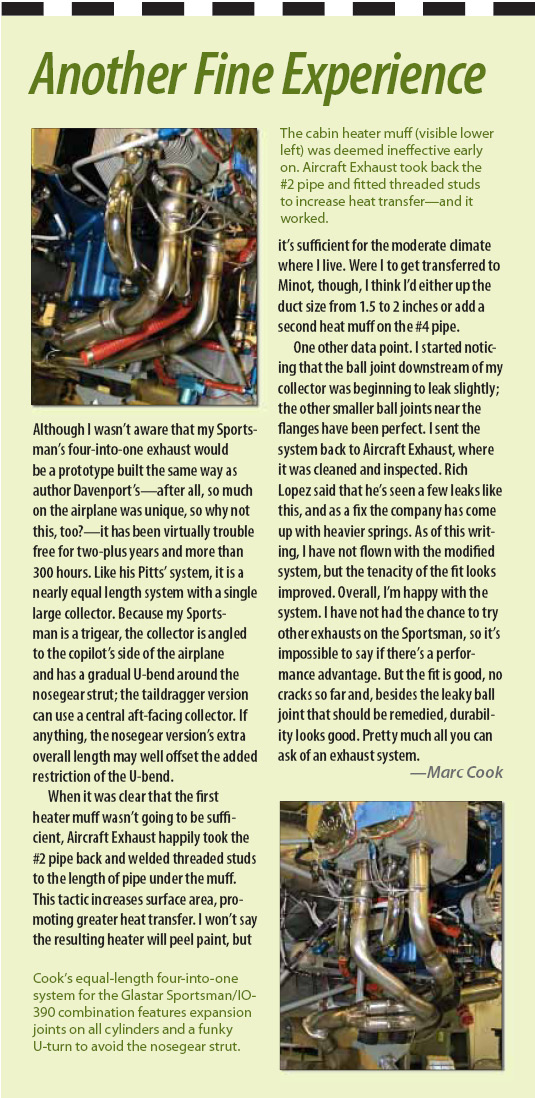
He said that the findings from a CAFE Foundation report stated that for my engine, a properly tuned four-into-one collector system was the best compromise for performance that could be obtained. He also said that he had accumulated dyno information on many different kinds of exhausts and found the best horsepower increase for the IO-360 was a four-into-one collector with equal-length headers. Supposedly, this configuration would create a semi-tuned exhaust system.
Lopez further explained that to create a true tuned exhaust system on an engine that was not completely stock would take a lot of work on a dyno with lots of trial and error, along with more length of tailpipe than most builders have room for. A semi-tuned system meant that the header pipes all need to be approximately 28 to 36 inches long and of equal length. This system would balance the EGTs better than any other. He encouraged me to check out the report for myself.
(You can find it at http://cafefoundation.org/v2/research_reports.php. There will be a direct link at http://www.kitplanes.com/.}
From my research I found that Lopez wasn’t doing the salesman thing. He was indeed telling the truth, and the findings were pretty clear. If I wanted the most performance increase and a balanced exhaust system, I needed a four-into-one collector system. I talked with a few friends who have collector systems from Sky Dynamics, and they all confirmed that collector systems were the best. After much information gathering, I finally decided to go with the custom four-into-one collector system.
How Custom is Custom?
As I discovered from working with Aircraft Exhaust, the answer is that a custom system is custom indeed, because you build it yourself. That may sound a little scary, but it is not difficult. Heres how the process works.
Aircraft Exhaust sends out a PVC mockup kit that costs $200 (plus shipping, which works as a deposit and goes toward final purchase). This kit has four exhaust manifold flanges and the four-into-one collector, or if you need a six-cylinder system, you can get a dual three-into-one setup. Thats the left side three into a single collector, the right side three into a single collector, and two tailpipes.
Home Depot’s Aviation Department
This is where the fun starts. You go to the local hardware store and find 1.5-inch Schedule 40 PVC pipe and buy out the store of all the angle fittings it has, which typically come in the following angles: 22, 45, 60 and 90 sweeps. Make sure you use sweeps, because the regular 90 angle is too sharp a bend for the final exhaust system to make. When I say buy the store out, I mean whatever you don’t use you just return. That way you don’t have to make 30 trips to the store for that missing angle you didn’t account for. A four-into-one system could use 20 to 25 different angle pieces.
Next you mount the flanges (dont forget the gaskets, as this will make a big difference) and position the collector roughly where you want it using tape, zip ties, whatever holds it firmly in place. Thats your start, and you get your two major hard points in the process.
There are many different ways to go from there. What I ended up doing is starting with the cylinder furthest away from the collector. I began there because I knew that would be my longest length primary tube, the length that I would try to match to the other cylinders to “semi-tune” my system. To get a rough idea on the routing of the pipe, I used a piece of SCAT duct and then attempted to recreate the routing using different angles and lengths.
Once you get the first pipe attached to the collector, it is a bit easier. At this point I started at the next cylinder of my choosing and again used my SCAT duct. Some of you may be wondering how I matched the length of the closest cylinders pipe to the longest. After you begin putting bends in the pipe, you can start to see that it will get longer the more bends you put in it. What works quite well is to actually reverse direction after routing the pipe straight down, sweep it toward the nose to meet up with the other pipes, and then sweep back to the aft of the engine compartment. Soon you will find it doesn’t take much to get the lengths really close.
Putting It All Together
With all the pipes dry routed and sitting with the proper clearances, you are done tweaking and will want to mark and drill the joints. Marking the joints is helpful when you take it apart to glue it with PVC cement or epoxy. I drilled pilot holes for two wood screws per joint and also glued it. Some may think this is overkill, but I didn’t want to put those pipes in a box and have them come apart or loose during shipping, possibly resulting in a misaligned exhaust. Before you disassemble the exhaust, take a bunch of digital pictures of the installation to send to the master fabricators. The whole process proves to be rewarding and fun, sort of like playing with Legos.
After you pack everything up and ship it to the professionals at Aircraft Exhaust you are just a few days away from having a beautiful new system. How many days? My exhaust took a little less than two weeks including shipping; however, time depends on the company’s workload.
My mockup was on its way, so I sat down at the computer and drafted an email to the team at Aircraft Exhaust to detail specifics like the collector configuration and where to install the Super Flow ball joints. The Super Flow ball joints are great. They help relieve stress due to misalignment (preload), which keeps cracking to a minimum.
I didn’t know where I wanted the ball joints, so I just asked them to put them where they thought best; after all, they are the professionals. Next you need to decide if you want a heat muff. If you do, then you need to decide what kind and where to put it. I didn’t want one, so this wasn’t a problem. Aircraft Exhaust has several configurations with plenty of pictures on its web site.
I wanted the collector to end 4 to 5 inches after the pipes merged, and I spent some time explaining this to them on the phone. They also have other options to merge the pipes and then add an additional rotation joint and pipe extension for those who want to merge the collector inside the cowling and run one pipe out. Again, there are plenty of examples on the web site.
Collector’s Edition
Now a little background on the collector. The collectors that Aircraft Exhaust produces are handmade, of the type usually found only on high-performance systems like Formula One and NASCAR racing engines. The pipes merge at the middle of the collector to a point, and this helps smooth flow and increase performance.
The pipe-bending process Aircraft Exhaust uses is called mandrel bending. It keeps the original dimension of the pipe, so you don’t have the classic inside-radius bend shrinking that regular benders cause. The material is 321 stainless that is 100% purge TIG welded. The 321 stainless steel is the best grade of stainless for this application due to its ability to accept higher temperatures.
When I got my system back from fabrication I was a worried because I had some close clearances. Even the slightest misalignment due to imperfect matching of the mockup could cause my system to touch the engine where it wasn’t supposed to. Lopez had assured me that the exhaust would be exactly how I sent it, no difference in any way. When I bolted the new exhaust to the engine, I was pleasantly surprised to find that everything was exactly how I built it in the mockup.
Even with all the custom work, the price of the exhaust is reasonable. Aircraft-specific crossover exhausts typically cost $700 to $900, depending upon accessories and configuration. High-performance/custom crossover exhausts cost $700 to $1500. The Aircraft Exhaust four-into-one collector system costs $1350. Remember that the $200 charged for the mockup kit is applied to your order. Cabin and carburetor heat muffs can be added a la carte. Also, Aircraft Exhaust sells conventional crossover systems for specific engine and airframe combinations. Those start at $625, and complete systems with shrouds, mufflers and tailpipes range from $910 to $1463.
Finally, Aircraft Exhaust provided the best customer service I have ever received from a vendor. The company’s reps took the extra time and went over and above to create a high-performance exhaust work of art.
For more information, contact Aircraft Exhaust, Inc., at 800/770-7287 or visit http://www.aircraftexhaust.net/.


