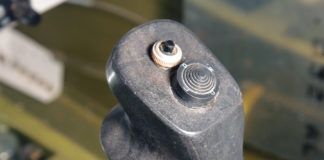
There are no two ways about it: Building airplanes takes time. More time per task than is obvious when the project is taken at face value. I worked efficiently (and single-mindedly) to build my RV-8 in 18 months and 1040 hours a few years back. But I had been working on airplanes all my life, and knew how a lot of things should be done. Thats a huge advantage, and partly explains all the repeat offenders in our ranks.
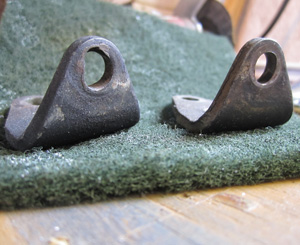
You realize that your job might not be as simple as you thought when the bolt holes are no longer round.
For the average first-time builder, everything is new and a lot of time is spent just staring at a problem, not knowing how to proceed. There is an expectation that a kit should be complete and easy to assemble-just follow the instructions, and go from start to finish without a lot of fuss. But the truth is, there are always surprises and things you have to figure out, and its important for all of us (experienced builders and rookies alike) to be honest about it.
Remedial Work
The project at hand was to replace the alternator on my wife Louises RV-6 (aka Mikey). This aircraft was built from an early kit. Its extremely well constructed, but with some, shall we say, prototypes for later designs. Louise had just had her third alternator failure in 500 hours, and that told me there was more to it than bad alternators; something was causing a shortened lifespan.
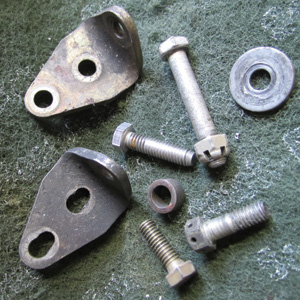
Early homebuilts often used an assortment of hardware and handmade brackets to attach accessories. This reflected the creativity of the builder, and requires more creativity on the part of the maintainer.
Checking out the unit provided the answers: The mounting brackets were primitive, out of alignment and worn. As a consequence, the bearings were shot, as I suspect they were in the previous units that died young. The alternator was the originally offered Vans 35-amp, internally regulated Nippondenso (ND) unit, but with the misalignment, this problem would have occurred even with one of the newer, more expensive options. The mount was simply eating alternators!
Folks can debate the wisdom of different alternators and regulator configurations till the cows come home, and there are valid points to almost every argument. I have had good luck with the internally regulated ND 60-amp units, getting better than 600 hours out of them on my RV-8 (far better than the certified alternators I had on my Grumman, good for about 300 hours), so in the interest of standardizing the family fleet, I decided to upgrade the RV-6 to the same configuration. This was a simple matter of trading in the dead 35-amp core for a new 60-amp unit at the auto parts store, removing the old external regulator on the firewall, installing a new mount, and replacing the old, oil-soaked wiring forward of the firewall. Piece of cake-right?
Not So Fast
As with any aircraft project, what appears at first to be simple generally takes more time. All I needed was the alternator and a bracket. Alternator was easy, the bracket-well, luckily, another builder had one, because it appears that Vans doesn’t have the same one as when I built my airplane. When I had all the pieces in hand, I test fit the alternator and bracket, and of course the pulley didn’t line up with the pulley on the engine flywheel. It was about 3⁄8 inch too far aft. Hmmm…what had changed? Well, no matter, they need to line up, so I drilled new holes in the bracket. The fit was good, but why in the heck was one of the bolts from the old bracket a metric head? The threads were normal, but the head needed a 12 mm wrench instead of the half-inch of the other three. I looked through my bins for the proper, drilled-head bolt (these need to be safetied!) without luck. All right. I guess I can live with the odd bolt-only a little time wasted, and I probably wouldn’t take this off until the next engine overhaul. I bolted up the bracket, and safetied it in place.
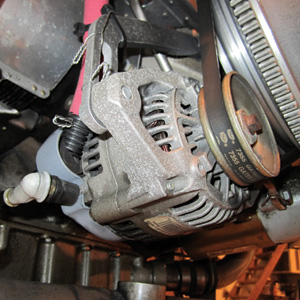
The often-used Nippondenso 60-amp alternator is easily replaced at the local auto parts store, but beware-they are not all alike.
Before installing the alternator, I figured Id clean up the wiring-18 years of engine heat had crisped the B-lead and field wire. Fortunately, I had the wire in stock, but no crimp-on ends for a #8 wire with a #10 hole. It was too late to run to the electronics store, but I wasn’t going to finish the job tonight anyway, so I put that off. Instead, I ripped out the old wiring and ran the two new wires with sheathing to make it look nice. How about mounting that alternator? I held it up, and as with all RVs, it fit snugly to the engine, so I had to put it on the belt first, then lever the mounting ears up into the bracket. Once I did that, it was bolt time.
The old bolts were, again, a bit odd. The rear one was at least an inch too long, and had used a combination of spacers and washers to take up the slack. The front one was OK, but it was long enough that when I tried to install it from the front (as desired), it banged into the flywheel before I could line it up with the hole. Off came the alternator, and a little fiddling showed that the front bolt was a no-go from the front for sure, and neither went through the bracket holes well. The holes needed to be reamed to size. Cut off the safety wire, take the bracket off (where did that 12mm socket go?), and run a reamer through the holes. Test fit with the alternator off the engine, and this time the bolts went in nicely. I still had the wrong length in back, but werent there some stock 5⁄16-inch bolts around here?
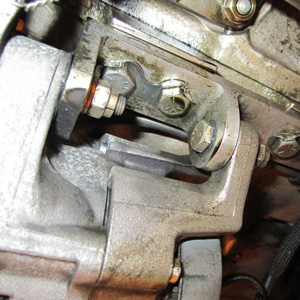
The one-piece bracket ensures good alignment, but requires that the alternator mounting legs are the specified width, which isn’t always the case.
More rummaging produced the right bolt, but it wasn’t drilled. Did I have another 5⁄16-inch metal lock nut? That would work! More rummaging. Then a trip to the local hardware store that carries fine thread, high-grade hardware. Got the nut I needed, bought two of them, might as well put one on the front as well. Back to the shop for another test fit. This time everything lined up, the bracket fit, the alternator fit-great! Safety wire, washers to fine-tune the bolt, alternator in place, and…what about that adjusting arm? Now wheres the bolt for that? Oh, there it is, but the old alternator was just drilled, this one is drilled and tapped, and the bolt for it doesn’t fit. Ahhh. Nippondenso = Japanese. Japanese = metric.
Rummage through my jet ski collection, and sure enough, its an 8mm bolt. I don’t have one the right length, so back to the hardware store for a good one. Of course, it isn’t drilled, so I have to chuck it up in the vice, get out my tiny drill and summon a steady hand to give myself a hole for safety wire. I tightened everything up and completed the wiring at the firewall end, removed the old voltage regulator, spliced the field wire and built a new B-lead to attach at the ammeter shunt. Some judicious cable ties and Adel clamps and-oh man, I don’t like the way that bundle moves near the alternator. There is a bolt holding a clamp for the prop oil governor line that would be a perfect spot to double up an Adel clamp and, you guessed it, its safety-wired to a bolt on the alternator bracket! Cut that wire, install the clamp (after drilling the hole the proper size in the Adel clamp, it was one size too small), then reassemble and safety-wire again.
Finally! Wiring all done, alternator secured, everything ready to go, and it is time for a test. One of the great benefits of being in an airpark is that at least I don’t have to drive home. I am already there, so I just roll it out back, and we start it up only to discover no voltage rise and no current in the system. Frustrated, it is time for the DVM (digital voltmeter). We ring out all the wiring, from bus through breakers through switches and out to the connector. Lots of lying under the panel and a few bad words. I have continuity everywhere, the breakers and switches do their thing, and the proper voltage appears at the field-wire terminal. Bad alternator? The auto parts store is still open, so off comes the alternator, and back to the store it goes. They are really great about it, must be DOA they agree. They have another on the shelf, so back home I go with another new unit. This one comes with a test card that shows it performed properly after rebuild.
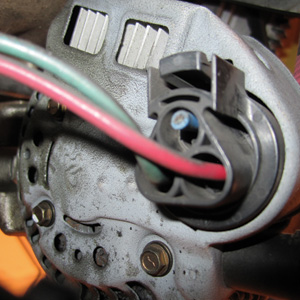
Further complicating what would appear to be a simple alternator change is the fact that the wiring plugs can differ among various units.
One basic ND 12-volt alternator is the same as another, even with a similar retailer part number, right? Wrong! I have now seen three different configurations of the same alternator-one with the front leg as part of the casting and the rear leg a bolt-on stamping. Another with both front and rear legs cast, and a third with the front and rear legs cast, but shaped differently. Guess what? The autos that use these must have brackets that go inside the legs (this being the critical dimension that must be maintained), but on the aircraft bracket, the outside of the legs are used, and the three versions have different outside dimensions. Out comes the Vixen file to remove a little aluminum. After a stop for dinner, reassembly is complete, and I told Louise that I couldn’t possibly go to bed not knowing whether it would work, so we roll it out at 8 p.m. and fire it up. Victory-we have voltage, and the battery is charging!
A Valid Example
This was a simple alternator swap, with bolt-up parts, sold for (if not originally designed for) this application. But there is always some fiddly bit required to make these things work! Such is life in the homebuilders workshop, and you have to learn to deal with it. We are indeed in a custom building avocation.
A tremendous amount of trial fitting and removal for adjustment is needed to make everything right. And it must be right-your life depends on it. Some parts of a build simply have to look correct, or be pleasing to the eye, and then there are parts that have to be built to high standards to ensure function or security. I have seen many builders get stuck, staring for weeks at a problem because they figure that surely it has to fit without adjustment. Well, folks, adjustments are necessary, bolt callouts are frequently just suggestions, and you need to figure out how to solve problems and move on. It is part of the challenge, and part of the learning process in bringing a new airplane to life-or fixing one thats already flying.

![]()
Paul Dye is an aeronautical engineer, commercial pilot and avid homebuilder with 30 years of leadership experience in aerospace operations and flight testing. He is also an EAA tech counselor and flight advisor who currently flies an RV-8, which he built, and is working on an RV-3.

