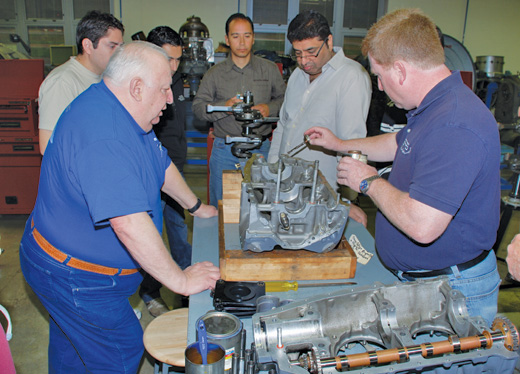
Instructor Jim Doebler (left) watches as a student applies sealant to a case half before installing the silk threads. The other case half is visible in the foreground with the camshaft resting in place. Note the gears on both ends of the camshaft. The crankshaft drives the rear gear to turn the cam, and the front gear drives the front-mounted prop governor on this model of engine. An engine with a rear-mounted governor would use a camshaft without the extra front gear.
The first two articles in the Firewall Forward series dealt with selecting and acquiring a Lycoming or similar type engine for a project. In this issue we will look at two factory-authorized training courses on how to operate and maintain your engine, and how to disassemble and reassemble it. You don’t have to be a hardcore gearhead to benefit from these sessions, though if you are, you’ll appreciate this learning opportunity. Even though these courses are geared toward the A&P mechanic, anyone with a good general sense of mechanical devices will be able to follow along.
Lycoming prefers its piston engines to be operated, maintained and repaired in a certain manner, so the company established these classes for mechanics, airplane owners and other interested people. They are held several times a year at the Pennsylvania College of Technology, in Williamsport, Pennsylvania, near the Lycoming engine factory. The first, Lycoming Service School, is a four-day, classroom-only course that addresses Service Instructions, Service Letters, Service Bulletins and other factory publications, as well as engine assemblies and systems. The second, Disassembly/Reassembly is a three-day, hands-on course held in the engine lab, which deals with (not surprisingly) engine disassembly and reassembly, timing and adjustments. I took these two courses back-to-back, with a weekend break in-between. Although I found both classes interesting, I’ll admit that after four days in the classroom I was ready to spend the next three days getting my hands dirty.

The Lycoming engine factory in Williamsport, Pennsylvania. This facility produces about 200 piston airplane engines per month. Turbine engines were also produced in an adjoining building at one time, but that division has since been sold.
Know-how on the Job
The cost for the Lycoming Service School is $700, and the Disassembly/Reassembly course is $675. If you don’t live nearby, you will need to get to Williamsport and secure accommodations there, which may mean flying into Newark or Philadelphia and either catching a commuter flight or renting a car and driving. I chose to rent a car so that I could drive to Gettysburg and the Piper Museum in nearby Lock Haven on the weekend. All things considered, some may find the expense prohibitive.
Course instructor Jim Doebler’s experience ranges from A&P/IA mechanic to Lycoming employee and all-around expert on Lycoming engines. He also administers the A&P exam to would-be airplane mechanics, many of whom attend the college where the Lycoming courses are held. You can find him at Oshkosh AirVenture each year, where he gives short versions of these courses in 2-hour sessions throughout the week.
Doebler’s teaching method was admirably short on war stories, but generous with the use of examples, and he was more than willing to talk to us before and after class, and during breaks, when he could elaborate on his wide-ranging experience.
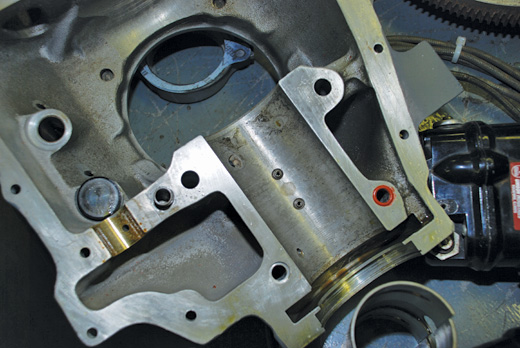
Shown above is the journal for main bearings 1 and 2. These support the crankshaft at its most critical point—the front of the engine where the prop goes. Two pins visible at the bottom of the journal hold the bearings (actually one large bearing that combines 1 and 2) in position. It is important to ensure that the bearing shells are properly aligned with these pins when the engine goes back together. This area is also vulnerable to damage during a prop strike. If this bearing journal is distorted by the prop impact, it will cause the bearings to quickly fail if it is not properly repaired.
Service Station
The Service School course occupied the first four days of the program. There were a dozen participants, some from far-flung nations. Doebler took us through Lycoming service publications to PowerPoint slides to discussion and back again. His goal was not just to tell us what we were supposed to do, but to explain how Lycoming came to make its recommendations. The factory’s knowledge base was built from hard-learned experience, and we came to appreciate that if Lycoming says to do something a certain way—or not do it at all—it is because its engineers and service people have tried the other ways, and they didn’t work. It’s a conservative approach born from accumulated experience.
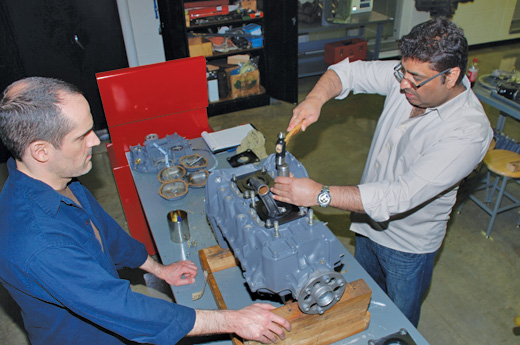
Students Daniel Stanton (left) and Mohammad Ali (no relation to the boxer) set the studs to the correct height with a hammer and a special driver. Note the torque plates on the engine and on the bench in front of the engine. This is the preferred way to assemble a Lycoming engine.
The highlight of our first day was a private tour of the factory. This tour is generally not available to the public, so taking this course is the only way most people are able to see the facility. Scott Miller, director of communications for Lycoming, conducted the tour. With four years at the company, he is relatively new compared to the average employee, whose tenure is more than 20 years. Nevertheless, he did a fine job of pointing out how the factory is organized to produce maximum quality at minimum cost.
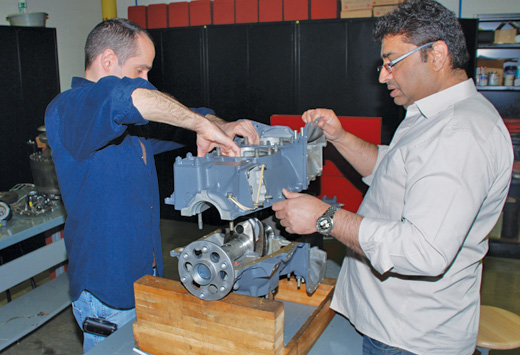
Classmates Stanton and Ali lower the left case half holding the camshaft onto the right case half and crankshaft. Two sets of hands make this job easier. One person can guide the connecting rods through the cylinder holes, and the other can watch to make sure the silk threads do not get disturbed.
Two things about the tour were striking: It was very quiet, and there seemed to be a lot of unused space. The extra room made sense because the plant has reduced its output in recent years, but the quiet was surprising. The reason is that the heavy, noisy work of rough machining and forging is done by outside vendors. Lycoming employees do the finish machining, fitting and assembly—all relatively quiet processes. Thunderbolt engines (Experimental engines now available directly from Lycoming) are assembled in their own part of the factory, away from the main assembly line.
The tour concluded in the museum and gift shop, where we saw some old Lycoming auto engines. At one time Lycoming engines powered 250 different makes of cars. Other notable engines included an old 65-horsepower O-145 that once powered the J-3 Cub, and the R680 radial engine that had graced the nose of many Stearmans and other WW-II-era biplanes. Photography was not allowed on the tour, but I have a Lycoming jacket from the gift shop to prove I was there!
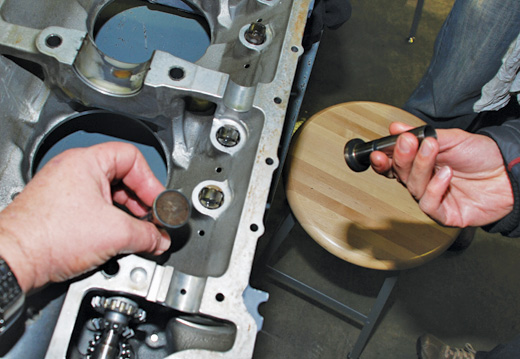
One of the engines in class had the new roller tappets. An old style flat tappet is held next to the roller tappets to show the difference. The new roller tappets produce less friction and thus less wear on the cam and lifters when starting the engine. All roller-tappet engines have serial numbers that end in “E,” as opposed to the standard wide-deck flat tappet engines that have serial numbers ending in “A,” or the very old narrow-deck engines that have serial numbers with no letter at the end.
Back to Class
Lycoming produces three types of publications: Service Letters, Service Instructions and Service Bulletins. Service Letters inform mechanics that a certain procedure can be performed on an engine with the factory’s blessing, or it may simply note a service or procedure that is now available. For instance, SL-234 announces special tools that Lycoming has available for rent to mechanics; SL-180 outlines the procedure to treat inactive engines to prevent corrosion. In each case, no action is required.
Service Instructions, as the title implies, instruct mechanics on best service practices. For instance, SI-1505 tells you how to start a Lycoming engine in cold weather, and SI-1425 gives instruction for removing a valve spring, called the “rope trick,” without removing the cylinder. You will need to know how to do this to check for valve-guide wear.

This crankshaft has movable counterweights between the No. 4 rod and the rear main bearing. These counterweights damp vibration caused by many props. Crankshafts without these weights typically have rpm restrictions because of this vibration. With the counterweights, those restrictions can be eliminated. If these counterweights are damaged or “detuned” by a prop strike, catastrophic failure may result.
While Service Instructions tell you how best to do something, and Service Letters tell you that you may do something, Service Bulletins tell you that you must do something—at least if you are a commercial operator. For private (Part 91) and Experimental operators, these instructions are not mandatory, but are highly recommended. In fact, many Service Bulletins end up becoming Airworthiness Directives, which are then required for commercial and private operators, again, highly recommended for Experimental operators. For example, SB-533 addresses what to do after a prop strike. While it may not be entirely clear whether ADs apply to Experimental airplane engines, they should be taken seriously for safety’s sake.
In the discussion portion of the class, we addressed real problems that customers have with their engines, and what to do about them. We also examined the rationale behind the factory’s specific instructions. For example, Lycoming recommends that spark plugs on a four-cylinder engine be rotated in the following way: Swap T1 with B4, T2 with B3, T3 with B2, T4 with B1 (T=top, B=bottom). Why? This removes bottom plugs from the area of higher carbon buildup, and it switches polarity of the electrodes, ensuring more even wear of the plugs and less fouling over time.
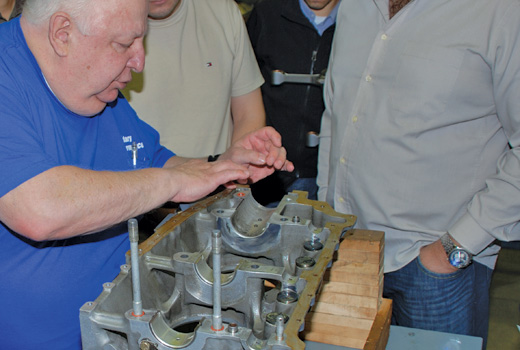
Instructor Doebler shows how to install the silk threads that help seal the joint between the case halves. The Lycoming factory still uses this method to seal new engines, though there are approved sealing systems that do not use silk thread. Nothing wrong with tried-and-true methods.
Another example of what to do and why is addressed in SL-180. For the planned non-operation of a Lycoming engine for a month or longer, especially in a damp climate, it’s important to take precautions to prevent rust from forming inside. The longer the engine is expected to be inactive, the more thorough your preservation measures must be. The procedure is well-described in the Service Letter, and it is recommended because Lycoming engines are particularly vulnerable to rust on the camshaft and lifters, which are positioned high in the engine above the oil sump (except for on the 541 engines). Lycoming is aware that this is a problem, because it has seen the damage corrosion has done to engines brought in for overhaul. However, with the recommended precautions, this damage can largely be avoided.
Lab Work
After a weekend of sightseeing, I was eager to get back to work. Monday morning found us in the engine lab for the first time. We split into groups of two or three and were turned loose on five identical O-360-A1G6 engines. This is not the most common engine model Lycoming ever built, but it served us well. The first day’s business was to strip the engine down to the bare crankshaft. is was mostly quick and easy work, but we learned a few things about getting the studs out of the case without causing damage. In the newer wide-deck engines, the studs are simply pressed in and are simple to pull out. Or, more accurately, with special tools and a lot of work, they simply pull out. There is definitely a method for doing it that works best, and we all managed to get our cases split with no major damage to them.
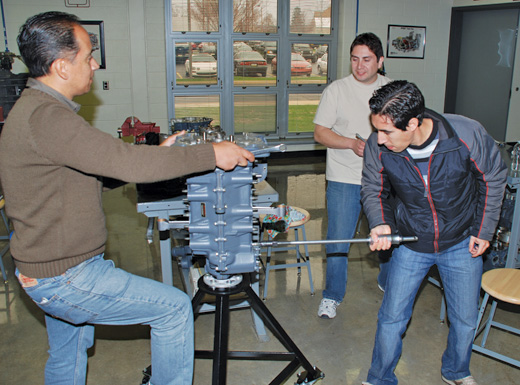
One of the Chilean students uses a slide hammer to extract the through-studs from the engine case. In the wide-deck engine these studs are pressed in, but they are threaded in the older narrow-deck engines.
Day two had us carefully reassembling what we so casually took apart the day before. First order of business: hanging the rods. Connecting rods should be installed with their numbers on the down side, but which side is the down side of a bare crankshaft? After some lively discussion and a few rounds of take-it-off and put-it-on-again, everyone had the rods installed correctly.
Next came the cases. The lifters and bearings go into the right side of the case first, along with an application of oil/STP mixture to the bearings and moly grease to the lifters. The lifters need extra protection because they are only splash lubricated. Then the cam goes into the left case half and is held in place with two rubber bands. The parting surfaces of the right side of the case are coated with POB No. 4 sealant. Then, two strands of 00 silk thread are tacked into place in the traditional way that the factory still uses to help seal the case halves. The technicians at Lycoming are able to place both threads simultaneously, but we were lucky to get them in the right place doing one at a time.
After carefully placing the crankshaft in the right case, the bottom end of the engine was ready to close up. At this point, Lycoming’s instructions are to secure the case halves together and install torque plates where the cylinders will eventually go. As far as I know, no one outside of Lycoming does this, but the factory is insistent that you should—and each plate costs $700. Per the overhaul manual, we installed all of the studs, bolts and torque plates using the approved thread anti-seize compound and torqued both ends of the through-studs at the same time. With all of the help and tools available, the process went smoothly.
The pistons and cylinders went on next. In turn, each torque plate was removed and each new cylinder set installed, with all parts torqued back up as we proceeded. Using the torque plates and removing them one at a time held the bearings in position, minimizing the stresses in the case. The immediate benefit was not apparent, but Lycoming has found that this procedure results in fewer bearing problems and cracked cases. The company sees about 45% of all overhauled engines in its shop, so it has ample basis for this recommendation.
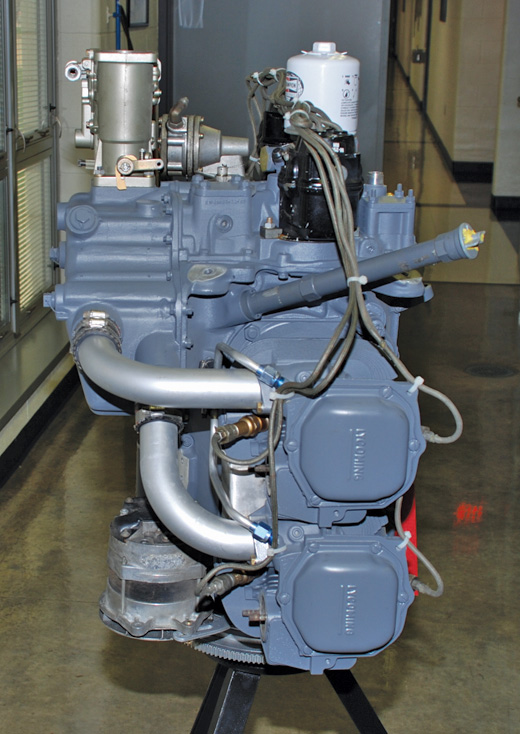
This is one of the fully assembled engines that was used in the class. Note the horizontal, rear-facing carburetor. This engine model would not be a particularly good choice for most homebuilt airplanes due to its unconventional intake arrangement.
Before the pushrods and rocker arms were installed, we checked the dry tappet clearances. Most Lycoming engines have hydraulic lifters that require no adjustment, but to work properly, the clearance between the rocker arm and the valve stem must be within a certain range; otherwise, the lifter cannot make the necessary adjustment. “Dry tappet clearance” means the hydraulic tappets must be dry inside; in other words, no oil is present and they are fully collapsed. To do this, the internal parts of each tappet must be removed and cleaned, and the check valve in each must be released to allow for the complete collapse of the lifter. At that point the clearance between the rocker arm and the valve stem can be checked. If a clearance is out of specification, the discrepancy can usually be resolved by using a shorter or longer pushrod. In any case, it must be correct for the engine to function properly.
Once the main body of the engine was assembled, we were able to install the accessories including starter, alternator, magnetos and ignition system, and the carburetor. And don’t forget the intercylinder baffles. Add some mineral oil, and you’re done: one new Lycoming engine ready to run. We were not able to actually start our engines, but I am sure they would have run well. After all, what could possibly go wrong?
More than a Week’s Worth
These informative courses covered a lot of ground in seven days, and as a bonus, each participant received a free set of Lycoming Service Publications. I was disappointed, however, that we did not spend time looking at actual engine problems in the lab, nor did we measure dimensions and evaluate parts for usability. The curriculum never claimed it would cover these topics, but it would have been beneficial.
So, were these courses worth it? For me, yes. I suspect that those who really want to understand their Lycomings and how to fix them would feel the same way. However, if you limit yourself to changing oil and spark plugs, the courses offer way more information than you will ever need. This is not to say that even the casual amateur mechanic couldn’t benefit from the courses, but in that case, the considerable commitment of time and money is probably out of proportion to the usefulness. Not every homebuilder wants to step up to the challenge of heavy repairs and engine maintenance, but for those of us who do, these courses are well worth the investment.
In the next installment of this series, we’ll look at choosing a propeller. The prop and the engine work together to propel your airplane, and the choice of one affects the choice of the other. Rather than waiting until the end of your project to select a prop, it is a good idea to do it early in the building process.
For more information on Lycoming courses, call 570/327-4775 or visit www.lycoming.com/support/training/piston-engine-service-school.html.


