
My story begins over thirty years ago. It began after a flight lesson when my instructor asked, “Do you know Walter Gee? He’s building a Long-EZ. You should check out his project.”
As fate would have it, we were destined to meet. I remember the first time I met Walter, walking in his shop, seeing a fuselage resting on sawhorses, the smell of epoxy, Long-EZ drawings hanging on the shop wall, and pictures of the dream he was building. For two years I watched epoxy and cloth being transformed into his wonderful flying machine. From my front row perch, I was inspired by Walter’s craftsmanship, dedication, and the way he handled the scratch-your-head moments when things weren’t going well. I don’t know when the seed was sown for me to follow Walter’s dream, but from the moment I watched his beautiful Long-EZ rotate on its maiden flight, I knew building an airplane would be in my future.

I was born with the incurable disease called aviation; a disease most aviators can relate to. Sometimes we have to put our dreams on the shelf for a season and this happened to me. Our farming businesses and growing family didn’t afford time or money for building a plane. Looking back, I realize how valuable this period was to the success of my future project. My free time was spent researching kit options that would meet the mission requirements important to me. The first requirement was a plane capable of operating safely from our grass strip, which narrowed my choices. In 1999 I was invited to a fly-in surprise birthday party at a local airport. On the ramp was the most beautiful yellow Harmon Rocket, and for me, it was love at first sight. For the next five years, my plane of choice was the Harmon Rocket.
Rocket or RV-8?
I started spending time researching Van’s “Total Performance” Aircraft. I wanted a kit manufacturer with good product support, standardized parts, and a history for longevity. The RV-4 was the only option for a two-place tandem-seat and tilt canopy kit. It’s a nice plane that would meet the grass strip requirement, but far from the lines of the Rocket. I need room for my 6-foot-1, 190-pound frame; the RV-4 cockpit would be tight for me. The RV-8, with its wider fuselage, was my next option, but I just couldn’t get the picture of the yellow Harmon Rocket out of my mind.
As I walked thru the lines of RVs at AirVenture 2006, I mistook an RV-8 for a Harmon Rocket. The builder had modified his RV-8 with Show Planes’ fastback tilt canopy and engine cowl conversions. The Show Planes engine cowl is longer than the stock RV-8, requiring a two-inch prop extension when a four-cylinder engine is used. The spinner hub diameter is 15 inches, and the length of the spinner is 21 inches. The longer cowl, in combination with the fastback, had dramatically changed the RV-8 look! This conversion affords unrestricted pilot visibility, improves cockpit entry, especially to the rear seat, seals better than a sliding canopy, and affords full access to the aft side of the panel with a removable instrument cover. Weighing the advantages of building an RV-8 with Show Planes’ conversions and having Van’s kit support made lots of sense, and my final decision was made: I would build an RV-8.

The cockpit side of the firewall has a ceramic blanket that is covered in foil

The ceramic blanket is covered in foil.

The engine side of the firewall is insulated with a 1/8-inch Fiberfrax blanket that will withstand temperatures up to 2300 F. The blanket is covered with a stainless steel skin.
Following a Dream
The summer of 2008 was perfect for growing grass in central Indiana. One day, after mowing the runway for the second time that week, I told my wife, “Something has to change! I’m not interested in maintaining the airstrip any longer.”
We had sold our Cessna 182 and a beautiful J3 Cub, and the hangar was being used for equipment storage. My dream of building a plane seemed very distant. I was running out of time, and I wasn’t interested in a fifteen-year building project. My decision to retire from our business was made before attending AirVenture 2008. My sons would assume my responsibilities in our nursery business, and I would devote full time to building. I’ll be honest—I questioned the sanity of my decision on more than one occasion. Today my finished RV-8 represents the aviation journey of my life with thousands of build hours and decisions, good and bad, made along the way. This was a full-commitment decision, and it was time to get started.
I can’t remember a time in my life when I wasn’t building or fabricating something. I’d been researching this project for years, attending forums and workshops, but still didn’t feel prepared for building a plane. One evening I was searching for the nearest tech counselor in our area when I discovered a builder’s assistance course offered ten miles from my home. I felt like I’d struck gold. My wife and I signed up for the weekend course and learned the basic skills used for building a plane. For a nominal fee, to cover tools and shop overhead, I could rent shop space for building my empennage, an offer I couldn’t turn down. The next three months were spent learning building techniques from an A&P mechanic experienced in the construction of RV series aircraft. When my empennage was finished, I felt prepared to work on my own and moved the project to my shop at home.
At last my dream of building a plane had become a reality. I’d gained confidence building my empennage, but I still felt like a mistake waiting to happen. Oddly, this feeling would be my companion, with its watchful eye on everything I did, constantly warning me to measure again and check the drawings one more time. Early in the project I implemented a system for combating this fear. When practical I’d mock up what I was about to do on the bench with scrap material or fabricate a template to get it just right. One of my most prized possessions is a box containing the templates used to build my plane.

It’s the little things builders do that create a common bond between man and machine. The author didn’t like the way the flap actuator is exposed in the back seat of an RV-8, so he added a cover.

The cover was then upholstered to match the custom leather seats.
A Contender?
I don’t recall when I first thought I might build a plane capable of competing for an Oshkosh Lindy, certainly not at the outset of the project, but the idea was in the back of my mind. When I walked through the rows of kitbuilt planes at AirVenture, I’d look for ideas and pay close attention to fiberglass fit, finish, and metal work. I felt a Lancair would be competitive. For an RV to compete with the perfection, sportiness, and factory in-house assistance Lancair provides builders, there would be little room for error.
I was enjoying the freedom granted to builders who build Experimental aircraft. My standard kit from Van’s was the new one and perfect in every respect—so perfect I often thought I was cheating when I’d think what builders before me endured building their planes. The Harmon Rocket was my model, and I was free to make modifications to the kit with no STCs, no field approvals, and no red tape.
The major modification needed to achieve this goal would be conversion of the fuselage to a fastback, installation of the tilt-over canopy and instrument cover, and Show Planes engine cowl conversion. I was making good progress building the fuselage, following the step-by-step instructions. That all changed when I started laying out my firewall, a complete deviation from the layout suggested in the plans.
When I started building my fuselage, a friend suggested I make templates for the cockpit side of the firewall. “It will be easier to do on the bench than when it’s assembled. You’re going to need them when you soundproof the firewall,” he said.

The roll bar is part of the Show Planes conversion. In addition to providing rollover protection, it makes cockpit entry easy, especially to the rear seat. For easier maintenance, the removable instrument cover gives full access to the aft side of the panel.

I followed his advice, made the templates, and put them on the shelf. I ordered the adhesive-backed soundproofing he recommended, but when UPS delivered the box, I knew I’d made a mistake. On the Van’s Air Force web site, I found information posted by KITPLANES contributor Dan Horton. He was doing burn tests on different materials used on firewalls. I knew the adhesive-backed soundproofing I had was heavy. What I didn’t know was the adhesive glue would emit deadly gas in a fire!
A firewall modification would require additional time. It would be the most important safety upgrade I would add to my plane and the most challenging. When the modification was finished, the engine side of the firewall was insulated with a 1/8-inch Fiberfrax blanket that will withstand 2300 F and is covered with a stainless steel skin. The firewall pass-throughs with firesleeve, dual heat valves, and fastening hardware are also stainless steel. The cockpit side of the firewall has a ceramic blanket covered in foil with 0.020-gauge aluminum panels to protect the foil and improve appearance. I used no adhesives. An engine over-temp sensor mounted on the firewall above the cold air ramp energizes a warning light on the instrument panel if temperatures exceed 220 F. My weight penalty is 8.9 pounds; the soundproofing material I was going to use would have weighed the same, perhaps more. Worst of all, it could have been a lethal hazard in an engine fire.

The well-equipped panel includes a Garmin GNS 430 navigator, GDU 370 PFD, GDU 375 MFD, GTX 327 transponder, GMA audio panel, TruTrak GX autopilot, and Dynon D10A EFIS.
The Joy of Building
What’s it like building a plane? For me it’s like falling in love with a wonderful girl. It sounds strange, but I never grew tired of building nor did I ever reach the point of burnout. When I was away from the project, I really wasn’t; if you’re a builder you know the feeling. My thoughts continually operated in the background in search of ideas. As my fuselage took form, it became more than bulkheads, longerons, and skins riveted together—it became an extension of me.
Modifications personalized my plane and were a joy to do. When Aerotronics, my avionics supplier said, “Paul, we need two more inches to get everything on the panel,” a panel modification was done and a panel template fabricated and sent to Aerotronics.

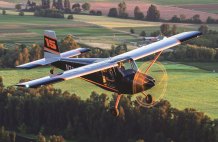
The Show Planes conversion includes a tip-over canopy to replace the standard RV-8 slider.
A friend, flying beside and below his dad’s RV-8, noticed the bottom skin oil-canning; upon inspection working rivets were found. With this information, I did a modification adding stiffeners to the belly skin of the tail section and added a doubler aft of the gear legs. The tail stiffeners are riveted to doublers attached at each bulkhead and to the skin.
I’ve never liked the way the flap actuator is exposed in the back seat of an RV-8, so mine received a cover. It’s the little things builders do that create a common bond between man and machine, that make the result an extension of the builder.
Very early in the project I reserved my N-number, N938W, a number with meaning. I started building September 3, 2008. The international alphabet code for W seemed a good way to figuratively re-christen my plane each time her number is mentioned.

Aero Sport Power IO-375 engine with Vetterman exhaust and Whirl Wind 200RV prop.
I also started working early, with Scheme Designers, to develop a paint scheme for my plane. When a scheme was rendered, I hung it on my shop wall. I was reminded, with each rendition, that my eldest sister was the recipient of all the artsy genes in our family. Unexpectedly, this phase led to the most challenging, aggravating, and in the end, rewarding event in the project. Paint schemes aren’t high on the list for earning points when an aircraft is being judged; the majority are done in professional shops, and they shouldn’t count. What if we painted the plane ourselves? Common sense told me it had to count for something.

The author’s first ride—Jon Hubbell front seat, Paul Berg rear.
First Flight
The droning of an approaching engine resonated through the morning air, reaching a crescendo as it entered the pattern to land on my grass strip. Weather the morning of April 18, 2014, couldn’t have been more suitable. Light and variable winds favoring our north-south grass strip are rare in central Indiana. The sun glistened as Jon Hubbell taxied his RV-6 to the hangar. The early morning dew reflected from his wheelpants as he shut his engine down. Through the open hangar door sat the steed Jon would be piloting on its maiden flight, the open canopy beckoning for someone to “take me flying.”

Six years and over 7000 hours of building time didn’t allow the author to maintain pilot proficiency, so Jon Hubbell made the first flight from the author’s grass strip.
I had long abandoned the thought of piloting the first flight. Six years with over 7000 hours of building time didn’t allow for maintaining stick-and-rudder proficiency. Most importantly, I was emotionally invested in the plane. A pilot builder lacking proficiency and being emotionally involved is a dangerous combination, a chance I was not willing to take.
Jon is an accomplished builder, an A&P mechanic, and pilot with first-flight experience. A more perfect marriage of man and machine would’ve been impossible to find. I watched as Jon climbed into the cockpit, secured his harnesses, locked the canopy in its taxi position, and started running through the checklist.
“Clear!” Three blades and the engine came to life. The sound of the Vetterman four-pipe exhaust system was music to my ears! As Jon taxied to the runway, I was overwhelmed by a nervous feeling; my friend was minutes away from flying the plane I’d built. I watched the takeoff roll. It seemed to be in slow motion. Her tail rose, the mains rotated, then after briefly flying in ground effect, Jon quickly climbed to a safe altitude circling the runway. The morning sun beamed off the wings as they banked into the turns with the blue sky silhouetted in the background. I can’t describe the feelings that overwhelmed me.
After thirty minutes of nervous bliss, N938W lined up on final, completing its first flight with a textbook three-point landing. Jon taxied to the hangar, shut down the engine, and opened the canopy with a huge grin on his face.
“Paul, does your plane have a name? Planes need a name. As I was flying, I looked out at the wing and a ladybug was clinging to it; I think you should name it Lady Bug.”
Jon knows Lady Bug well, flying 12 hours in one day to finish the Phase 1 requirements, just days before leaving for Oshkosh. Without Jon’s help, there wouldn’t be an AirVenture story to tell.

Lady Bug with the Air Force Thunderbirds at AirVenture 2014.
AirVenture
The most amazing week of our lives was spent showing our plane at AirVenture 2014. Days started with a stop at Sacred Heart’s concession stand by the main entrance for coffee and a sweet roll, then we’d walk to our plane tied down north of the north taxiway. My wife and I made a commitment to our plane, judges, and attendees to stay with the plane during the show. Porta-John breaks were the only exception.
Monday, July 28, 2014, was the first day of judging. Lady Bug glistened in the sun, secured with its tiedowns, decked in show array. Months had been spent preparing for this day; I’d documented the journey with build logs and a series of four albums telling Lady Bug’s story. Displayed between the gear legs was a banner with Lady Bug’s first flight captured on its center. By week’s end a brown grass trail circled Lady Bug. A dream conceived thirty years earlier as I watched Walters’s first flight had come true for me, and it was an incredible journey! The most awesome gift I received from my Oshkosh experience was meeting and sharing my passion for flight with fellow builders and those catching the dream. N938W was the AirVenture 2014 Silver Lindy recipient.
It’s Showtime!
Our AirVenture display took months to create. We filled four binders with building logs and pictures, detailing every aspect of building the plane. Another binder had the electrical wiring schematics professionally done by a friend, and the engine and airframe logs were also available. To add some flair we wore shirts with the same paint scheme as Lady Bug.

Four albums detailed every aspect of building the plane.

Richard VanGrunsven and Paul and Peggy Berg.
On the first day of the show a gentleman asked, “Do you mind if I take detailed pictures of your plane?” I said, “Not a problem. If you need the canopy or anything else opened I’ll be happy to do it.” He became a regular visitor. Toward the end of the show, I saw him walking toward my plane. Approaching me he said, “I can’t leave without thanking you for bringing your plane to Oshkosh.” Lots of similar stories could be told. The show of appreciation will always be a highpoint of our Oshkosh experience. My first ride came when we flew with EAA on a photo shoot. When we landed, arrangements had been made for a quick picture with the Air Force Thunderbirds in the background. I was honored when General Dan Cherry, a former Thunderbird commander, posed for a picture. But the icing on the cake was having Richard VanGrunsven visit our plane.
—P.B.

Painted Lady
Without a doubt painting the plane was the biggest challenge of the project. The scheme has black checks faded into yellow. For this reason professional paint shops were reluctant to price the job, so the decision was made to do it ourselves. We bought a very used paint booth, reassembled it in our farm shop, and started preparing the plane to receive its wardrobe.
First, the fuselage was prepped and primed gray, followed by a white base coat, which must be used before painting yellow. Next, the fuselage was sanded and masked for red, and then the faded checks were sprayed.
We practiced painting the fade on numerous test panels. Nevertheless, we failed on our first attempts to paint the wings and fuselage. Finally, we cracked the code that had eluded us. Drop shadows and pinstripes were added to the scheme for extra flair.

Priming the fuselage.

Yellow is applied over a white base coat.

After masking, the fuselage is sprayed red.

The left wing painted yellow and red.

Masking the wing for the checks.

Blue tape marks indicate fade transitions.

Faded checks applied to the fuselage.

The left wing after spraying the checks.

Pinstripes are painted with a small brush.


Wow!
There is so much impressive detail in this plane, when seen in person, that the article could not cover; it is truly a master piece beyond reproach.
Paul I really enjoyed reading your article. Beautiful work!!!
Comments are closed.