Tires wear every time you take off and land, so changing tires is an inevitable part of aircraft ownership. Doing the work correctly will keep you safe and extend the life of both your tires and tubes. Tires get little attention from the typical pilot/owner because they are usually tucked inside wheelpants where they are difficult to see. It’s the old out-of-sight, out-of-mind routine. However, a flat tire on a light airplane usually means that you are not going anywhere until it is fixed. And if the flat occurs during a landing there is an excellent chance you will go off the runway, completely out of control. Take care of your tires and they will take care of you.

Use a dolly to move your plane if it has a flat tire. This prevents damage to the tire and wheel and makes it much easier to move.
When to Change a Tire
A tire needs to get replaced when one or more of the following occurs:
1. One or more of the grooves that go around the tire wear away.
2. When any tire cord is visible anywhere on the tire.
3. Whenever there is a cut in the tire that goes down to the cord.
4. Whenever there is a flat spot on the tire caused by uneven wear or excessive braking that causes the tire to vibrate or thump when you taxi. This is different than the flat spot that can result from not moving an airplane for a long period of time. That flat spot should go away once the tire is warmed up.
5. Whenever there is checking or cracking of the tire rubber that goes down to the cord.
You most likely only need to replace the tube if you have a clean puncture, a tube failure, or an otherwise sound tire that will not hold air. In my opinion, patching a tube is an emergency repair, not a long-term solution to a leaking tube.
Some airplanes like to wear the inside halves of their tires more quickly than the outer halves. For these planes it is perfectly reasonable to flip the tires so the worn part of the tire is on the outside and the unworn part is on the inside. Just be sure to do so before the inside grooves are completely worn off. This can double the life of the tires on such airplanes.
Which Tires Should I Buy?
Buying new tires is a place where you pretty much get what you pay for. More expensive tires last longer. Here is a typical price spread of new tires: A Goodyear Custom Flight III 6.00×6, 4-ply tire costs $163 versus an Air Hawk tire of the same size for $72. Will the Goodyear really last over twice as long? Yes, it probably will, as long as it isn’t damaged or otherwise abused. Is the Goodyear really worth it? That is something each owner must decide. It is not that inexpensive tires are unsafe; it is just that they wear out more quickly.
An alternative to a new tire is the recapped tire. Desser is the leading maker of recapped aviation tires, and they have a very good reputation and loyal following among people who use lots of tires. Their standard 6.00×6, 4-ply recapped tire costs $59. One caution regarding Desser tires; they tend to be a little bit larger diameter than new tires, so there may be clearance issues with tight-fitting wheelpants.
The one question that always comes up regarding new tires is, “Do I really need to replace the tube when I get a new tire?” Sadly the answer is yes. Get the best deal you can on a name brand tire and buy a new tube. There is no need to match the brand of tube and tire if you can get a better deal on another brand.
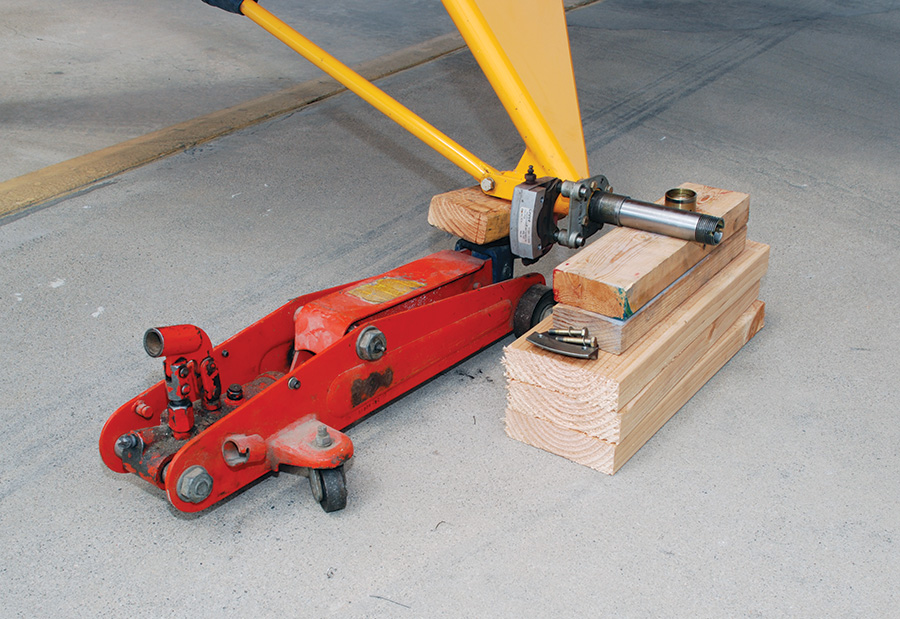
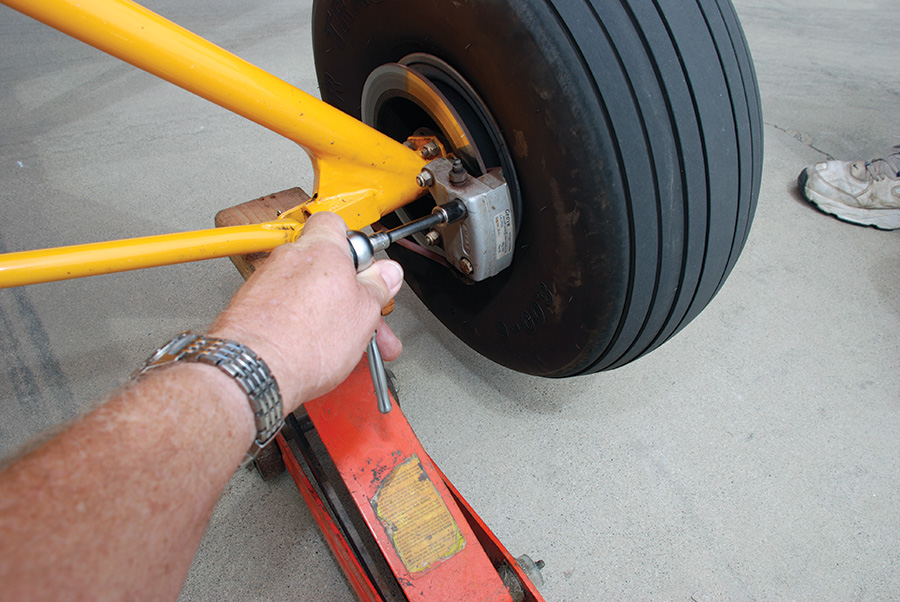
After removing the wheel, be sure to rest the axle on blocks. Do not leave the plane supported only by the jack for any longer than absolutely necessary.
Removing the Old Tire
The first step to changing a tire is to safely jack up the plane. This is going to vary from one plane to the next, so get some advice from experienced owners. This is where that owner/builder forum really comes in handy. Many others have gone down this road before you, so there is no need to learn this lesson the hard way. Your kit manufacturer should also have some suggestions if your particular plane does not have a well-organized owner’s group. The important thing is to be safe. Minimize, and if possible avoid, spending any time under an aircraft that is only supported by a jack. Once the tire is removed, support the plane with a stand or blocks, not the jack. Make sure the plane is stable at all times. Always look to minimize risk in your shop. Unstable jacks can fail with catastrophic results. Don’t let it happen to you.
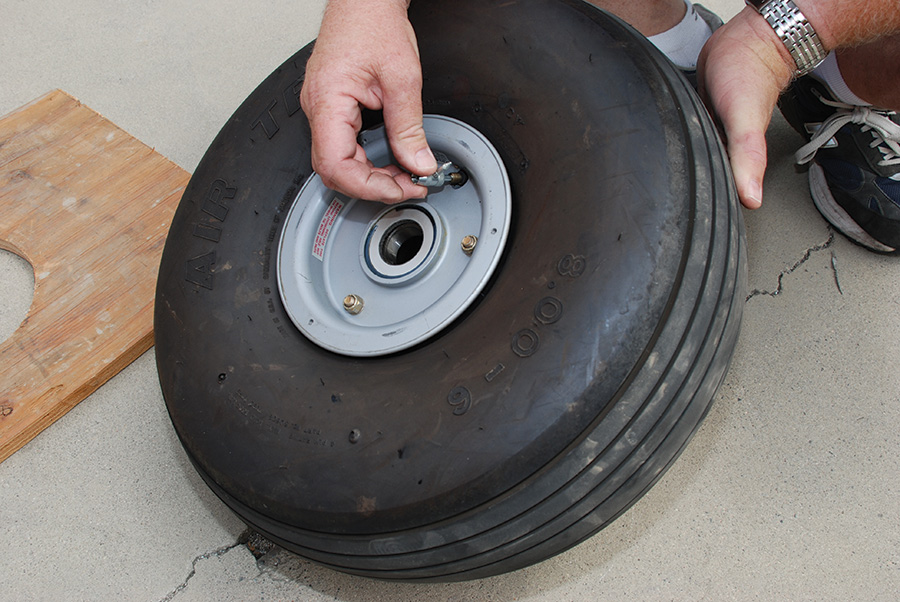
Remove the valve stem from the tire valve to let the air out. You can buy a valve stem tool at any auto parts store.
Here are the basic steps to remove a tire:
1. Remove the wheelpant and disassemble the brake caliper only enough to allow the rotor to be removed.
2. Jack up the plane the minimum amount necessary to remove the tire and wheel.
3. Remove the axle nut cotter pin and the axle nut.
4. Slide the tire and wheel off the axle, keeping track of wheel bearings and spacers.
5. Lower the plane onto a solid support (not the jack).
6. Remove the valve stem from the tube and let all of the air out.
7. Break the bead loose from the wheel on both sides of the tire. Use the proper tools. Pry bars and hammers are not included on the list of proper tools.
8. Remove the bolts that hold the wheel halves together. Warning! Never do this if there is any air pressure in the tire. That can be very dangerous.
9. Remove the wheel halves from the tire.
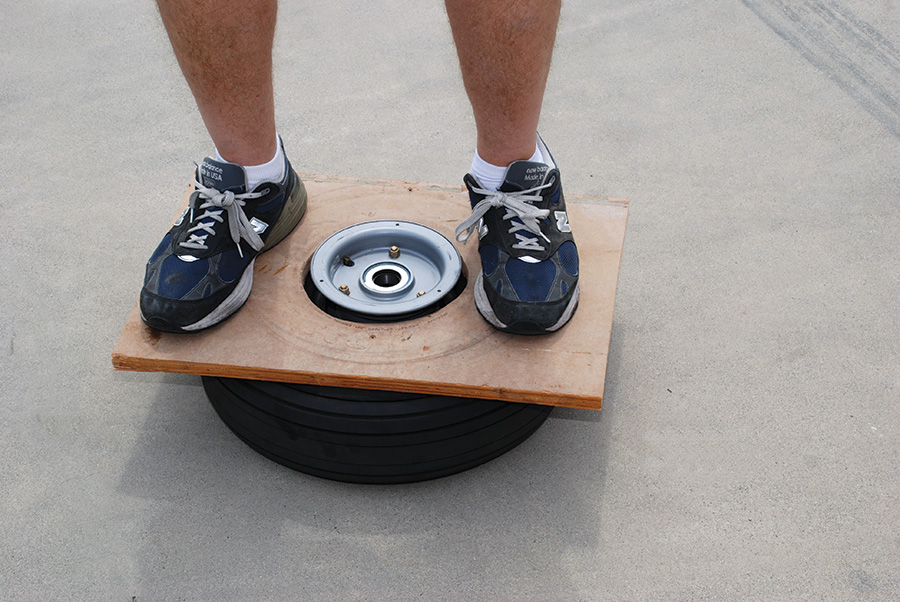
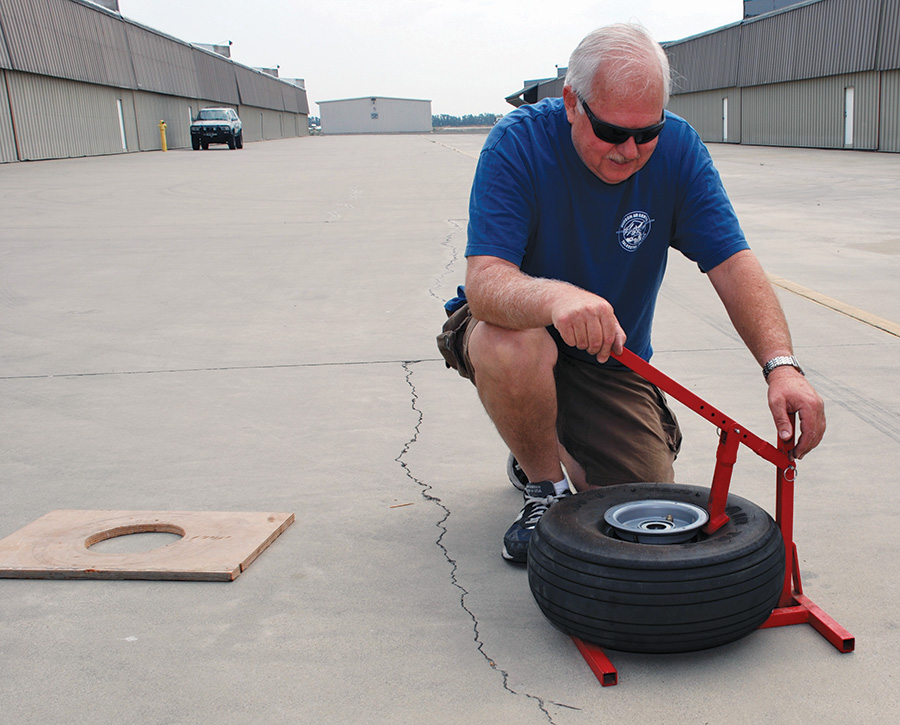
Use a piece of ¾-inch plywood with a hole in the center to break the bead loose on your tire. The hole needs to be just slightly larger than the outside diameter of the wheel.
There are relatively expensive tools designed to break the tire bead loose from an aircraft wheel. These are available from aviation vendors such as Aircraft Spruce & Specialty, but are somewhat pricey for the person who changes at most one tire per year. But there is a low-cost option that does a good job and does not damage the wheel or tire. You can make such a tool by cutting a round hole just a bit larger than the diameter of the wheel in the center of a piece of ¾-inch plywood. A square piece about two feet on a side is great, but the dimensions are not critical. It just needs to be bigger than the tire. Place the hole over the wheel and stand on the tool, working it back and forth until the bead breaks loose. Then turn the tire over and do the other side. With just a bit of effort, you just saved yourself $150.
Now is a good time to inspect the brakes and wheel bearings, but that will be the subject for another month. Without going into too much detail, it is obviously important not to reinstall parts that are worn out or damaged. If the brake pads are worn down to the rivets or the rotor is cracked or scored from running the brake pads down too low, those items need to be replaced. The same idea applies to the wheel bearings. If a quick turn of the bearings reveals a problem, or the bearings appear to need more grease, be sure to take care of those problems before proceeding to install a new tire.
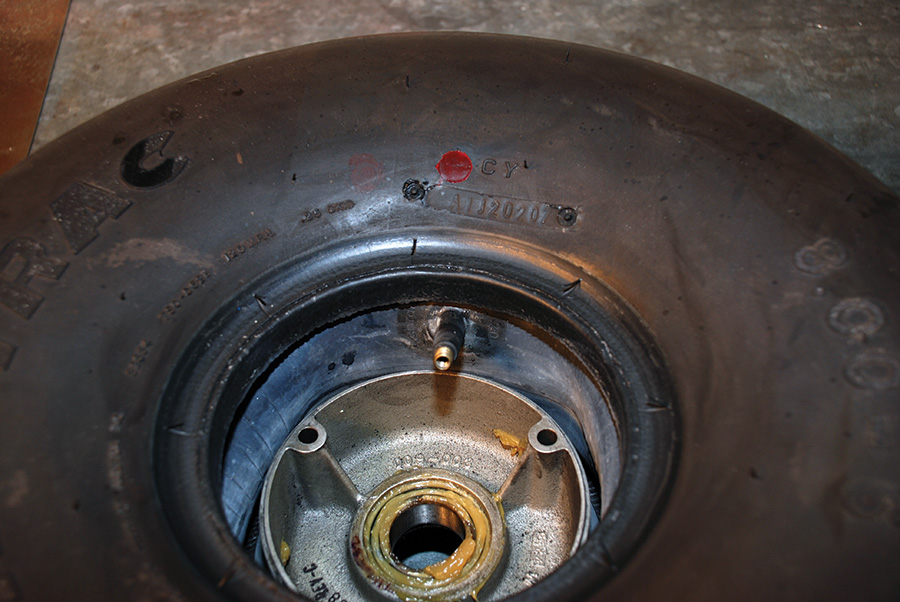
When installing the new tire and tube, be sure to line up the valve with the red dot on the tire. If there is no red dot, don’t worry about it, but do look for it. It can be hard to see sometimes.
Mounting the New Tire
Here are the steps for mounting a new tire:
1. Remove any packing material and labels, and inspect the inside of the tire for any foreign objects or projections.
2. Shake some tire talc powder inside the tire to ease the movement of the new tube inside the tire. (This can be very messy.)
3. Place the new tube inside the tire with the valve pointing outward. Be sure to move the tube around inside the tire so the red dot (if present) and the valve line up with each other.
4. Remove the valve stem from the new tube, and blow in enough compressed air to just get the tube to sit squarely inside the tire with no folds or wrinkles.
5. Inspect the wheel halves for cracks or other damage. Minor dents around the edges of the wheels are permitted, but in no case should you reuse a cracked wheel. When in doubt contact the wheel’s manufacturer.
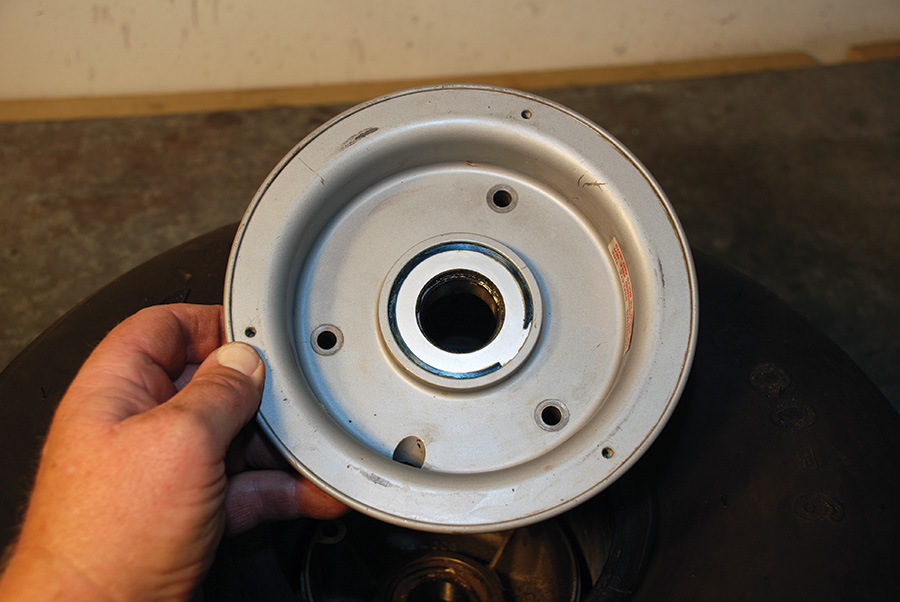
Inspect each wheel half for nicks and cracks before reusing it. Replace any cracked wheel immediately. A cracked wheel can lead to a tire blowout at a most inopportune time, leading to damage to your plane and possibly you.
6. Set the tire and tube onto the inner wheel half, making sure the inside of the wheel is clean.
7. Set the outer wheel half into the center of the tire, aligning it with the bolt holes in the inner wheel half. Be sure not to pinch the tube between the wheel halves. Be sure to inspect the bolts for damage or corrosion before reusing them.
8. Bolt the brake rotor and the wheel halves together, at all times being careful not to pinch the tube. Tighten each bolt so it just makes contact with the wheel at this time. If there is any noticeable loss of drag with any of the stop nuts, be sure to replace them.
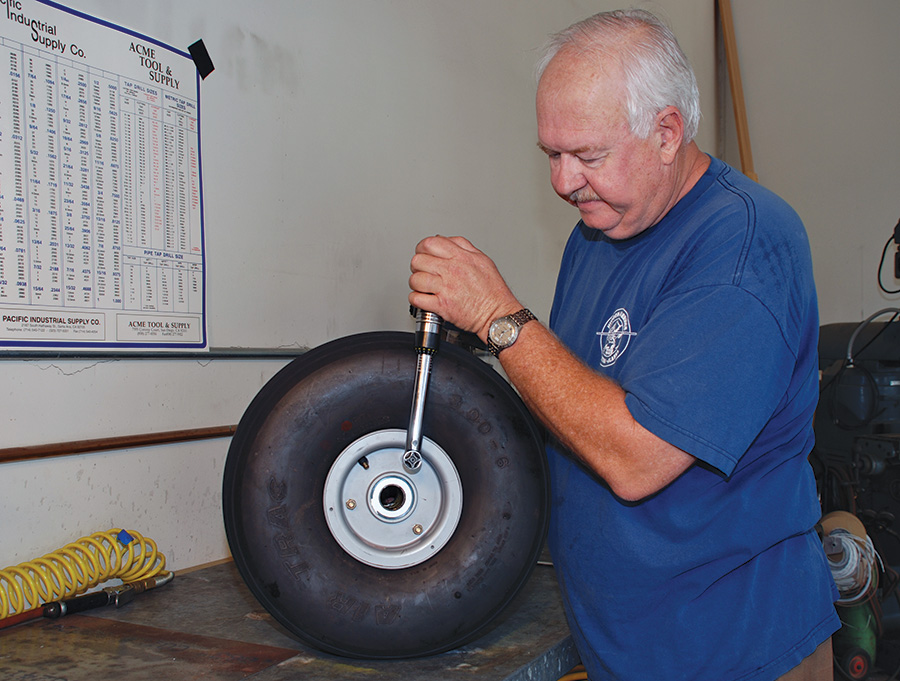
9. Be sure all the wheel bolts are tight to the point of just making contact, then torque each bolt to half the wheel manufacturer’s recommended torque. Then go around a second time and torque to the full value. This will avoid any uneven tension on the bolts.
10. Install the valve stem and fill the tire with air to half its normal pressure. If anything looks amiss as you proceed, immediately remove the air pressure from the tire and correct the problem. Do not be startled when the tire bead pops into position on the wheel.
11. If everything looks OK and you do not hear any air leaking, inflate the tire to its normal operating pressure. If any cracks appear in the wheel as you are doing this, immediately stop adding air to the tire.
12. With the tire fully aired, clean off the brake rotor and brake pads with brake cleaner.
13. Jack the plane up just enough to slide the new tire and wheel back onto the axle, again being careful to avoid any unstable condition or prolonged exposure to risk.
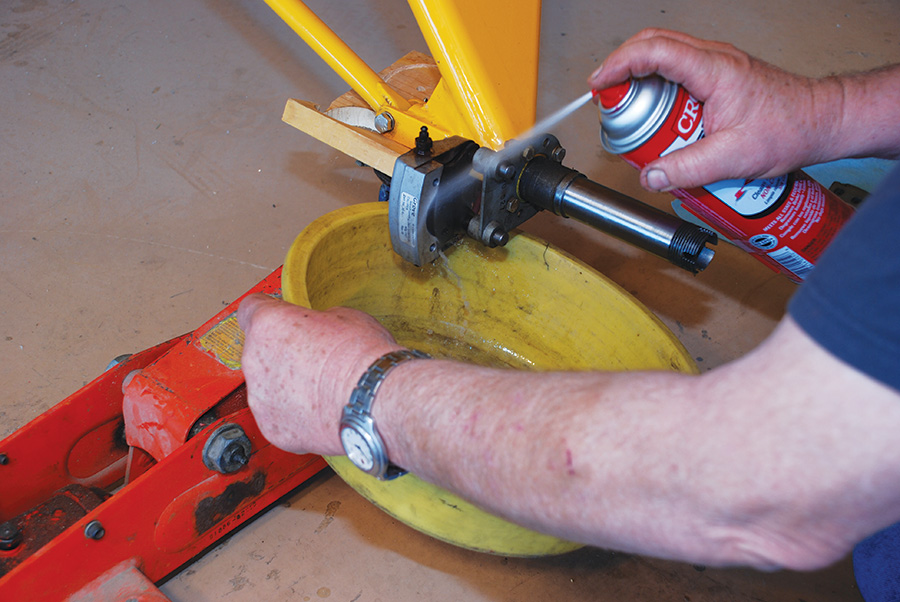
Clean brake parts with brake cleaner, available at any auto parts store. Be sure to catch waste cleaner and dispose of it properly.

Apply a light coat of grease to the caliper pins prior to reassembling the brakes. This will ensure free movement of the caliper and more effective braking. Needless to say, be careful to keep grease off the brake pads and rotor.
14. Slide the wheel assembly back onto the axle. Any spacers previously removed should be reinstalled in their proper places.
15. Tighten the axle nut until you cannot shake the wheel on the axle. Then align the axle nut hole with the hole in the axle so that a new cotter pin can be installed. Do not over-tighten the axle nut or leave any slack in the wheel that will allow it to move on the axle, except to rotate freely. There is only one correct position for the axle nut. Be sure to find it, then install a new cotter pin.
16. Lower the plane off the jack so that its weight is supported by the tire.
17. Reinstall the brake caliper and safety-wire the bolts.
18. Give the tire pressure one last check, and reinstall the wheelpants if applicable.
Long tire life comes from proper tire pressure and judicious use of the brakes. Ideally, your use of brakes should be minimal-to-none on the runway, especially if you are flying a taildragger. Try to plan your landings accordingly.
The simplicity and relative familiarity of a tire change may encourage you to take it for granted, but it is really best if you do not shortcut the process or become casual about safety.

![]()
Dave Prizio is a Southern California native who has been plying the skies of the L.A. basin and beyond since 1973. Born into a family of builders, it was only natural that he would make his living as a contractor and spend his leisure time building airplanes. He has so far completed three—a GlaStar, a Glasair Sportsman, and a Texas Sport Cub—and he is helping a friend build a fourth, an RV-8. When he isn’t building something, he likes to share his love of aviation with others by flying Young Eagles or volunteering as an EAA Technical Counselor. He is also a member of the EAA Homebuilt Aircraft Council.

