“Oh no!” Sharon moaned, “Look at my poor aileron!”
I looked in the direction she was pointing and my heart sank. There was a wrinkle in the fabric on the trailing edge of her Kolb Twinstar’s right aileron. It was a big wrinkle. You could see the very obvious bend in the thin-wall 5/16-inch 6061-T6 aluminum tubing that makes up the trailing edge of the aileron. We knew from past experience that when you see a wrinkle in a fabric-covered airplane that hadn’t been there before, you were in deep doo-doo. It meant that you had some structural damage hiding somewhere under the fabric. Actually, in retrospect, that’s a pretty good feature to have in a fabric-covered plane. A wrinkle tells you something just isn’t right. We just didn’t want to see a wrinkle on this particular fabric-covered plane. Not today!
We knew it was going to happen sooner or later, and since we’d built the Kolb in 1988, we were way past due. Even the great flood of ’93, that trashed every plane on the field, hadn’t done any structural damage to the Kolb. It had just filled the Kolb up with mud. We’d stripped all the fabric off, flushed out the mud-filled tubes, coated each tube’s innards with LPS Hardcoat, recovered it, repainted it, and drove on. It took all winter to get finished.

Here’s where the broken tube came from. The author is holding the replacement trailing edge in his right hand.
In this case we were pretty sure how this damage happened. We were right in the middle of one of our big fried green tomatoes fry-in picnics (as opposed to a fly-in) at Liberty Landing International Airport. The field was crowded with planes that had flown in for the picnic, and we had cars parked all along the road. We had three different deep fryers going like gangbusters trying to keep everyone fed.
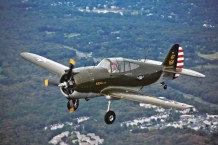
For once Sharon was not one of the cooks. This was a rarity. She was actually flying! She’d been taking people for rides in her Kolb. Then she jumped out of the Kolb and punished the sky in her Airdrome Aeroplanes Morane-Saulnier L Parasol replica. She was having a ball.
I was flying my Graham Lee Nieuport 11 replica and doing the same. It was just swell!
This unexpected little bump in the road brought all that to a screeching halt. The day suddenly turned dark brown with a vengeance.

The splice has been inserted in the trailing edge on the left side of the break and riveted in place.
We knew from when we’d covered the Kolb after the flood how fragile the thin-walled, trailing-edge tubing on the aileron was. You had to be really careful when shrinking the fabric that you didn’t turn the aileron into a pretzel by shrinking the fabric too much. And this was lightweight 1.8-ounce Dacron! Even with this super-lightweight cloth, too much heat on the Dacron will warp the frame of whatever you’re working on. What probably caused this damage was that someone bumped into it and didn’t even know they’d done any damage. It didn’t take a lot to bend that fragile, lightweight tube.
So, on the spur of the moment, we decided to fix the damage on the spot. We had fabric, pinking shears, Stewart Systems EkoBond cement and brushes. And most important, we’d found some extra 5/16-inch 6061-T6 tubing left over from some forgotten project up on the mezzanine in the hangar. I didn’t think we’d need the tubing because it looked like we’d be able to straighten the bent trailing edge after we’d cut the fabric away from it.

Using the awl to move the splice into the replacement trailing edge tube. This was the hardest part of the whole repair job.
We knew we couldn’t straighten it with the fabric on it. That was a non-issue. We’d tried that before on some other damaged tube-and-fabric aircraft parts. You were doomed to even think it might work.
You might be wondering why we chose to do a slam-bam-thank-you-ma’am shade-tree-on-the-field type repair instead of taking the wing off, removing the aileron and doing the repair “right” according to the FAA’s AC 43.13-1B—Acceptable Methods, Techniques, and Practices—Aircraft Inspection and Repair. Well, I’ll tell you—we were planning on recovering her in the coming winter, so for right now, a shade-tree type repair was just what the doctor ordered. After all, this was not a critical structural problem that would compromise flight safety.
So, we got all our tools and ingredients together, went down to the end of the row of hangars to the Kolb’s hangar, and got ready to work. Stand back and duck sports fans…We were going into Baslee Mode! Yessirreebob, that’s what we call it when you decide to get ‘r done! No “blue sky” moments. No frosty Diet Dr. Thunder breaks. No sitting. No hangar talking. No horseplay. It was time to kick some serious covering butt and take names.

The aileron trailing edge repair is ready for cover.
When we’re in Baslee Mode, we pretend we’re in “Bullwhip Baslee’s House of Pain” working on a project, and he’s behind us watching what we’re doing. Trust me, if you’ve ever been to The House of Pain, you know what I’m talking about. If Robert catches you standing still not doing something, he will find something for you to do…Right now!
It’s a great incentive to start working on something. Or pretend you’re working on something. Most of the time that won’t work. He can tell when you’re stalling. He’s got the piercing gimlet eyes of a starving eagle. Remember, he built four full-scale Nieuport 17s for the movie Flyboys in only 52 days. That’s from start to first flights! Baslee Mode is his normal operating speed.
When we’re in Baslee Mode, we’re usually not really concerned with cosmetic appearances. We just want to get it done and get it in the air.

The fabric is pressed into the fresh EkoBond cement. It tacks up quickly, so there’s no real wait time between jobs.
The Kolb’s 20-year-old paint job was looking pretty seedy by now anyway. The fabric was still in excellent shape, but the paint job…well…uhhh…Scrofulous would be the best word to describe it. There were places where it was peeling, and some surface tapes had edges coming up. So, we just wanted to fix the wound and get her back in the air right now…that day…P.D.Q! We were in Baslee Mode—let the carnage commence!
The first thing I did was walk 500 feet all the way back to the big hangar to get some razor blades I’d forgotten to bring with me. I needed them to cut the fabric away from the bent tube. Baslee Mode took a hit there. On the long walk back to the Kolb with the razor blades, I was trying to think of what else I’d forgotten to bring.
Trimming very carefully, I cut the fabric away from the tube between the ribs. Then I gently pulled at the middle of the bent section to straighten it out and get ready to do the fabric patch.
“SNAP!”
I’d just barely started to pull when it broke at both ends of the bend and just fell out in my hand. Baslee Mode came to a screeching halt.
“OH *&@#$*()!!!” I screamed.
“Was that a bad thing?” Sharon cheerfully chirped as she peered over my shoulder.
“Dear,” I said. “This was a very bad thing. It was the baddest of all bad things. I need a blue sky moment here.” I sat there on a milk carton and studied the shard of tubing I was holding in my hand. It had broken right at both of the holes where a rivet was used to rivet the aileron rib to the trailing edge.

Starting to duplicate the same process on the top of the aileron. You can see our fake German observation balloon in the background. It’s been flamed hundreds of times and always reappears.
Sharon went back to reading one of her steamy “bodice-ripping” novels.
I was at a loss as to what to do. Just about then, Dick Lemons came sauntering by. He’d just taxied up in his “double-wide” Quicksilver MX Sprint to fill it up with gas and take a break. He’d been giving non-stop rides to kids and their parents all morning long.
Dick looked at me sitting there holding the piece of tubing and studying the forbidding gap in the aileron. He could see I needed to fabricate a splice to go in-between two tubes that were fixed in place. Think about that for a minute. An “oversleeve” splice would work but it would show up like a diamond in a pile of poop. It would be really easy to do, too, but would be so noticeable I wouldn’t even consider it. After all, this is my Sweetie’s plane. She expects and demands only the best. Ask me how I know this!

Final shrink on the top of the repair.
I didn’t have a clue as to how to fix it.
Dick looked at it for a while and then spoke up. “You’re going to have to cut more fabric away. Remove the rest of the trailing edge between those two ribs where the break is. Then cut two 3-inch long pieces of that 5/16-inch tubing. Split them lengthwise. Then cut enough out lengthwise, so that when you press the split edges together you can slide them into the new piece of trailing edge you’re going to make. Splice them together and you’ll be ready to cover.”
I sat there looking at him like he was speaking in tongues.
Dick looked at me and sighed. He knew I was in deep doo-doo. “I’ll show you what I was talking about. I need to take a break anyway. Grab that piece of 5/16-inch tubing and follow me.”
Salvation was at hand. Aren’t buddies great to have around? Particularly if they know what they’re doing!
We went back to the big hangar where our workbenches are. Dick got me to cut off two 3-inch pieces of tubing. Then I carefully split them on one side lengthwise. We got out our smartphone calculators and did some ciphering on how much of the split needed to be cut out so that when we pressed them together, the diameter of the “new” modified piece of tubing would slide into the existing trailing edge tube and the new replacement piece. It took a few tries, and we tried out some new words, but we finally got them to slide together.
Thundering back to the Kolb, we got ready to make a splice. We reamed out the existing ends of the trailing edges so the splice would slide into them easily. Next we did the easy one. We pushed one of the splices into the existing trailing edge tube halfway. It was riveted in place. Then the new trailing edge tube was slid over the splice and riveted in place.

White paint is used first to give a good base for the colors that will be going on top. The white base makes for a much more vibrant color top coat.
Now it was time for the problem child.
There was one more thing we needed to do, and we’d be ready to do the deed. In the old end of the trailing edge, I drilled a 1/8-inch hole through one side of the tube. Then I reamed it out again, so the splice would still slide into it easily. I marked the splice at its midpoint with a black Sharpie marker.
It was crunch time. I slid the splice all the way into the existing trailing edge till it was flush with the end.
Then, lining up the new trailing edge section with the old end, I worked with a sharp awl to move the splice halfway into the end of the new trailing edge. We did this until the black mark on the splice could be seen at the joint between the old trailing edge and the new piece. This took all six hands from me, Dick, and Sweetie trying to hold everything in place. More new words were tried out. Just about then, to muddy the waters, Big Bad Bob Loyd came wandering up from his Avid Flyer to offer unneeded commentary and totally useless advice while all this was going on. He really added to the moment.

Applying the yellow Glidden Evermore Gloss Exterior Latex.
When everything was in place, the entire assembly was riveted. The ribs were reattached to the trailing edge, and she was ready to cover.
All this feverish activity had taken about an hour and thirty minutes. The picnic was still going on strong, so Dick went back to flying his doublewide.
Sweetie and I went back into Baslee Mode. While I was applying Stewart Systems EkoBond cement to the aileron, Sweetie was cutting out the piece of fabric we were going to use for the repair. She made sure we had a lot of overlap. We needed to have enough area for the patch to grab, so it wouldn’t creep when we shrunk the fabric. When the cement got tacky after about five minutes, we carefully laid the fabric in place.
Then we brushed EkoBond through the rest of the fabric till all the weave was filled and the EkoBond had penetrated all the way through to the existing cloth underneath the patch.
Next we folded the fabric over the trailing edge and did the same thing to the other side of the aileron.

Finishing up the red, ready to start on the blue. The plane was back in the air in two days.
The last thing we needed to do was carefully wipe the excess EkoBond cement off both sides with a damp paper towel. This was a step I normally forgot, but Sweetie was right on top of it this time. It makes for a much smoother finish, a better cement bond, and some weight savings.
We were forced out of Baslee Mode. The cement would need to dry overnight before the patch could be shrunk, filled and painted.
The next morning we were out there bright and early, ready to kick butt and take names. While Sweetie was ironing down the edges of the patch, getting it ready to shrink with our close-quarter covering iron, I was hunting up our little fabric iron we use for larger surfaces. After the edges were sealed down, Sharon started the first shrink at 175 degrees. She did this to both sides of the aileron. Then she cranked up the iron to 250 degrees and hit both sides again. And that’s where we stopped. You can shrink at a lot higher temperature before the fabric starts to crystallize (a very bad thing to have happen), but we stopped here because we didn’t want to warp the aileron.
Now it was time to seal the fabric. We use EkoBond for this, too. It does a great job. Did I mention it’s odor free and water cleanup? Sharon filled the weave on both sides of the aileron and it was, once again, time to let everything cure before painting.
We went flying for the rest of the morning. Patrolling the trenches around the field and hunting German observation balloons is a fine way to spend the morning until the air gets bumpy. Then, it’s time to head for home.
The next day dawned bright and sunny. It was going to be a perfect day to paint. We had our Glidden Evermore Exterior Latex ready. We started off with a base coat of white. It dried in about thirty minutes. Then Sharon started on the colors. The yellow went first and then the blue and red. In about two hours, the Tweetie Bird was ready to fly again. All in all, it hadn’t been that bad. We’d learned a lot, and that’s what flying Experimental aircraft is all about.
The Adventure was ready to continue once again!

![]()
Dick Starks has written two books about the joy of flying; “You Want To Build And Fly A What?” and “Fokkers At Six O’clock!!” He was the recipient of Flying’s 2001 Bax Seat Award “for perpetuating the Gordon Baxter tradition of communicating the excitement and romance of flight.” Dick and his wife, Sharon, both fly WW-I replica aircraft.


No Ekofill for UV protection?
Comments are closed.