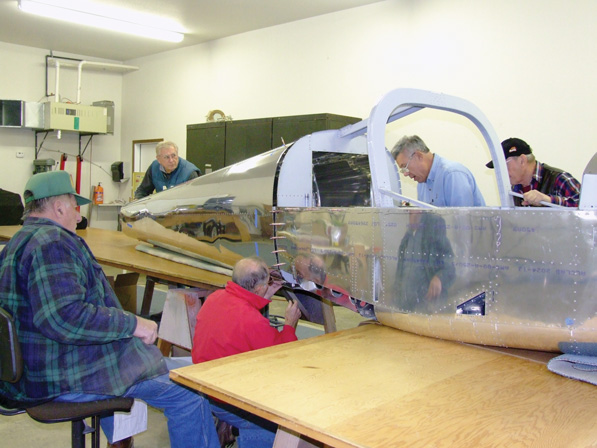
The really big moment: The tail cone and all of its 288 rivet holes are about to align with their mates in the forward fuselage.
Compared with the wing/flaperon segment and the tail cone/empennage kit, the package that builds into the Van’s RV-12 forward fuselage looks formidable. The inventory lists dozens of small, medium and large parts, and that doesn’t include the separate lengthy hardware list. Unlike the wing and tail packages, many of the fuselage parts are not recognizable; you would be hard put to determine where they go without the builder manual. The hardware package is also impressive.
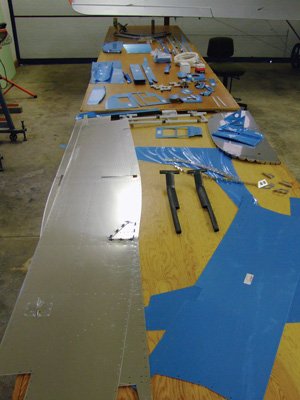
Fuselage sideskins are among the larger forward-fuselage kit parts.
Our inventory clerk (my wife, Lois) used several dozen plastic drawers in our parts storage system, and in some cases up to four separators per drawer to store various sizes, lengths and configurations (round head or flush) of solid and pulled rivets. Screws, bolts, nuts, fuel system plumbing parts, varieties of washers, nylon fasteners, brake system parts and cotter pins each had its clearly labeled drawer and bin assignment.
Building a Ship?
My DVD collection includes one that shows how the aircraft carrier USS Harry S. Truman was built using CAD/CAM for design and construction. Modern shipbuilding technique is to make huge chunks called superlifts some distance from the dry dock and move them using gantry cranes to where they are welded together to form the finished product. CAD/CAM produces accuracies to a few hundredths of an inch, assuring that everything including wiring and plumbing in each superlift will fit the next big piece. Reviewing the 67-page instruction manual for the RV-12 forward fuselage makes it clear that Van’s has used the same technique with the airplane. The forward fuselage is built in separate subassemblies whose rivet holes match so precisely that the big pieces really do fit together perfectly when it’s time to mate them. One or two people substitute for the gantry cranes. Finally, the entire forward fuselage is maneuvered to join the tail cone, using hundreds of pulled rivets.
Getting Started
As in other kit segments, the sheet-metal parts come cut and bent to shape, the holes for fasteners are punched to size, and each piece is covered with protective plastic and labeled. Labels are stuck to the protective vinyl, so we used a temporary marker and transferred the part number to the metal before discarding the vinyl.
The first task of the forward fuselage segment is completion of the center section bulkhead. It consists of a forward bulkhead factory-riveted to a massive U-shape extrusion and an aft bulkhead that the builder finishes and attaches. The center section is the focal point of the entire airframe, bringing together the forward fuselage and aft baggage compartment/fuel tank area, landing gear, wingspars, and the two pins that lock the wings to each other and then to the fuselage
Nutplates are installed on the aft part of this carry-through, followed by clamping it to the forward part and match-drilling 72 locations, mostly for 1⁄8-inch solid rivets that can be squeezed or gunned and bucked. After installation of the baggage compartment floor and a dozen nutplates on some of the six baggage compartment ribs, they are riveted to the aft carry-through bulkhead and the baggage floor.
At this point it’s worth noting that telling #8 size nutplates from #6 plates is difficult, and we made some mistakes that required replacing a few. I soon adopted the policy that each nutplate would be tested with its appropriate size screw before riveting it in position. A bearing bracket for the flaperon system is installed between the center baggage ribs, completing this minilift fuselage subsection.
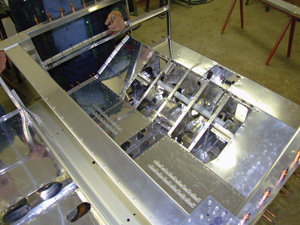
Left and right seat assemblies, part of the bottom skin and some side pieces are in place. Note the gray control column under the forward seat pans.
More Subsections
We tackled the seating subsection next. It consists of four fore-and-aft ribs that define each of the two separate seat bottoms. Two piano-hinge halves are mounted on each of the two seat pans for seat-back bottom adjustment. The forward hinge position allows attaching the bottom of each seat-back forward for shorter-legged people or aft an inch for a longer-legged pilot or passenger. Nine nutplates (two configurations) are riveted to each seat pan before it is riveted to the seat ribs. The forward, sloping area of the seat ribs accommodates the crotch-strap supports and a double pulley bracket for stabilator cables.
For the first superlift-type operations, the two four-rib seat bottom assemblies are riveted, one at a time, to the front of the fuselage carry-through. Adding center bulkhead left and right side pieces allows installing left and right wingspar rollers that permit quick and easy wing attachment and removal. Because the spars are offset an inch and the spar is tapered, roller orientation is opposite on right and left sides. I noted incorrect installation of one of the rollers when it was still easy to correct.
The forward-seat bulkhead may be thought of as a separate subsection, because the control column bearings and forward wing subspar receptacles are attached before it is riveted to the front of the seat ribs. Nineteen nutplates also precede bulkhead attachment. The welded and powder-coated control column is fed through holes in the sloped seat ribs and bolted in place.
Factory-curved bottom corner skins are riveted in place, paying attention to leaving certain holes open for attaching the fuselage bottom skin. Preparing the bottom skin, we dimpled and installed 20 nutplates for inspection plates and marked many holes not to be riveted initially. Lots of Clecoes attached the bottom to mating ribs and allowed pneumatic riveting where required.
Making stiffening brackets from extruded aluminum angle stock allowed mounting large nutplates for the steel boarding steps. I had these powder-coated locally to match the intended gray cockpit interior. Although instructions called for us to mount the steps at this point, we chose to leave them off because the fuselage sat on a wide shop table. Step installation can be done at any time.
Plastic snap bushings of many sizes were installed throughout the fuselage assembly. Six special studs were mounted on the fuselage bottom between the seats. They capture bottom and top halves of the nylon devices that will hold wiring harnesses and metal fuel lines later.
The front section is built up in superlift fashion before attachment. It consists of curved and flanged forward lower fuselage skins, a center fuselage floor, large sloped center tunnel ribs and the stainless-steel lower firewall. Hard points for part of the engine mount are located between the tunnel ribs and the firewall. A flurry of nutplates is installed in this subassembly. A bracket for the supplied fuel-flow sensor is installed between the tunnel ribs. There is also a stainless-steel firewall shelf that will support the rudder pedal/toebrake assembly. When complete, this large piece is riveted shipyard style to the front of the seat-pan assembly.
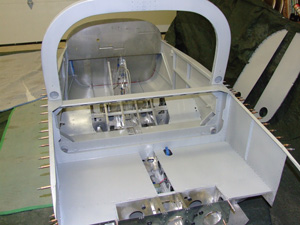
Looking forward reveals epoxy paint in the baggage area and the crew quarters.
Sideskins and Other Details
Before the sideskins can be attached, a top cockpit longeron, made of heavy ¾ x ¾-inch aluminum extrusion, must be bent into a curve and twisted in a large vise, and then cut and trimmed. The process takes patience and a lot of carefully applied force, some of it with a large soft-head hammer. I would call this the most physically difficult part of the RV-12 building process so far. After making the first piece, the one for the opposite side appeared to be an easier chore. Lois made the lightweight, adjustable seat backs.
The roll-bar attach plate is made up and installed across the center-section posts. In the cockpit, curved armrest brackets were riveted before forward fuselage skins were prepared and riveted in place, again marking holes to be Clecoed but not riveted yet. Left and right skins are different because of the wingspar offset. A lot of time and small pieces went into the left and right air-vent doors in the fuselage sides.
The multi-piece rollover structure and its rear support frame come next. The plans call for installing the polycarbonate rear window after tapping the rollbar for #6 screws. Lacking proper thread-cutting fluid (kerosene works well; machine oil doesn’t), I managed to break two 6-32 taps in the holes. With considerable skill, experience and a dental pick, machinist Doug Davis was able to extract the broken taps and salvage my mistakes. We trial-fitted the rear window, but I decided to leave it out until the fuel tank was installed in the next kit segment.
Rudder pedals, toebrakes, the four master brake cylinders and their lines are most easily assembled upside down on the edge of a table. The powder-coated steel parts are captured at both ends and in the middle by nylon blocks. Holding the entire assembly with masking tape, we unclamped the assembly from the table, and I carefully manned the cockpit and wrenched the nylon blocks onto the bottom of the horizontal firewall shelf. Doing this mostly by feel took some time but eventually worked. Quarter-inch, high-pressure PT-062 plastic tubes with brass fittings attach to the brake masters. Hookup to the firewall-mounted brake fluid reservoir is left to the next segment.
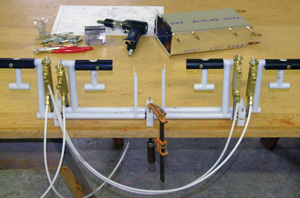
The rudder pedal/toebrake unit and its hydraulic lines are assembled upside down on a table edge.
The fuel system consists of aluminum supply and return lines, an electric pump, shutoff valve, a flow sensor in the forward cockpit tunnel, and a gascolator/fuel sample quickdrain forward of the firewall. Making the tubes was not difficult as the plans provide full-scale drawings of the curvy parts, and they can be formed by hand. After this kit was received, instructions were received to reverse the gascolator plug and L-shape output fitting to the engine. This revision to the earlier plans ports the gas to the right side of the firewall to avoid interference with the nosegear. The change took about a minute.
After all of this, we hand-carried the forward fuselage to our hangar. Wearing latex gloves and my chemical mask, I applied lacquer thinner to areas that would be painted. I masked and taped parts to remain unpainted and attempted to cover everything else with tarps. Seat backs and the cockpit interior were washed and sprayed with rattle can self-etch primer, followed by two-part epoxy gray that is close to the color of the factory powder-coated parts. A day later we walked the forward fuselage back to the EAA hangar for its big date.
The Big Moment
With painting complete, it was time to mate the tail cone with the forward fuselage. I counted 288 rivets needed to do this, and it helps to have at least three people, each equipped with an awl or a drift pin to gently align the holes before inserting Clecoes. The manual calls for you to start by mating the bottom surfaces first, which is how we did it. In a minute, we could see that the holes along the bottom were lining up. Then, by tipping the tail cone up slightly, we saw that all of the holes would align! For the first time since wing skinning, we nearly ran through my Cleco supply, trying to lock every other hole pair. Within 5 minutes we had this accomplished. Rivet pokers and pneumatic puller operators to the front of the line! Twenty minutes later, the fuselage was a single piece. It was time to stand back, admire our several weeks of work and contemplate the next kit segment.
What’s Next
The finish kit has a lot of systems and detailed operations and is likely to take considerable time. Included are landing-gear legs, wheels, brakes and everything to hook them up, wiring including provisions for the optional autopilot and nav lights, controls connections and rigging requiring wing installation (for the first time in our case), fuel tank, seat belts and harnesses, upholstered seats, and canopy fitting and trimming including a laid-up fiberglass canopy forward fairing. It should be exciting.
For more information, call 503/678-6545 or visit www.vansaircraft.com.


