It had been a very long day, a hot one at the hangar in late June. The project had, at around 7 p.m., reached what I recognized as the point of no return. Just then, I’d wrestled the entire instrument panel out of my GlaStar Sportsman and managed to set it gingerly on the workbench. Behind it, a long, thick strand of sheathed wires trailing behind their canon plugs.
I’d turned back to look inside, and what I saw must be a little like the view of the cliffs edge racing away, having just been tossed over. Where there had been a perfectly serviceable and reliable instrument panel was now a crisscross of structural tubing, a shiny firewall I’d not seen this clearly in more than three years, and a mass of wires spilling this way and that.

Confessions of the Possessed
What in the name of a flying, fully functional homebuilt had caused me to do such a foolhardy thing?
Blame Garmin. You see, while trolling the buildings at Sun n Fun, Garmin’s Tim Casey sidled up to me and said, basically, We have the G3X almost ready and you need to be flying with it. Need. Yes, thats it; I need this latest bit of electronic-instrument technology. I need an entirely new EFIS that wont even remotely slot in where the old unit resided. But Casey, Ive learned, seldom takes no for an answer, and in the week to follow wed laid out a plan to commit N30KP once more to becoming a test bed. My Sportsman has seen its share of new equipment tested (sometimes alpha- and beta-tested), but this would be the biggest shakeup of its kind-and an educational experience larger and much more nuanced than I’d anticipated.
You don’t have to be an on-call beta tester to find a refit necessary or desirable. Technologies develop, and in the case of Experimental instruments, the rate of change is truly thrilling. From the time you start a project until the night before the first flight, electronic equipment can morph in form and capabilities many times. It’s foolish, then, to think in terms of the now when designing your panel. Take it from me that it’s worth the consideration of future expansion right from the start.
Unless you’re techno-averse and uncommonly resistant to change, its not likely that your homebuilt will live its whole life with one set of instruments and radios. Think about that as we work through this short series on N30KPs retrofit-first looking at the planning and initial execution, then focusing on the Grand Rapids Technologies Horizon HX and then the Garmin G3X suite. (As we went to press, the G3X was functional, but many of the really desirable features were still in the in development stage, so well let Garmin’s programmers catch up with us.)
Allow me to circle back and answer a question that might be rattling around in your head: Even changing from one brand of EFIS to another, why was it necessary to yank the entire panel? The simple, humbling answer is this: Because I didn’t plan far enough ahead way back in 2005.
Panel Design
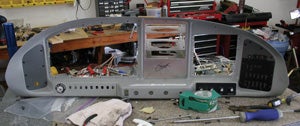
One aspect that kept this project from spiraling totally out of control is the modular design of the Sportsman panel. This is a compromise, of sorts, in that the fiberglass backing panel and the flanges needed for mounting the aluminum inserts consume some real estate; no doubt the most space-efficient design would be a monolithic metal panel. The next best approach might be a sectioned aluminum panel without the fiberglass surround, but then youd have to work out the structure and mounting aspects on your own. The ingratiating aspect of the composite panel is that the metal inserts follow somewhat imperfect recesses, and making the assembly look good is more a matter of artfully following the surround line than cutting and trimming to an exact straight edge.
Whatever you decide to build, think twice about designing a specific mount or panel substructure for one piece of equipment-it might not be in the airplane forever, and the component to replace it may not fit the same footprint. I see this in EFISes already: No two have the same footprint or mounting scheme. Give yourself some margin, even if you think the new structure or layout is somehow suboptimal.
Starting at the Front
You’d think this project would have started somewhere other than the engine cowling, but the fact is that the Sportsman panel has all four push-pull engine controls-throttle, prop, mixture and purge valve-running through the center section without a provision for individual removal. Some GlaStar builders have used a lower subpanel to carry these controls, and I’d be tempted to try something similar if the new location wouldn’t be too close in the vertical plane to the manual flap handle. In your own project, making the engine controls separate from the main panel would be worth considering if it doesn’t raise other issues. Either that, or peg your rework plans so that you have a day or two on either side of the panel portion to deal with the engine controls; if you have many hours on the airplane, this would be a good time to carefully inspect and consider replacing or overhauling any of these controls. Pay particular attention to any Heim joints and attachment hardware.

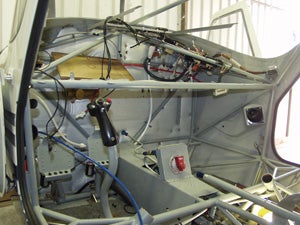
With the engine controls removed, along with all the slide-in radios, it came time to carefully dissect the main harness from all the later add-ons, a process complicated by my airplane having the first iteration of the factory harness, which wasn’t quite complete. As you’re designing your own panel, plan well ahead so that everything coming in or going out of the panel has a form of quick-disconnect.
In the factory-supplied Sportsman harness, all of the connections to the main part of the airplane are carried in one massive harness that terminates in four large AMP-brand canon plugs. For example, all of the autopilot wires are in this loom, as are all the headphone/microphone connections for the back seat, power to the strobes and nav lights, hookups to the sticks for com push-to-talk and trim, and a handful of other items including power and position data from both electric trim servos. A lot of wires, in other words.
And yet there were still more not included in the harness that had to make a hard connection between the panel and the forward half of the airplane, and these included the magneto P leads, master and starter solenoid controls, alternator B lead and field wire. Pretty much anything that went forward from the panel was on a discrete wire. Even though it took about half an hour to snake the larger main harness from the underseat area, it required several hours to carefully extract, free and un-terminate each of the wires not collected into a quick-release connector.
In the course of troubleshooting some engine-monitor indications in late 2006, I’d split that instruments harness at a large terminal strip, and that step helped with this changeover as well. Trust me: Even though you think you’ll save time in the initial build by going straight from item to item, you’ll add a lot of time if you ever have to pull the panel. (And, yes, I know there are inherent risks in breaking a circuit with a connector, no matter how good the quality is. But I think its worth the risk if you know how to properly populate the connectors and use high-quality components.)
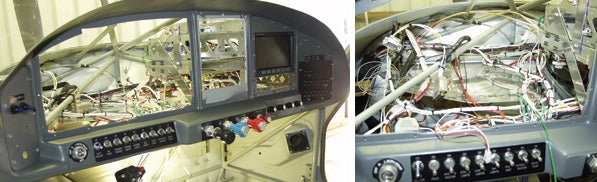
Also seriously consider, now that you’re in Version 2 of the panel, making Version 3 even easier by stubbing out power and data lines. As you’ll see in the upcoming stories focusing on the EFISes themselves, I didn’t do myself any favors by hard-wiring the various networking wires from unit to unit. Its much easier, while the panel is apart, to pull at least two RS-232 serial outputs from your main GPS-in my case, a Garmin GNS 430W-to a central location. At the same time, run all the ARINC 429 in and out data streams to a place where you can pick them up later. Yes, you’ll have more wire strung about the cockpit, but when you want to add a new autopilot or another accessory that needs access to the RS-232 or ARINC 429 data stream, you’ll thank me.
Finally, if you have your panel set up similar to mine, with the avionics circuit breakers off to some far corner, now is the time to run a few extra red wires from the CB panel to a terminal strip near the center of the stack. Leave them tied off behind the panel if you like, or fit the breakers now; it’s up to you. Probably you’ll think you don’t need the power now, but someday you might.
Physical Exam
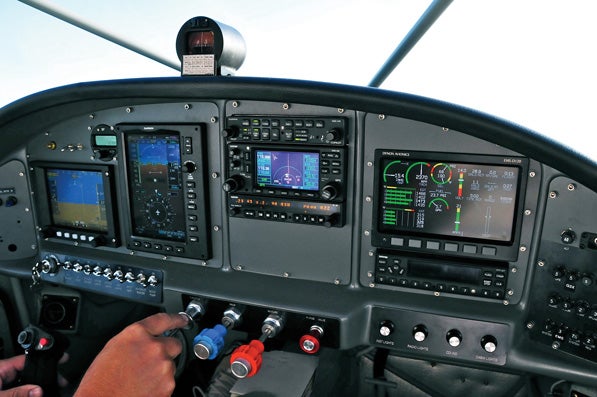
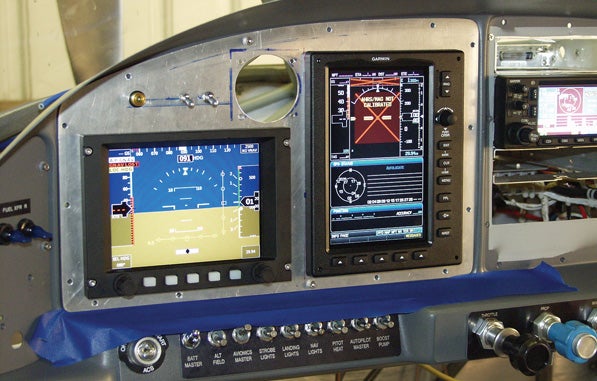
I knew that the basic panel structure would remain unchanged, but additions to the radio rack meant that the existing setup would not be easily modified. I had a Garmin SL30 and a PS Engineering PMA8000B audio panel/intercom originally installed, just below an Air Gizmos mount for a Garmin GPSMAP 496. A fine setup, but not legal for GPS approaches and lacking an ARINC 429 data output to drive the high-end functions of my TruTrak DigiFlight II-VSGV autopilot. I would be adding the Garmin GNS 430W and moving the GMA 240 audio panel that I have been flying with.
The 430W is a fine box, but big, long and heavy. The existing mounts would clearly not take the load, so I had to build reinforcements that spread the heft, particularly from the back half of the radios, directly into the meat of the panel. A simple solution was to tie the racks together and then build a diagonal brace back toward the lower section of the front panel. (In other aircraft, you might find it easier and stronger to connect to a structural member behind the panel, but the Sportsman doesn’t have much of use in this regard.)
While installing these new pieces, I had to work around rack mounts-basically aluminum angle that captures the vertical faces on the left and right sides of each radios installation rack-that were drilled for other radios. With a bit of finessing, I was able to use most of the existing screw holes and drill new ones where required. But a much better solution would be to make the rack mounts easily removable so that if you need to add radios later, you can merely replace the angle stock; its also infinitely easier to build the racks together outside of the panel. Whats more, don’t forget that the old Garmin/AT (nee Apollo) radios are slightly narrower than the current Garmin devices, so their racks will need thin shims.
Cutting Metal
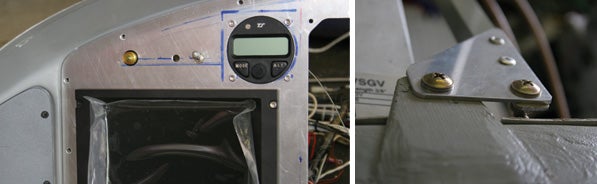
Once upon a time, if you had a good holesaw and an Instrument Quick layout template, you could cut all the metal pieces yourself with hand tools. As you can see, the only round instrument left in the airplane is the autopilot head, and the remaining cuts can be complex and demanding. (The Horizon HX has little bezel overlap top and bottom, so you’d better get that cut right or you’ll see daylight.) Because of that, I elected to have SteinAir put its CNC cutter to use and make me a new main panel with the G3X and Horizon HX cutouts, as well as a new radio-rack mask.
By changing from Dynon equipment to the current setup, I also had to find room for a pair of ADAHRS boxes; the Dynon components are all internal, simplifying installation considerably. After a lot of head-scratching and one false start, I came up with an aluminum shelf made from 0.063-inch-thick 2024 (probably overkill) thats connected via padded clamps to the Sportsman’s inner cage along the firewall-conveniently, this tube is level left to right-and supported by a link to a cage crossmember and further by an aluminum strip to the radio rack. The difficulty here is that the plate needs to be both level and at the correct angle of attack of the airplane. My digital level and a forest of clamps made this easy work: Put it where you want it, clamp it tight, drill your mounting holes, Cleco together and double-check your readings. Fit the final hardware, and check again.
As this is written, N30KP has been to Oshkosh and back with the new panel and equipment. No problems to report, Im happy to say, after about 30 flight hours. I finished in time to put several hours on the system, and to perform the necessary calibrations, before leaving California. Now for the fine-tuning and software testing. Never done!
![[Credit: JetStream Rider]](https://www.kitplanes.com/wp-content/uploads/2026/04/AdobeStock_345999332.jpg?w=218&h=150&crop=1 "2026 Avionics and Lights Buyer’s Guide")
![[Credit: Radiant Technology]](https://www.kitplanes.com/wp-content/uploads/2026/04/550095_5165745cc27748a598699799d796fd94mv2.jpg?w=218&h=150&crop=1 "Radiant Technology Unveils SafeGyro")
![[Credit: Dynon]](https://www.kitplanes.com/wp-content/uploads/2026/04/EMS-stand-alone_HDX.png?w=218&h=150&crop=1 "Dynon Unveils Scalable Engine Monitoring for Kitbuilders")


