Every Lancair Evolution starts to take shape the same way, in Brian Harris’s shop next door to Lancair. This is not a factory program per se, but it is a factory-authorized assistance program that is included in the base price of the kit. Lancair wants to be sure that every Evolution goes together exactly as designed, so the company more or less requires builders to go through this process. That way every builder gets started with a fully assembled, accurately constructed basic structure that will fly the same as every other Evolution.
With that solid foundation, owners, flight instructors and insurance companies can all be assured of consistency across the Evolution fleet. You might call it the “no surprises” approach. No one wants to be blindsided at 300 knots at high cruise, or at 80 knots flying around the pattern for that matter. This required-assistance stance removes the variations that inaccurate building can introduce into an airplane project, and ensures the basic structural strength and flying qualities needed to create a successful final result.
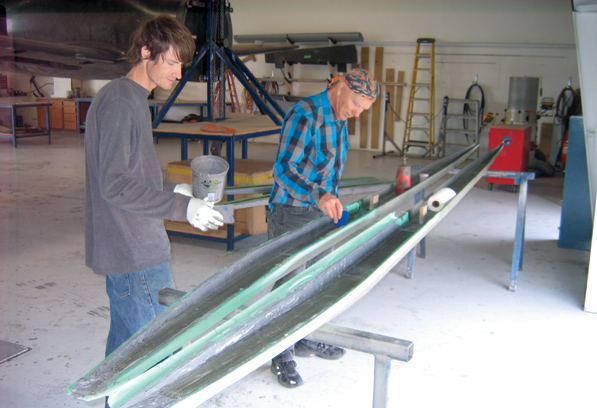
Wendell Solesbee (right) and Bruce Cole-Baker, one of Brian Harris’s employees, work together to reinforce the wingspars with additional carbon fiber and filler. Another customer’s Evolution can be seen in the background.
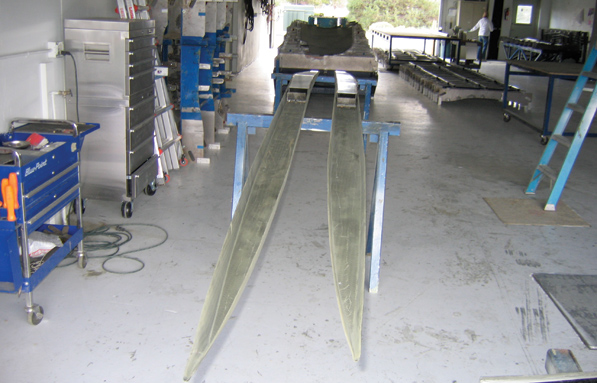
Two massive carbon-fiber wingspars await installation in the wing assembly jig. These spars must carry the weight of the entire airplane and resist the drag produced by 300-knot cruise speeds.
Building Blocks
The construction process begins with the wings. Lower skins go into the jig first, then the ribs and spars. Everything gets bonded in place with Hysol high-strength epoxy adhesive. Some of this work was pre-done for our builders, the Solesbees, just because the folks at Harris were looking for something to do, but normally all of this work is done with the builder present and participating. There was still plenty of wing work left for the Solesbees, so even though they saved a bit of time, they didn’t miss out on any key operations in the building process.
With all of the parts bonded to the lower wingskins, the next step is to prepare the fuel tank section of each wing and coat it with sealant. Then come the fuel lines, wires, hydraulic lines for the gear and brakes, and every other little part that has to go inside each wing. The Lancair factory has jigs and patterns for every piece, so the work goes quickly. This is the same approach that Glasair Aviation takes with the Sportsman in the Two Weeks to Taxi program. It is amazing how much time is saved by having all the correct tools, patterns and jigs on hand at just the right time. This doesn’t just save hours of assembly time, it saves days.
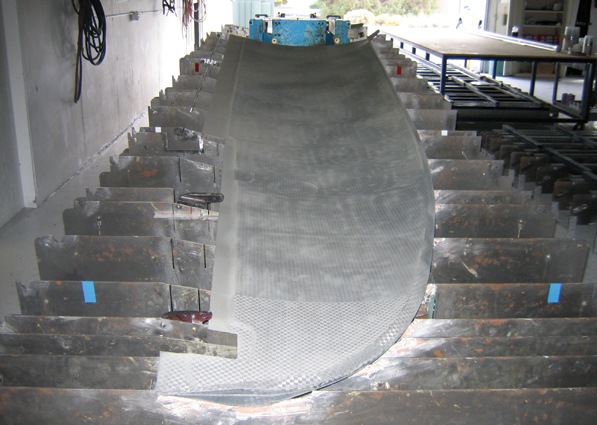
The wing assembly process begins with the top skin resting in the massive wing jig. The spars and ribs are added next, and then a number of smaller components will be installed and the fuel tank sealant applied. Finally, the bottom skin gets bonded into place to complete the wing.
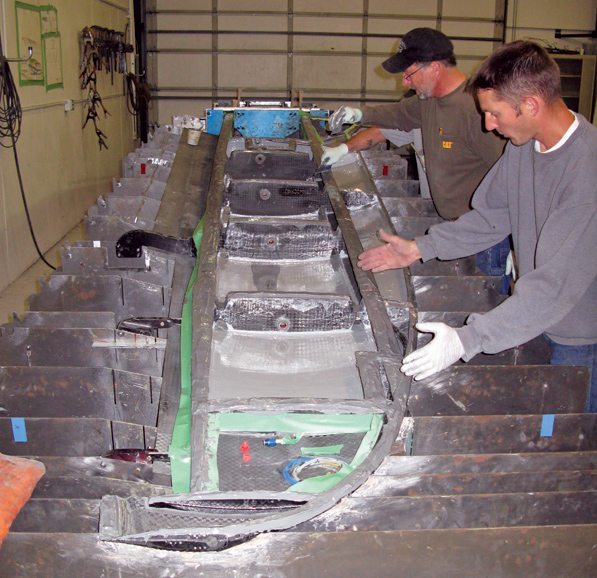
All hands come together to apply Hysol to the ribs and spars when it comes time to set the bottom skin into place on top of the rest of the wing assembly. Most of the assembly process is slow and methodical, but this part needs to be done methodically and quickly.
Gimme Some Skin
With everything in place the wing top skins get bonded into position and firmly held in massive steel jigs until the Hysol can set up. This project only works if all hands join in and apply the Hysol to every needed spot in the shortest amount of time possible. It takes at least four people working like mad to make this happen. The jigs are the key to quality and consistency. It would be far beyond the means of most customers to produce such precise jigs, but with the factory providing the tooling, every builder gets to share in the benefit. The jigs and the manufacturing-like process used to build the major structural parts are also key ingredients in reducing build time from thousands of hours to hundreds. It is unlikely that nearly as many Evolutions would get sold if these new assembly processes were not available and, again, they are more like each other than not.
The basic fuselage comes pre-assembled, but the builder has to install the horizontal stabilizer, which is permanently bonded in place. More jigs make this work go fairly smoothly and ensure that the angle of incidence of the tail is exactly as it should be. Unfortunately, it also produces a fuselage/tail assembly that is 13 feet wide, presenting some challenges when it comes time to take everything home. Builders can elect to attach the horizontal stabilizer later, but the Solesbees felt that they should take advantage of the factory jigs. Those who are planning to finish their planes at outside builder-assistance centers often elect to defer this step to make transportation easier, but the Solesbees wanted as much of the major structural work completed as possible prior to leaving the facility.
The rudder, elevator and trim tabs come next, utilizing a similar process to that used on the wings and horizontal stabilizer. The ailerons and flaps are pre-built, so they are simply fitted to the wings without further fabrication. Next come items like the windows, which are fairly critical in a pressurized airplane. The Solesbees were impressed with how precisely the windows fit into the fuselage openings. They were not just close; they fit perfectly.
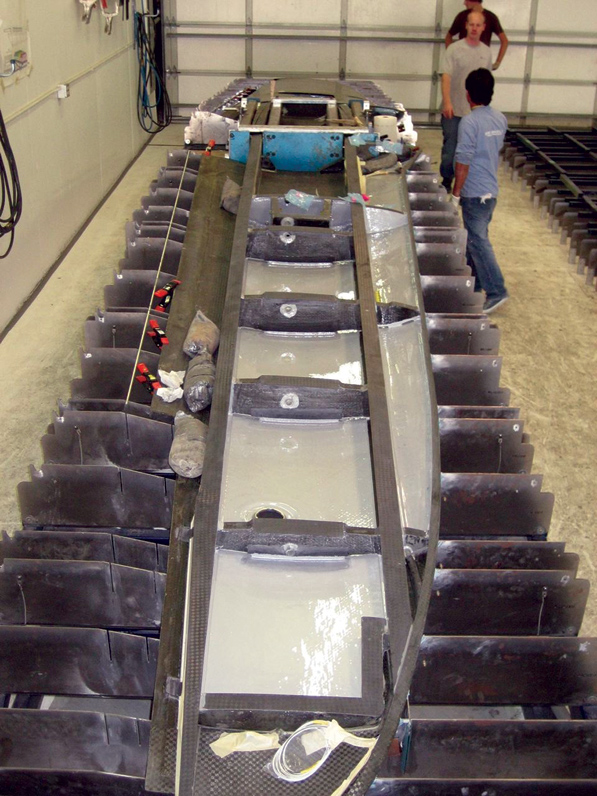
The top skin is in the wing jig with the ribs and spars now secured in place. The lighter color seen on the top skin is fuel tank sealer. Soon the wing will be ready for the bottom skin to be bonded into place and the upper half of the jig closed.
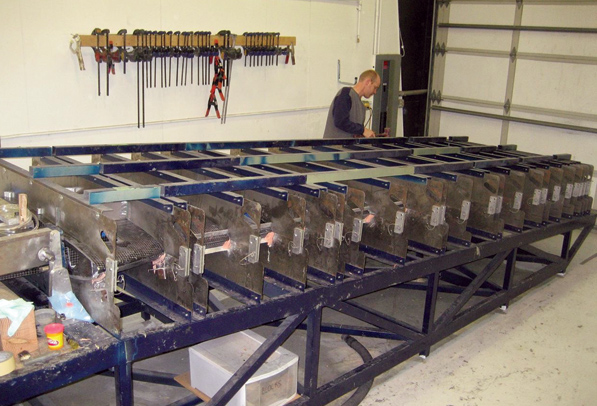
With everything in its proper place in a sturdy jig, the resulting wing components come out precisely as engineered time after time. This massive steel jig is the key to precise construction of every wing.
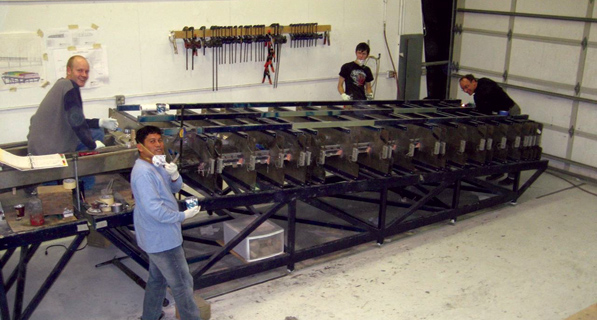
Closing up the wing jig requires some real muscle. The top portion of the jig comes in five pieces that are best installed with as much help as possible. Typically Brian Harris musters four men from his crew to handle each heavy section of the jig. All of this may seem like overkill, but repeatable, precision parts come out of strong tooling.
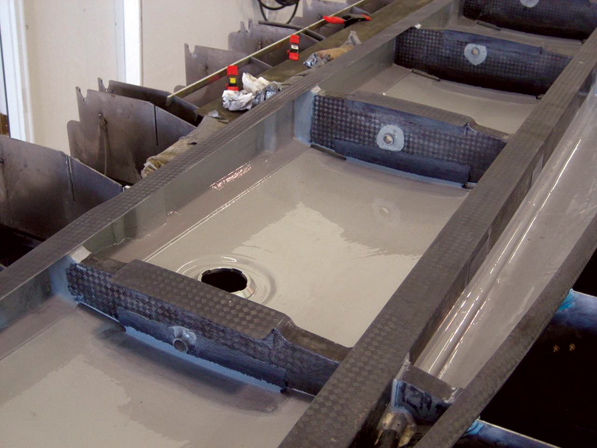
This is a close-up view of the partially assembled wing showing the construction of the ribs. Note how they have been formed to allow fuel to move through the entire length of the wet wing. The holes in the centers of the ribs are for the fuel level sender probe. Utilizing the entire interior of both wings produces a total fuel capacity of 168 gallons.
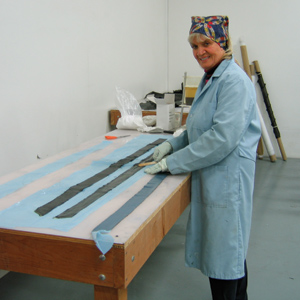
Martha Solesbee prepares some strips of carbon-fiber cloth that will be used to bond the baggage compartment floor to a below-floor partition. When her work is finished, various hydraulic and electrical components will be installed in the compartments she is forming.
Pressure Applied
One rather tedious and time-consuming task that fell primarily to Martha Solesbee was the installation of the reinforcement plates that secured the pressure bulkheads to the fuselage. She calls these tabs “chicken plates,” a name she presumably didn’t invent herself. These require the drilling of some 150+ holes through the carbon-fiber fuselage shell, a task that seems to have been invented by someone who sells drill bits for a living. The carbon fiber is so abrasive that each bit is only good for two or three holes before it needs to be sharpened. In the interest of maintaining steady progress, a great many new cobalt drill bits get consumed. If the drilling process is hard on bits, it is also no picnic for the person wielding the drill. It takes a great deal of effort to wear out all those drill bits, and Martha Solesbee will gladly attest to that fact.
The next big step is the firewall-forward work on the Pratt & Whitney PT6A engine. This is not really a builder-intensive part of the construction process, in that Lancair does most of the work of fabricating and installing the various shrouds and accessories. Though this could be done by the builder, it would require some pretty good sheet-metal fabrication skills and a thorough knowledge of turbine engines, both of which are in short supply among typical Evolution builders. The only hard part in this phase is writing some big checks.
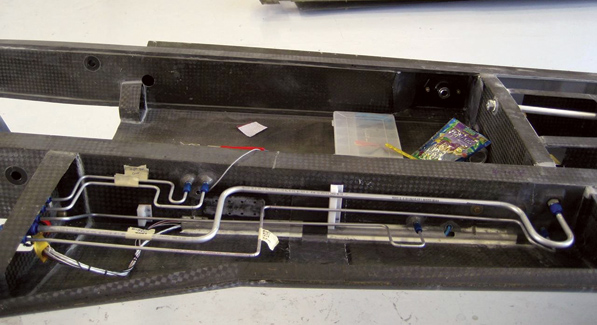
Here you can see in greater detail the various lines that get enclosed in the wings. Patterns and jigs make fabricating these lines exactly to size very easy. It’s important to make sure no tools get left behind before sealing everything up.
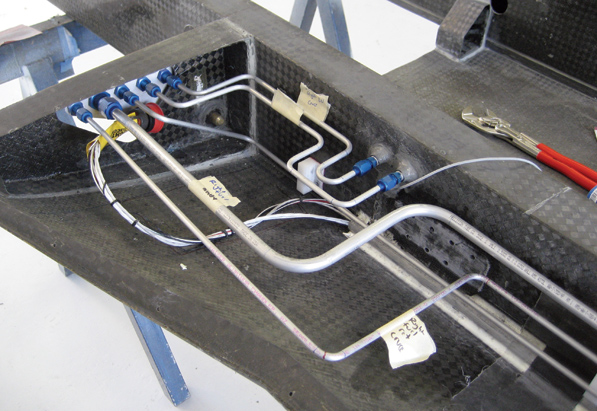
Accounting for Things
So what kind of big checks are we talking about? First of all, the kit costs $495,000. That is a lot of money, but it includes a lot of things ordinary kits do not. Besides the parts that you would expect, it includes a complete pre-wired instrument panel featuring a Garmin G900 EFIS suite. That is worth over $100,000 all by itself. It includes the two-week initial builder assistance, and it includes a thorough pre-first-flight inspection and pilot training. It also includes things most builders never consider for their projects such as air conditioning, supplemental oxygen and pressurization. All of these parts add up to make that initially staggering kit price seem more reasonable.
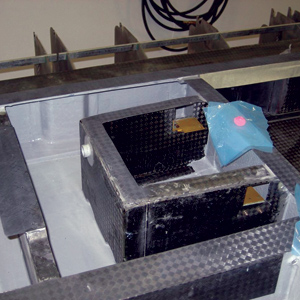
This detail shows the fuel pick-up box that is designed to ensure that fuel is always available near the fuel pick-up point. Small flapper valves close when fuel tries to slosh out but open when more fuel is needed to feed the fuel pick-up. That way any brief period of uncoordinated flight will not starve the engine of fuel, even when the fuel level is fairly low.
All of this standardization in the kit and construction process is designed to ensure consistency in training as well. There is a great deal of safety and comfort that comes from knowing that the plane you trained in will be like the one you ultimately fly, even if that means some stifling of the builder’s creativity. It is a trade-off that Lancair made to keep its airplanes and customers in one piece, and all things considered, it is a good idea. As Wendell Solesbee describes it, the builder really just steps into a pre-planned manufacturing process where everything is ready to go.
If you buy a new engine for your Evolution, you can expect to shell out about $464,950 for that, plus $32,500 for the propeller and $84,000 for the firewall-forward package Lancair supplies. A used mid-time engine such as the one the Solesbees purchased can cut $200,000 or so off of that number. All you then have left to pay for are finish items such as paint and interior upholstery. That will give you a complete airplane for somewhere between $900,000 and $1.1 million. If you take advantage of builder assistance from an outside vendor after your two weeks at the factory, you could conceivably add $100,000 to that total.
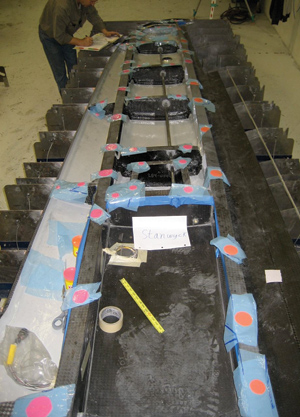
The wing is just about ready to have the other skin placed on it and closed up in the jig. Wires, hydraulic lines, and fuel lines are all run before closing the wing up, greatly simplifying the assembly process. All the wing pieces are bonded together with Hysol.
An option that no one has yet taken would be to install a new Lycoming TEO-540-A1 engine in lieu of the turbine. This new turbocharged engine, which Lycoming has dubbed the IE2, has FADEC controls with fuel injection and ignition individually computer controlled for each cylinder, including knock sensing, among other great new technologies. However, Lycoming has not yet begun selling this engine, so it’s a moot point for a current builder.
Cowling Connection
The one piece of composite work that is not done during the two-week builder-assistance period is the engine cowl. An inexperienced builder would need some help with this important step, but the Solesbees have many years of custom car experience to draw upon, not to mention the knowledge gained from building two other composite airplanes. With all that to guide them, they tackled the cowl by themselves, with the end result looking every bit as good as you would expect. Wendell describes the cowl fitting as among the most time-consuming aspects of the whole project. He had to install a flange on the fuselage to achieve the smooth, flush fit he was looking for, which involved removing the firewall blanket previously installed at the factory. To get the kind of award-winning look the Solesbees were shooting for, Wendell decided to use piano hinges all around to secure the cowl to the fuselage. This makes a smooth, blind connection with only a parting line to delineate the cowl from the rest of the airplane. Many RV builders have used this method to join their cowl halves, so Wendell didn’t exactly invent the process, but he has certainly mastered it. The cowl must not only fit the fuselage perfectly, but it must also properly mate to the engine air intake and the oil cooler. It is hard work to get everything just right.
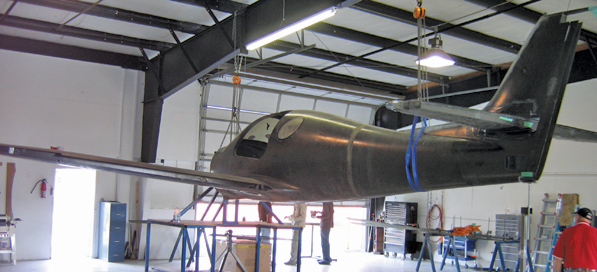
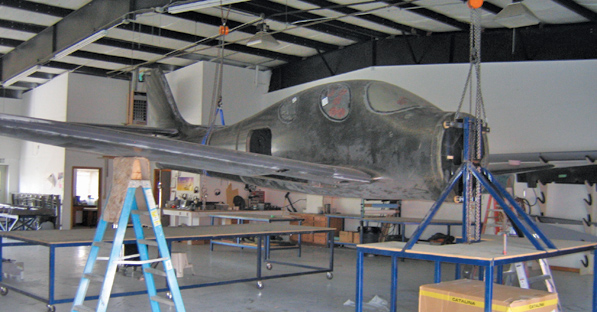
With the wings mated to the fuselage, the Evolution is suspended to allow work to proceed on the landing gear and various carbon-fiber reinforcements in the fuselage. At this point the horizontal stabilizer and the windows have already been installed.
The last challenge in this important first phase was figuring out how to get a 13-foot-wide airplane down roads that have a maximum legal load width of 102 inches. The Solesbees rented a 26-foot moving van and brought it to Harris’s shop. There they made some cradles that would support the fuselage and hold it at just the right angle to stay within the legal maximum width. With everything loaded up and secured, the Solesbees were ready for the trip back to Southern California. It must have been something to see that big airplane tail sticking out the back of the van as it made its way south from Redmond, Oregon.
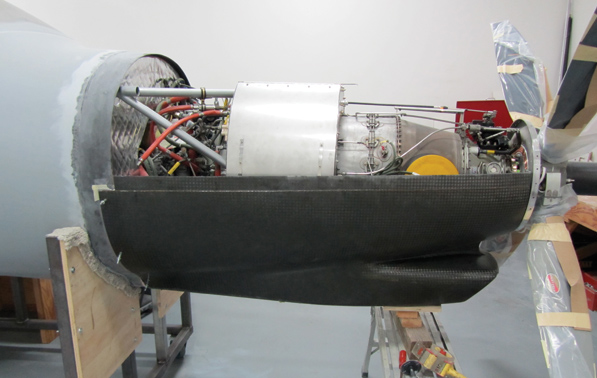
The Pratt & Whitney PT6A and its lower cowling have their first meeting with the fuselage. This massive engine will someday propel the Evolution through the air at over 300 knots. Between now and then there is still much fitting and finessing to do.
Are Your Builder Skills Enough?
As we wrap up this second article in the series, it seems appropriate to return to our big question. Can a first-time builder really build such a complex airplane? I would have to say: So far, so good. The factory jigs and excellent builder assistance during the initial two weeks should make completing this first phase pretty easy for anyone who can move around well and follow instructions, with the sole exception, perhaps, of fitting the engine cowl. A first-time builder may have his or her hands full with that task, as evidenced by how much work Wendell Solesbee did on his, and remember he is a third-time builder.
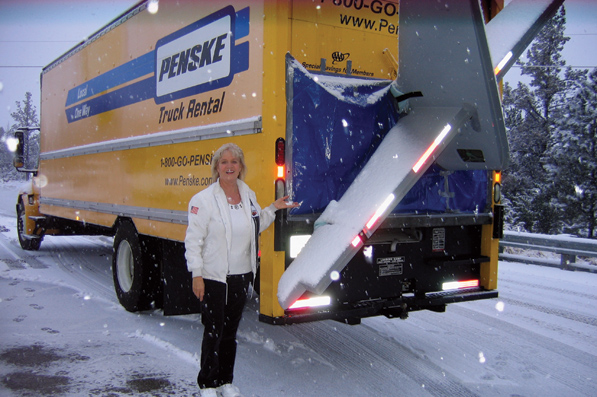
With the fuselage safely secured inside the truck, just barely legal, Martha poses for a parting shot. Some well-made cradles from Harris’s shop helped the Evolution survive the ride and make it back to Southern California in good condition.
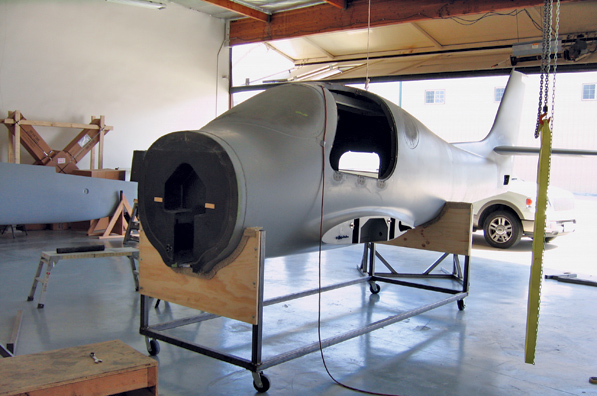
The Evolution, in the Solesbees’ Chino Airport hangar, is placed on a special dolly to make moving it around easier.
For those with less experience than the Solesbees the next step may well be finding a shop to provide further builder assistance. This is no doubt the most controversial part of the Lancair building process, but it is something that the promised possibility of anyone being able to build an Evolution rests upon, at least to some degree. Glasair Aviation has proved that it is possible to greatly streamline the building process without running afoul of FAA Advisory Circular 20-27G, so there is no reason to think Lancair can’t do the same. However, unlike Glasair, Lancair’s promise must be delivered by outside vendors. Time will tell how well this works. Most Evolution builders are using such services, so we should not have to wait too long to see the results.
The commercial assistance that the Solesbees have received so far seems appropriate and necessary considering the performance of the airplane they are building. In the meantime, the Solesbees are heading home to continue their adventure on their own. Their well-equipped shop at Chino Airport is about to become their home away from home for the next several months as they work to turn their dream into reality.
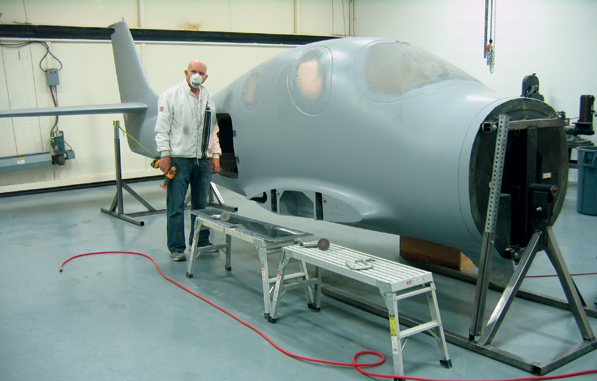
Wendell gets ready to do some body work on the freshly primed fuselage shell back in his hangar at Chino Airport. This is really the Solesbees’ specialty, so we expect great things when the body and paint work are finally complete.
For more information, call 541/923-2244 or visit www.lancair.com.

