Torque is a twisting or rotational force about an axis such as the length of a bolt. It is measured in foot-pounds, inch-pounds or Newton-meters. These units may also be shown as pound-feet and pound-inches. These are just different ways of saying the same things.
When installing aviation fasteners (nuts and bolts), we use torque to determine how tight the connection made by the nut or bolt in question is. We care about this because a bolted connection is designed to retain its tightness when the design load is applied to it without loosening. This is achieved by placing an amount of tension in the bolt or stud that exceeds the anticipated load. If a connection is too tight—that is, over-torqued—the bolt can fail. If it is too loose, it can allow movement in the connection under load that can lead to displacement of the joint, fatigue and possible failure. Uneven tightness of things such as propeller flanges can cause the track of the prop to wobble, potentially causing a host of problems. Thus, achieving the correct amount of tightness in a nut, bolt or stud is very important.
The question is, how do we best achieve that end?
The torque wrench is the tool of choice for aviation fasteners, not so much because it produces the best results, but because the tightness standards we are required to use rely on torque. Engineers will tell you that we should really be measuring bolt stretch to measure the tightness of a joint. They, of course, are right, but that doesn’t help us much because we don’t have any way to measure bolt stretch in most cases and have no proven specifications to utilize if we could. So, we will concede the point and move on.
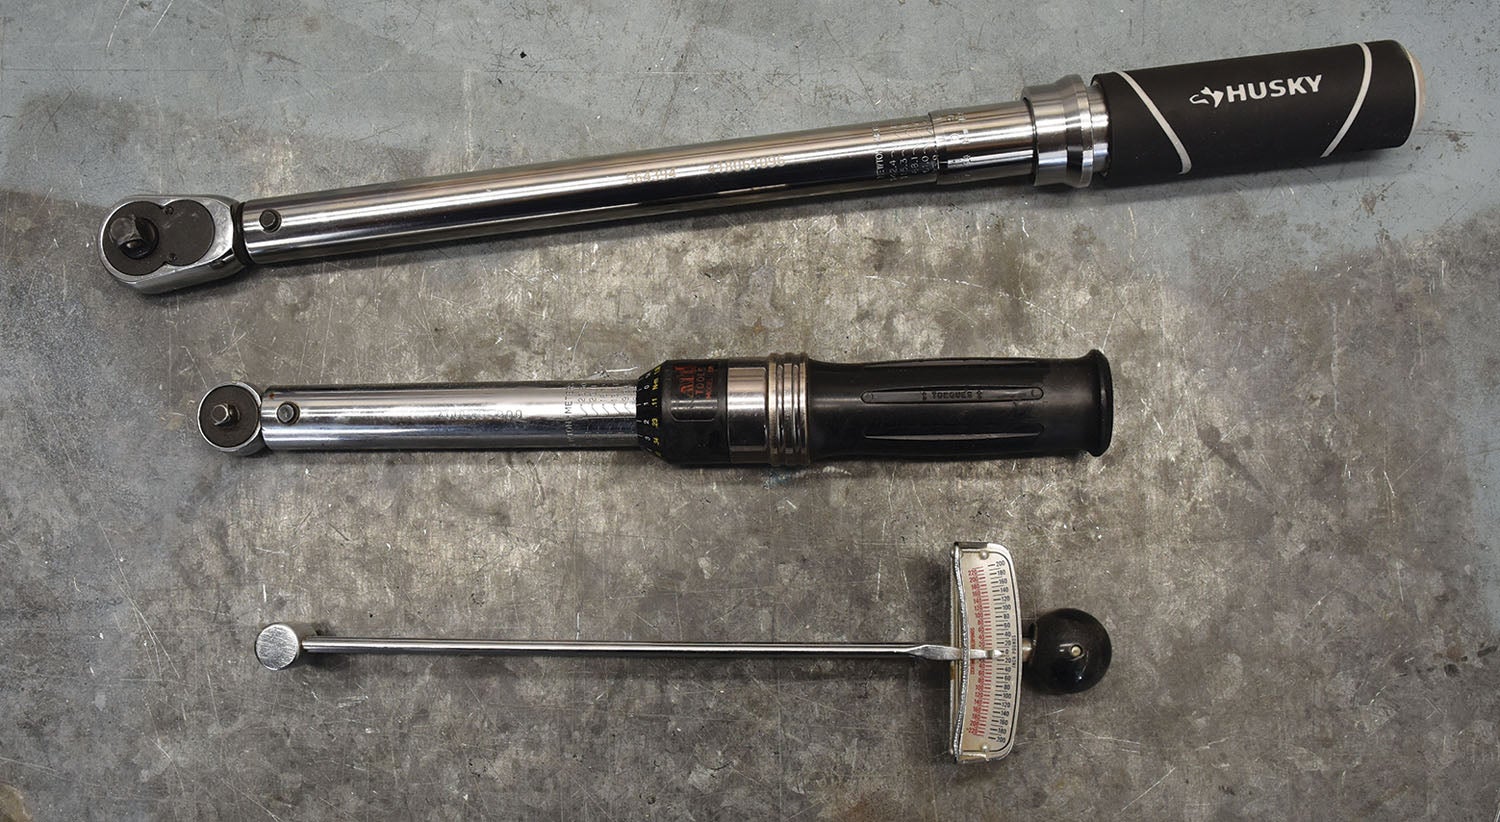
Torque Wrench
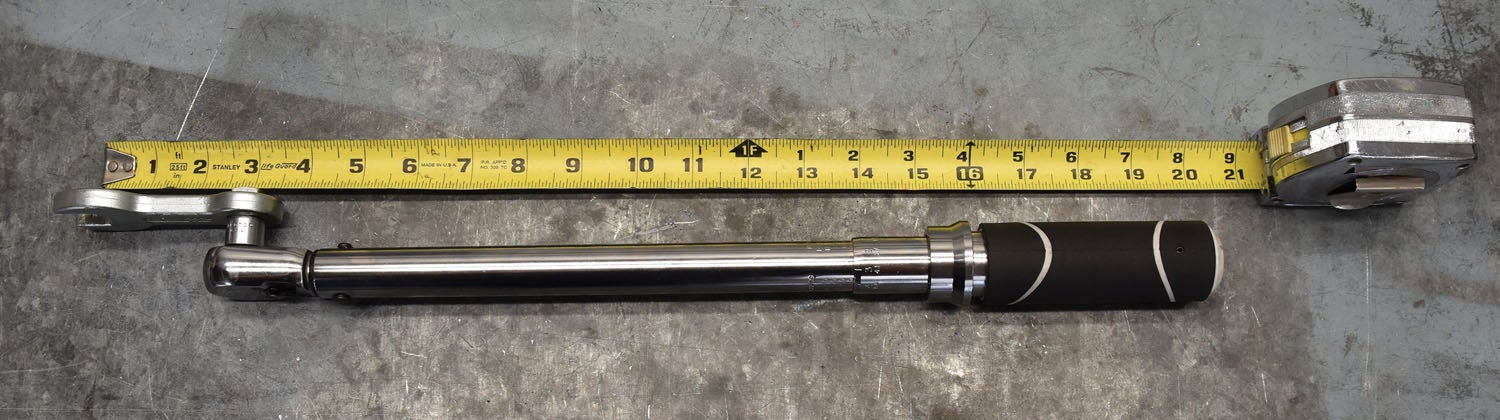
A good torque wrench is a must for proper airplane maintenance and assembly. For many things, a 1/4-inch drive torque wrench is very handy, but it will not be big enough to torque spark plugs or propeller bolts. You can buy two torque wrenches if you like, but it is certainly more economical to buy one 3/8-inch drive tool that will cover everything. Torque specifications for smaller bolts are usually listed in inch-pounds, but most 3/8-inch wrenches are calibrated in foot-pounds, so if you go that way, you will have to do the conversion. However, that isn’t really much bother. Just remember that 12 inch-pounds equals 1 foot-pound. When you buy a torque wrench, look for one that will go up to 75 foot-pounds or 900 inch-pounds so you can handle prop bolts.
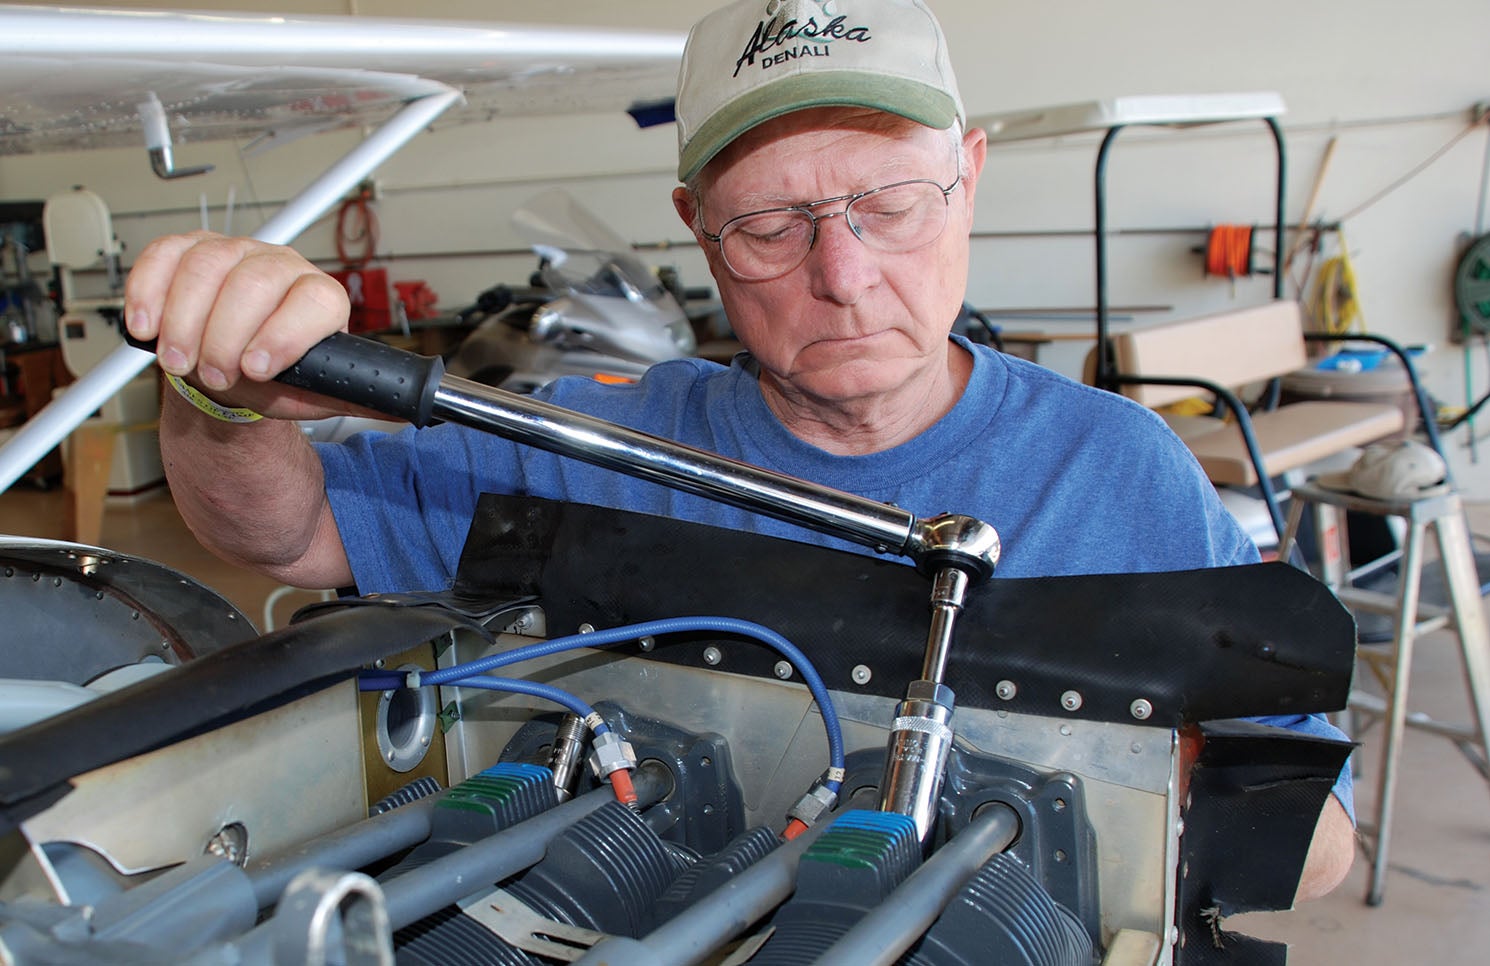
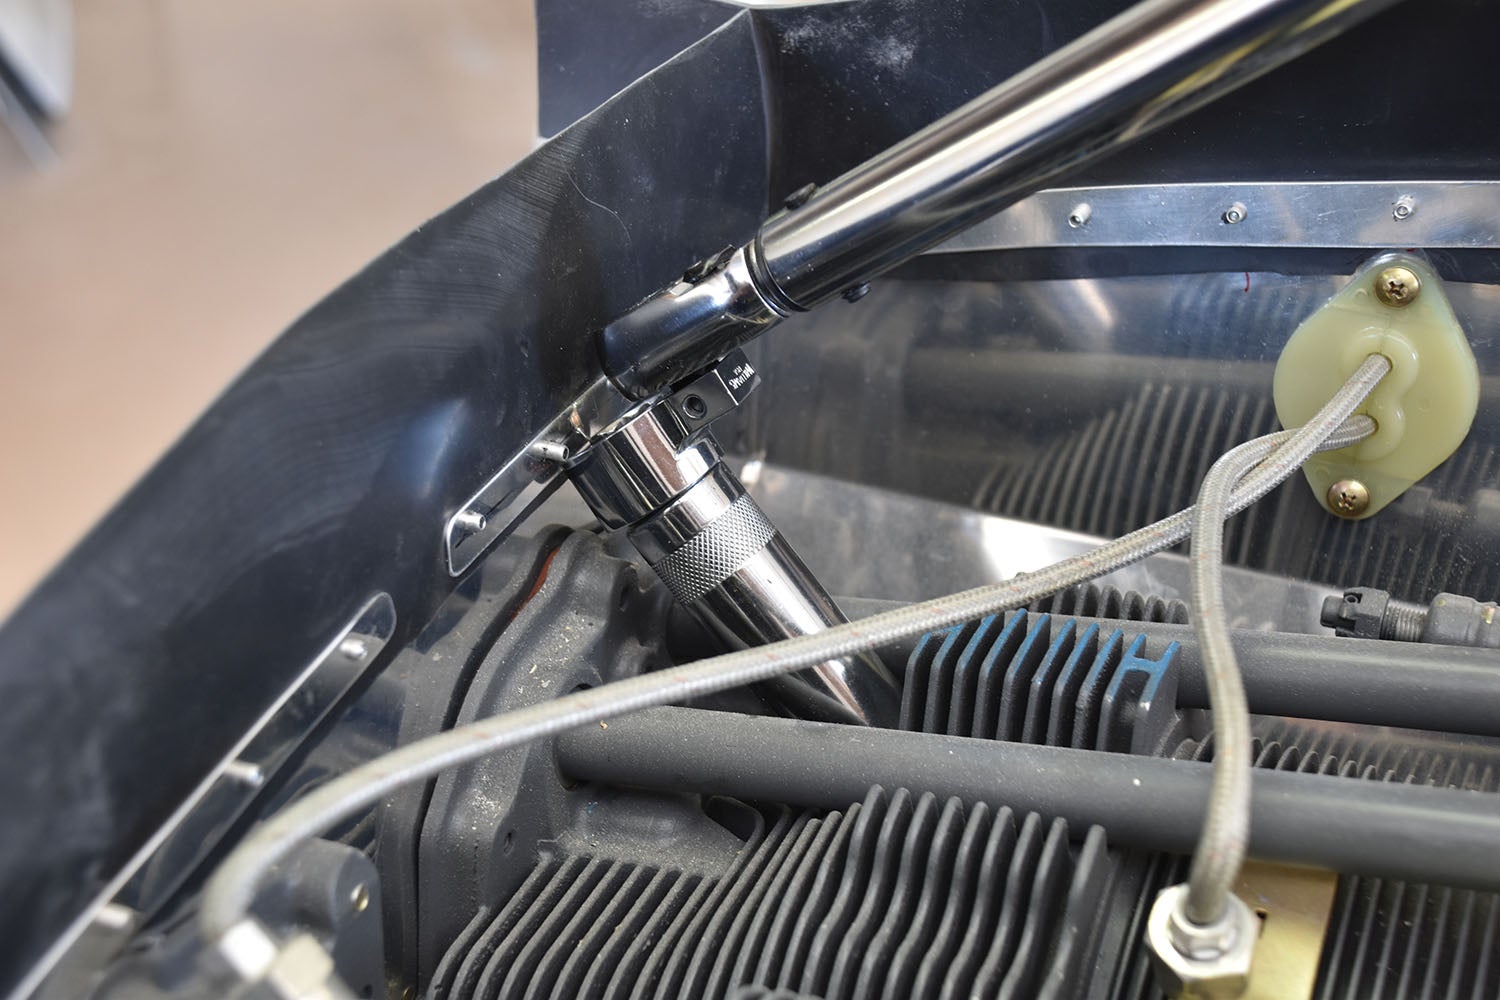
Torque wrenches come in two basic types: beam-type and clicking or adjustable torque wrenches. There are now electronic wrenches, too, but having a battery in what for most is a seldom-used tool seems likely to lead to frustration. The beam version relies on the bending of a steel beam to determine torque. A pointer shows torque on a fixed scale attached to the beam near the handle. These tools are inexpensive and reliable. On the other hand, they can be hard to read if the item being torqued is in an inconvenient location. They represent good value but lack the convenience of the clicking torque wrench.
The clicking torque wrench operates by setting it to a specified torque and then using it as a normal ratchet handle until it clicks. At that point, the proper torque has been applied. This type of wrench is more expensive than the beam-type wrench and requires annual calibration (and immediate calibration after dropping) but it is very easy to use in almost any position. These tools are very popular, but having them recalibrated is not so popular. That problem notwithstanding, clicking torque wrenches easily outsell beam-type wrenches. In any case, one or the other of these is a must-have tool for an airplane builder. One comment about clicking torque wrenches: The urge to click the wrench several times for each nut or bolt is almost irresistible for some people. However, all those extra clicks add a little bit of extra torque, so it is best to click only once and move on to the next bolt.
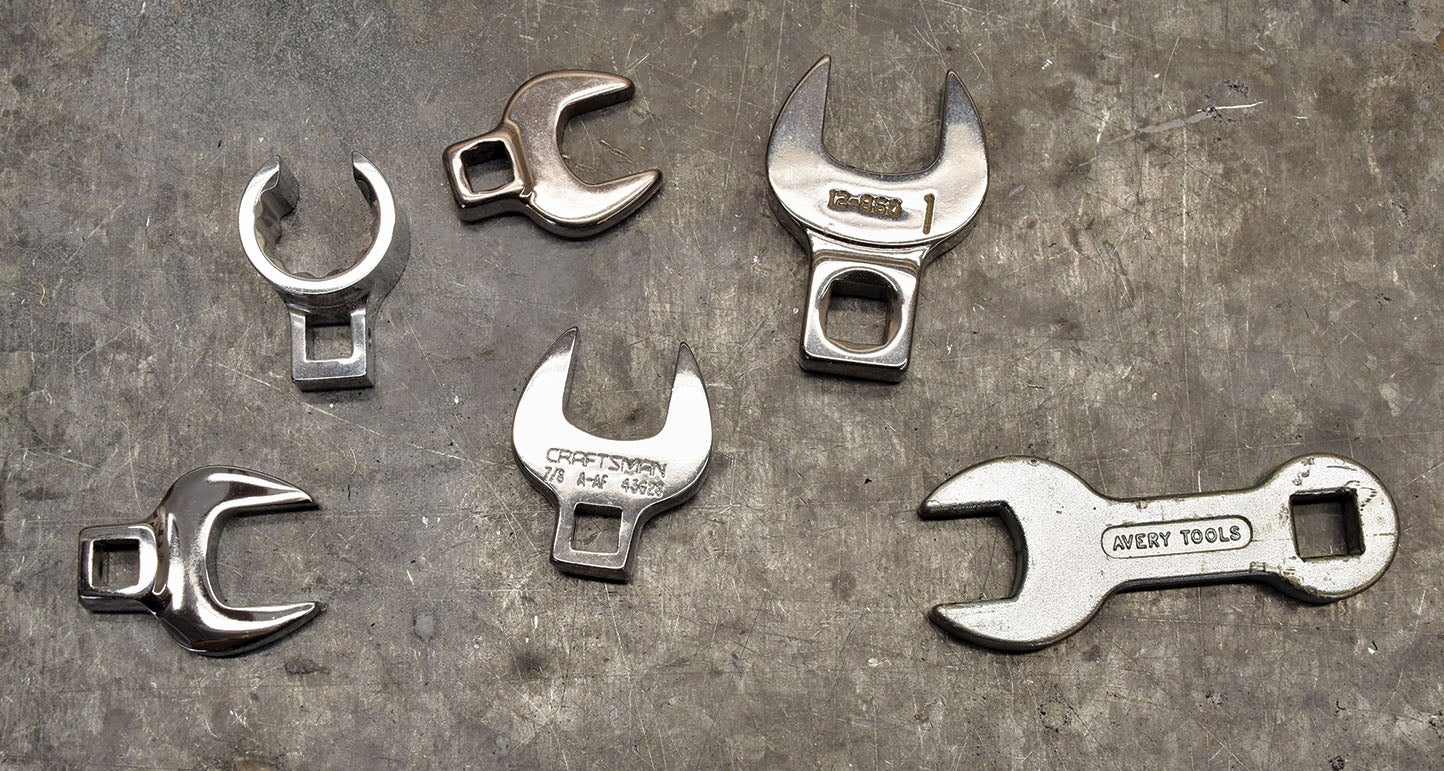
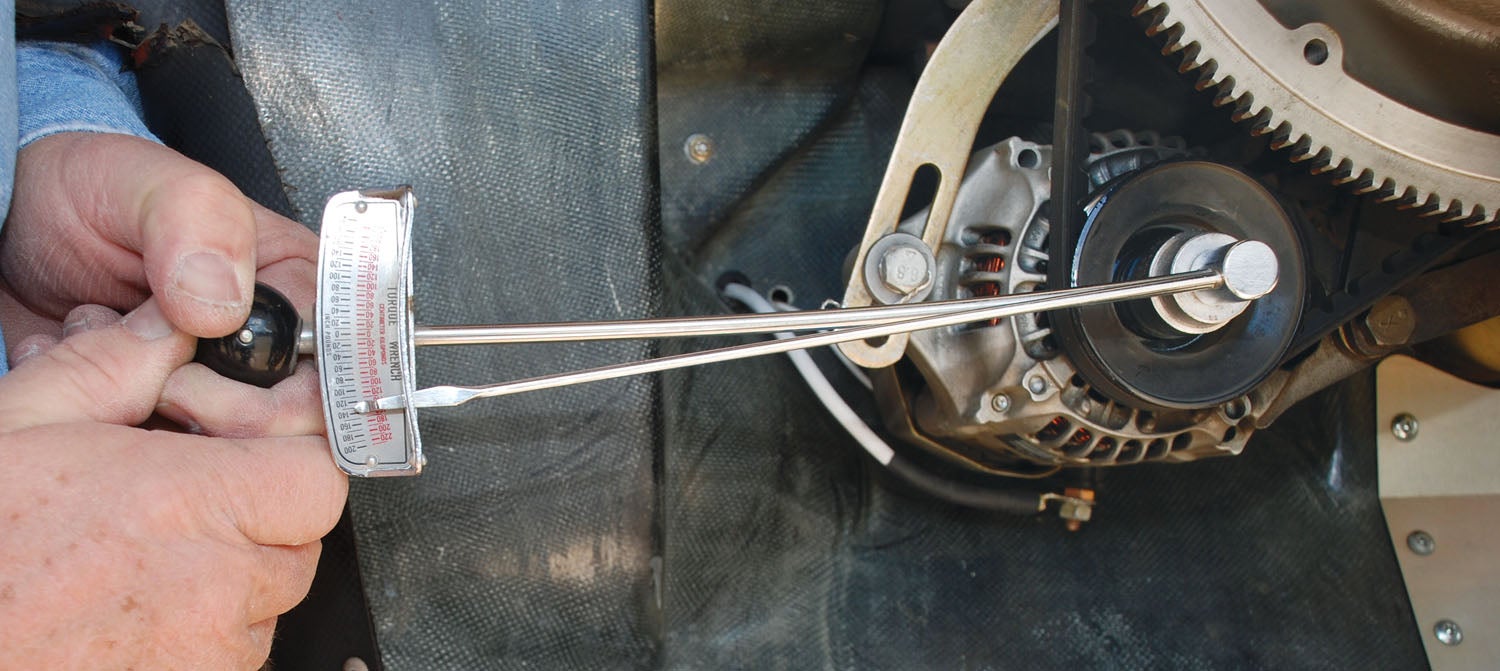
When it comes time to torque your prop, you may need a crow’s foot. The Hartzell propeller tool is a special crow’s foot designed to tighten propeller bolts on Hartzell (and other) props. This special tool attaches to the torque wrench and allows you to apply torque to the bolts on constant-speed propellers or on other fasteners where a socket will not fit. When using a crow’s foot, you will need to adjust the torque setting to compensate for the added length that the crow’s foot will contribute.
Here is the formula for setting your torque wrench with a crow’s foot extension on it:
Tw = Wrench torque setting
Ta = Torque to be applied to nut or bolt
L = Length of torque wrench
E = Length added to wrench by crow’s foot extension
Tw = (Ta x L) / (L + E)
Here’s an example. Suppose we wish to apply 50 foot-pounds of torque to a propeller bolt. What wrench setting should we use if our torque wrench is 15 inches long and our crow’s foot extension adds 3 inches to the length of the wrench?
Tw = (50 x 15) / (15 + 3)
Tw = 42 foot-pounds
In other words, set your torque wrench to 42 foot-pounds to apply 50 foot-pounds of torque to the prop bolt. Be sure to use the same units for the length of the wrench and the length of the extension. They can both be in inches or they can both be in feet. Just don’t use feet for one and inches for the other.
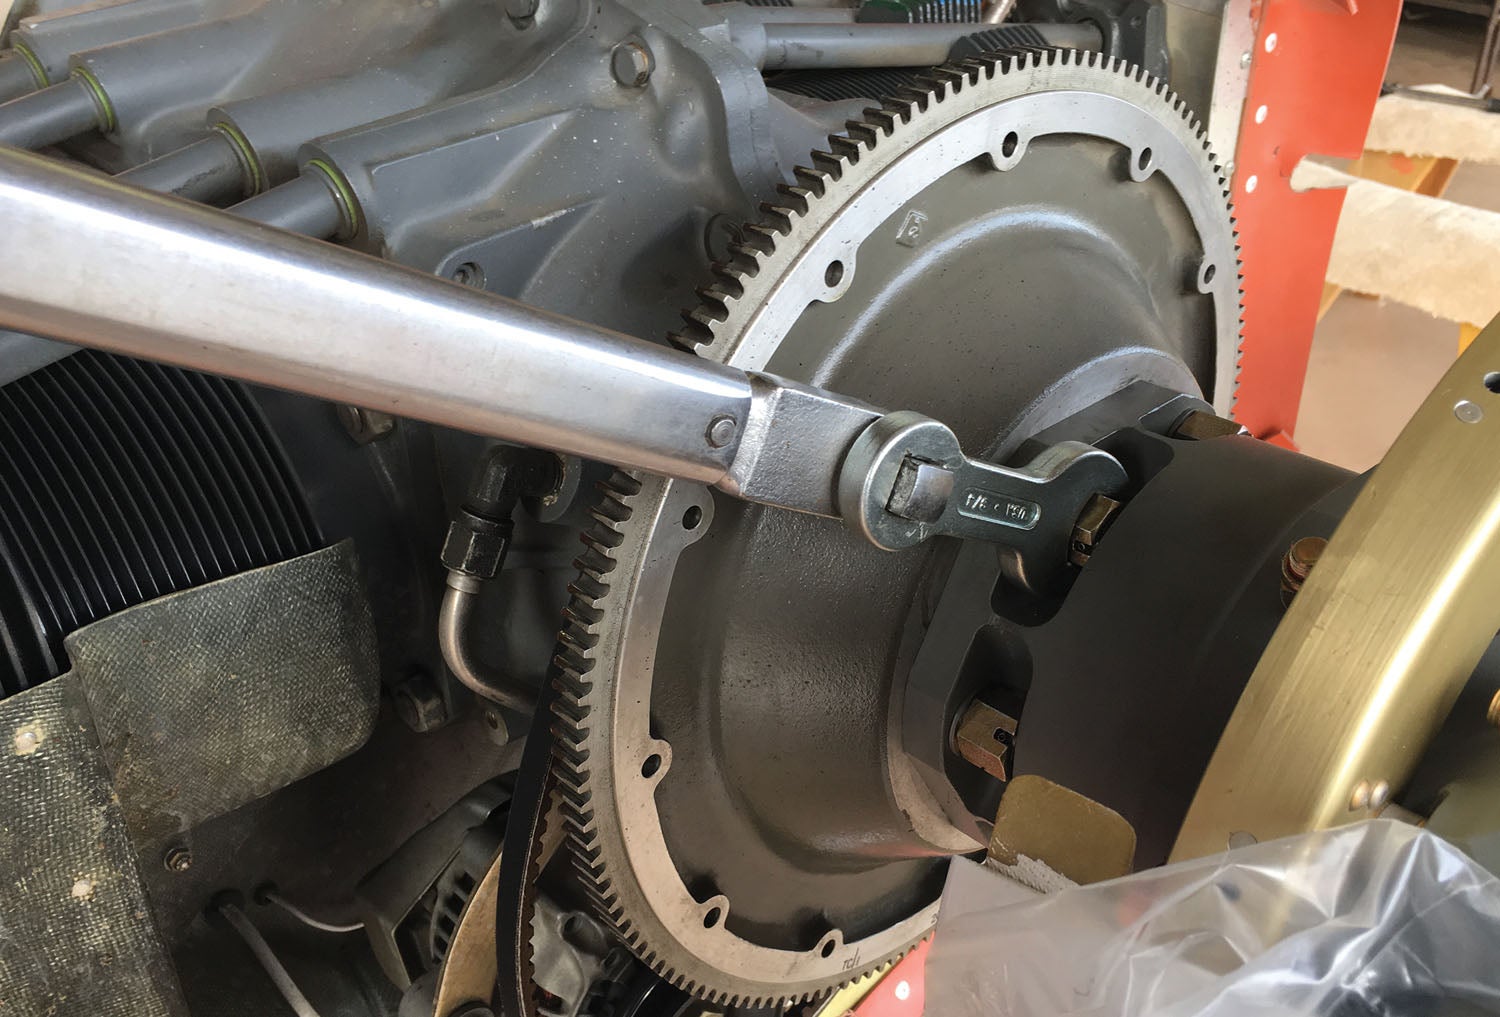
The premium tool makers produce torque wrenches with open-end wrench attachments that work really well for things like prop bolts, but they are pretty expensive for Experimental airplane builders. Sometimes you can find a good used torque wrench of this type for a reasonable price, but most of us will have to forego such a luxury and just use a crow’s foot.
Torques for Fine Thread Nuts and Bolts by Bolt Size
| Bolt Size | Standard Nuts AN310, AN363, AN365 [in-lb] |
Shear Nuts AN 320, AN364 [in-lb] |
|---|---|---|
| 10-32 | 20-25 | 12-15 |
| 1/4-28 | 50-70 | 30-40 |
| 5/16-24 | 100-140 | 60-85 |
| 3/8-24 | 160-190 | 95-110 |
| 7/16-20 | 450-500 | 270-300 |
| 1/2-20 | 480-690 | 290-410 |
Reference: Standard Aircraft Handbook, McGraw Hill, 1999.
Fasteners
To properly tighten a fastener, it is imperative that the nut, bolt or stud are in good condition. That means that there are no damaged threads or nicks or worn spots on the fastener. An aviation fastener should have its original cad plating intact and it should be clean—free of oil, dirt, or other foreign substances. Fasteners with minor thread damage can be restored with thread-chasing taps or dies. You should never use a thread-cutting tap or dye to restore threads on an aviation fastener because they remove material, especially at the critical thread root. The best advice is when in doubt, throw it out. Do not reuse questionable fasteners, especially in critical areas. Engine manufacturers will often recommend replacing critical fasteners at overhaul. These recommendations should be followed.
Here is a good test for a fastener. You should be able to easily thread a non-locking nut onto a bolt or stud with no noticeable drag or hang-ups. A good nut should easily thread onto a known good bolt with very little effort. If you can do this, your fastener’s threads are acceptable.
Aviation nylon-insert lock nuts present a special case. The FAA says that those nuts should be replaced when they lose their ability to prevent the nut from loosening. However, there are no specifications for how much locking force they should apply or how to measure it. Again, we are left with the advice to discard and replace any nut that has questionable locking ability.
Most torque numbers are given for clean, dry fasteners. The standard torque tables in aviation handbooks are based on clean, dry threads. Engine fasteners are another matter. Lycoming specifies that engine bolts be lubricated with a mixture of engine oil and 10% STP. Other engine manufacturers have their own thoughts on this. The point of lubrication is to reduce friction between the bolt or stud and the nut. This friction is a potential source of inaccuracy in bolt tightness as determined by torque. High-performance automobile engine builders typically use lubricated threads and bolt stretch measurements to determine tightness whenever possible. This is much more accurate but generally not available to aircraft engine builders.
For aviation mechanics, the point is to be sure you know and follow the engine maker’s specifications when it comes to lubricating threads (or not) and measuring torque when assembling an engine. Do not use generic torque tables for engine bolts. Refer to the Lycoming Overhaul Manual or a similar publication by the engine maker for the engine you are assembling or repairing.
Standard Torque Table for Aviation Fasteners
When there is no other specification available for torque you can use these standard numbers from the chart on the left.
Nylon insert lock nuts and all-metal lock nuts present a special problem. How much torque does it take to overcome the resistance of the locking insert? There is no known specification for this, and it varies as the nut is used again and again. I did my own study to determine the torque to overcome nylon inserts in lock nuts, but this has no official status and did not consider all-metal lock nuts. Here is what I found:
This drag torque should be added to the specified torque to achieve the proper torque at the fastener. For example, add 10 inch-pounds of drag torque to the listed 50-70 inch-pounds of torque for a 1/4-28 nut to achieve the prescribed tightness at the joint.
| Nut Designation | Drag |
|---|---|
| AN365-1032 | 4 in-lb |
| AN365-428 | 10 in-lb |
| AN365-524 | 15 in-lb |
| AN365-624 | 20 in-lb |
Using a Torque Wrench
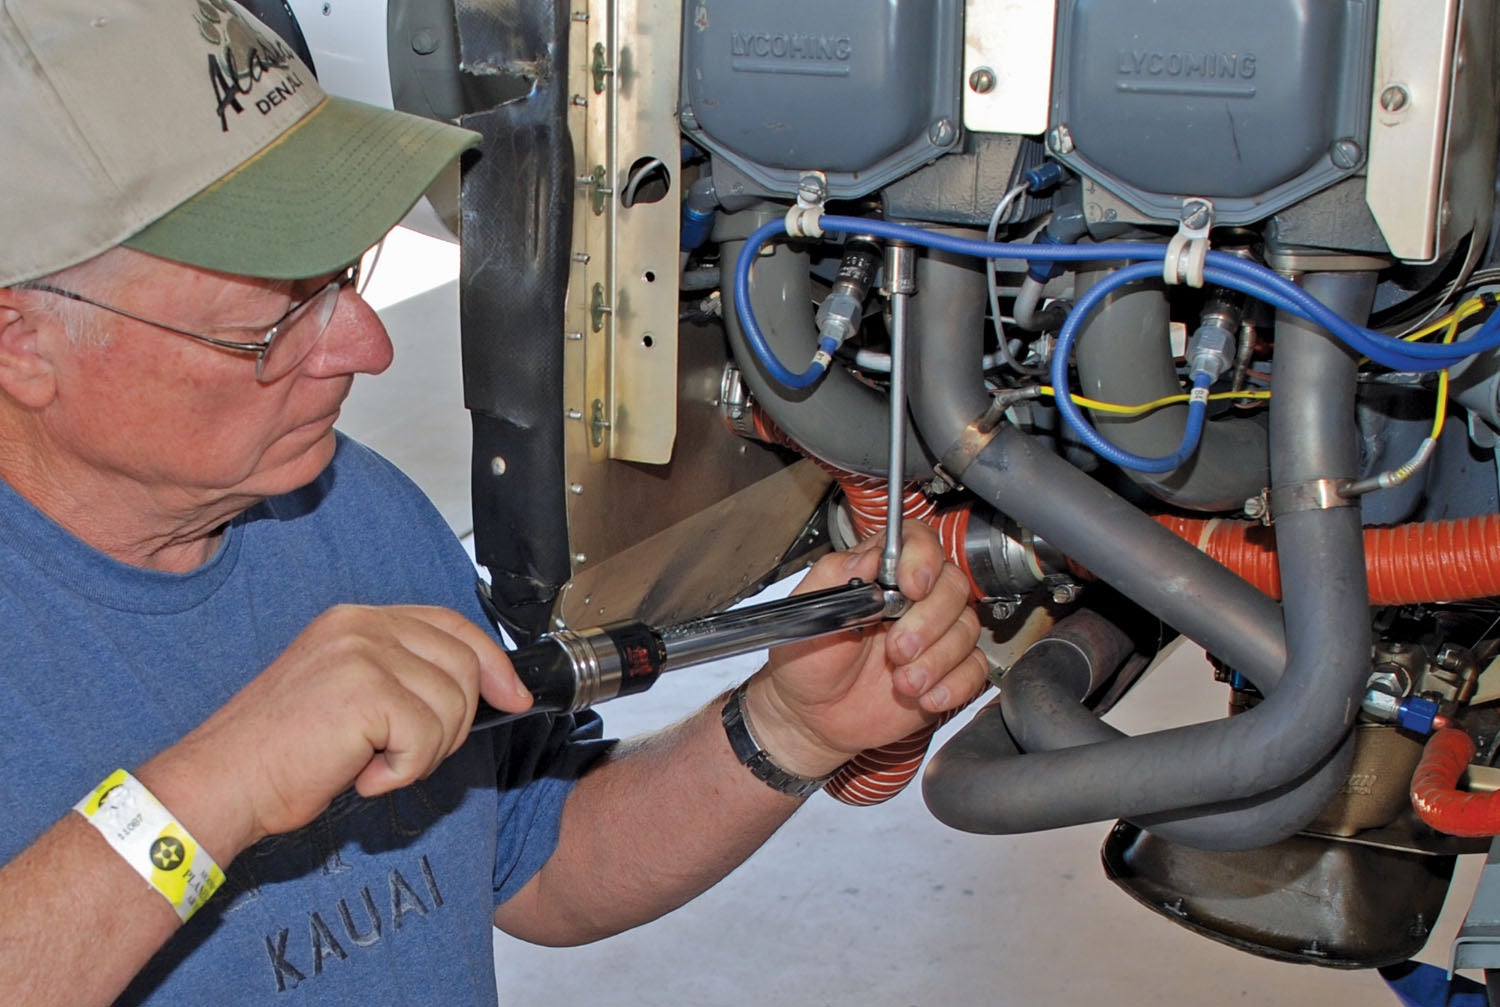
Torque wrenches should be calibrated annually or after being dropped on a hard surface. An uncalibrated wrench cannot be relied upon to deliver the specified torque. Even though most torque wrenches come with a ratchet head that can be used to tighten or loosen a nut or bolt, they should never be used to loosen anything. Use a standard ratchet to tighten bolts at least to snug, then switch to the torque wrench. Remove bolts with standard wrenches or ratchet and sockets.
Often the maker of a part will specify that a nut or bolt be tightened in stages. This is especially common when multiple fasteners are involved, such as with a propeller or an engine cylinder. The procedure would be to first snug all nuts or bolts, then torque to one-half the final value using a cross pattern. Finally, torque to the final number, again using a cross pattern in the case of multiple fasteners. Be aware that engine manufacturers often have torquing sequences that are not necessarily obvious. Read the book and follow it.
As a general rule, I prefer to use the shortest extension possible in cases where one is required. The longer the extension, the more there is a need to stabilize the head of the wrench with your other hand. This can introduce inaccuracy. In some cases, this is unavoidable but do your best to minimize the use of extensions wherever possible.
Lastly, be sure to have your torque wrench recalibrated from time to time. A professional mechanic should do this yearly. For an amateur builder who only uses a torque wrench two or three times a year, this is probably overkill. But if you have never had it done, it is high time to do something about that.


Dear Dave, I am a retired airline Captain and former Italian Air Force F-104S pilot. I have been reading your article on torque wrenches. I think you are the right person I want to share some information on what I invented (and patented) in this particular field. I will be pleased to receive your personal email address.
Best Regards,
Enrico Fassio
Dear Dave, I have a Craftsman beam 3/8″ torque wrench which I’d like to use with a Hartzell CS prop on a Lycoming O-360. Am I understanding you correctly that this type of wrench does not need annual calibration? Should ship it for calibration or is that only necessary for click-type wrenches?. Or, optionally, could I take it to my local FBO which keeps a wall-mounted calibration test rig for their A&Ps? They send it out for annual calibration. And finally, after calibration, should I be given an error card for the wrench?
By the way, I use an Ultimate Propeller Wrench from Anti Splat Aero LLC for a Hartzell CS prop on an O-360-A1A. It is the easiest to use prop wrench I’ve used. I highly recommend it.
Hope to see you at AirVenture 2021
Dee Whittington
There is one thing you forgot to mention about click-type torque wrenchs. They should never be stored with a torque setting. They should be set to zero torque because the higher the torque the more the internal spring is compressed and over time this introduces error as the spring is weakened making the setting inaccurate.
I just wanted to chime in and add in a little bit of information about lock nuts. In your article you said, “The FAA says that those nuts should be replaced when they lose their ability to prevent the nut from loosening. However, there are no specifications for how much locking force they should apply or how to measure it.”
While your statement is correct about the smaller sizes of fastener, AC-43-13 does have a table on page 7-12 for “Minimum prevailing torque values for reused self-locking nuts.” The smallest size fastener it has a value for, however, is a 7/16 – 20 (AN-7) bolt.
One comment about using the crow’s foot extension. The formula you provided applies only when the crow’s foot extends the wrench in the same direction (i.e. makes the wrench effectively longer). If, on the other hand, you set the crow’s foot at a 90 degree angle to the handle of the wrench, my understanding is that no correction is necessary and the desired torque can be set directly on the wrench. You can’t always do one or the other depending on the specific job, but it’s important to apply the formula only in the necessary cases.
You did not mention Warren & Brown type torque wrenches. These are a beam type which also provide a “click”, and are more accurate than beam-type wrench which you describe in this article. They are widely used in aerospace applications in Australia. Worth a look.
https://wbtools.com.au/deflecting-beam-torque-wrench-1-4-drive-1-25nm.html
Comments are closed.