The previous installment of this series explored the process of selecting a Fokker D.VII replica to serve as a low ‘n slow complement to my RV-6 and also pay homage to the dedication of early aviators who pioneered our pursuit of aviation. We also discussed avenues of thought a builder visits in the course of determining not only which aircraft appear attractive as prospective projects, but whether a particular aircraft fits the resources of the builder. Other essential factors considered were powerplant selection and total project budget to assure the build has a high probability of seeing completion.
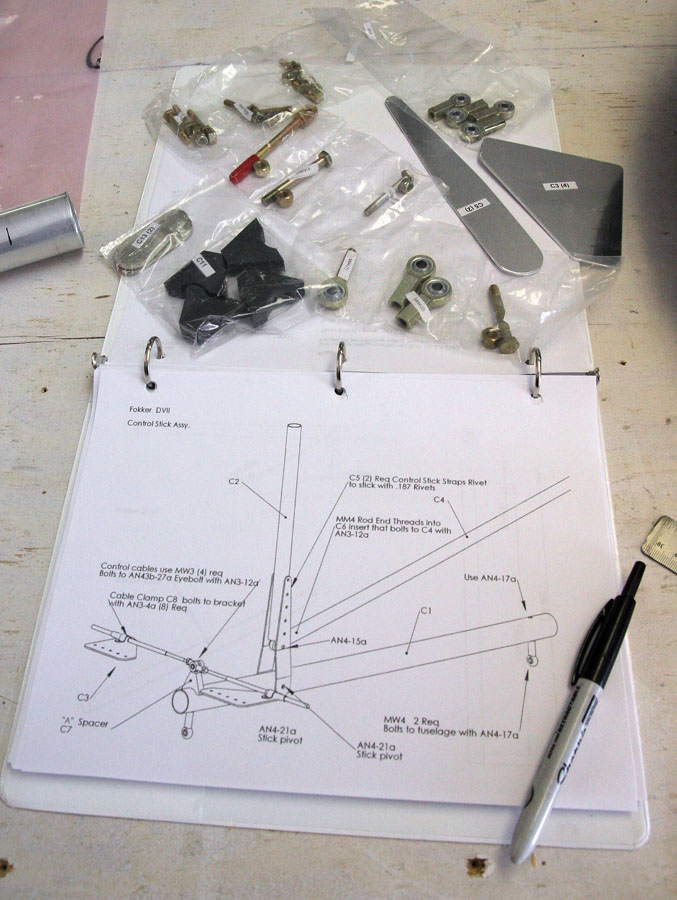
The kit is divided into subkits. Each subkit is bagged separately and individual parts are tagged and bagged.
This article continues that discussion and examines the construction of my 80%-scale Fokker D.VII. As described earlier, departure from close authenticity will be accepted in order to create an aircraft that is reliable and easily serviced but still representative of the original D.VII. The primary concessions to practicality are in the area of firewall forward, cockpit accommodations, and the tailwheel. Of course the internal structure of the Airdrome Aeroplanes D.VII differs greatly from the original aircraft, but that departure is not noticeable to the casual observer.
Actually, uniqueness is not uncommon for these aircraft because so much of the project is left to builder discretion. The kit documentation is only applicable to the basic framework of the airframe, and the builder must fill in many gaps. This can be enjoyable for an experienced builder who wishes to leave his individual stamp on the aircraft, but a novice builder may be intimidated by the myriad of undocumented details if no experienced builders are near to lend assistance.
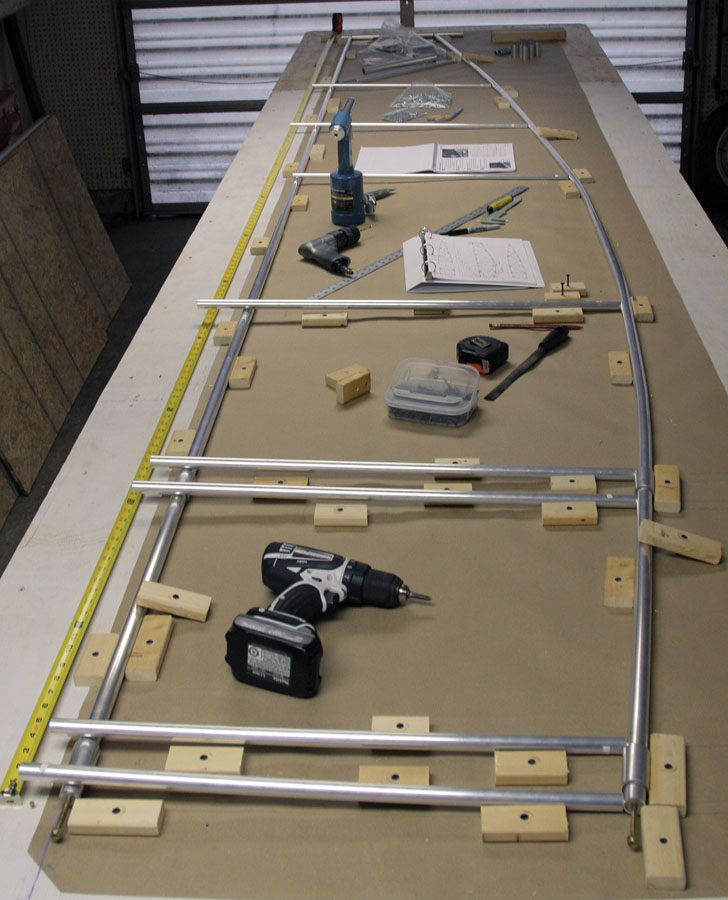
Wood blocks establish locations for fuselage stations after the dimensions are carefully marked on the layout paper. The fuse station tubes have not been cut to final length in this photo. Good practice is to retain all layout paper in case repairs are needed in the future.
Airdrome Aeroplanes’s claim to fame is how quickly an airframe can take shape. I work faster than many builders and can devote considerable hours per week due to my semi-retirement, but I was still impressed when my airframe was ready for fabric in a mere six months from cracking open the crate! This is due to the low parts count and unconventional design for a non-ultralight aircraft.
Kit Arrival
After gestating in Robert Baslee’s shop for six weeks, a 12-foot-long, 530-pound crate arrived at my local freight terminal. I elected to take delivery at the terminal instead of having to arrange meeting a driver at home, and the crate easily fit in an open 12-foot U-Haul trailer. Upon arrival at my shop, removal of a couple dozen screws revealed an interesting assortment of…airplane stuff. Easily identified were wheels, wheel covers, cowl nose bowl, fuel tank and a document package. But the real bones of the kit were apparent after digging deeper into the box. Dozens of 6061 aluminum tubes comprised the majority of the shipment. There were several large plastic bags labeled for individual subkits containing gussets, hardware, and fittings. Fortunately, every item was tagged with a sticker bearing a coded number associating it with a subkit.
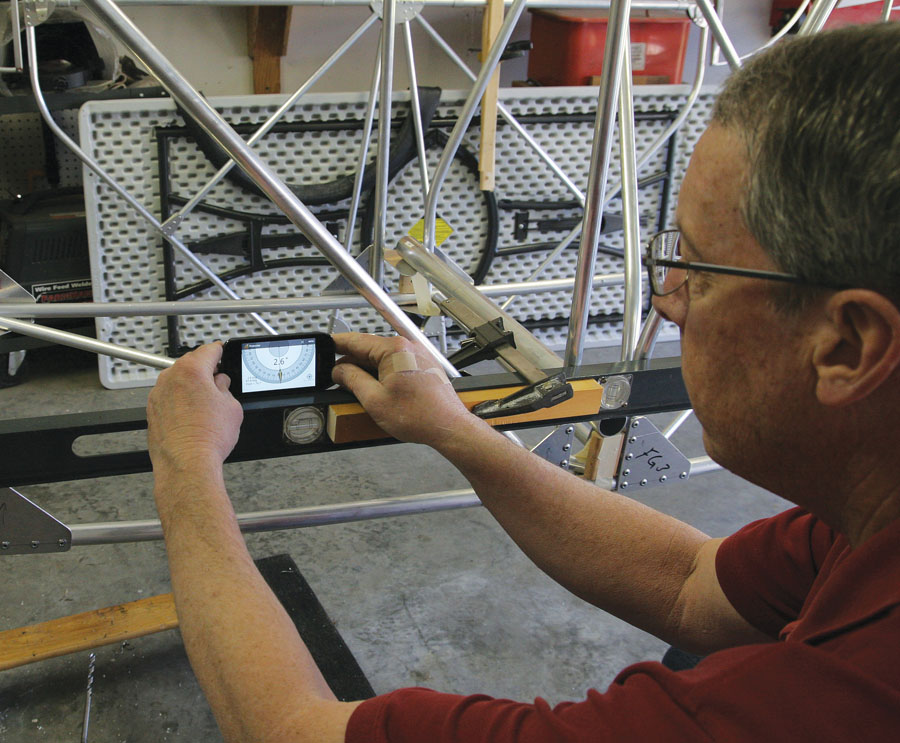
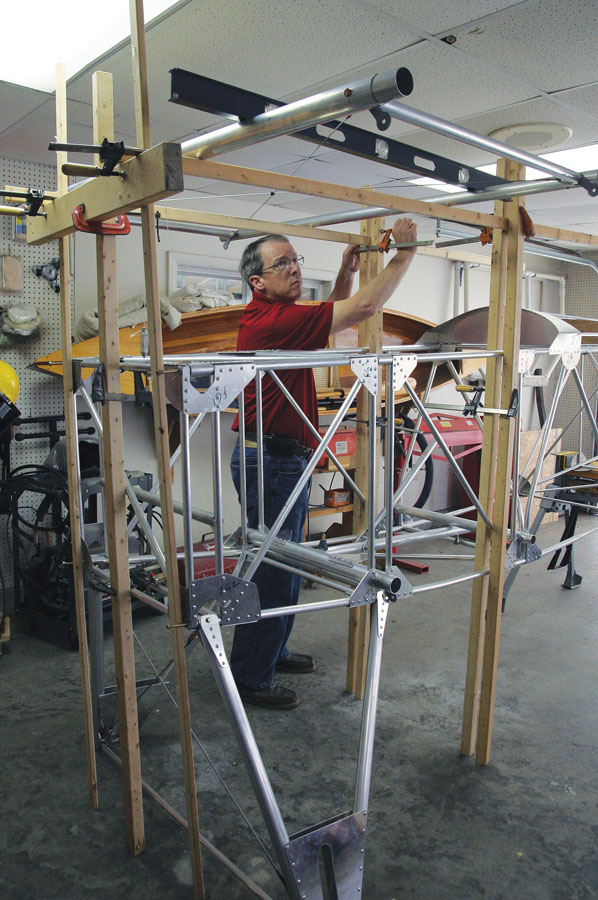
I found a free protractor app on my phone to be as useful as a high-dollar digital level. The fuselage spar carry-throughs must be located with precision because they establish wing straightness and incidence, and are key to building a properly rigged airframe.
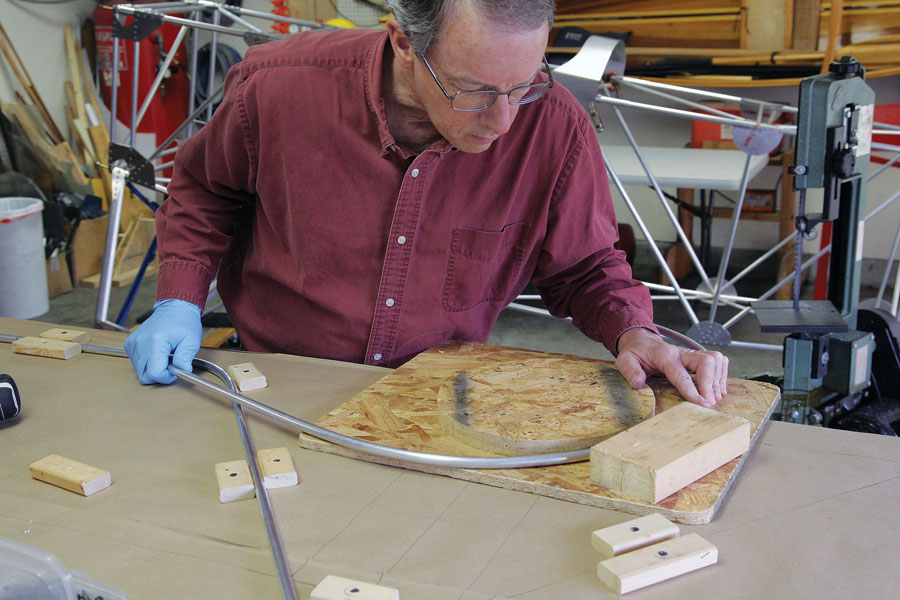
It is necessary to build simple bending fixtures so tubing for the fuselage, empennage and wing ribs can be shaped as necessary. Patterns for these fixtures are included in the document package, so particleboard, salvaged from the shipping crate, was cut to shape and attached to the workbench. The aluminum tubing can be smoothly bent cold if care is taken to form each bend in small increments. Attempting to bend tubing too aggressively results in kinks (aka wind chimes) and ordering fresh tubing.
The fuselage and upper center section are very carefully leveled in preparation for fabricating the cabanes that attach the upper wing center section to the fuselage. Accuracy is critical in achieving an airframe that is straight and properly rigged.
The first evening was spent exploring the document package, which includes a build manual, a set of drawings, and two DVDs with photographs and a video. Surprisingly absent from the package was a materials list with which to verify the shipment was complete. It would be possible, but very tedious, to make a detailed inventory by picking apart each drawing and matching it with the pile of parts, but I decided my time was better spent elsewhere. However, several times in the project I wished an early inventory had been practical because of shortages that were discovered as the build progressed. Robert Baslee was usually prompt about shipping needed parts, but I would have preferred not needing to call attention to the omissions.
Poster-board mock-up assisted with determining the final configuration of the prototype cowl. Exhaust stacks are Aeronca Champ with no modifications.
Fuselage Construction
Many kits direct the builder to construct the empennage first in case an inexpensive tail surface needs to be replaced while building skills are perfected. But I prefer building the fuselage first so other components can be built to fit and attached as they are completed. This also serves as motivation because it is enjoyable to watch an airplane taking shape instead of a pile of dissociated parts.
A roll of Fokker fabrication media (masking paper) was purchased in the aviation department of the local Lowe’s. The paper is 35 inches wide, perfect for marking up the fuselage side components. The paper was stapled to the bench and a reference line chalked the length of the bench. This became the location of the top longeron.
The plans provide dimensions for locating the fuse components. A drywall square worked nicely for drawing perpendicular lines to the longeron reference so all the fuse stations could be located. The most demanding task of this session was bending the bottom longeron. I used the bending form to gradually curve the longeron to fit the dimensions and general shape of the drawing. All parts were fabricated in duplicate so the other fuse side would only need assembly.
The empennage trailing edges are carefully bent using a simple particleboard fixture. The key to smooth bends is to work slowly, bending the tube a tiny amount at a time.
The Airdrome Aeroplanes builder must possess the ability to neatly trim and fit tubes prior to assembly with gussets and rivets. This process, commonly referred to as “fishmouthing,” is similar to the method used to assemble welded fuselage frames. An ultra-precise fit is not mandatory because the gussets transfer much of the loads, but established construction practice encourages good craftsmanship. Various methods are used in the building community to create fishmouths, including specialized tubing notchers and combinations of grinders and sanders. In the course of building the steel fuse for the Legal Eagle, I learned a technique using simple aviation hand snips. After practice, semi-circles can be snipped from the end of a tube and quickly refined with a half-round file. Once mastered, the entire process is faster than setting up a tubing notcher, but each builder will settle on a method that best suits his skill set. My Harbor Freight metal band saw was constantly in use as aluminum tubes were transformed into Fokker components.
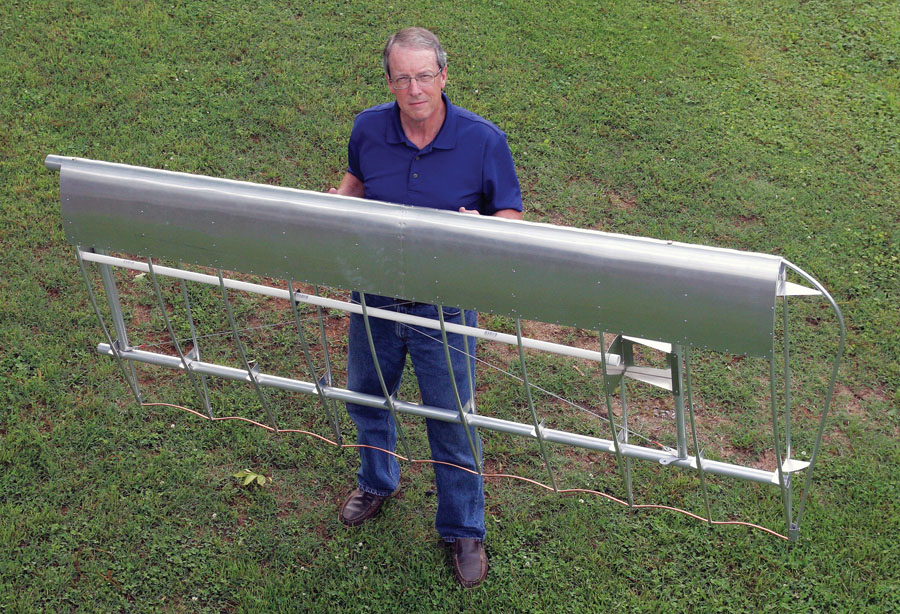
The D.VII lower wing panel illustrates low parts count and minimal weight. The PVC conduit and access bay are for the pitot-static tubes, another area left to the builder’s creativity. Trailing edges are -inch copper tubing carefully formed by hand.
Tubes are joined with aluminum gussets and either 1/8- or 3/16-inch steel rivets. A pneumatic riveter is advisable for 1/8-inch rivets and essential for setting 3/16-inch rivets. A good cordless drill with sharp bits works nicely for drilling the hundreds of holes needed without the hassle of dragging around an air hose. A few dozen 1/8-inch and 3/16-inch Clecoes, along with a good assortment of spring and bar clamps and ratchet straps, are needed as the airframe takes shape.
I found the tube-and-gusset design to be much faster to assemble than welding a fuselage, and I didn’t catch the workbench on fire a single time! Once the fuse sides are complete, simple jigs are used to hold them in place as the remainder of the fuse stations are added. I built a plywood “firewall” attached to the bench to hold the forward ends of the fuse in alignment, and a plywood and 2×4 fixture at the opposite end of the bench to secure the tail of the fuse. Everything was carefully measured, leveled and plumbed, then measured, leveled and plumbed again. Errors introduced at this point will haunt the project forever, so care taken squaring the fuselage pays huge dividends. A critical step is locating the lower wingspar carry-throughs because they must match spar spacing in the wing panels and also establish wing incidence for the entire plane.
Empennage and Wings
Once the fuselage is framed up, the Airdrome Aeroplanes builder has developed the primary skills needed to complete the remainder of the airframe. The other components are constructed with variations of these basic methods. The empennage requires more complex bends of smaller diameter tubing, the most stringent requirement being creating identical bends for each elevator. But patience while bending tubes a tiny amount at a time is the key to successfully navigating these portions of the build. The D.VII, as with all WW-I Fokkers, is distinguished by trademark curves and outlines, which are easily duplicated using simple bending fixtures.
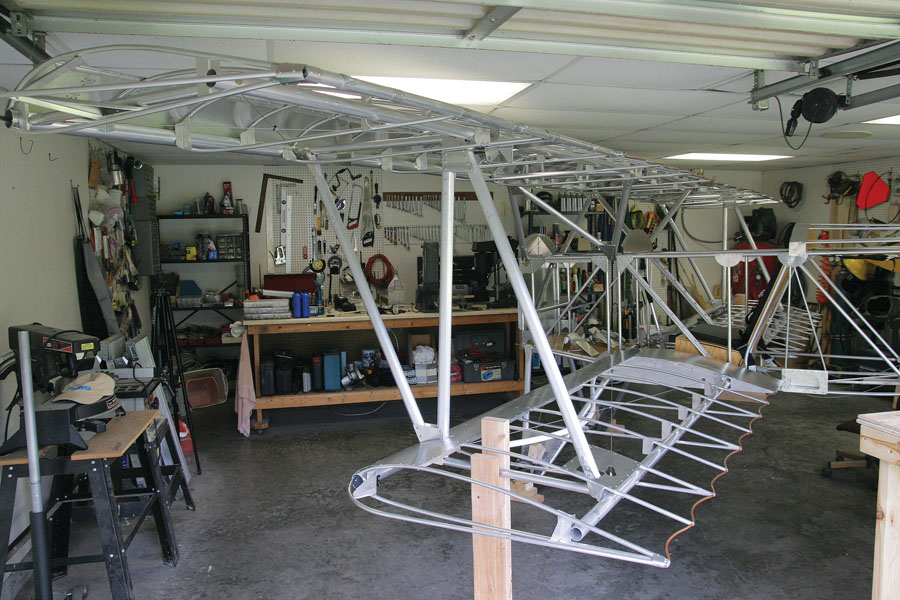
It’s a tight fit, but the D.VII first spread its wings within the 24 x 24-foot shop. The entire airframe is constructed with aluminum tubes joined with gussets and pulled rivets. The PEX conduit in the lower wing is for the push-pull aileron control cable that will transition from the cockpit, through the wing, then up the N-strut to the aileron horn.
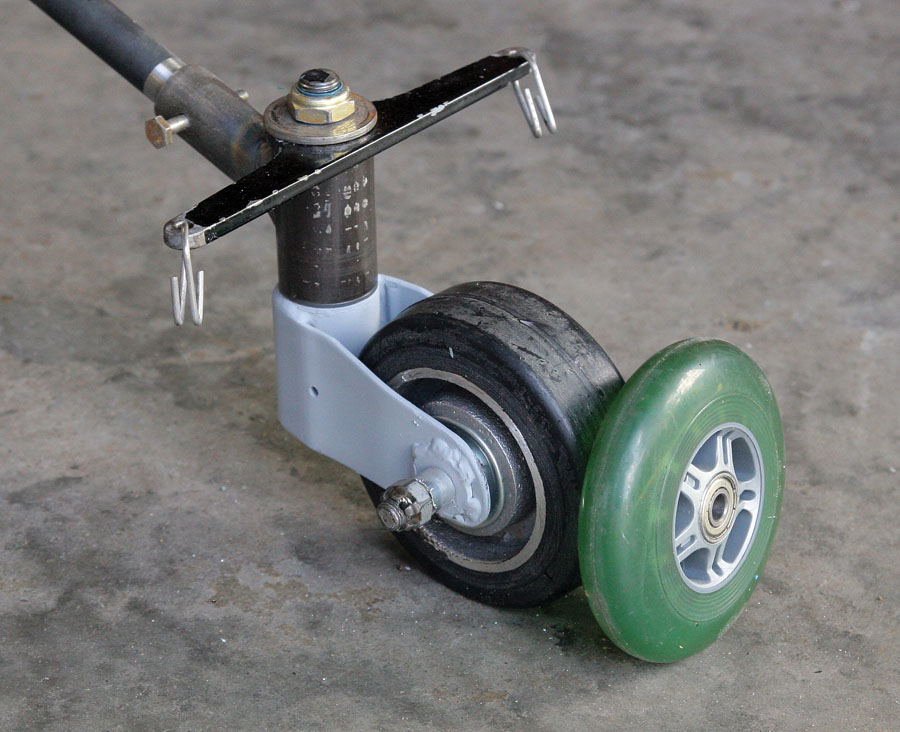
The kit includes extruded aluminum hinges for all control surfaces. Control horns are merely AN eyebolts combined with a Delrin spacer. However, I prefer a conventional control horn constructed of sheet stock, so I designed horns for the elevators and ailerons. Another change is adaptation of an RV tailwheel spring, yoke, and wheel to replace the kit setup, which is based on aluminum tubes, a bungee, and a plastic inline skate wheel. I just couldn’t fathom the little plastic wheel lasting very long on a paved runway. The RV system has proved to be an excellent application for my D.VII, plus it has the advantage of having a full-swivel yoke. This was another example of where I sacrificed a bit of authenticity for the sake of enhanced and reliable service.
Here is an RV tailwheel, yoke, and spring in the process of being adapted to the D.VII to replace the standard inline skate wheel and bungee. The RV yoke is also full-swivel, which allows easier ground handling.
The D.VII wings obviously have ultralight aircraft ancestry with tubular spars and ribs. This design results in expeditious assembly of the wings due to the low parts count. The rib tubes are formed on a bending fixture and attach to the spars with aluminum sheet brackets. I formed all rib tubes and brackets at one time, so assembly of the wing panels could proceed without interruption.
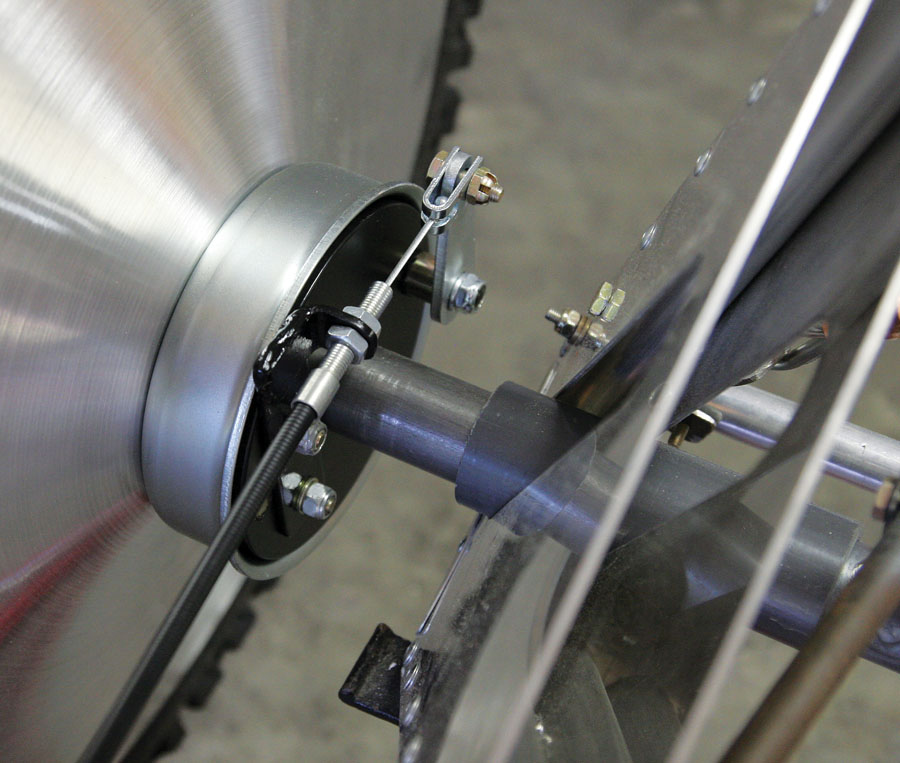
The D.VII kit does not include brakes, so a set of Tracy O’Brien drum brakes were added. Attachment brackets were fabricated so toe brakes could be installed. Also visible is the slot in the gear leg that allows the bungee-damped axle to absorb landing loads (bungees not installed in this photo).
Tubular compression struts and 1/8-inch drag/anti-drag cables keep the wing structure square and rigid. The basic framing of a wing panel can be easily completed in a few hours. Another work session or two devoted to riveting ribs, leading edge sheeting, and tip bows has a Fokker wing nearly ready to cover. Because each panel is less than nine feet in span it can be easily assembled on an 8-foot table. I built the upper center section panel first so I could rig it to the fuselage (and get familiar with wing panel construction) and found it to be the most complex of all the wing panels. Part of this is due to adding a cutout in the trailing edge so the pilot can have access to the cockpit. This was another area of construction that was not documented in the plans.
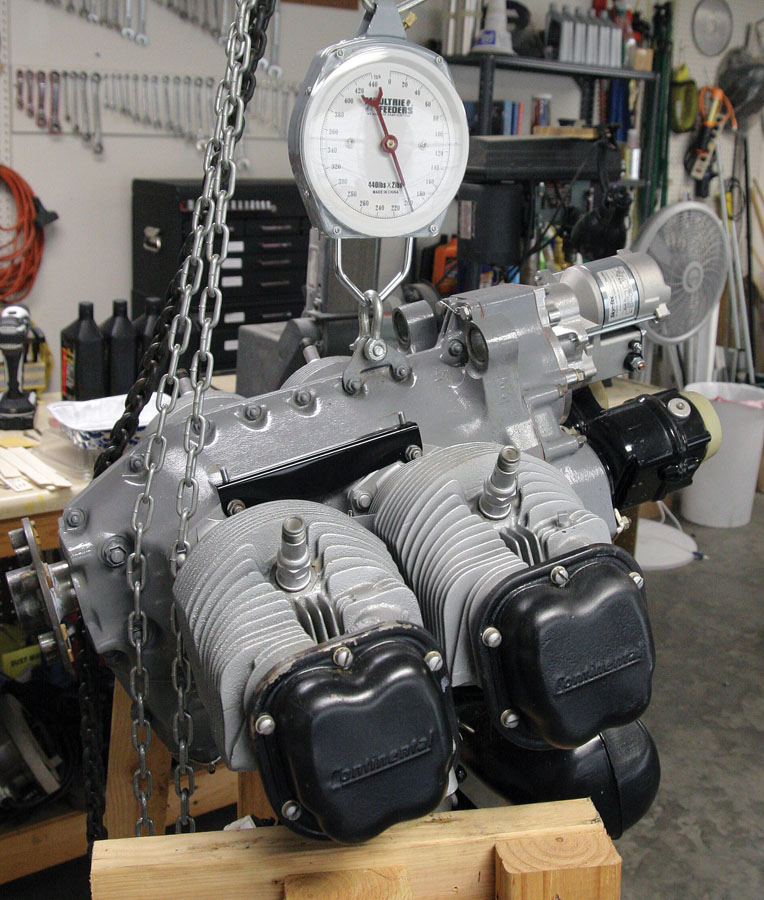
To address concerns from fellow Airdrome Aeroplanes builders about the O-200 being too heavy for the D.VII, it was weighed and found to be comparable to the big-bore VW re-drive engines used in many AA aircraft. Weight-saving features of this engine include Slick mags, lightweight Sky-Tec starter, and a compact B&C vacuum-pad-mounted alternator. The scale is indicating 200 pounds.
The most involved aspect of the build is fabrication of the cabanes and N-struts that hold the entire structure together. These components require careful assembly because they dictate whether the aircraft will be rigged properly or a nightmare that requires attention later to achieve airworthiness. The struts are built from oval tubing supplied in the kit and, while simple in design, require about as much time to build and install as was spent on wing construction. Jigs and fixtures must be built to hold the wings and fuse in proper alignment as the struts are fabricated in place. Once fabricated, the struts are non-adjustable—they must be correct when built or replacement/rebuild is necessary. It was a very tight fit, but I was able to rig the D.VII in my 24 x 24-foot shop. A digital level is a nice tool for rigging, but a high-quality bubble level is sufficient if used with care. However, I found my phone’s free protractor app to be as accurate as the digital level.
Firewall Forward
Once the bones of the D.VII were assembled, attention was turned toward system details, the largest being what to hang on the firewall. As disclosed in the previous article in this series, I decided to power the D.VII with a Continental O-200, in spite of this being the first D.VII with this engine. This pushed me into the realm of building a prototype and completely dependent on my own decisions as the package took shape. I was confident the O-200 would fly the D.VII in a splendid manner, but how to integrate the pancake engine with the narrow, slab-sided cowl was a challenge with no known solution. My first attempt involved adding cheeks to the cowl to cover the cylinders, but this would require a pressure cowl, and the more I worked this option, the more complicated it became. It was obvious this scheme was not aligning with my desire for a simple installation.
I decided to reboot and incorporate more established methods of installing the little Conti, which dictated less authenticity but hopefully was better aligned with my mission goals. This is typical of the thought processes a builder working with a plans or materials kit must experience as challenges are faced and solved. The exercise can be intimating to the point of paralysis for many builders expecting a plug-and-play workflow, but others find satisfaction in addressing engineering issues. I belong to the latter population, so starting over with the engine installation was no reason to become disenchanted with the project.
There is nothing more minimal than the cowling found on a J-3. The more I studied the nose of the D.VII, the more it became apparent it could be radically reworked to incorporate the J-3’s cooling eyebrows. This eliminates a pressure cowl and distills the installation down to just the essential basics. I made poster-board mockups of various versions of an open cowl until a scheme was hatched that covered all the engine except the eyebrows. A J-3 eyebrow was at my disposal, so patterns were made and a set of poster-board eyebrows was taped together and fitted to the O-200 cylinders. It was then a matter of building the remainder of the cowl around the eyebrows and modifying the nose bowl so air can flow into the eyebrows. The result was definitely unlike a D.VII, but fit my preference of reliability and simplicity over authenticity.
Every aircraft is a set of compromises; as builders we merely decide where the compromises occur.
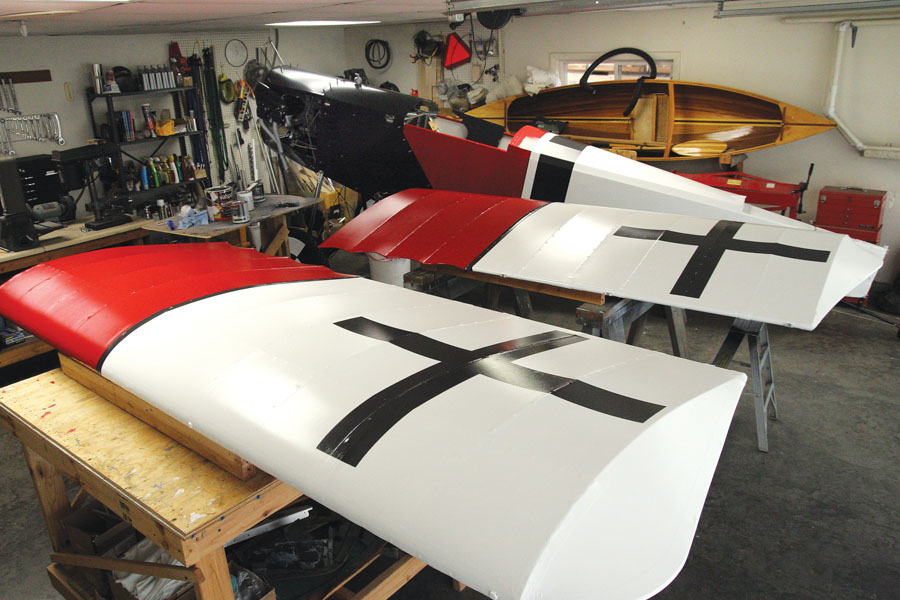
Painted D.VII wings await final assembly at the airport. The entire finish process is waterborne, from Stewart Systems’ EkoBond adhesive to the acrylic house paint top coats. The top coats were applied with a 4-inch foam roller.
Other items left to the D.VII builder’s discretion include fuel tank mounting, seat construction, brakes, and a myriad of finish details. I elected to install wood floorboards and seat, plus add brakes, various fairings, and other components that are documented on my web site.
Finishing Up
The D.VII is covered with 2.7-ounce non-certified Dacron and finished with acrylic house paint. There are several good internet resources that detail how to apply acrylic paint, which results in a finish appropriate to this aircraft without the sizable cost of “aircraft” systems. The fabric is secured to the ribs with #4 pan-head screws instead of stitching. This method is quicker than rib stitching and has proved to hold the fabric taut in flight.
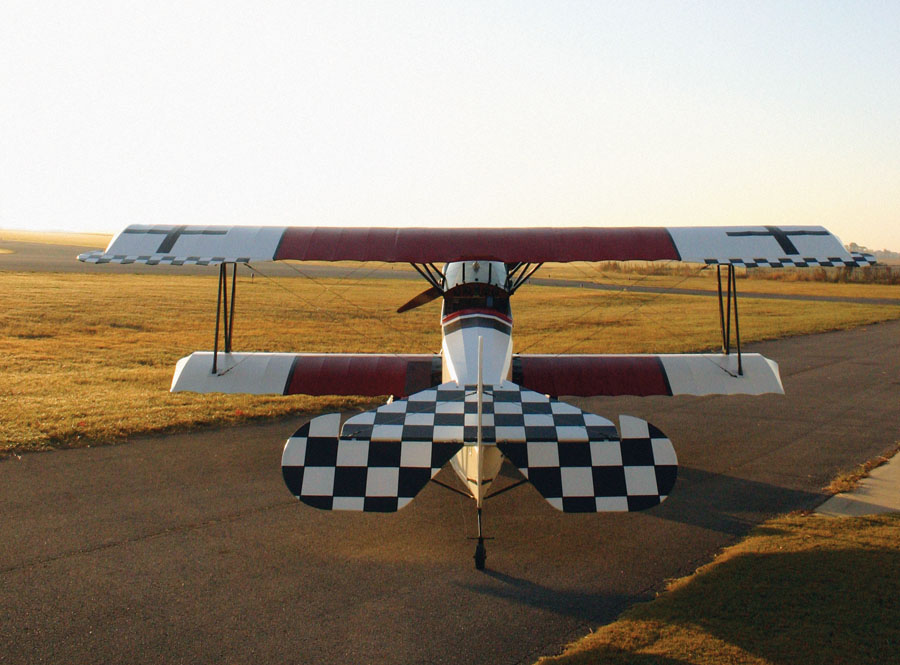
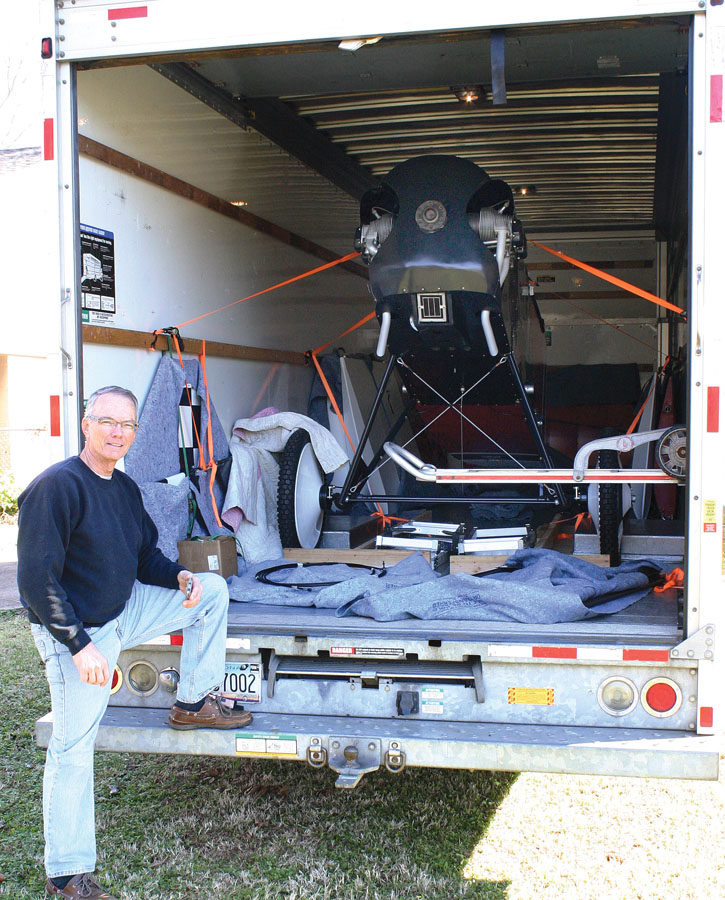
Ten months after the crate arrived at my shop, the D.VII, now known as N1918Q, was assembled, painted, and ready to be transported to the airport. Creating N1918Q was a journey of enjoyable construction interrupted by moments of challenges and problem solving. The Airdrome Aeroplanes kit had verified its claim of rapid construction, in spite of lapses in documentation and details left to the builder’s ingenuity. The Fokker is indeed an attention magnet and draws a steady stream of aviators interested in discussing our aviation roots. Even though the D.VII is a distant ancestor of our modern aircraft, it illuminates the remarkable progress aviation experienced in the decade and a half following the Wrights’ first powered flight. I am constantly in awe of the young men who loved flight enough to face certain peril in the Great War, and in that regard, the Fokker D.VII fills its role as not only a means for me to enjoy flight, but a measure of how far we have come in our pursuit of aerial freedom.
In the next installment, we will discuss the first flight, the frustration of discovering major problems, and the process of overcoming these obstacles while achieving the goal of an enjoyable WW-I era aircraft.
Big day! The D.VII is packed into a 26-foot rental truck for the 12-mile trip to the airport. This photo was taken 10 months after the Fokker arrived at my shop in a crate.



Nicely done….