 By Jon Humberd with Kate O’Connor
Most builders spend a lot of time dreaming about flying their project while it is still in the build phase. Rightfully so, since flying an airplane you built yourself is only a dream for most people. Persistence, determination and those constant dreams are the things that make it a reality for a few.
One primary reality lately has been weight loss for both me and the plane. On my side, I have been having some back troubles for quite a while, which has limited my activity somewhat, including work on this project. I am currently waiting on a second back surgery—my doctors are planning disc replacements and, since I am constantly thinking about airplanes, I just hope that the replacement discs are both lighter and stronger than my original discs—so things may again slow down a bit with the build during the (hopefully very short) recovery time.
That’s enough about me, though. Let’s talk about the weight loss program for the airplane!
Keep It Simple
Overall, I have approached the SDX build with a different thought process than with my first plane, the Super701, which I heavily built for comfort. Although the mission has a lot of similarities, I am hoping this 750SDX build will still allow a great level of comfort, while offering the performance benefits of a relatively lightweight aircraft.
“Simple” has been one of my main goals for the SDX since the beginning. I have been building it to be lightweight, robust and clean so that it will meet my expectations for performance and adventure. As discussed in the last article, the ULPower engine I ordered fits this ticket nicely as it has one of the highest power-to-weight ratios in the kit airplane world.
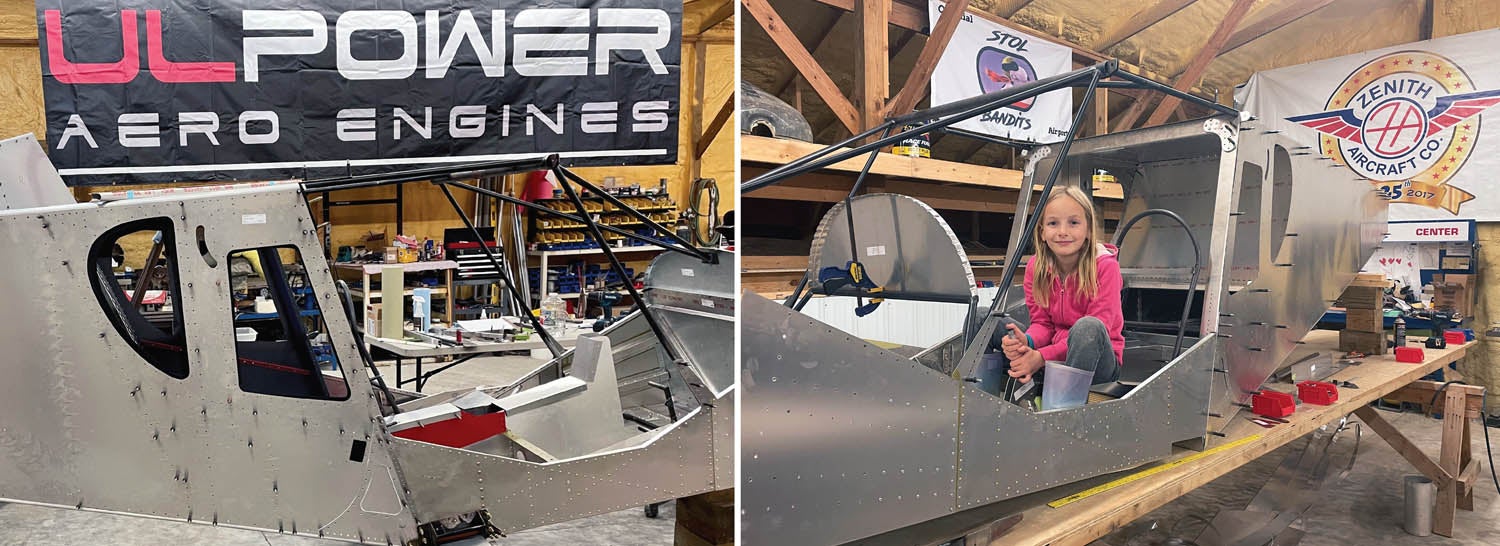
Along with the engine, the instrument panel and related components can add substantial weight to an airplane and thus require careful consideration. While I have a vision of how I want this to turn out, I still have a lot of work to do in the cabin area before I can sit in it and get down to sorting out the ergonomics of the panel itself. With visibility also in mind, some decisions have been made.
Due to its simplicity, low weight and capability, I have decided to go with a Garmin system. It will be a single G3X Touch display on the panel with almost everything else controlled remotely. The electrical system will be fed, monitored and controlled through a Vertical Power electronic breaker system. Given the complexity of putting together a clean, simple panel, expect a much more detailed look at the process in a future article in this series.
Trimming, Scalloping and Lightening Holes
So, how else can you lose some weight, you ask? Well, I am attempting to lose a fair amount with the kit itself. One of the big advantages of these being Experimental aircraft is that we can make modifications as we build them, within reason. As you read and look through the following weight loss strategy, please realize that if you are not absolutely sure about which pieces to modify and how to make those pieces lighter without compromising their strength, stick to the factory components and how they were designed and made! I can’t emphasize this enough: This is absolutely not an area to mess up on.
With those warnings in mind, I have spent a lot of time making some pieces even lighter than they came in the standard kit. This is where scalloping, trimming and adding extra holes come into play. To make some of this process much easier and quicker, I found a used hand arbor press and have modified and made a few attachments for it.
Scalloping is done on the nonstructural side of various angle pieces (usually the side that is against a skin and is between a structural bay of some sort). For this, I bought a cheap knockout punch and die set and modified it to work in the arbor press. After positioning the piece to be modified, a quick pull of the handle cuts out a crescent-shaped scrap and ultimately leaves only the edges around the rivet holes to be trimmed and cleaned up. Cleanup is done by small belt sanders and deburring.
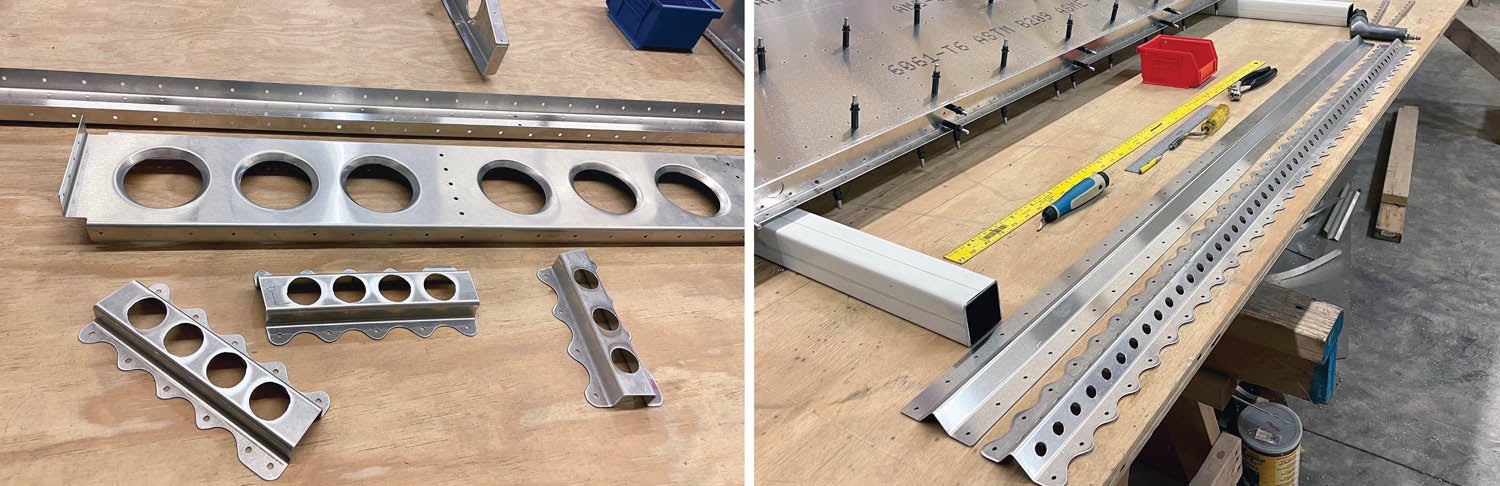
When it comes to trimming, one of the main things to keep in mind is that triangulation is where the majority of strength comes from in many structures. Extra material beyond the triangulation is often just extra weight with no added strength. This means that, if done carefully, trimming the ends on some braces into an angled shape can shed a little weight. Most of the time, these pieces have “excess material” because it’s easier for the factory to build that way and the potential weight loss isn’t worth the effort—only to fanatics like me.
The last method I’ve been using to lighten the structure is simply cutting out holes. Some of the bigger holes require special tooling such as fly cutters and flanging/cutting dies. Others can just be smaller holes that I punch with a homemade punch-and-die set for the arbor press. One thing to remember is that deburring around any open hole is really important.
While every piece is critical in some way, I have stayed away from lightening heavy load components (such as main spars) and stuck to lightening some of the extra bracing and secondary “critical” components. Paying attention to edge distances with scalloping and the amount of material between lightening holes is essential. You can see some of the details of what I am talking about in the pictures.
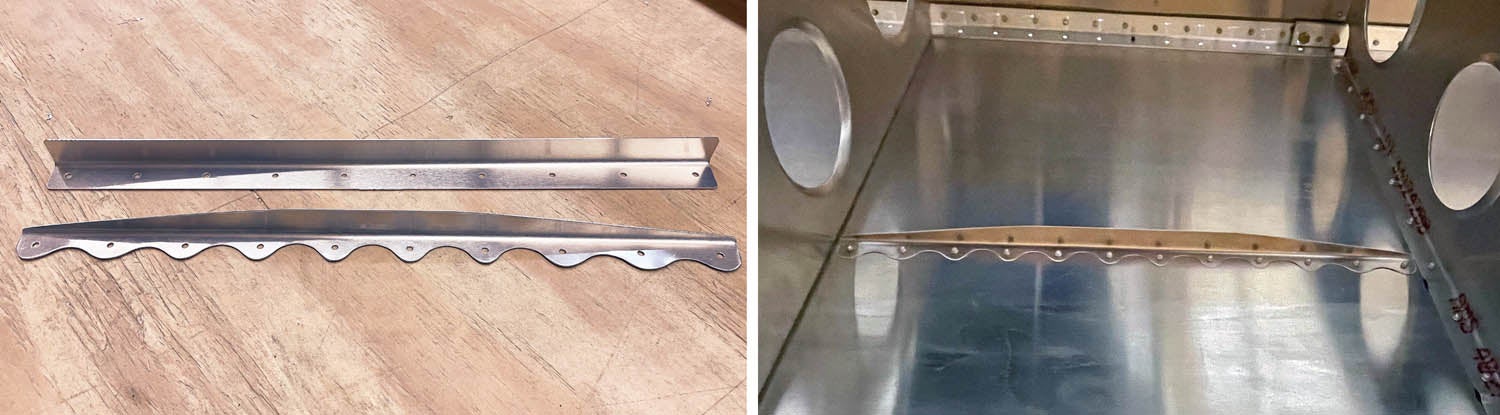
Most of the pieces I have modified are 20%–30% lighter than the standard pieces. Since these modifications are mainly on smaller brace pieces and not the heavier load-carrying components, the true weight loss is minimal. It actually feels kind of unfortunate that so much work is going into parts that will never be seen by most people who look at this airplane.
Overall, these savings will add up to several pounds, but will probably not be substantial in the final weight and balance of this aircraft. The weight loss will likely be offset quickly by paint and other finishing touches anyway, but at least I know it is as light as possible up until that point. Sometimes I wonder if it is even close to being worth the extra effort. Time will tell…

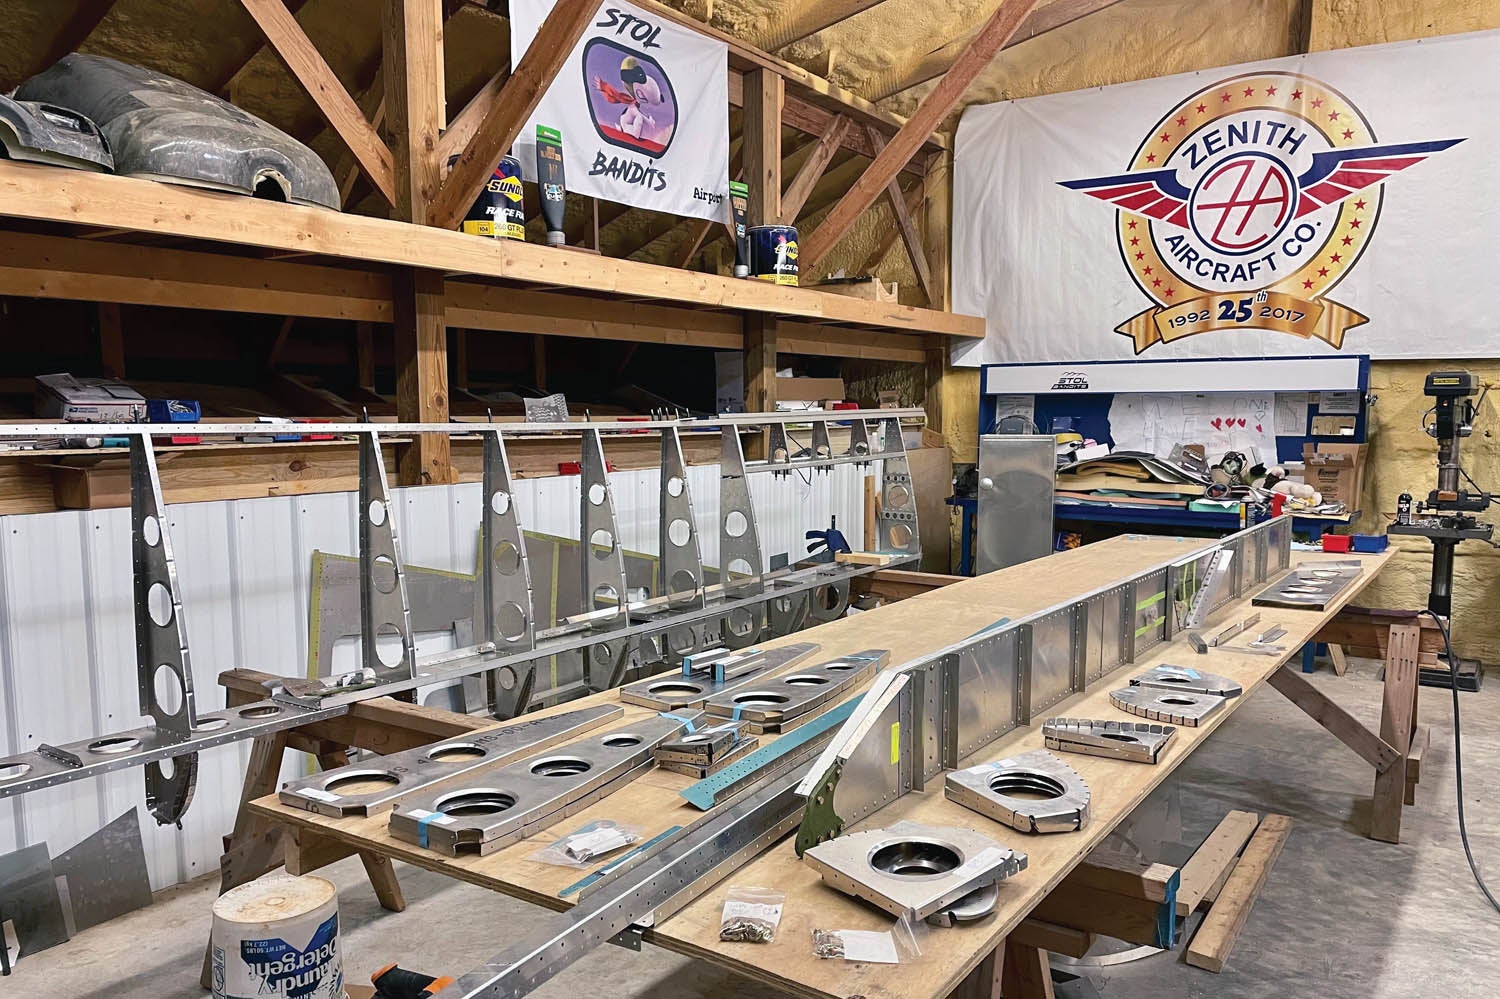
Wing Work
As I’ve mentioned before, I tend to work on many components at the same time. While the fuselage is on the main gear I am figuring out how to make it lighter with various things like the adjustable seats.
I also have the wings in process on the workbench. I have decided to build both wings at the same time. As I build one wing skeleton, I switch over and also do the other skeleton while that part of the build is fresh in my mind. A lot of time is (still) going to deburring, smoothing edges and rounding corners of various pieces. In addition, I’m currently working on logistics and planning for the fuel system, wiring and other things inside the wings. Long story short, I hope to have the wings mostly complete and ready to hang on the fuselage soon.

Checklist and Challenges
There’s a saying that at some point in the building process you are 90% complete and have 90% left to go. Unfortunately, the SDX is not to that 90/90 point yet. There are a lot of components ordered, but as I stand here looking at this project, the list of parts needed for completion makes me realize there is still a lot of work to do.
Looking at the build checklist also reveals some upcoming challenges. With the engine ordered, there will be a lot of planning and figuring out how to best install it with my specific mission in mind. This could possibly include a custom engine mount and will most likely involve building another custom cowl, like I did for the Super701.
While I said that I would never build another engine cowl after my first experience with composites (the Super701 engine cowl), enough time has passed that I find myself considering building another one. Building a carbon fiber cowl from scratch is quite a process in itself, but should go much faster with the previous experience under my belt. On the plus side, it is one of the most visible custom pieces you can build for these airplanes and can really set one apart from the rest, if done nicely.

The unique appearance of the Super701 cowl has been mentioned constantly at airshows and I have jokingly said many times that it is kind of like putting the front end of a Lamborghini on a pickup truck. However, I really feel like some of the performance gained on the 130-hp Super701 is because of the slim, smooth and tight-fitting cowl that helps the high-pressure air coming from the propeller get started around the rather draggy STOL airplane. The Super701 will cruise at 105 mph when traveling with faster flying buddies and will also easily hit the 110 mph Vne in straight and level flight.
Other upcoming big things on the checklist include brake and wheel selection, as I am considering going with a Beringer setup on the SDX. I am also expecting to go with a DUC propeller since I have had such good results while testing several DUC props on my Super701. The DUC propellers have proved to be quite robust with high performance and are very lightweight.
The Garmin remote components placement will be coming soon as well and there is still a lot of planning to do for the wiring and electrical system. I may be a bit unusual with this statement, but I actually look forward to the wiring and electrical system installation. On that front, I was talking with the AeroLEDs engineer about wiring for a unique light pattern on the wings. All of these things will be talked about more in-depth later, as each will become the focus of the build down the line.
Is There Ever Enough Space?
As a final note, there is one other thing that I am beginning to consider as the SDX starts to come together: getting this airplane, which has a 33-foot wingspan, in and out of my 24-foot main shop door. It’s worked well over the last several years for the 27-foot wingspan on the lightweight Super701—it just takes a little shoehorning and back and forth a few times to swing out the second wing. It may be interesting to figure out how to do the same with the extra 6 feet of wingspan on the SDX. I’m sure that a larger hangar specifically for the SDX will be in the future at some point, but right now I’m just dreaming of getting this beast in the air!
Videos of Humberd’s builds—and some of the fun that can be had with flying a STOL airplane—can be found at www.youtube.com/@TNFlyingFarmer
![Coming in for a landing at Humberd’s Farm [All Images Credited to Jon Humberd]](https://www.kitplanes.com/wp-content/uploads/2026/07/9-1.jpg?w=218&h=150&crop=1 "Overcoming Setbacks on the Zenith 750SD Xtreme")
![[Credit: Zenith Aircraft Company]](https://www.kitplanes.com/wp-content/uploads/2026/06/31142685469.jpg?w=218&h=150&crop=1 "Zenith Throws Open Its Doors for “Fly-In to Summer”")
![Members of the North Idaho High School Aerospace Program gathered at KSZT [Credit: North Idaho High School Aerospace Program]](https://www.kitplanes.com/wp-content/uploads/2026/02/IMG_3499.jpg?w=218&h=150&crop=1 "North Idaho High School Student ACES Fly the Aircraft They Built")


I admire your efforts to make your airplane lighter. I build R/C STOL airplanes and do the same things to try to eliminate extra weight , and like you, i feel good about saving a few ounces. I doubt that extra lightening holes and scallops will make a measurable difference in performance, but the fact that you are paying attention to weight as you build will help make sure that you don’t end up with an overweight airplane. In my case with my last electric Super Cub build, the airplane came out very light, but I did a flight with a larger than normal battery that weighed several ounces more than the weight I saved in the build, and there was no noticeable difference in takeoff or flight performance-but I’m still glad I saved the weight!
Comments are closed.