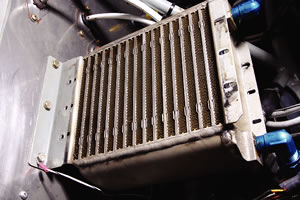
Among the various homebuilt-project maladies, high engine temperatures rate near the top of the list. And, more than anything, its greater-than-desired oil temps that cause builders to wonder what they did wrong, and how to fix the problem. Take a quick poll, and you might believe that sizing and mounting an oil cooler are more art than science; sometimes builders get lucky, sometimes they dont.
In researching the subject of oil coolers in general, I discovered that a lot of data is either old or missing, and that, it appears to me, many airframe manufacturers (certified and not) take the cut-and-try approach to sizing and fitting oil coolers. Using real data and some math, we can determine, generally, how large an oil cooler any engine requires; see the sidebar Lets Do the Math on Page 42. But thats just half of the equation, so to speak. The second part is the installation itself.
For an airframe manufacturer (and this includes kit makers), the oil cooler may well be the last consideration in the entire engine-cooling package. An airframer typically wants to start with the smallest (lightest) and cheapest cooler that will do the job. Sometimes, this results in a marginal system. Cessna Turbo 210 owners, for example, are accustomed to seeing the oil-temp gauge hugging the redline in a summertime climb. But you, as the manufacturer of your kit aircraft, can be smarter, choosing the right cooler and mounting it properly because the small incremental costs of the effort are not bloated by manufacturing numbers; instead, its a comparatively tiny investment to keep your larger investment (the engine, that is) happy.
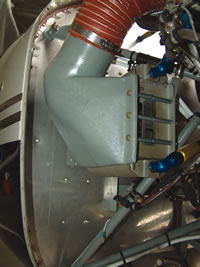
For optimum efficiency, the coolers inlet duct should be as straight as possible. But sometimes compromises have to be made.
Where Should It Go?
The most familiar place for an oil cooler is in the engine compartment. There are exceptions, of course, but for reasons of reduced install weight, minimizing the length of the oil lines and various other considerations, the practical solution is to keep the cooler close to the engine, even if a remote location might cool the engine more effectively. For Lycoming installations, which typically employ a remote cooler, the most common locations are the firewall, behind the vertical baffling behind the engine, or below/beside the engine. Many Continental designs have integrated coolers, either ahead of the cylinder row or behind it; for these installations, there’s not much a builder can do except to ensure the cooler receives sufficient airflow and has an unobstructed cooling-air exit path.
Mounting the cooler ahead of the engine, in the path of the cylinder-cooling flow, will influence cylinder-head temperatures (CHT) because the cooler consumes some of the air meant for the cylinders, which results in a pressure drop in the inlet side of the cooling cavity. In addition, while it would seem that mounting a cooler behind the cylinders would subject it to hotter air, thats not the case. Cooling air flowing over the cylinder (in a conventional tractor application) doesn’t pick up appreciable heat before reaching the oil cooler.
There are structural issues as well. An oil cooler mounted directly to the engine is subject to the engines vibration. Mounting the cooler to the baffling will add loads there; its important to reinforce the baffling around the oil cooler to prevent cracks and outright failures. While Experimental aircraft designers and builders are not subject to it, FAR Part 23.1023 states: Each oil radiator and its supporting structures must be able to withstand the vibration, inertia, and oil pressure loads to which it would be subjected in operation.
While looking at your mounting scheme, consider this issue as well: The total oil pressure drop in the oil-line hoses, fittings and oil coolers must meet the engine manufacturers requirements. When installing the oil lines refer to AC 43.13-1B for proper guidance. Avoid restrictions to the oil flow that may cause an extreme load on the engine. Keep the oil cooler(s) and oil-cooler hose lines away from any hot surfaces.
Hoses & Things
Here is another concern of which to be aware: hose size and length. The size of the oil-line hose does not change the oil flow in the oil cooler. However, two things do happen when using, for example, a No. 6 compared to a No. 8 oil-line hose: No. 6 oil-line hose will have a 26.6% pressure drop compared to No. 8 oil-line hose from 1 to 4 feet. And No. 6 oil-line hose will have a 58.6% increase of velocity (ft/sec) compared to a No. 8. Cooler choice will dictate which size of hose you will use, but this effect is worth keeping in mind.
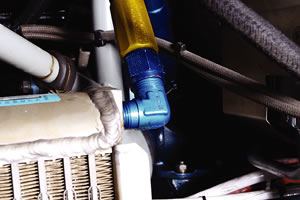
Fittings and hose size are important. Right-angle fittings, like these, can contribute to flow restrictions.
Hoses should be kept as short as possible. You will notice the pressure drop increase with the length of oil hose line. Referring to the Stewart Warner Performance Chart in Figure 1 (Page 41), and using the oil mass flow of 50lb/min at 235 F, oil temp gives a 4.7 psi drop for one oil cooler.
Duct or Scoop?
For a builder, determining how much air the oil cooler requires is a difficult assignment. How much air is entering the duct from the slipstream is unknown without testing, but as a baseline expect a 25% drop from indicated airspeed for an external duct.
The next decision, if considering an external air source-that is, if you’re not taking the oil-cooler air from the back baffle or elsewhere inside the engine cooling cavity-is NACA duct or a scoop? The advantage of the NACA duct is that it requires only a small section of air from the airflow. The NACA duct enlarges and slows the air to present a smooth, low-speed, high-pressure flow into the duct without disturbing the boundary layer, which would produce a significant amount of turbulence and associated drag. This provides very little disturbance to the external airflow with less drag than the scoop.
The NACA duct is best located on the forward surface where the air is being pushed aside by the expanding width of the body. The boundary layer is thin, compressed and attached to the surface. Areas to avoid when installing a NACA duct: turbulent flow area and downstream of any drag protrusions into the boundary layer.
The duct provides a transition for the air mass flow from the NACA duct to the diffuser. There are two types of ducts: round or square. Round tubing such as SCAT or SCEET is less expensive and easier to install than square or rectangular ducting. Rectangular ducting has a greater cross-sectional area for less friction or airflow resistance than SCAT tubing. For example a 4×4-inch rectangular duct would have 16 square inches, whereas a 4-inch diameter duct would have 12.57 square inches.
The NACA duct, diffuser and duct tubing should be located above the oil-cooler location. Remember to keep the duct length as short as possible, and use a NACA duct for each oil cooler. Avoid sudden changes in direction and diameter. The number of bends should be kept to a minimum and should have as large a bend radius as possible. Use a 1.5 or higher radius-to-diameter ratio. Sudden expansion or contractions should be avoided. Use smooth ducting or metal construction whenever possible. The ducting should use as large a cross section as practicable. Avoid tapers in the duct line, and avoid sharp bends-preferably have none at all.
Duct length is very important. The longer the duct length, the more pounds per square inch (psi) drop is lost in air density, air pressure, temperature, air mass lb/min and velocity. Adding bends to the ducting increases the psi drop.
When installing the diffuser to the oil cooler, use RTV to seal any gaps. You might be wondering, what is a diffuser? It is simply a transitioning point for the air flow leaving the duct to an opening, in this case at the oil cooler without getting technical as shown in Figure 2.
How Much Air-Mass Flow is Required?
Calculating how much air-mass flow is required involves two sets of variables, temperature and air-mass flow. The force convection equation becomes very lengthy, so if you are looking at the Figure 3 performance chart, you will notice that at 63 mph the required air temperature being exhausted out the back of the oil cooler is 150 F. As the air-mass flow increases-lets say to 220 mph-then the required exhaust temperature is 100 F for the proper heat rejection to cool the oil using dual oil coolers. Also notice in this chart the difference between using one versus two oil coolers and how much air flow is required to obtain proper heat rejection (air temperature being exhausted) from the oil cooler.
A 4-inch-diameter duct will require less air-mass flow for the proper heat rejection to cool the oil. The bigger the duct diameter, the more air-mass flow over the oil cooler surface area is cooled. If there is not enough airflow through the duct, increase the air-mass flow with a bigger duct size.
There are several ways to check for air-mass flow, one of which is using an air-mass flow indicator to be totally accurate; the indicator can cost several hundred dollars. The inexpensive way to check if the installation is correct is to calibrate the oil-temperature gauge on the instrument panel. Include graduation marks for different temperature readings, and fly the airplane to see if the oil temperature is at the correct reading at different outside air temperatures. Another possibility would be to install an airspeed indicator system in front of the oil cooler and a temperature gauge behind the oil cooler. Using the graph in Figure 3 to determine the correct airspeed versus temperature output would also give you a good indication of whether the installation is correctly backed up by the oil-temperature gauge reading.
In the end, you are responsible for ensuring that the oil cooling system is adequate. Understanding the engines requirements-a way of double-checking that the kit manufacturer has recommended the right oil cooler-is the first part, followed by creating an installation that makes the most of the chosen coolers capacity. Select wisely, install properly, and high oil temps should not be a problem for you.



Mr. Ellis, if using two oil coolers, would you also use two vernatherms?
How do find the the flow rate through a vernatherm when full open? I can’t find any specs on the Lycoming P/N 53E22144