After dealing with the usual, “When are you going to be finished?” or “How far along are you?” and “How much does it cost?” the next question about my project is usually “What’s the most expensive part?” For the first three questions I have the same answer, “I don’t know.” That last question, though, I know too well.
Pound for pound, the costliest component of my wood-and-fabric Celebrity project is the glue. Structural epoxies may seem reasonably priced, but over the life of a project, hundreds of dollars will be spent procuring the stuff that holds it all together. So let’s face it, anything a builder can do to cut down on waste is well worth it—and mixing epoxy can get messy and generate a lot of wasted glue and money.
Mixing by Weight
There have been several schemes developed to do volume mixing of two-part epoxies such as T-88 and West System. The former is a 1:1 volume mix, and the latter uses pumps sold by the vendor to get the dispersal just right. For T-88 the EAA has videos showing mixing in the bottom of aluminum soda cans or using syringes as being clever ways of getting a good mix. What many builders do not realize is that this same material can be mixed by weight with superior results, less waste and less mess.
Mixing by weight yields a more precise mixture than you can achieve by volume. It also seems to minimize curing time because your mixtures will not contain excess hardener. That excess does not speed the mixing time or the quality of the resulting epoxy.
Most important, not only can you avoid the mess of what you do with the now useless soda can or syringe, but the amount of resin and hardener used will be more even with what the manufacturer supplied. Isn’t it annoying to use up a container of hardener only to find that there is still resin left in the bottle? If only System Three sold “T-88 Part B” by itself? As we know, that leftover amount is useless and wastes money.
Checking the T-88 technical data sheet, which is provided free on the System Three website, shows that a mix by weight is obtained as a 1 weight-unit of Part A (the resin) to 0.83 weight-units of Part B (the hardener). This 1:0.83 ratio works in any weight measure of your scale: grams or ounces.
As for West System epoxies, there are numerous combinations of resins and hardeners that can be employed, and they have different mixing ratios. The weight proportions for the resin and hardener of choice are listed with the respective volumes in the West System User Manual and Product Guide, which can be downloaded from their website.
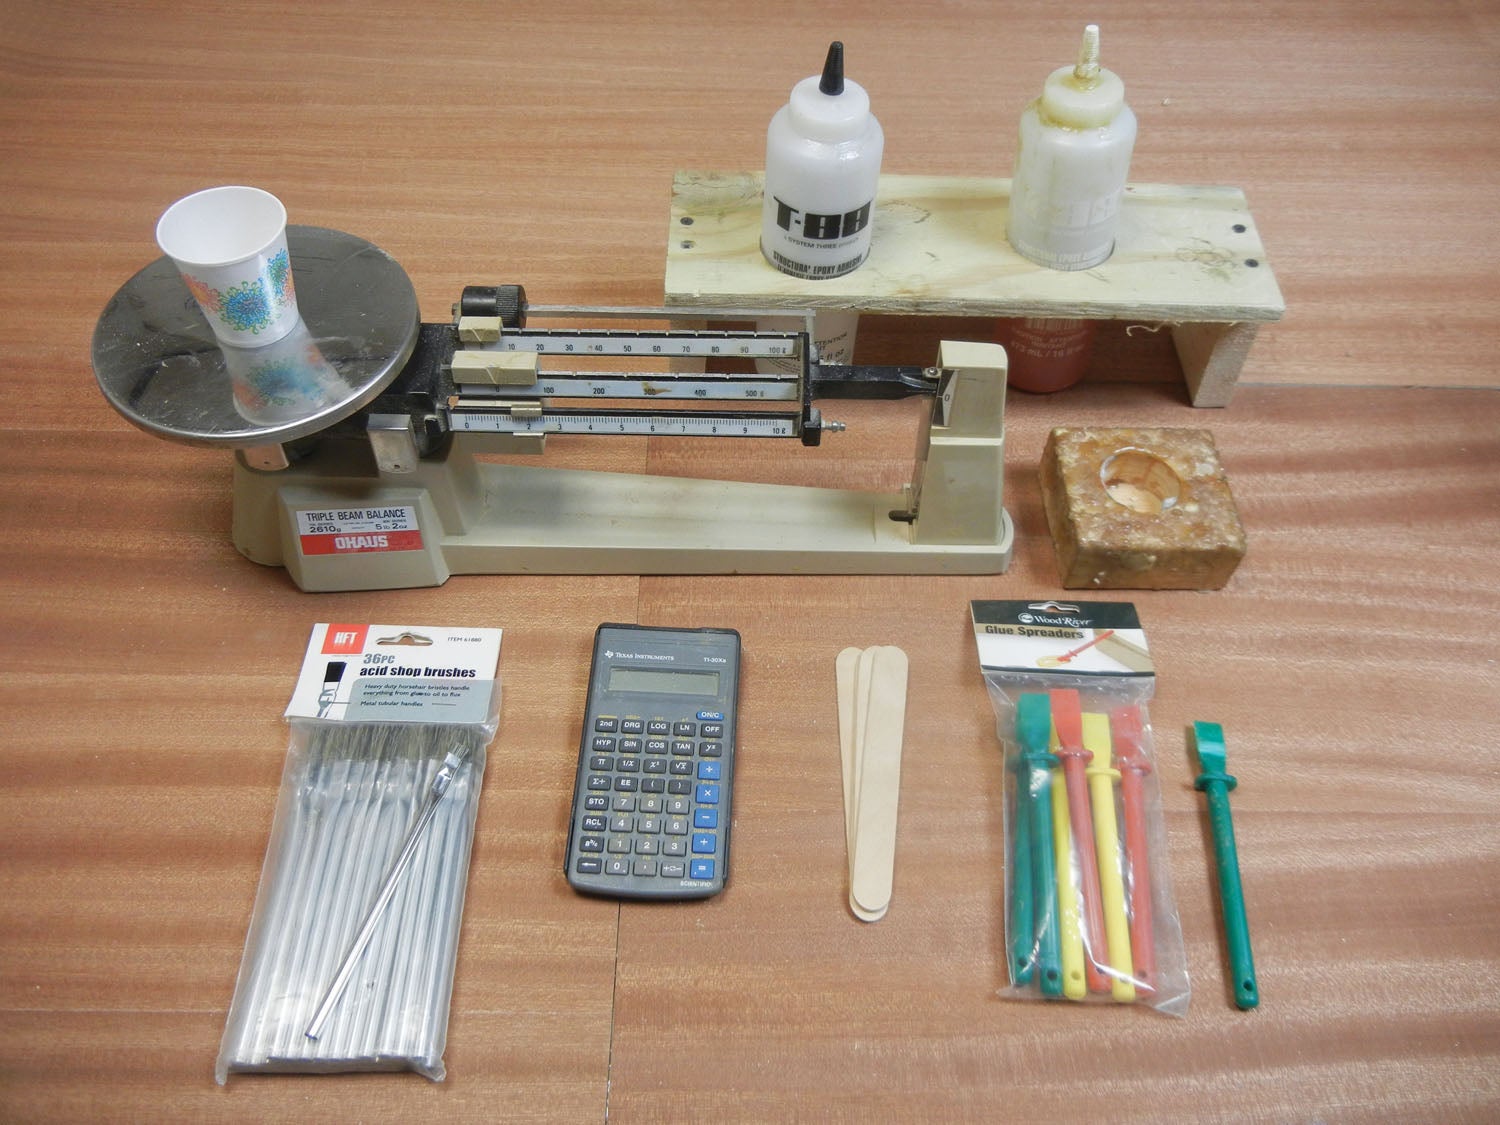
For the purpose of this article we will use T-88’s ratio, 1:0.83. The easiest way to obtain this is with a triple beam balance. These can be a bit costly but can be picked up used. The advantage of spending money for one is that over the length of a full project, you will save more than enough in unwasted epoxy to make up for the cost. You can also use an inexpensive digital scale, but most of those have a display time-out feature that gets in the way when you are moving between steps, and they don’t always show a continuous readout of the weight change as you pour the material.
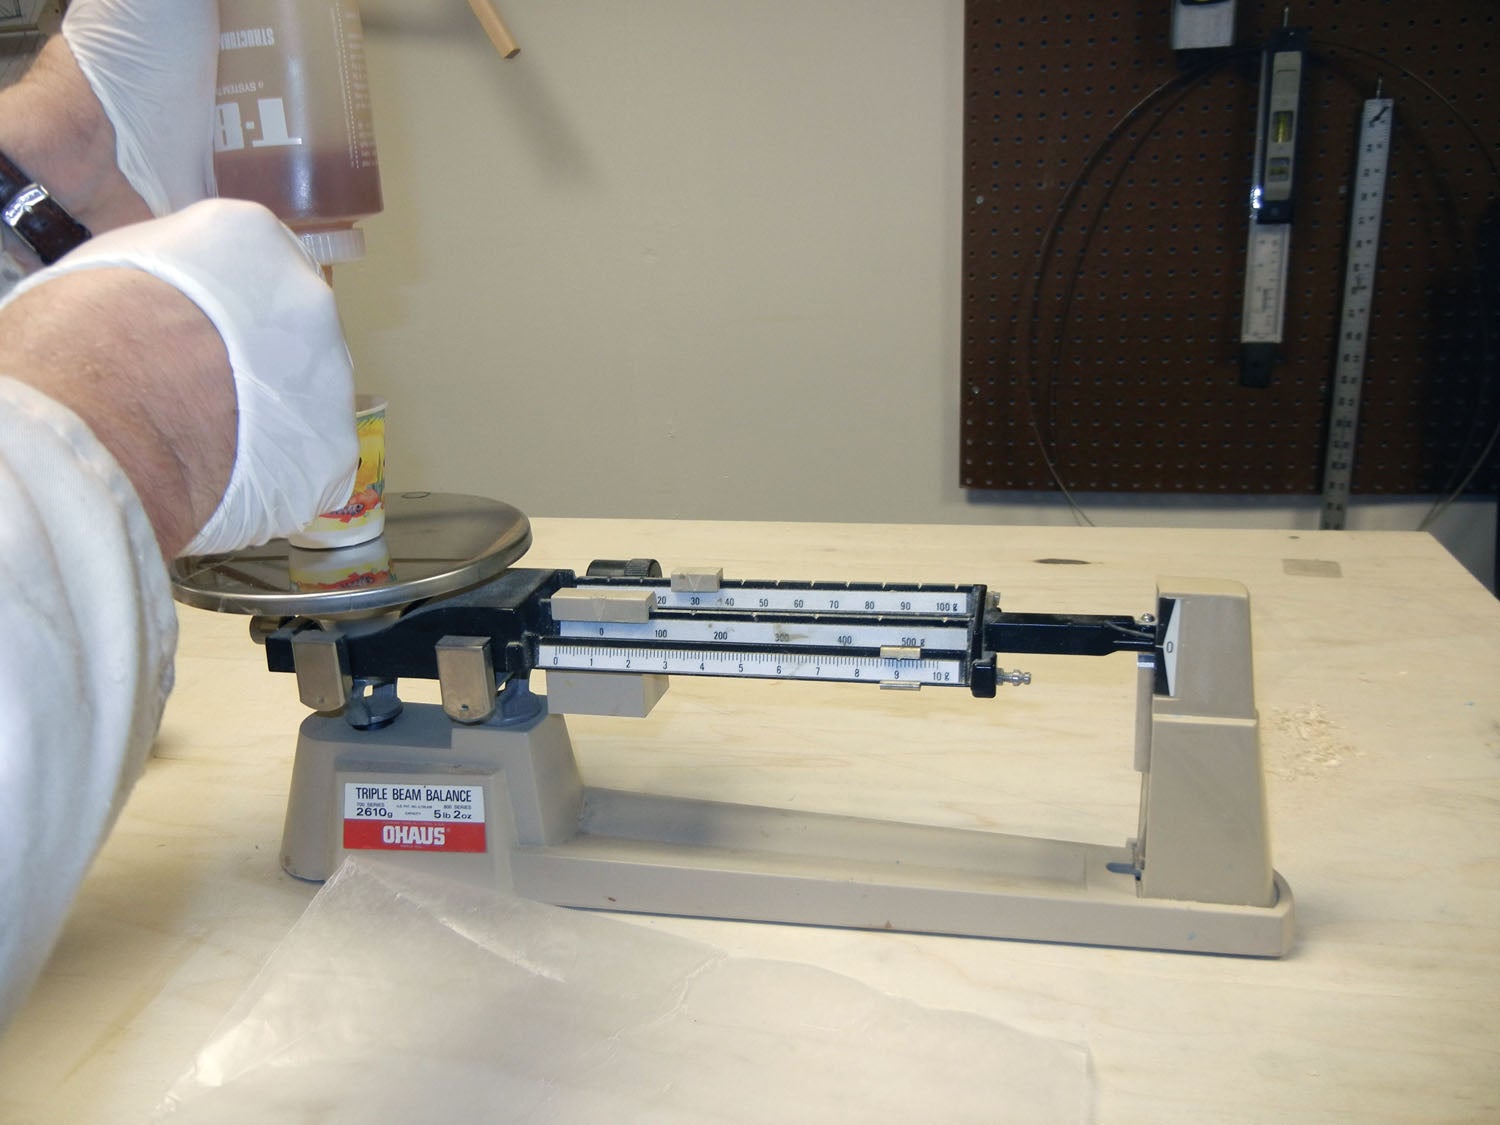
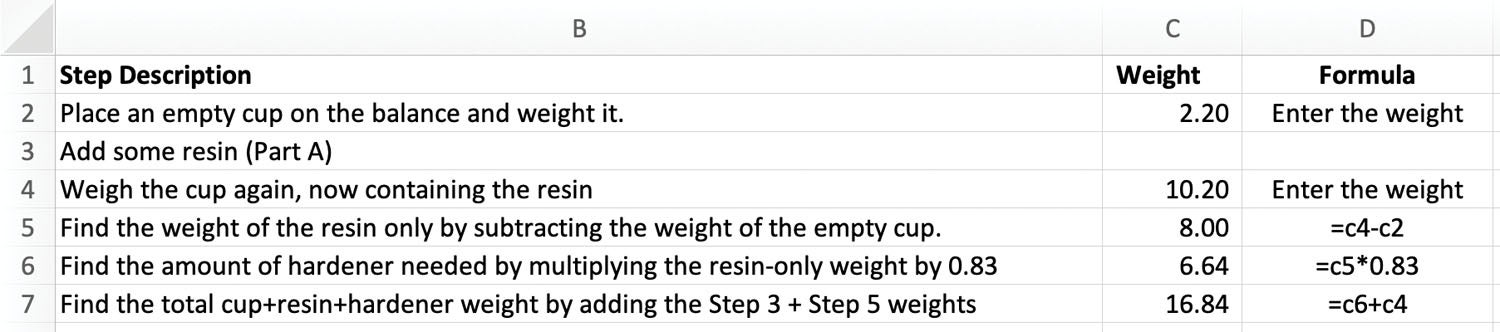
The basic process is to start with an amount of resin, determine its weight, apply the ratio to figure out how much hardener you need, add that to the resin weight, then set the balance for the target end-weight of the mixture and the cup.
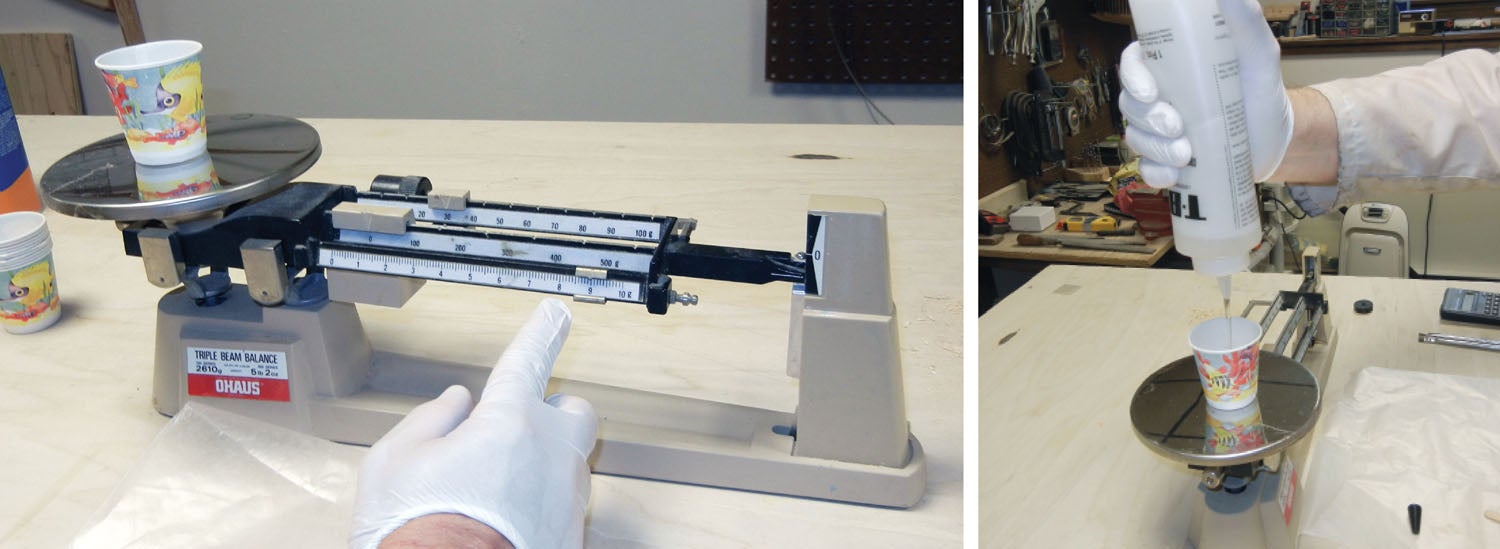
On a balance this is easy: Weigh an empty cup, then add some Part A, read the combined weight and subtract the weight of the empty cup. That gives you the amount of resin that you put in the cup.
Once you have that weight, multiply it by 0.83. This tells you how much hardener (T-88 Part B) is required. If you then add the needed hardener weight to the weight of the combined cup plus Part A, you have the entire final weight, the target end-weight, to yield a perfect mix.
Take a look at the spreadsheet above. In this example we’re using a 2.2-gram cup (more about that later), then adding some resin, which results in a total cup-plus-resin weight of 10.2 grams. After we subtract the weight of the empty cup we’ve found that there are 8 ounces of resin in the cup. Multiplying the resin-only weight by the T-88 hardener ratio of 0.83 results in requiring 6.64 grams of hardener.
The target weight that we then set the balance to is the total of the cup plus resin plus hardener, and that is 16.84 grams.
The cup is never removed from the balance through this entire procedure. We’ve just started with an empty cup, weighed it, added resin, weighed it, did some math, reset the balance to the desired end-weight, and added hardener until the balance leveled.
You don’t need a computer or a spreadsheet to do this, either. A hand calculator will work just fine, and after you do this a few times, or hundreds of times as in the case of a wood aircraft project, you’ll have it in your memory for good.
While you can mix by weight with other types of scales, I don’t recommend it. Postage scales and kitchen scales just don’t have the precision you need. Electronic scales have the precision but a continuous readout is required through the procedure, and you’re not going to be helped by the power and screen saving features of these electronic scales. It is important to be able to observe the weight changing as you add hardener toward your desired target end-weight. That is what makes this entire scheme work.
As for the cup, I rarely need a batch of epoxy that is more than 30 grams in total weight. That fills up only about half of a typical bathroom 3-ounce disposable cup. These can easily be purchased in your local grocery store. They come in boxes or bags with dozens of cups for less than the cost of one set of syringes at the drug store, they are disposable, and the good news is that they don’t have coatings in them that mix in any harmful way with the epoxy.
It’s also a good idea to make a simple holder for these cups as it helps prevent the eventual spill that all builders of epoxy-based projects dread.
Keeping Down the Mess
The key to not turning your project, your shop and you into a mess that it is nearly impossible to recover from is the same as that for obtaining a good bond: Plan your gluing.
Face it, you are going to get globs of epoxy on things where you don’t want them. You can’t avoid it unless you are building this project in space where there is no gravity. This stuff has an amazing ability to find cavities in your work and fill them. Only problem is that after it fills them, it doesn’t know when to stop, so it will drip and run toward your worktable and always to another part that you never intended to glue.
Think of gravity as your friend…and your enemy. Plan your assemblies so that gravity will help the epoxy move downward into the part. This is easy for many structures built early on in the project like ribs and spars. Later, when you get to larger items like wing and fuselage assembly, it gets more complicated. Bonding things that are not horizontal is difficult, and there are times when you have to do just that.
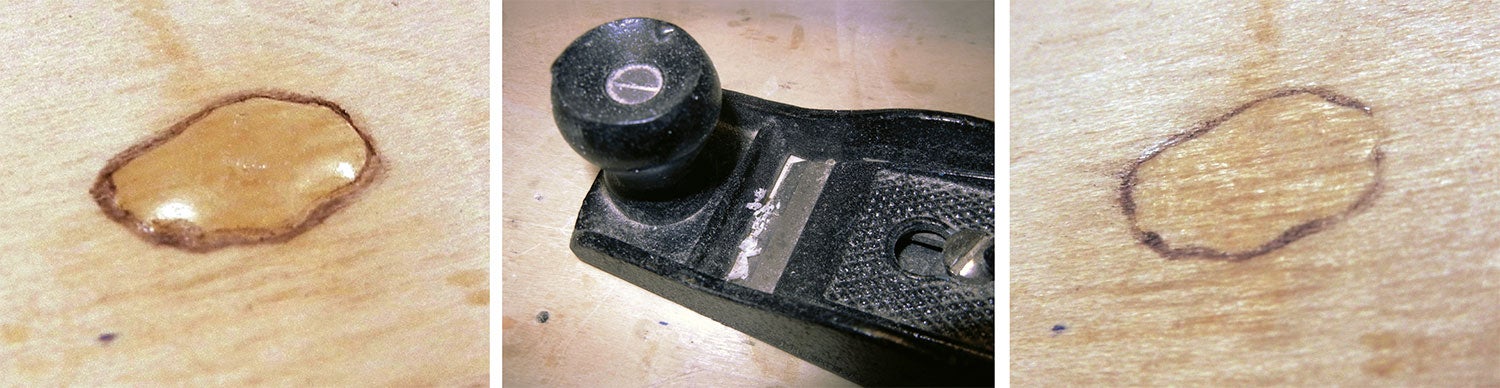
It has to be said that keeping epoxy from going where you don’t want it is as important as getting the right amount of wetting on the parts. Lacquer thinner and MEK have limited effectiveness on removing the glue and certainly will not after it cures. You can wipe up most of what is on the surface, but any that has soaked into the fibers of the wood or grain of the metal is going to be there for good. The best way is, of course, to keep the epoxy only where it belongs in the first place. Getting the surfaces horizontal, masking and careful wetting are about your only means for this.
You will learn the right amount of pressure required to get a good bond on vertical surfaces. It still does not take much, but there will be squeeze-out that will head toward unwanted places. I’ve heard of builders that give the glue some time to set up before applying it on vertical surfaces to minimize dripping. This may help a little on the mess end of things, but it does not ensure that proper absorption of the glue is taking place into the wood. Instead, I like to use enough epoxy and clamping means to ensure good absorption. Make adhesive trays out of masking tape affixed below the part to catch runaway glue.
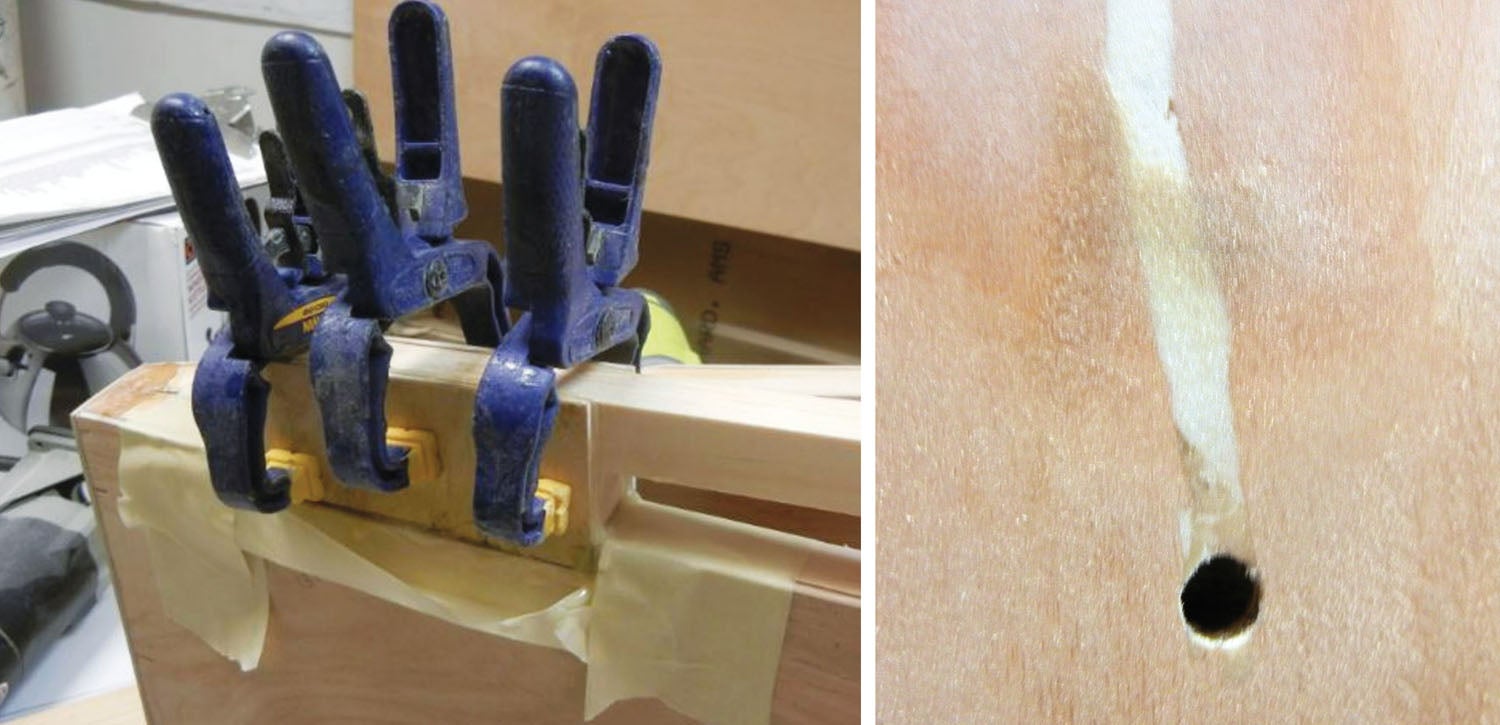
Don’t dismiss masking. Yes, it takes time and there is expense associated with the tape, but it is the best way of keeping things neat. Electrical and plain masking tape work best. A very important point here is to remove the tape after the epoxy has had enough time to set up but not enough time to harden. Getting the masking tape removed while the glue is still a bit pliable but no longer able to run or drip will give you an expert finish. It also will not allow the tape’s own adhesive time to bond itself into the wood and pull fibers out when you remove it.
All of this not only helps the integrity of the project but yours as its builder. In addition to the tech counselors and inspectors, there will be other visitors wanting to see what you are building. When it comes to showing the work to others, I find there are either people who will think you are crazy for building an aircraft or people who will think you are crazy for building an aircraft made of wood and fabric and glued together. The former are usually not aviators and the latter can be.

Yes, every now and then you do get someone that comes by the shop and thinks that what you are doing, in spite there being no pneumatic tools or compartment trays of rivets, is just plain cool—but don’t expect that to happen often, even among the aviation savvy. There is, however, one reliable way to deflect the criticism: Do nice work!
Dry fit and mark everything. A little rehearsal goes a long way here. With epoxy mixed and the part and its destination wetted is no time to try to figure out if you applied glue to the right edge, what the right orientation of the part should be, or even if you are holding the right part! But it does happen, and there are times when you are going to make that ugly mess, so here are the three rules to remember:
Rule #1: You can only remove this stuff mechanically.
Rule #2: Use light pressure.
Rule #3: Power tools are evil.
It is really tempting to get out the Dremel with a sanding drum and crank up those rpm. I get that. I’ve done it. The project has suffered because of it.
The best way I’ve found to get rid of unwanted epoxy is to wait until it hardens and then use a sharp chisel or hand plane with very light pressure and repeated strokes until the glob is gone.
If you must sand, Aircraft Tool Supply or Woodcraft sell several sanding detail kits. ATS part number 12301 is excellent for getting into tight spots.
Of course, as already mentioned, the less excess you put on your project the less excess you’ll have to deal with later. Using a commercial glue spreader such as those sold by Woodcraft or cutting the bristles off inexpensive shop acid brushes make far better applicators for placing the right amount of epoxy where you want it to go than the wooden stick you used to make the mix.
Filling Gaps and PPE
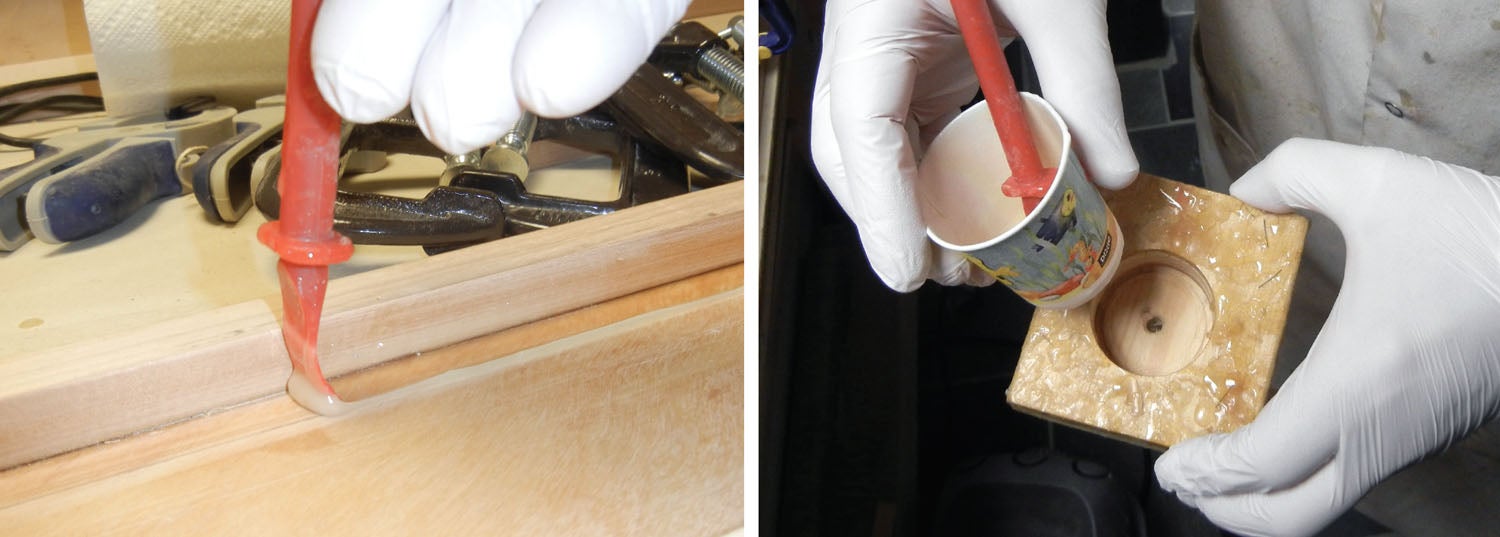
Epoxies can be turned into putty, which turns out to be quite strong and nice to work with. My favorite technique is to mix it with microballoons. You can purchase a pound of this material from aircraft supply houses, and that will probably be enough to last a lifetime. This material gets airborne quite easily and looks like a light powder dust, but it is far lighter and harder to control once in the air. You don’t need this stuff going into your lungs, so make sure you wear a respirator and have ventilation when handling.

Speaking of PPE (personal protection equipment), in this current pandemic era, protective gloves are getting hard to find. Invisible Gloves Hand Protectant #1211, sold by Aircraft Spruce, is quite good at protecting your hands. It takes a while to get used to as the soapy material is slick, and it is not natural to allow the epoxy to come in contact with what looks like unprotected skin, but this product works rather well and is worth a try. It also makes a good product for those more mundane male chores like working on your greasy car engine or getting that old lawnmower started.
Back to putty: First mix the epoxy as normal, then add microballoons and mix until you have a firm putty. It takes a surprisingly large volume of the balloons for each gram of epoxy, so start small. Don’t worry, the stuff weights nearly nothing, so there will be plenty left of that pound you bought.
Once the putty is where you want it, you can spread it with a wooden stick, putty knife, the glue spreaders mentioned earlier or almost any other implement you can think of to fill the gap. This putty mix is one time you can get very liberal with the amount you apply to the project. It won’t run vertically and sands perfectly smooth when dry. Remember also that this is for filling gaps only. It should not be treated as structural bonding.
Finally, it must be said that only with experience will you get to know how much epoxy you need in each batch—whether gluing or puttying. It doesn’t take long to learn how many grams a typical wing rib takes, or a fuselage cross member, or a corner block.
Yes, the cost of entry, the triple beam balance, might be a bit more than you want to spend, but there are benefits on the back end. Using these tips you’ll still get the “What’s the most expensive part?” question and you’ll still have the same answer, but you’ll also have less waste, more precise bonding mixtures, a project that won’t look sloppy and the knowledge that you saved money along the way.


