 In parallel with completing my fuel tank project and sanding literally everything, I was also working on designing my panel with Advanced Flight Systems (AFS). They worked with me closely over the course of many months to perfect the final product. Part of the reason I chose AFS was that many of my friends here at Sacramento Executive Airport (KSAC) have their panels in their planes and love them. These include Nick Leonard’s Van’s RV-10 (N916SL), Kim Owen’s RV-6A (N811WT) and Stan Lawrence’s RV-14 (N7442S).
While it’s a substantial investment that forced me to get what I call a “real people job,” an AFS panel would be well worth it in the long run. It would increase the value of N2165U far more than classic steam gauges. More than that, the AFS team works with their clients to customize the panels, they can be upgraded to be IFR capable, the panels come already partially assembled and you can monitor traffic on the EFIS. Another reason to go with AFS: I was also already quite comfortable with their panels from flying Stan’s RV-14.
Over the course of about a year (with some breaks in between), the AFS team and I worked together to design the final product. Jonathan Severdia started the process, providing me with the quotes. He worked with me to help me figure out exactly what I wanted—specifically if I wanted it to be IFR or VFR. He also could personally relate to my struggles as a builder through his experience with his own RV-9 project.
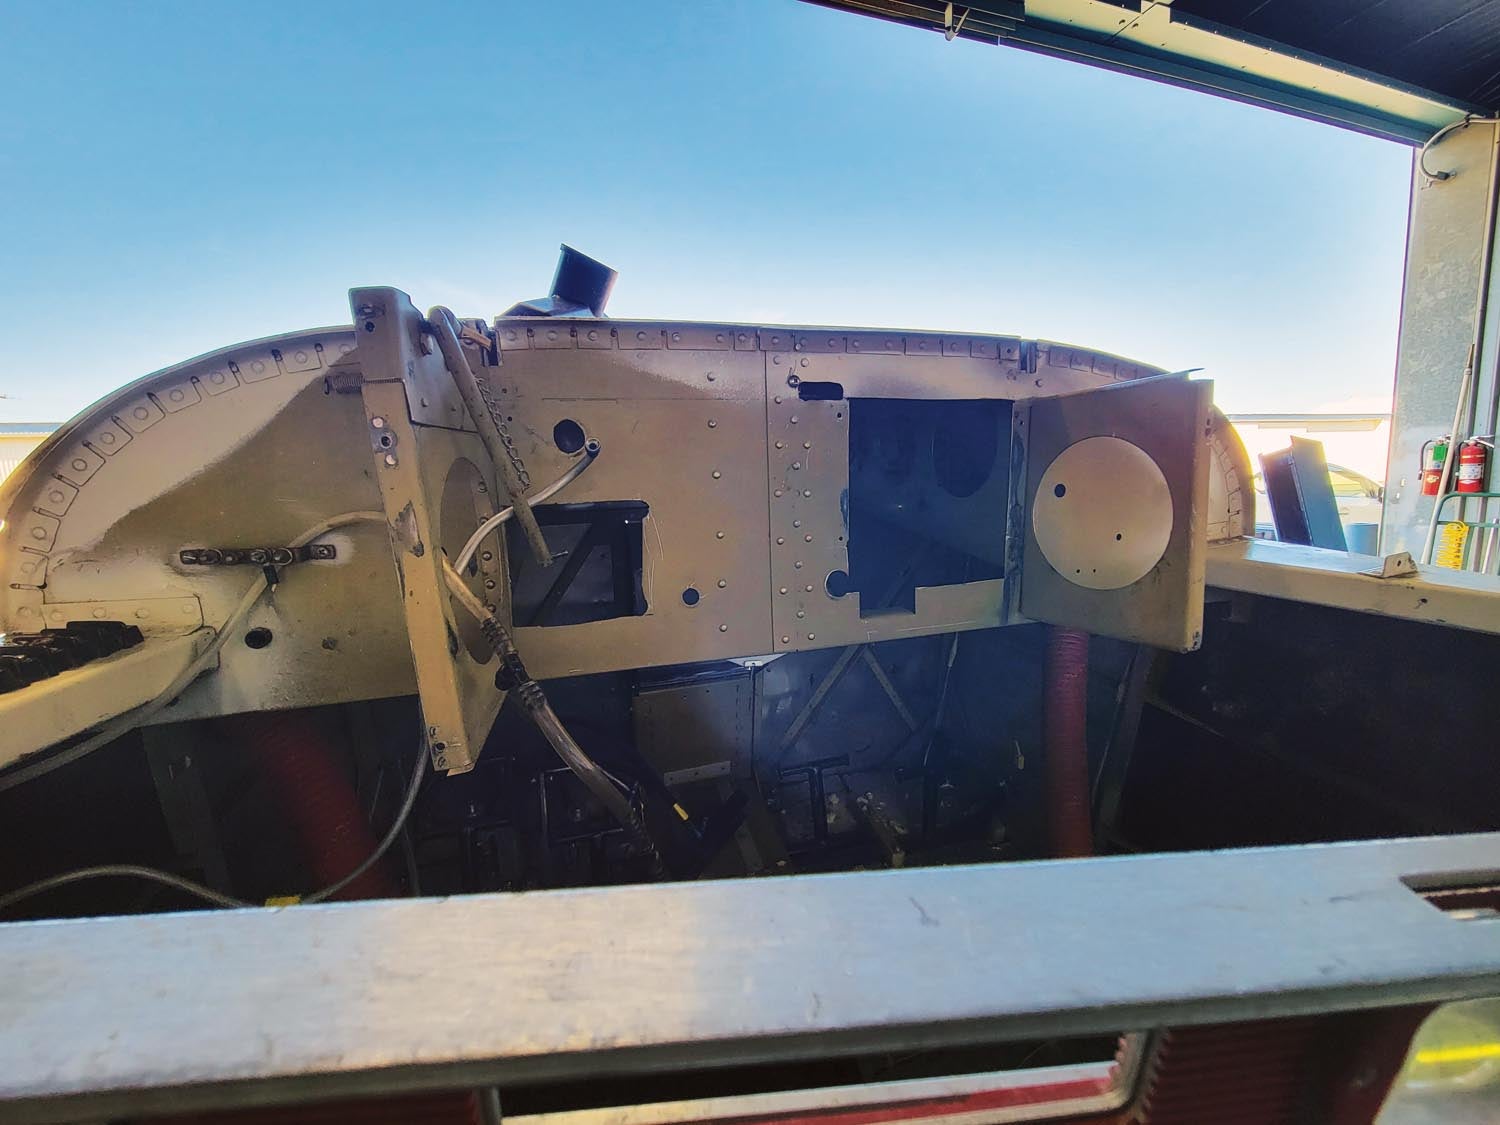
After finalizing the quote, he passed me off to Kyle George, who was the point person for the design process. Kyle worked with the CAD team at AFS to draft my panel. This took some back-and-forth with multiple revisions. Like most RV-6s, the panel is attached to the aircraft with ribs extending back from a bulkhead about halfway to the firewall. He helped ensure the correct vertical spacing between the top and bottom screw holes, so that we could match the ribs that I had in my panel already. (Nice to have the original panel in hand for measurements.) He also gave me the option to upgrade to the AF-6600 EFIS, a newer version of the AF-5600. The AF-6600 has a higher-performance processor, new screen, more vivid palette, higher resolution and faster refresh rate than the AF-5600. As a backup option to the EFIS, I chose to save space for a Garmin G5.
So Many Revisions
Kyle got back to me with two panel revision options, as we had a small dilemma with spacing and clearance. Revision 1 was the same height as my original panel. The problem was that the navigator would be too close to the switch module in the center. The bezel, which stuck out about 5/8 inch, blocked the visibility to the switch labels just below. Also, to accommodate this layout, we would need to trim the support ribs for the PEM nuts that the switch module would be attached to.
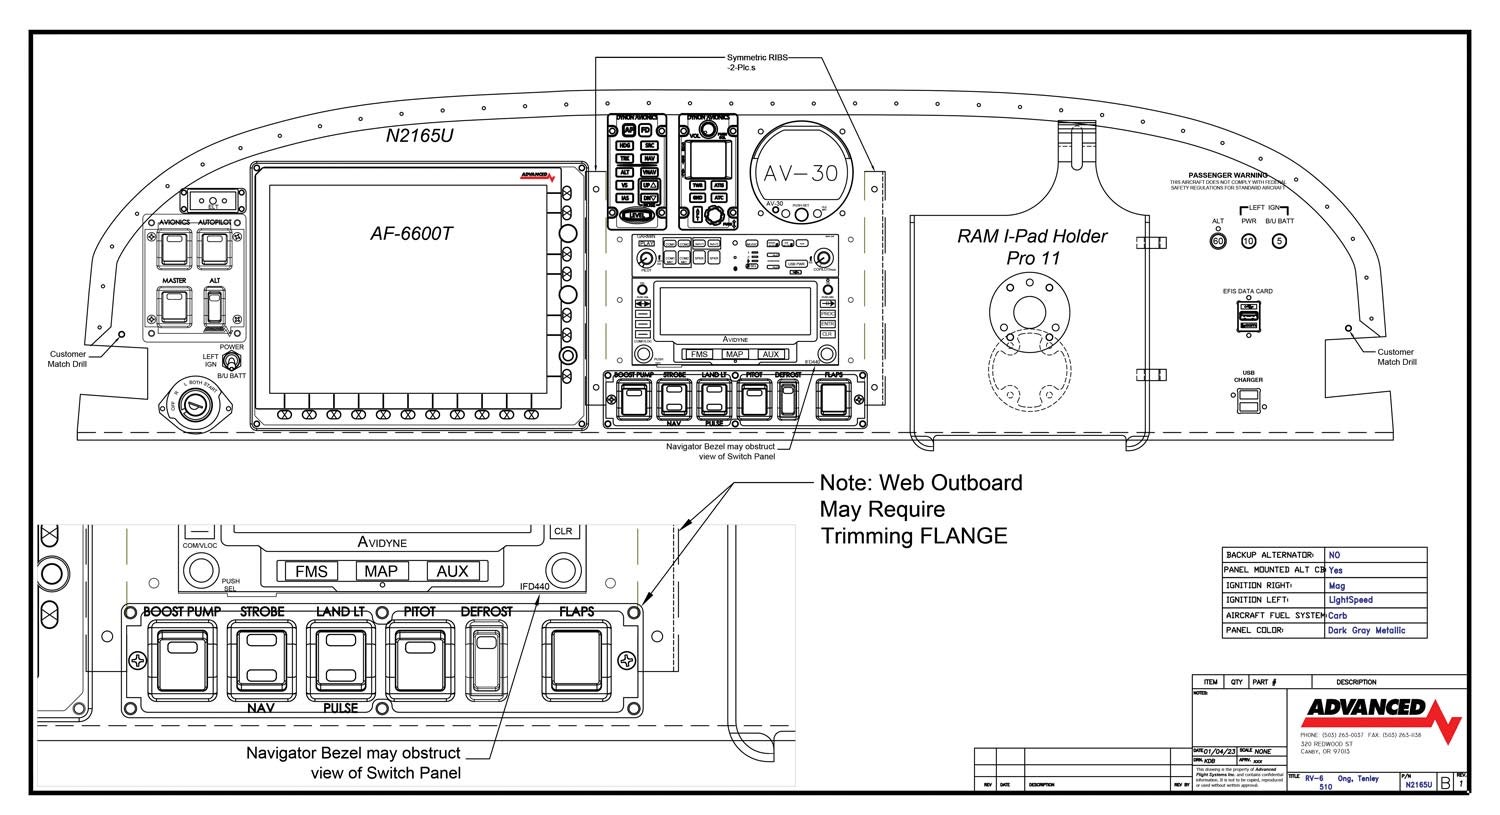
Revision 2 added a half inch to the bottom of the panel. It allowed for the switch module to sit lower so that the labels would be visible. In addition, we would also not need to trim the support ribs. Kyle also proposed the option of adding a remote audio panel, which would help with the visibility of the switch labels in addition to providing flexibility with positioning my autopilot and com panels. (My plan was to use a remotely mounted com radio, whose control head is the same size as the autopilot controller.)
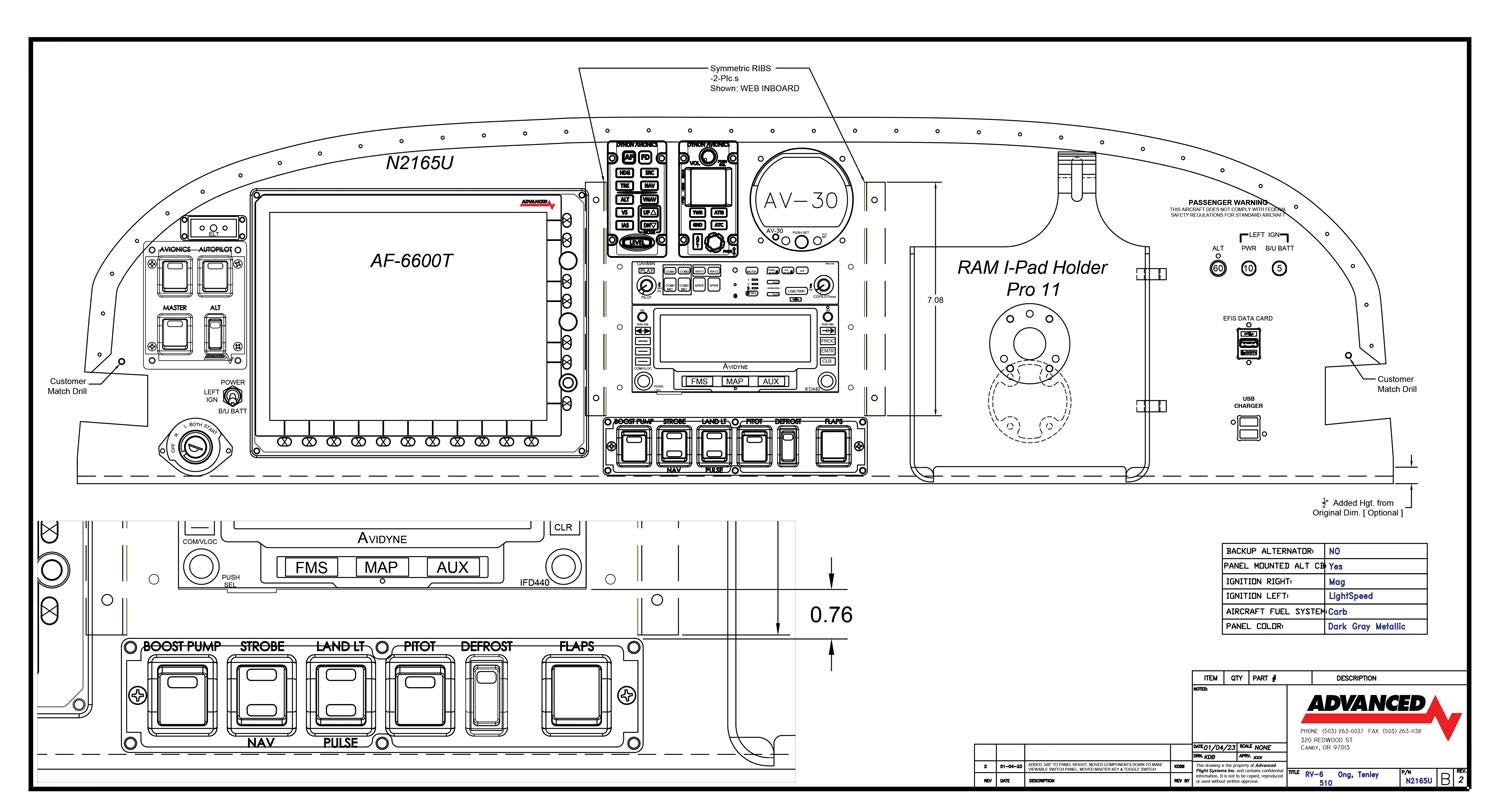
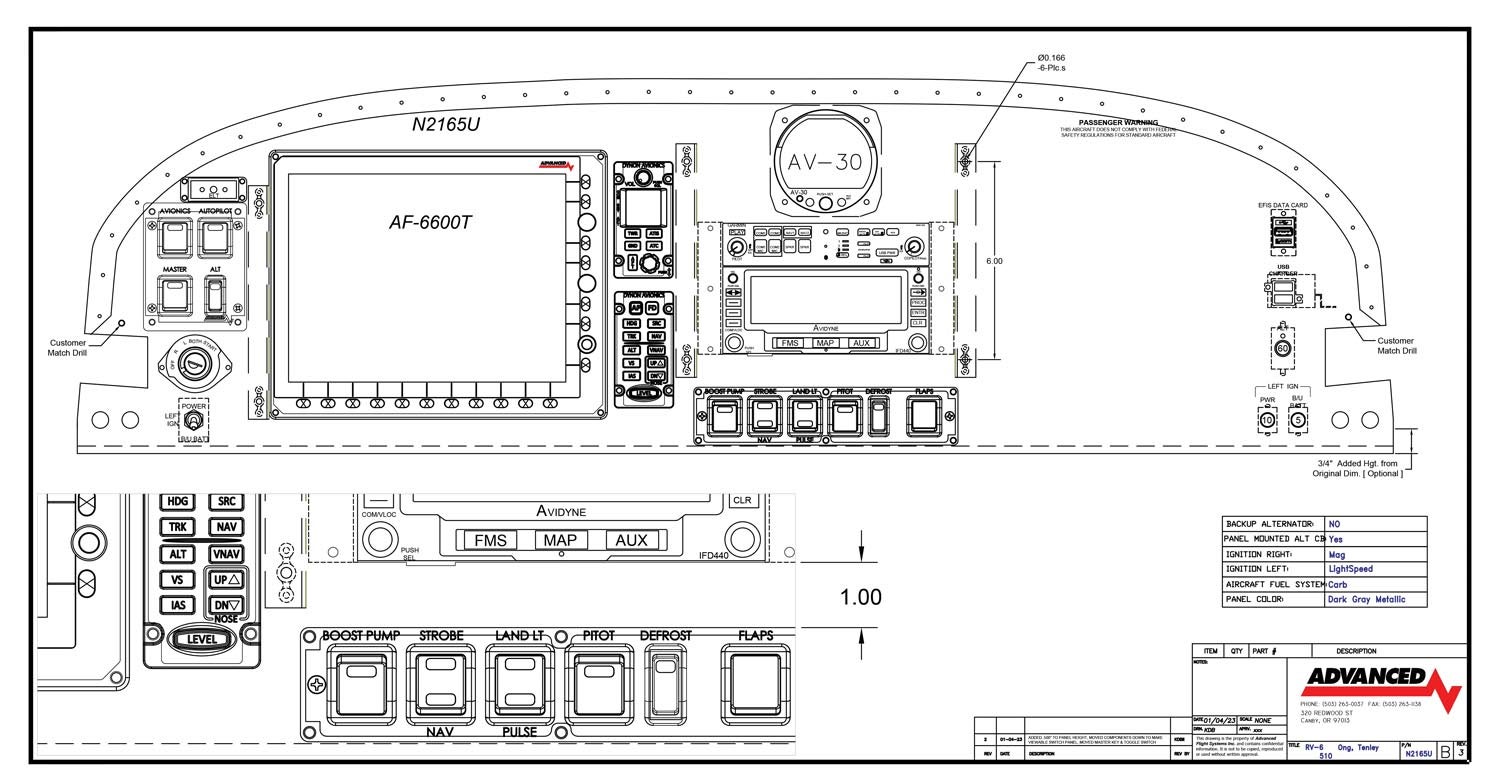
Stan, having been through the panel process multiple times before, knew exactly what to do (as always) when Kyle sent this to me. We decided everything looked a little cramped to the left. We chose to move everything down and add ¾ inch to the panel height instead of the 1/2 inch as suggested. We also decided to move the left rib to the right by 1 inch, which would allow for 1/2 inch of space to the left and right of the 6600. Stan said we could add an extra support to the left of the 6600 and one to the right of the iPad mount. Stan also said I should add headphone jacks in the lower left and right corners.
We also discussed the option of mounting my iPad. AFS could cut a rectangular hole into the right side of the panel to fit my iPad perfectly. The advantage of this is that it would be flush with the panel, complete with cooling fans and a built-in charger. However, I preferred the external mount. The reason for this is that if Apple changed the shape of their iPads and I upgraded to a newer iPad, then it would no longer fit properly in the panel. We decided against the flush mount, which ended up being the right decision after Apple changed their iPad shape (like I predicted).
Kyle replied quickly with Revision 3, which included the height increase. This allowed the left ignition power switch to be moved underneath the key switch, which was much more aesthetically pleasing. He also included the headset jacks and moved the com and autopilot panels next to the PFD, and we discussed the depth of primary navigator we had in mind to ensure nothing would conflict.
I also wanted the option to make my panel IFR capable and mentioned the Avidyne IFD440 and Avidyne IFD410 to Kyle. He said that the 440, which is a combined com/nav/GPS, would be the best because you can file and accept clearances for more procedures, approaches, departures, etc. It also included an additional 11-watt com. The 410, which has the com and IFR-capable GPS but not the VHF nav, would limit me to GPS-only approaches, en route navigation and unfortunately only one 6-watt com radio. It wasn’t urgent to decide between the two now, as the dimensions between the 440 vs. 410 are the same, but it was helpful that we discussed it. I asked if I would be better off purchasing the Avidyne 440 from Avidyne directly or from somewhere else because those units are almost as expensive as my panel itself! Kyle advised that they get the “best price in town” on the Avidyne 440.
We also discussed the possibility of adding the much more purse-friendly Garmin 430 instead, then upgrading to an Avidyne later. Garmin says it is sunsetting support for the 400/500-series boxes this year, so it’s not really a long-term solution. We also discussed the Garmin GTN series but in the end we decided to cut a hole for the Avidyne 410 or 440 and cover it with a plate, and then any unit could be added down the road. In case you’re wondering how I’ll navigate, the AF-6600 has its own GPS source and map software.
With everything happily concluded and finalized, Kyle sent me back a list of panel color options from Prismatic Powders, the vendor their powder-coat facility orders from.
Panel Color!
The next question was what color? Everyone seems to have black or gray panels. I wanted to be different. Maroon? White? Blue? Blue was the clear favorite but I had to find the perfect shade. Not too glossy. Not too flat. Not too dark. Not too light. I quite literally felt like Goldilocks and the Three Bears. After about a month of debate, the perfect color was chosen: Canfield Blue.
Kerry suggested my panel be powder coated at his old friend’s powder-coat shop, Wion’s, just up the street from our base at Sacramento Executive Airport. We drove over there one day to see if they could do it. Kerry and I looked through a booklet of options and they happened to also have Canfield Blue. Kerry was a fan of that color and Wion said he could do it for about $150. I kept this in mind and now had to decide between Wion’s and AFS for the coating. Unfortunately, Wion’s didn’t do laser engraving. If AFS powder coated my panel, they would laser engrave the labels afterward. With this information, Stan and I decided it would be a better deal to have AFS take care of the powder coating.
Lastly, I had to choose the text color (black or white). AFS ran a test with the Canfield Blue and two other color options. The general consensus was that even though white looked better, it was a little harder to read. Therefore, we chose the black text instead.
Finalizing the Design
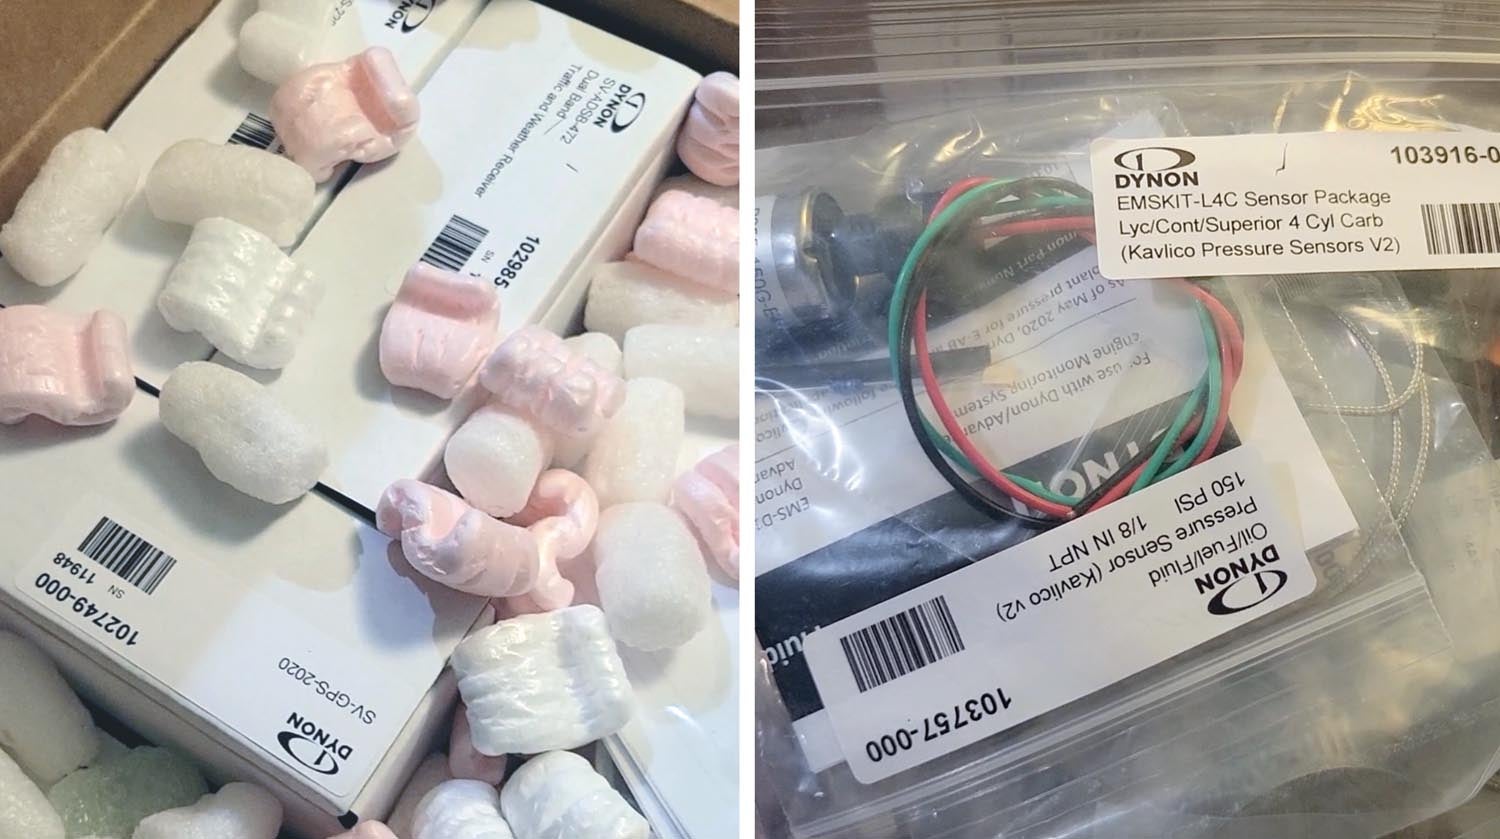
After confirming the final revisions, Kyle advised it would be a four- to six-week time frame to get the panel cut and labeled. He said we could order some parts from AFS ahead of time, so that we could start installing them while the panel was getting bench tested and assembled. He sent a list of items eligible for early shipping and I ordered them all! These items included the SkyView primary ADAHRS, SV-GPS 2020 GPS receiver module, SV-EMS-220 engine monitoring module (plus the kit of engine sensors and harness), FT-60 “red cube” fuel flow transducer, ADS-B receiver (for traffic and weather), Advanced Control Module (ACM) connector kit and various harnesses. I also got a RAMI AV-74 transponder/ADS-B blade-type antenna. The autopilot was to be added later on because I was quickly becoming broke.
A few weeks after wiring the funds to AFS, I finally received all the parts in the mail—and wow. When I got to hold each part in my own hands, it finally felt real!
A huge thank you to Jonathan Severdia, Kyle George, Rob Hickman, Jen Hickman and the rest of the team up there in Oregon for making this such a fun and special process. After months of planning and lots of emails back and forth (with very important interjections from Stan), we finally got it right.
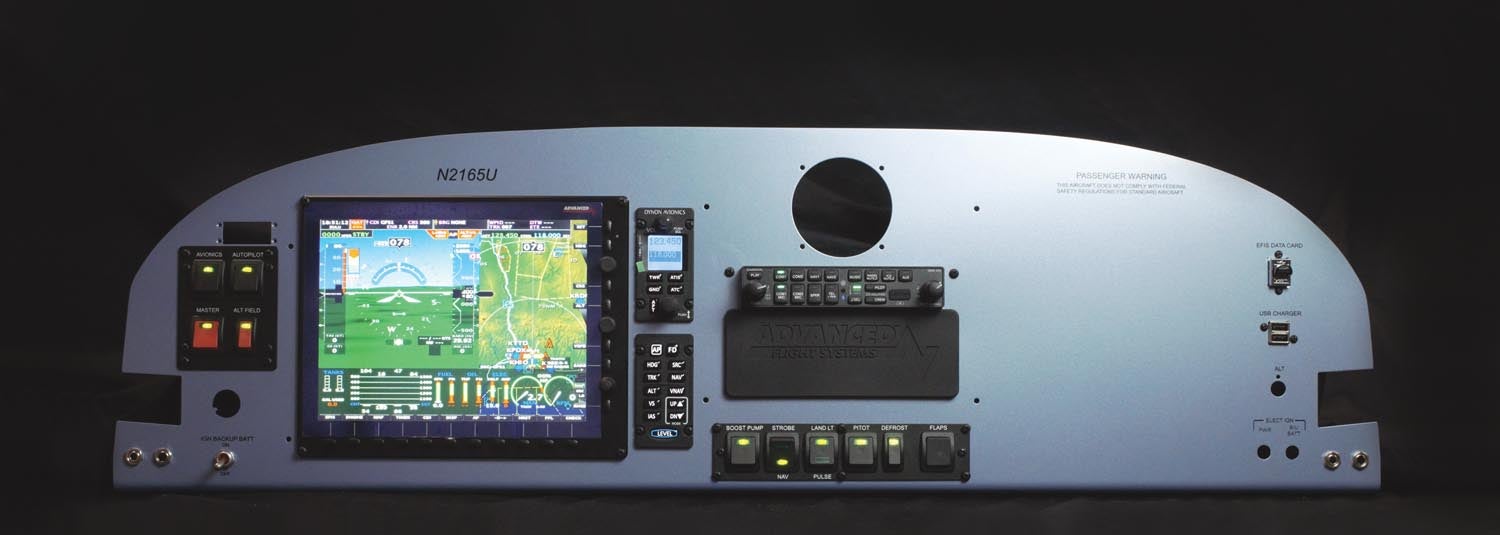
Finally, by April of last year, Kyle sent me the final design. And I was absolutely obsessed with it. “Tenley & Stan—I am pleased to inform you that your panel is complete and will be getting staged for shipping today! Jen will be in touch with the final invoice…Above is a photo of the finished product. We had a few drop in customers today getting a tour of the shop, they were all enamored with the blue finish, it stands out nicely from the gray and black panels we normally do.” I was very pleased to hear that other people liked it too and was more than excited to be receiving it in person soon.
Special Delivery for the New Flaps
After removing the flaps from N2165U and beginning to sand them, the boys and I quickly realized that they were damaged. They weren’t in awful condition, but looking into buying or building new ones would be worthwhile. The flaps rubbed on the wing and there were streak marks in the paint where they had been touching.
Building new flaps would take more time, adding to the already large project. Therefore, Kerry and Bruce posted a want ad for RV-6 flaps on VansAirForce.net and Chuck Spaur in Colorado quickly responded. Kerry gave me his information and I immediately expressed my interest! Chuck went to UPS to see how much shipping would be and was surprised to find out that it would cost $300 to pack and $330 to ship the flaps. That’s $630 total! He mentioned looking into FedEx or other ideas as the prices seemed outrageous.
Stan recently had an unfortunate experience shipping airplane parts after he spent weeks building ailerons for a friend’s Van’s RV in Florida. He finally finished them and shipped them, only for them to get damaged in the mail. After that horror story, I was nervous to ship my flaps and didn’t want to risk damaging them. It was time to look for alternative options.
Driving? The original plan was to drive out to Denver to meet Chuck and pick them up. It would be cheaper to drive than to have them shipped…and a lovely trip could be made out of it. Flying GA? After taking measurements, we concluded that the flaps wouldn’t fit in the RV-14. Renting a 172 would make zero sense cost-wise…it was a nice thought though, Tenley. Flying commercially? Unfortunately, airlining wouldn’t work, either. The flaps would more than likely have gotten damaged if they were checked. Between the cost of the airline and the cost of checking a bag, it would be the same as shipping them.
That’s when I came up with a genius idea. I work in dispatch at Axis Jet, a Part 91/135 private aviation company based at KSAC. One of the advantages of working for a charter company is that sometimes as employees we get to hop on empty legs. My idea was to airline to Denver and then hop on an empty leg back, so my only external cost would be that of the airline (which was cheaper than the packing/shipping). I asked my boss in passing if this would be OK and she agreed!
I kept a close eye on the empty legs and, by some miracle, had the perfect flight pop up! It was coming out of Colorado (KBJC) back to Mather, California (KMHR). The aircraft and crew had flown passengers into KBJC and there was an issue with the plane. The dispatch and operations teams had to decide whether or not it could come back to KSAC. That night we decided it could, but there could be no passengers, meaning there was an empty leg out of KBJC in the morning! I had one night to create my master plan. After confirming that Chuck could drop off the flaps and that the deadheading crew would be up for my plan, the only question was whether to ask permission from my boss—or forgiveness later. I chose the latter.
After talking with the crew, I realized I didn’t even need to be there. If I could coordinate with Chuck for the drop-off, pretty-please the crew into loading the flaps and finding a way to Mather when they arrived, I could do it by remote control. Money saved!
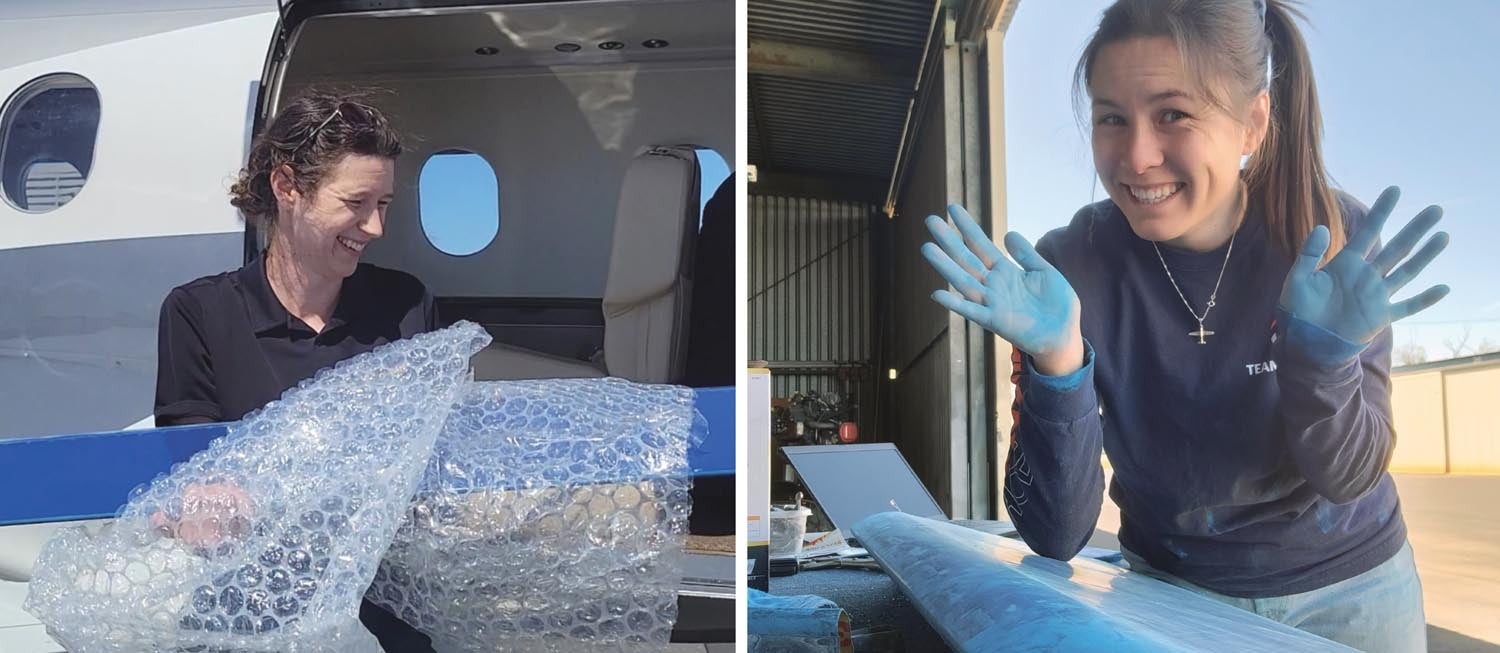
The next morning, I showed up to work on time at 6:00 a.m., ready to start the day and monitor the flaps adventure. The crew was met by Chuck and loaded the flaps onto the aircraft, a Pilatus PC-12. I received a text from Chuck: “Looks like they are tucked in nicely. Your people were taking good care of them. I’d love to see pics of your project.” I was so excited and tracked the plane all the way back to KMHR. During my lunch break, I drove over to KMHR with my friend Christopher Morales. He went out to meet the plane with me and pick up my flaps from PIC Helen Dobeck and SIC Daniel Walker. They were so sweet and helped unload them from the back of the plane. One of the owners of my company also went out to meet the plane, which surprised me. But, despite choosing to ask forgiveness rather than permission, I didn’t even get in trouble! He thought it was cool.
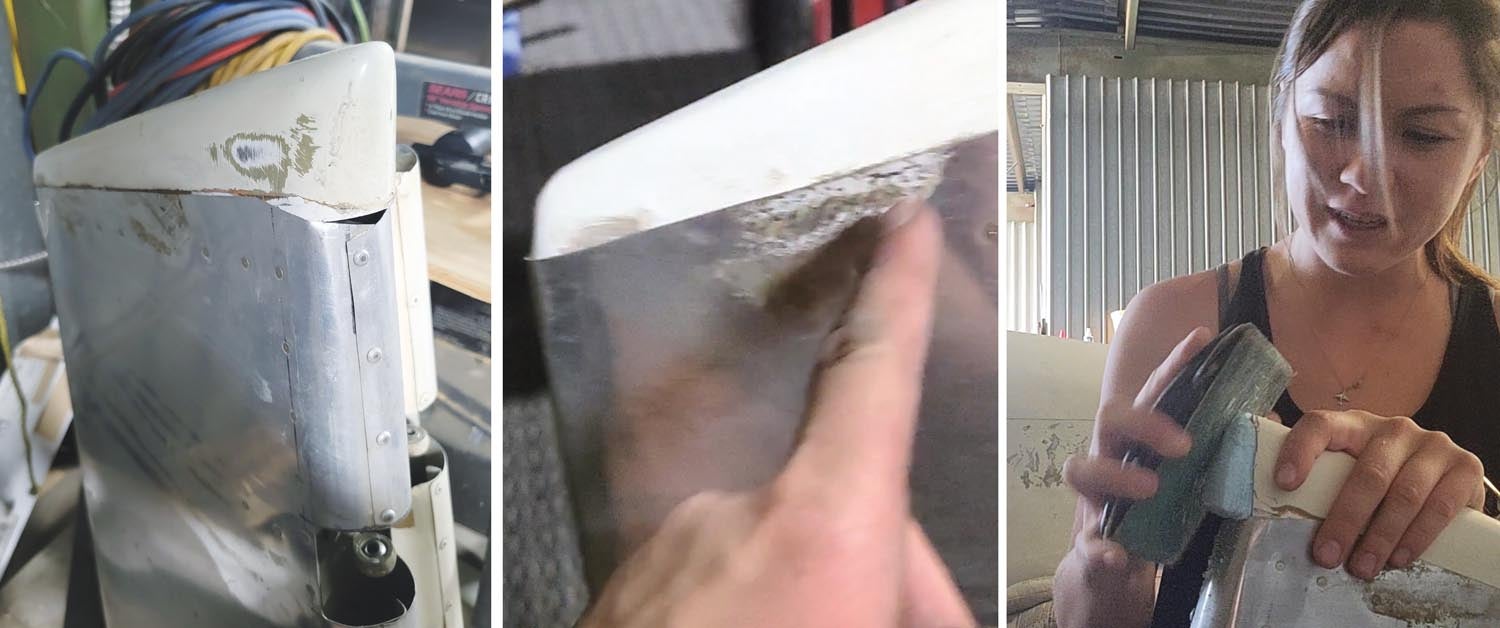
When I brought them home, we fitted them to the plane and they fit way better than the original set. I started sanding them and immediately my skin turned smurf blue. I’d been dealing with white paint so much lately that I forgot the paint bits could come off in a totally different color! The blue flaps were quite fun to sand, to say the least.
More Getting Ready for Paint
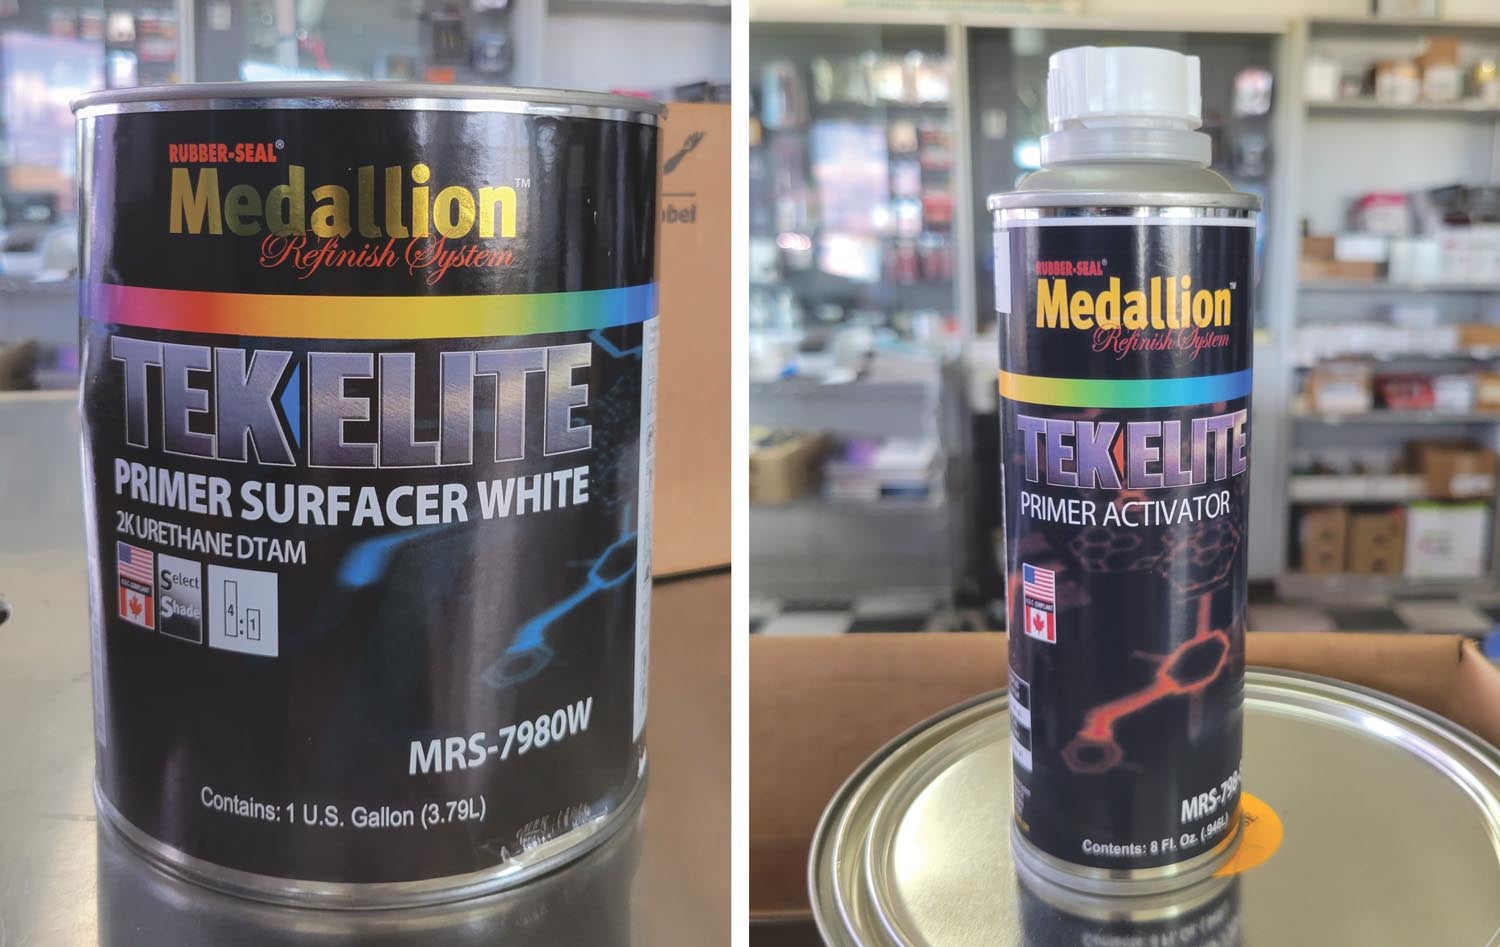
Stan spoke to Justin Frei, our friend who owns Ultimate Collision Center, an auto body shop in Sacramento. As a pilot himself, Justin has painted planes for some of our friends around the airport. The plan was to finish sanding all of the pieces, then take them to Justin’s for paint. He told me that I needed to pick up some primer, so I got one big can of Tekelite primer surfacer white and four small cans of Tekelite primer activator. I agreed to drop this off at the paint shop when we dropped off the fuselage for painting.
We are replacing my rudder with a new one, as my current one has cracks in it. Fortunately, Stan had an extra rudder in the back of the hangar. Yes, it’s a thing. It seems like every time we need something, there’s “an extra something” lying around.
I had to remove the end caps off of the old rudder and refit/shape them to fit the new rudder. I measured it and taught myself how to use a Dremel. After watching Kerry fiberglass, I had learned how to cut the fiberglass cloth and epoxy it together. I started fiberglassing the rudder end caps.
The thing is, if you leave a project unfinished at the hangar, sometimes someone will see it as a new opportunity for themselves. So, when I left my rudder project for a few days, intending to come back to it, I came back to find that Kerry had finished it! And he did a beautiful job.
![[Credit: Radiant Technology]](https://www.kitplanes.com/wp-content/uploads/2026/04/550095_5165745cc27748a598699799d796fd94mv2.jpg?w=218&h=150&crop=1 "Radiant Technology Unveils SafeGyro")


