 For the typical RV builder one of the first questions is: Build a slider or tip-up? Then, somewhere much further into the build comes the question a bit more difficult to answer: How do I complete the canopy without messing it up? (For non-RV builders out there, understand that part of the process is to separate the provided canopy glass into sections and bond them to frames. This is known inside the RV community as The Big Cut.
Those three words are sure to drive a builder’s blood pressure to hypertensive levels. Not to worry. Neither is the end of the world; actually, you should fear an infarction much more.
So where to begin? The manual is the first step, but manuals may not be modified as methods change. Specifically, Sikaflex bonding canopy to frame. It’s fairly new to the Experimental world. So, how do we do it?
The first step is research how others have done it. I did the same. However, in my case, they were saved as PDF files for reference, and the computer wore out reading them over and over. In the end, I still craved a step by step how-to but the job had to be done, so I jumped into the abyss. In the process, I documented as much as possible, hoping to save the next builder from making my mistakes and maybe, just maybe, impart a tiny fragment of wisdom that might help keep their blood pressure under control.
The Details
My build is a Van’s RV-7A slider. Clearly the process is unique to the model, but some methods should apply to other aircraft with similar build requirements. After all, most airplanes have a windshield, right?
Many steps in the manual instructions for my slider were altered to accommodate the process of gluing the canopy to the frame. I also added the Flyboy Accessories Supertrack Canopy Tracks Extension modification. I documented the changes and encourage you to review my blog (see link below) for details. So, let’s start.
Sikaflex is the same bonding agent the automotive window replacement company uses to glue your windshield in place. It’s a different Sikaflex product, but from the same company and the process is very similar. It’s also used extensively in the marine industry to glue windows in place, so we are not in uncharted territory. I actually had an auto windshield replaced not long ago and tortured the technician with questions. Poor guy. He even gave me a couple of the special tips for the Sikaflex.
Which Product?
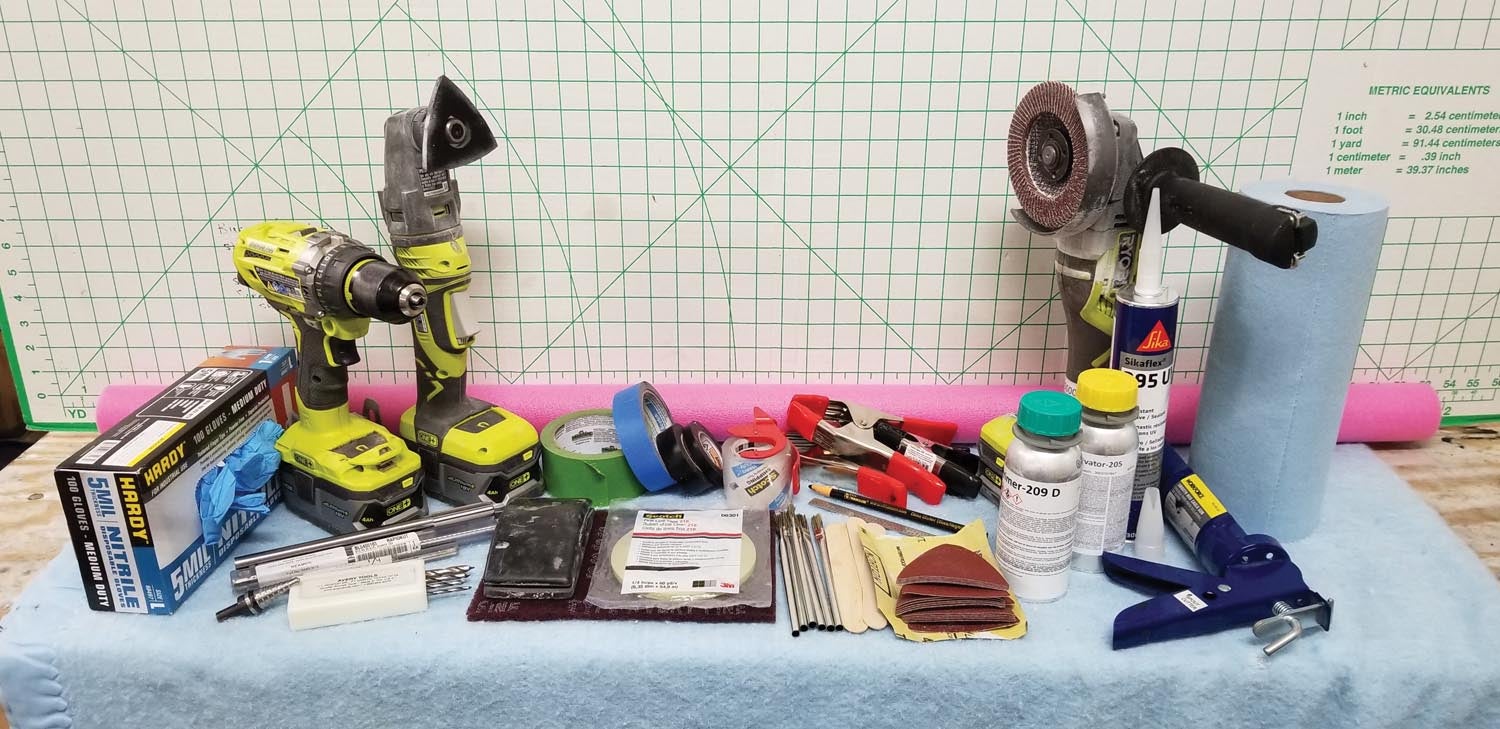
There are three products typically used to glue our canopies. Sikaflex Aktivator #205. The previous part number was #226. The 250ml bottle is plenty. Sikaflex Primer #209D. The 250ml bottle is plenty. There’s some discussion regarding which primer to use where, but the consensus seems to be #209D is fine for both the Plexiglas and the steel frame with or without powder coat. There is also some discussion as to the powder coat, but once again, the consensus seems to point to leaving it in place. Sikaflex is pretty tenacious stuff. Most likely the powder coat would break loose before the adhesive.

Finally, Sikaflex #295UV Black is the actual adhesive. Most canopies and windshield assemblies will require two tubes. They also make Sikaflex #208 Remover and Sikaflex Handclean Wipes. Feel free to try them. I used lots of nitrile gloves.
Van’s canopies are molded from a sheet of Plexiglas. One huge canopy front and back, tipper or slider. The first step is The Big Cut. Sounds scary, sure, but don’t worry. Let’s start with some common tools. Safety is first. So grab those safety glasses, dust mask, ear muffs and a respirator. The chemicals emit vapors and you want to protect yourself.
To cut the Plexiglas, Van’s recommends a cut-off wheel on a die grinder. They even provide the disk in the finishing kit. Feel free to use it, but there’s a new tool on the market. The Dremel Saw-Max Model SM-20 kit comes with a SM500 Wood/Plastic blade and SM 510 Metal blade. It’s available at most big-box home-improvement stores for about $100. This tool with the SM500 blade cuts through Plexiglas like the proverbial hot knife through butter.
Once the Plexiglas has been cut, that cut must be sanded and polished or you’ll risk a crack. I found that an oscillating multi-tool has so many uses. My preference is for the Ryobi 18V ONE+ JobPlus with Multi-Tool Attachment. (Yeah, that’s a long title for a tool.) This tool will also cut Plexiglas well, but it really shines at sanding an edge with the pad attachment.
After The Big Cut, use 60- or 80-grit sandpaper to take out tooling marks, then switch to 220 grit to smooth the edge. This is adequate to protect the edge, but for the final cut and prep for assembly, you want to polish the edge with a sanding pad and 400-grit wet sand.
The final few trims are usually very small amounts. The Saw-Max would work for most cuts, but if you’re taking down 1/8-inch or less, it’s not the best. For that, I used a 60-grit flap disk on the Ryobi 4.5-inch cut-off tool/grinder.
You probably have at least one drill, but I recommend a variable speed drill with a clutch. Most cordless drills have this feature for driving screws. Turn the clutch all the way down. This may save your canopy when drilling a hole. If a bit catches, the drill clutch will slip much faster than you can release the trigger. Yes, it adds time dealing with the clutch slipping, but just might save a nice crack.
There are a few miscellaneous items that will also come in handy. A variety of spring clamps are useful, but be wary of the sharp clamping edge. I recommend using a strip of wood from a stirring stick or chunk of hose to pad the clamp against the canopy. Find something to use as spacers. I used clear plastic tubing, but some builders repurpose the garden hose. Bet the wife loves that! A dozen pieces 1/8-and 1/16-inch thick and about 1-inch wide is adequate.
The Sikaflex comes in a tube, so you need a caulk gun. The Aktivator and Primer are very thin, viscous fluids. I found disposable acid brushes worked best. They hold very little fluid and pose less of a danger with excess running or dripping everywhere. You can also use foam brushes, but do so at your own peril. They hold a lot of liquid and release it at the most inopportune moment. The Primer is quite tenacious and very difficult to remove. Tongue depressors or Popsicle sticks work great for making the fillets. Marking the canopy is tricky. I tried a Sharpie but found it difficult to write on the protective plastic. A simple grease pencil worked beautifully. It’s easy to sharpen just by rubbing on paper like a crayon. Make all your marks on the outside clear protective film. Tape is critical. The Aktivator and Primer are very thin and will release pretty much any tape. Buy some 3M Fine Line Tape #218. It’s pricey, but resists solvents really well. Any other tape will release and leave a nice mess where these chemicals seep under the tape. Black electrical tape will work just fine as a secondary line of defense. Blue or green masking tape may be used to mask off large areas to protect against drips and spills. Remember the nitrile gloves and paper towels. Treat Sikaflex just like Proseal. It will end up everywhere, so be ready and dress appropriately.
Depending on model, you may need drill bits and/or a Unibit. I experimented with scrap and found reamers made the best holes and left a nicely polished edge. Plexiglas bits worked well, but I needed a 5/8-inch hole for the latch. The Unibit is recommended by Van’s. It works, but not as well as reamers. You can also take a bit and drill a few times into concrete to dull it. I didn’t try it.
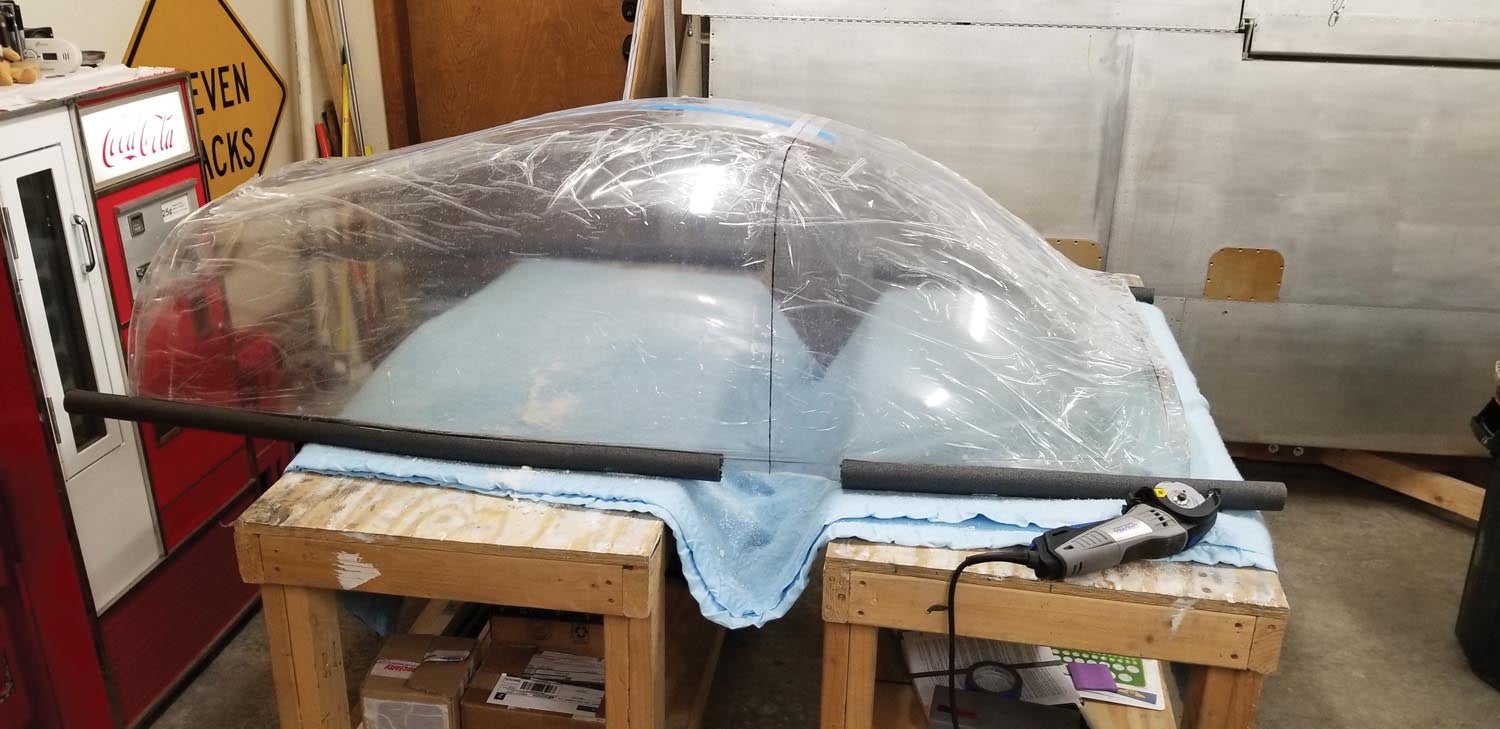
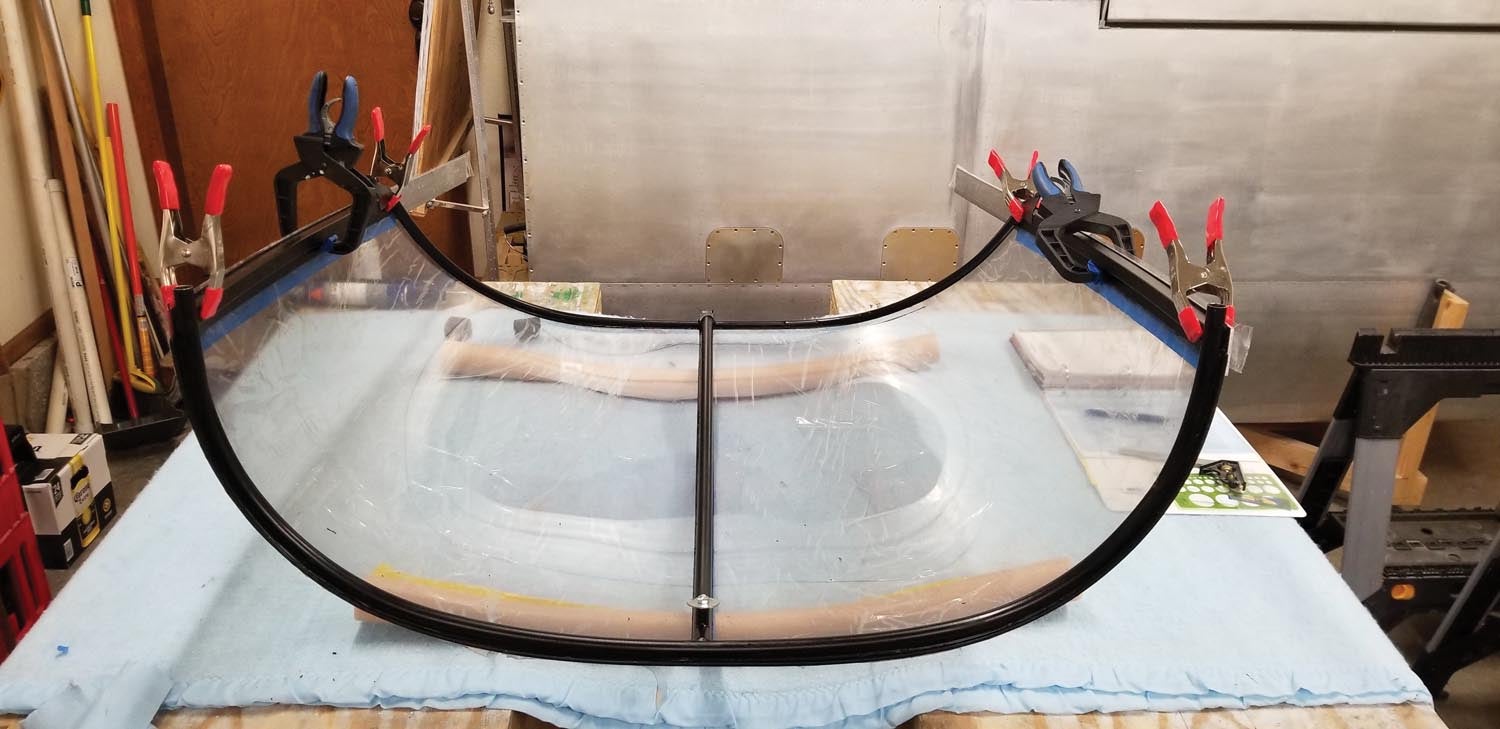
The canopy needs to be stable while working on it. Upright, the canopy needs to rest on edge flat on the bench so all the weight is distributed evenly. Upside down, it needs support to minimize stress of the weight trying to spread it apart. Figure out what works best for your shop and canopy. I used my EAA Benches placed about 2’ apart then spread an old blanket over them and clamped the blanket in place forming a sort of hammock. A couple of pool noodles come in handy to support the canopy with no stress. See photo. We’ll talk about the edge later.
Let’s Get to It
Now that we have our tools ready, it’s time to cut some Plexiglas. First, let’s turn up the heat—the shop heat. I live in the mountains, so it’s tough to heat my shop to recommended temperature, but I try and get above 75 degrees. The hotter you can stand it, the better. I must confess, none of my work was done above 68 degrees.
We need to know where to cut and make some marks, so follow the manual and find the location of The Big Cut. Mark it with short tick lines on the inside protective film. What? You peeled it off? NO! Leave it till the last moment. If you peeled it off, use blue masking tape to temporarily locate the line on the inside. Get some help and rotate the canopy upright and mark the centerline. Find center in several places by measuring across the width and make tick marks. Connect the dots and you have a centerline.

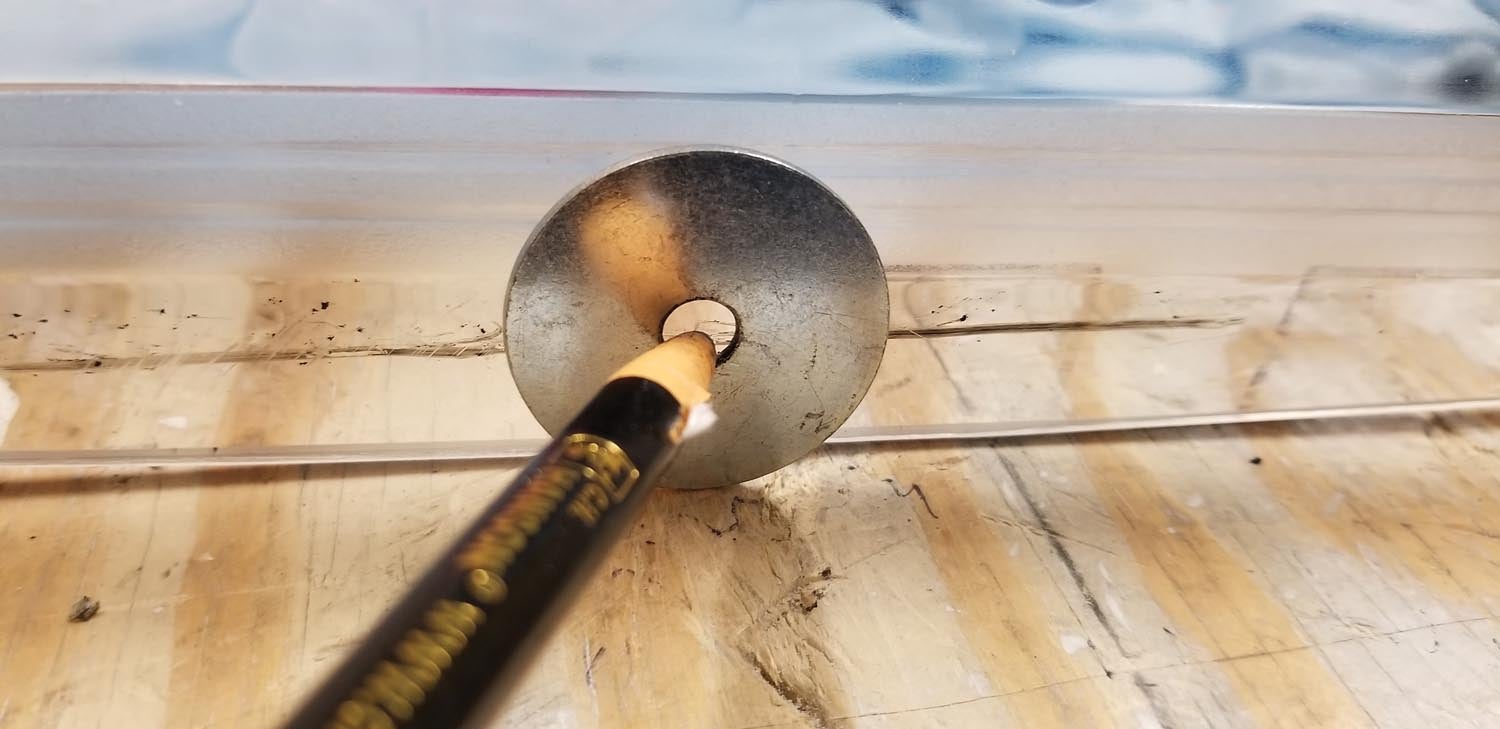
The first cuts should be practice. Van’s recommends the first practice cuts should be removal of the forming flanges on either side bottom edge. The manual suggests cutting at the bottom of the canopy frame. Better to leave too much than cut off too much. There’s plenty of opportunity to remove more later. I recommend cutting off just enough to make the canopy edges lay perfectly flat on the bench. While the canopy is upright on the bench, use a big washer to draw a line along the bottom edge by rolling it with the grease pencil against the canopy. The idea is to practice yet preserve as much as possible. This cut will allow the canopy to rest on the bench perfectly flat with minimal stress.
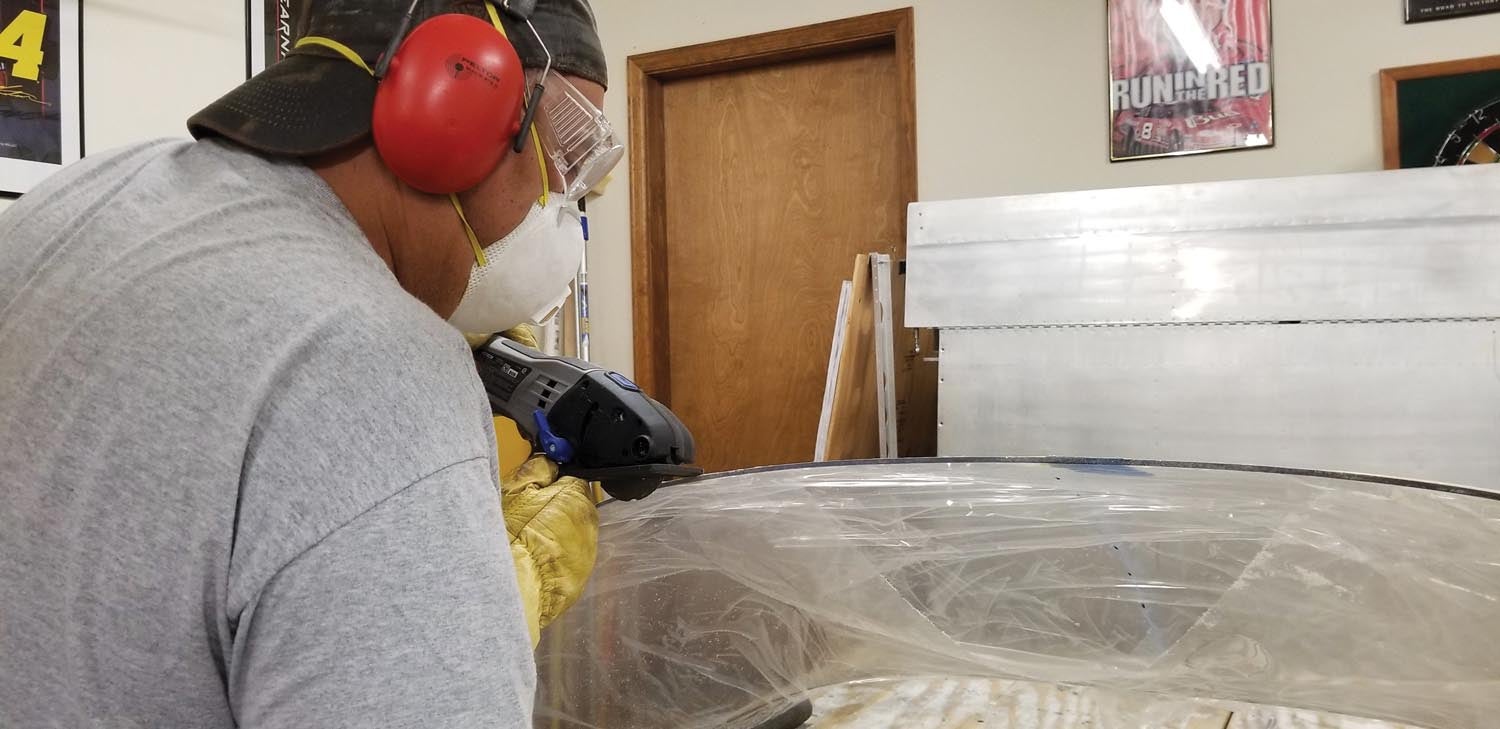
Get some help and flip the canopy over on its back on the blanket. Support it with pool noodles such that it’s stable. Plug in the Saw-Max and put on your dust mask and eye protection. (I suggest a hoodie. Yes, it’s hot, but Plexiglas dust is going to go everywhere. Pull the hood over your head, zip it all the way up and tie the string. Put the ear muffs on over the hoodie. You’ll thank me later.)
The Saw-Max cut line is easier to see looking at the left side where the blade and cut notch are visible. That means cutting left to right. Support the Saw- Max with your right hand so the saw foot is firmly against the Plexiglas. Notice the notch. Fire that puppy up and gently guide it while supporting the foot against the Plexiglas. Go slow and straight. It will bind and kick back just like a circular saw, leaving a gouge—so if it feels like it’s binding, stop, slowly back up and go again. Release the trigger and stop if needed. The blade will cut really fast so be careful.
The object here is to make a practice cut following just outside the line. The piece may try to fall away and pinch the blade as you get close to the end, so stop about half way and use one of those spring clamps to hold the start of the cut and keep the piece stable. Ideally, you want to see the line when you’re finished right at the edge of the cut. Your first cut done with success! Let’s clean up that edge.
Use the multi-tool with 80 grit pad and smooth off the tooling marks. If you can’t see them, grab a light and shine it at the edge. They pop right out. Every one of them is a potential stress crack so we need to remove them. Use a damp paper towel to wipe off the dust and you can really see them clearly. Get rid of them.
While you’re at it, hold it at 4 degrees and chamfer the inside and outside edges. The 80 grit removes material fast, so don’t dwell in an area. Use 220 grit to final sand the edge and the inner and outer chamfered edge. Lather, rinse, repeat for the other edge. Now the canopy will sit flat with no localized stresses. This is important when it’s time to make The Big Cut. Slide a section of pipe insulation or pool noodle over the edge. Get some help and flip the canopy back over right side up.
Time for The Big Cut!
Now that you have some confidence, The Big Cut is no problem. Position the canopy so the cut line is between the two benches with room for you to maneuver the saw. Cut the pipe insulation and leave a gap where the cut will be made. Find two sections of plywood about 8 inches wide and tall enough to touch the inside of the canopy plus enough to clamp to the bench. Place a piece of pipe insulation on the top edge of each. Clamp the plywood so the canopy is resting on it but not lifted off the bench. When the cut is complete, these will keep the canopy halves from sagging in the middle.
Make a dry run as practice. If you’re height challenged like me, make another dry run with a step ladder. You want to practice without a live tool till you feel confident you can make the cut at least to the middle without losing balance.
Now do it for real. Be really careful as you get to the end of the cut. A helper is recommended to stabilize both halves as the cut is finished. Remember to dress those edges. Success! Take some photos and show your pride. This is a big moment. Go have a few adult beverages.
Now We Bond
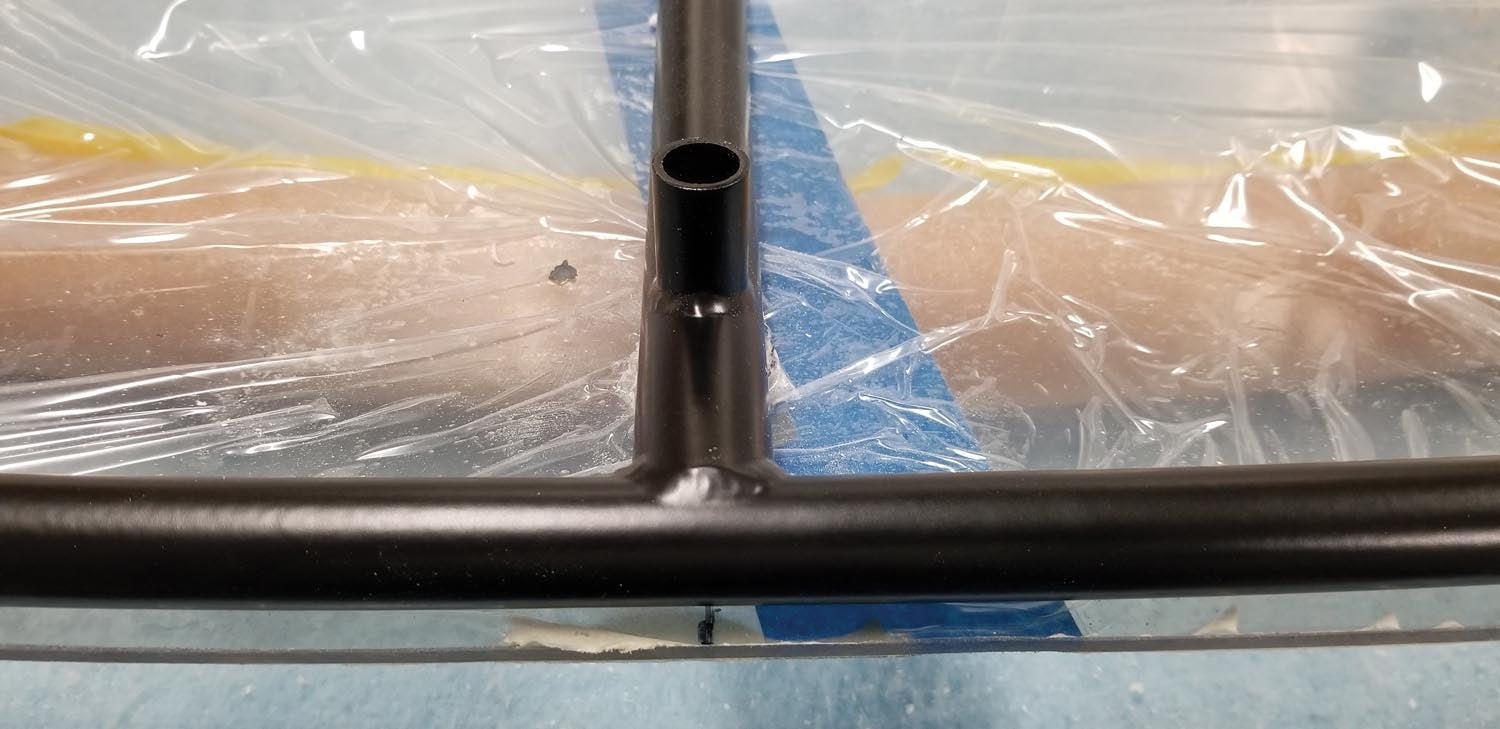
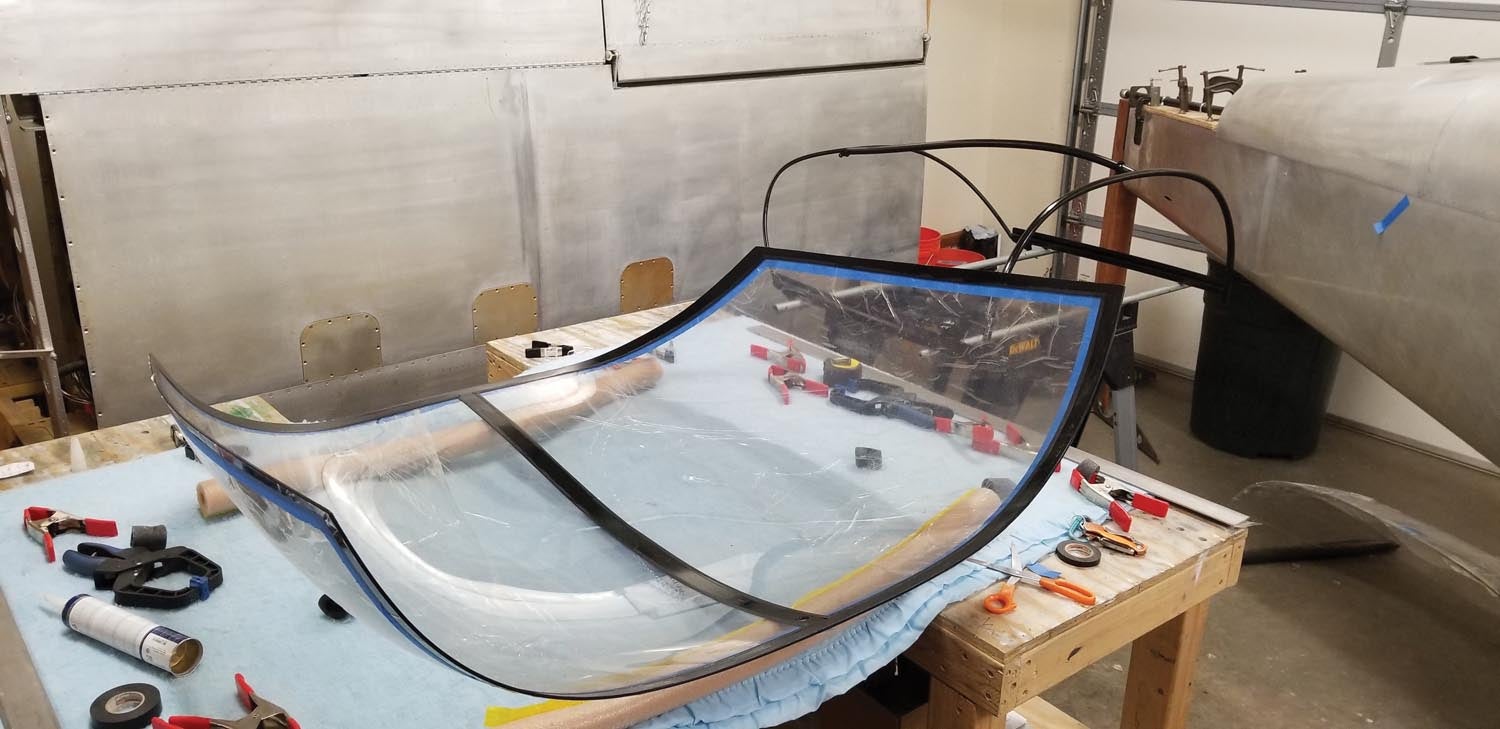
Follow the manual to fit the canopy to the frame, but consider how it will fit with Sikaflex. Sikaflex recommends 1/8-inch gap for the adhesive to allow for thermal expansion and contraction. Remember those spacers before making the final trim adjustments. This gap will affect the final dimension in relation to the frame. Mark and start making fitment cuts. Always cut outside the line. Final adjustments are easy to make with the angle grinder and 80-grit flap disk.
Mark the canopy for final trimming each time. Don’t guess and try for a ballpark trim. Clamp a section of sacrificial aluminum so the trim line is even with the aluminum. Use the angle grinder to sand away the material to the line. If you go too far, the aluminum is there to stop the grinder. Remember to dress that edge every time. Once you have the canopy fit perfect, it’s time to glue it. But we need to polish the finished edge first.
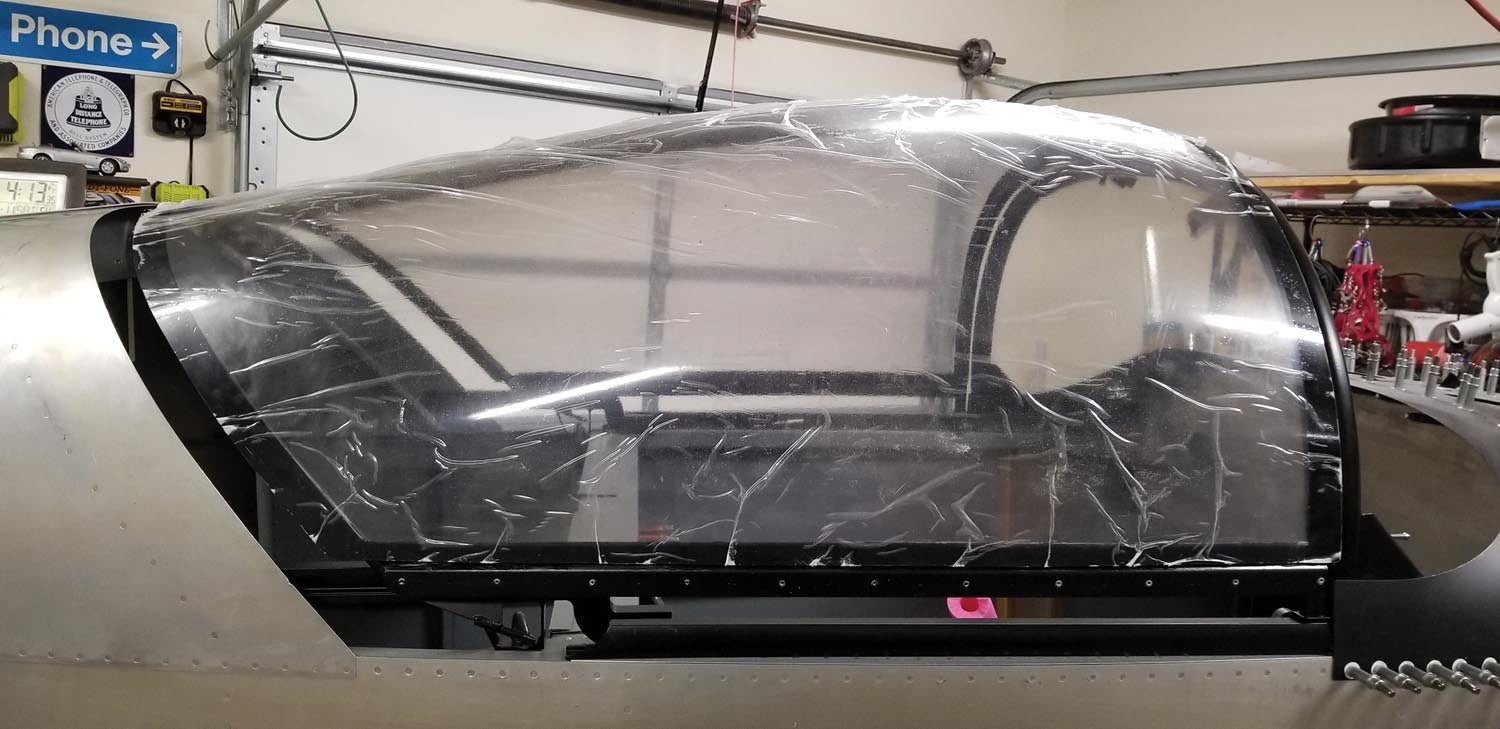
Use the sanding pad with 400 grit or finer wet sand paper. Wet the paper and polish by hand. Use a damp paper towel to wipe the edge and examine it with a light. You want it polished like the edge of a piece of glass. Remember those chamfered edges. The edge of polished Plexiglas is just as sharp as glass and will cut just as easily. Finished? Okay, we are ready. Assuming you know exactly where the frame is to be located, remove the protective plastic film. Unless, of course, you already did. It’s time to mask.
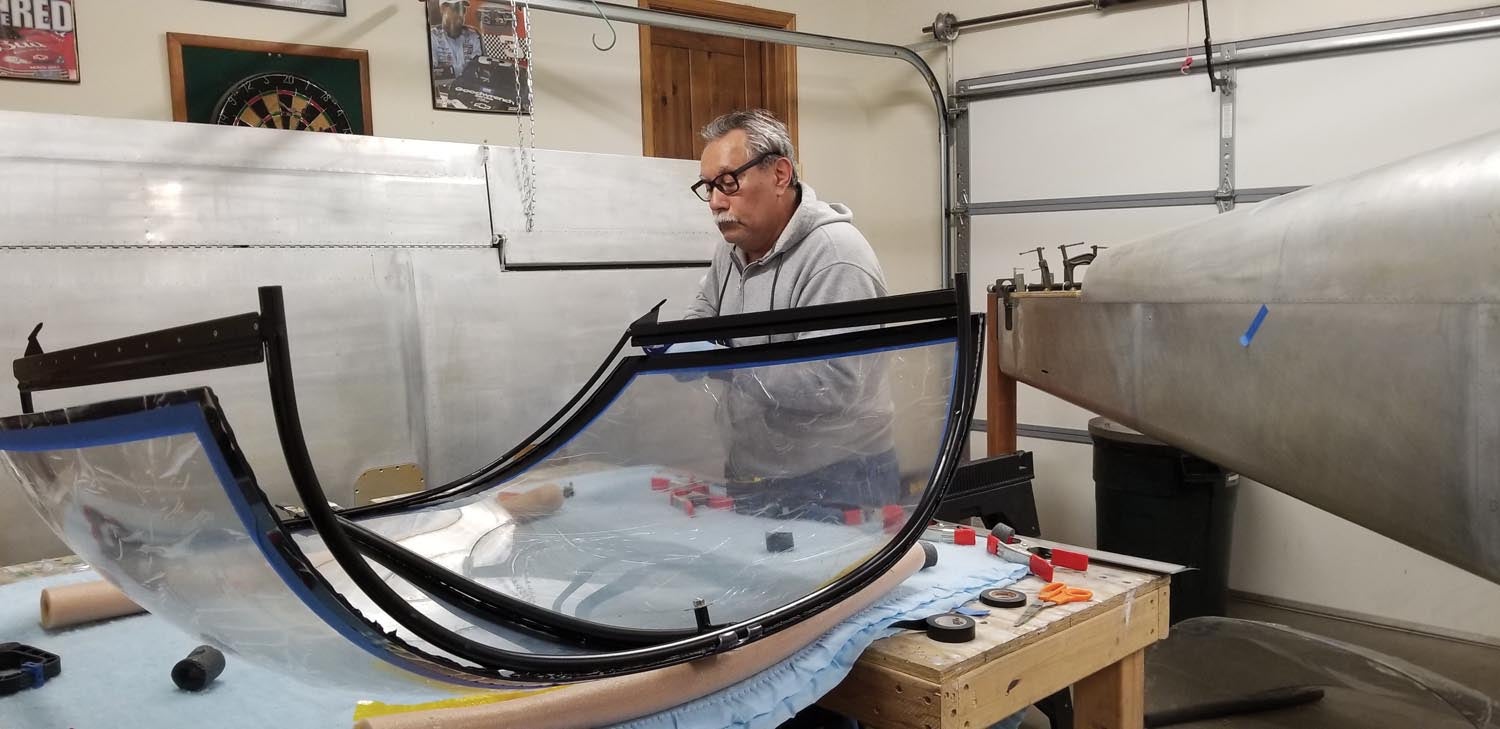
Place the canopy upside down on the blanket hammock with noodles so it’s nice and stable. Last thing you want here is the canopy moving when you’re working with the Sikaflex.
A 1-inch-wide mask line is best, but you could use less depending on the frame. It’s up to you, but remember the fillets need some area. Whatever you decide, start by masking the edge with the 3M Fine Line tape. Do not pull tension on it as you mask. Rub it down well, especially at the glue edge. Apply a layer of black electrical tape right over the 3M to the same mask edge. Rub it down well. Don’t put that 3M tape away just yet. Apply a strip on the actual edge of the canopy. This tape mask will keep chemicals from leaching around the edge onto the outer surface of the canopy. Rub that tape layer really good onto the edge. Apply blue or green painter’s tape and paper to mask off the rest of the open areas. Trust me, you don’t want these chemicals anywhere other than the masked area. Apply a black electrical tape mask to the frame as well. The fillet won’t be deeper than half the thickness of the tubing, so shoot for that level with the masking.
Scuff the areas well with maroon Scotch-Brite. Wipe the areas clean with a damp microfiber cloth. Time to glue a canopy.
Are You Still Breathing?
Remember that respirator! Start a timer or make note of the time. Apply the Sikaflex Aktivator #205 using an acid brush. Apply to both the canopy and frame. It’s extremely thin, so be careful. Wait 10 minutes. Start the timer again. Apply the Sikaflex Primer #209D. This stuff is a bit thicker, but it dries really fast so spread it quickly. Apply to both the canopy and the frame contact areas. Watch that tape line. It is really difficult to remove the Sikaflex Primer #209D, so be careful where you apply it. Wait 30 minutes. Peel the first layer of black electrical tape off the canopy and the frame. Check the 3M tape line and fix it if necessary. Feel free to peel the 3M tape off the edge at this point. Any Sikaflex will not stick where primer is missing. Apply a fresh black electrical tape line at the edge of the 3M just as before. The reason for this is the Sikaflex #295UV will not stick in the absence of Sikaflex Primer #209D. This is your savior. Use it to your advantage. If you get the Sikaflex #295UV where you don’t want it, leave it till it dries. It rubs right off like that booger-looking adhesive they use on credit cards when they send them in the mail. The replacement electrical tape mask will make it much easier to make a nice fillet when the time comes. Feel free to reapply the electrical tape to the frame as well, but it really isn’t necessary. The excess Sikaflex #295UV will rub right off beyond the tape line. You have 30 minutes to 2 hours before the Sikaflex must be applied, so watch the clock.
Remember the spacers? I only used them to position the canopy and make a uniform gap. Once the gap was uniform and the sides clamped, I removed the clamps on the bows and removed the spacers. The idea here is to glue the canopy in a uniform curve with no localized stresses. The spacers and clamps create stresses at each clamp. Once the Sikaflex sets, it locks those stresses in place. I may be way off base, but it made sense at the time. Let’s glue a canopy.
Get some help. You have up to two hours from application of Sikaflex Primer #209D, but time flies when you’re having fun, so let’s work. Some builders cut the Sikaflex applicator tip off square to the end then cut in a “V” to produce a triangle shaped bead. I chose not to, but feel free. There are a few different methods to choose. One is to place dollops of Sikaflex #295UV along the contact areas and allow it to set then return to apply the fillets. Another option is to apply it everywhere except where the spacers are positioned, allow it to set and return to apply the fillets. I chose the latter. Lay a bead down of Sikaflex #295UV where the canopy frame will contact first. I chose the spine since the other areas were not touching till the canopy was clamped. Get some help and place the frame right on the center of the bead. Locate the position for the remaining application and apply a bead or dollops. Clamp the canopy and massage it into final position. If you need to remove or address any excess, use the tongue depressors. Walk away for at least 24 hours.
Apply a fresh coat of Sikaflex Aktivator #205 before applying more Sikaflex #295UV. It will soften the Sikaflex Primer #209D and Sikaflex #295UV allowing the new application to adhere properly. Apply Sikaflex #295UV and dress the fillets. Pull the black electrical tape mask then pull the 3M tape mask. It should be a nice beautiful line. Walk away for another 24 hours or more. I recommend leaving it clamped as long as you can stand it. After 48 hours, it’s pretty stable, but after 2 weeks it’s solid. Now you can say you’ve made The Big Cut and bonded your canopy—and survived it all!


I keep reading this excellently written article over and over while I wait for the northwest to warm back up this spring and I get my courage up to make the small and large cuts on my RV9A slider canopy!
Thank you for the kind words Steve.
If it helps, I live in the mountains of Colorado. It was pretty cold outside when I cut mine. I managed to get the shop up to about 70 when I finally drummed up the courage to fire up the SawMax.
Happy to answer any questions. Feel free to e-mail.
Thanks for this write up. I’ve read this article last year and I am keeping on referring back to this article as I work on my RV8 canopy
Larry, I was looking for the link for the super tracks installation. I’m doing that with a RV14 mod and Sika. Thanks for the Sika write up
It’s my turn to do my canopy and I’ve decided on Sikaflex. Great article!
I tried to check out your blog, but get an error saying “This blog is open to invited readers only”. Do we need an account and permission to view it?
Comments are closed.