When I last left you, we’d just towed Sharon’s down-but-not-out, lightly-bruised Airdrome Airplanes Morane Parasol back to the hangar after its adventure in the soybeans. After sinking into the beans on a thermally day, she had landed and the airplane had flipped on its back. Luckily, Sharon escaped unscathed.

Heading back to the barn. All the damage is visible: rudder, fin, axles, broken PSRU mount, cowling, starboard eyebrow and bent exhaust manifolds. All very fixable and it was within three weeks.
This had happened towards the end of the big annual Fry-In orgy of fried green tomatoes at Liberty Landing International Airport. (See KITPLANES® Magazine, October, 2012 for the details.)
While everyone else was watching the flying, Sweetie and I started taking things apart on the Morane, assessing the damage and planning the order of repairs. Sharon and Tom Glaeser were in the hangar taking the wheels off so they could pull the bent axle. I was outside ripping fabric off the rudder and fin to see if there was any hidden damage. As for the wing, aside from some minor holes punched in the fabric on the top of the wing from soybean stems, there was no structural damage. So, bottom line, it really wasn’t that bad.
The list of minor repairs was: repair the vertical fin, fabricate a new outline for the rudder, make a new starboard cooling eyebrow for the engine and make a new axle. There were two easy-to-do bolt-on items: A new PSRU for the Valley Engineering Big Bad Twin engine, and as long as we were at it, we were going to change out the straight exhaust manifolds and put in Valley Engineering mushroom mufflers to quiet the beast down a little bit.
The big job was going to be making a new cowling. Making a new part that has to fit perfectly on an older part is a daunting challenge. More about that little ordeal later.

Bullwhip Baslee does his magic on his English wheel. How it works beats the heck outta us, but that nose bowl looked brand new when he finished.
Crop Selection
In case you didn’t know it, a WW-I airplane without power generally glides like a thrown brick. Basically, if the engine quits, you look straight down and that’s where you’re going to land. Gliding in to a crash landing in anything is far better than stalling and lawn darting from 100 feet. And, if you lose power on climbout after takeoff in a WW-I airplane, you never, ever try to turn back and make a landing on the field.
After her soybean adventure, Sharon was getting a lot of sympathy from many of the pilots around Liberty. I might add that they were all Experimental or ultralight pilots who had their own been-there-done-that tales of woe concerning off-field adventures. Most spamcan pilots flying aircraft with certified engines have never experienced the character-building adventure involved in extracting a downed aircraft from a field of ankle-deep mud, or even better, the middle of a 40-acre field of 8-foot tall corn.

The repaired nose bowl has been mated with the new side sheets and Clecoed in place. The Camloc studs have been installed. It’s ready for prime and paint.
Just about every one of the ultralight and Experimental pilots there were veterans of these exciting, high-pucker-factor excursions amongst the different grain crops of Missouri.
There was some disagreement about what ripe crop, if you were given a choice, is the most desirable to plunk down in.
Sharon had been lucky in a sense. A tall stand of young, healthy soybeans was the number one choice; it’s thick and bushy. While you will for-sure end up on your back, the soybeans are like a big cushion. In very few instances of soybean landings was there serious damage to the aircraft or the pilot. Just about everyone who had the novel experience of being upside-down in a good crop of soybeans said the same thing. (Note: a field of ready-to-harvest soybeans is a totally different animal. Very dense and not very yielding.)

Sharon finishes up the final paint on the new cowling. Author used Glidden Evermore Latex gloss house paint.
At the bottom of the list were the top three crops to avoid—like you’ve really got a choice with a glide-like-a-brick WW-I airplane. The least favorite choices, in order of catastrophe, are ripe field corn, pumpkins and big round hay bales.
I can personally attest to the corn. When I dumped my Taube replica in a field of 8-foot ready-to-harvest corn, the damage was pretty grim. Those rock-hard ears of corn can really pummel a light tube-and-fabric airframe. (See KITPLANES® Magazine, April 2004.)

Sharon and Dave Laur, the newest member of the Dawn Patrol, work on the covering of the repaired fin and rudder. Dave started hanging around Liberty Landing International Airport last year, sold his RV-6 and bought Dick Lemon’s Graham Lee Nieuport 16. The Nieuport is in the process of being recovered.
In a field of pumpkins, you are destined to straddle some big 40- or 50-pound gourds and that’s a sure-fire landing gear destroyer. Then, when you go over on your back, there’s no nice cushion to rest on like you get with green soybeans, tall green corn, wheat, oats or rye.
I don’t even have to mention what a forced landing in a field of those big round hay bales will do to an airplane. If you’re lucky, you might miss them. If not, you’re bound to snag one of them with a wingtip and then, yee-haw! You get firsthand experience with the ground loop from hell. There were two guys at the fry-in with hay bale stories and both ended up with some pretty significant damage, or in one case, a totaled aircraft. But now, back to the repairs.

Sharon paints the new starboard Big Bad Twin eyebrow. The exhaust manifolds have been removed in preparation to install the new, much quieter Valley Engineering mushroom mufflers.
Getting Started
The next day we ordered a new Series-3 PSRU from Valley Engineering in Rolla, Missouri for the mighty 50-hp Big Bad Twin engine. Miraculously the Culver prop was undamaged. Again, this was attributed to the big cushion of green soybeans.
Back home in our tiny one and one-half car garage, the repairs on the vertical fin and rudder commenced with a flurry of positive enthusiasm and energy.
Every repair was going to be a piece of cake except the dang nose bowl. Sweetie and I were dreading that. Fabricating the original cowling had been a nightmare of frustration, bad language, thrown tools and sullen pouting.

This transfer fixture is a variation on a standard hole locator. An eighth-inch hole was drilled through two pieces of aluminum strip. Then a steel rivet was inserted in the back piece with aluminum washers, both on the backside.
Having built/rebuilt seven tube-and-fabric airplanes, Sharon and I were able to fabricate a new rudder and fin in one day. The day after that, the new fin and rudder were taken to the field and fitted to the plane. Then we headed back home where Sharon, who is a covering wild-woman, had them covered, shrunk, taped, sealed and ready-to-paint in two days. Stewart Systems EkoBond cement is the bee’s knees when it comes to gluing fabric to airframes. It’s all we use now in the Dawn Patrol for fabric work.

The two aluminum washers fit snugly into the inside diameter of a Camloc receptacle and position the hole on the other leaf of the fixture directly over the center of the Camloc receptacle.
While Sweetie was covering, I was working on the cowling. The soft aluminum of the nose bowl was pretty much bent up, but there were no sharp-edged dents in the metal. I went to work with a rubber hammer with a bag of cat litter (unused by the way) as a backup and got the cowl formed back pretty much like it had been. It wasn’t great, but it would do.

Sharon demonstrates how the fixture operates on the repaired cowl with its Camloc studs already in place. The hole on the outside is centered exactly over the center of the receptacle and serves as a precise drill guide.
But, after looking at it for a while, I decided that “would do” wouldn’t do, so we decided to build a new cowling from scratch. That next weekend, we loaded it up in the stealth van with the rest of The Dawn Patrol and headed over to visit our can-do guy, Robert “Bullwhip” Baslee at his Airdrome Airplanes shop near Holden, Missouri. (Also known by those who have spent some time there as Bullwhip Baslee’s House of Pain.) I showed Robert my pathetic efforts at cowling repair and told him we wanted to buy a new nose bowl.
We also needed a new piece of 4130 chrome-moly for a new axle and two new stub axles to insert in the new straight chrome-moly tube.

Jerry (Rotaxman) Sharp gives Sharon advice as she does some trimming on the new oil cooler plenum which got a little munched by the soybeans. Jerry’s the go-to man at the airport for all the Rotax-powered planes. If he can’t fix it, it gets thrown into the Missouri River. (Just kidding!)
It didn’t take us long to realize that Robert was having one of his builders’ assist sessions. A couple from Texas were there, doing a House of Pain weekend, working with Robert on their full-scale Sopwith Schneider. We felt kinda bad about interrupting that.
But, when I talked to them later, they admitted they enjoyed the break. Baslee’s House of Pain is aptly named; having built two aircraft in the H.O.P. Sweetie and I recognized the hopeless, haunted look in their eyes. The U.S. Marines on Guadalcanal called it the 2000-yard stare. We’d experienced it, too.
Robert looked at the bowl I’d been hammering on and snorted, “Oh good grief…you don’t need a new nose bowl …gimme that!”
What he did next was akin to black magic. Robert whipped off the tarp covering his English wheel. He twiddled with a few adjusting knobs, stuck the nose bowl between the wheels on the fixture and then started working the metal. In the space of less than five minutes, Bullwhip had that nose bowl worked as smooth as a baby’s behind. We were amazed!
We loaded up the stealth van with axle parts and the new smoothed-out nose bowl. Filled with resolve and encouraging thoughts, we headed back home to get serious about fixing Sharon’s pride and joy.
The next day we drove to Airparts, Inc. in Merriam, Kansas for some new 0.025 2024-T3 aluminum for the cowl sides. The original had been munched beyond repair. We’ve been going to Airparts for over 32 years for aircraft hardware and sheet aluminum. Their prices are right, too. Usually, if you can’t get over there, but order before 11 a.m., your order is shipped the same day.
Loaded up with the new 2024-T3 aluminum, bags of new Cleco 1/8-inch fasteners, Cleco pliers and high hopes, we headed home to Dick and Sharon’s Garage of Confusion to start work on the replacement cowl.
It actually went quite well. We laid out the new sheet aluminum on the floor underneath the old cowling side, which had been jumped on repeatedly, accompanied by grunts and curses until it was pretty straight and would make a decent pattern. We were able to get a good outline drawn on the new part.
Then using many clamps and drilling holes oh so carefully, the new cowl was fabricated. This took two days of slow, careful work, but it was finally all riveted together and ready to paint.

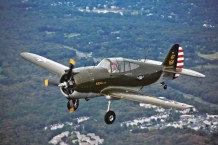
Back in the air again. Three weeks after the trip into the beans, Sharon and Dick make a pass down the runway at Liberty Landing International Airport. (Photo by Bob Punch.)
The biggest hurdle in the whole repair job was drilling the holes in the new side sheeting to match the receptacles in the Camloc fittings already in place on the fuselage. But once again, science and technology triumphed over ignorance and superstition. I whipped up a poor-man’s transfer fixture to mark the location of the holes to drill in the new cowling side, so they would match perfectly the Camloc receptacles on the fuselage.
I took two 1.5-inch wide by 12-inch strips of 0.025 2024-T3 aluminum and riveted them together at one end in several places so they wouldn’t slide. They looked like a clapper that you see at some sporting events. Then I drilled a 1/8-inch hole through both pieces at the loose end. I put a steel rivet in one side of the un-riveted end so it was pointing away from the other side. Then I placed two 1/8-inch aluminum standard (SAE) flat washers that fit over the rivet and pulled the rivet. The flat washers fit inside the Camloc receptacle perfectly. Then you slide the fixture over the edge of the cowling and place the aluminum washers in the Camloc’s receptacle. Holding the cowling side sheeting tight against the Camloc receptacle, you drill through the hole on the other side of the fixture and viola…the holes line up perfectly. All I had to do then was use a unibit to open the hole in the side of the cowling’s sheet metal to the diameter of the Camloc stud, install the stud and move on to the next hole. Worked every time.
The new PSRU arrived from Valley Engineering. That only took one day to install and line up the belts. The Culver prop was bolted on and it was time to go aviate again. Sharon was back in the air in only three weeks, with no signs of the event.
And so, the adventure continues.

![]()
Dick Starks has written two books about the joy of flying; “You Want To Build And Fly A What?” and “Fokkers At Six O’clock!!” He was the recipient of Flying’s 2001 Bax Seat Award “for perpetuating the Gordon Baxter tradition of communicating the excitement and romance of flight.” Dick and his wife, Sharon, both fly WW-I replica aircraft.