 Despite Newton’s claims, those of us who have been upside down, under the panel, with sweat dripping uphill, know that there are sopping exceptions to the theory of gravity. We’ve all been there.
Air conditioning an entire hangar is an expensive proposition and sometimes an old fan balanced on sawhorses and boxes is just no match for the heat of summer, especially when trapped in the bowels of the footwell. However, there is a way to get cool air into the airplane at greater cost than the old fan, but much less than the whole-hangar air conditioner.
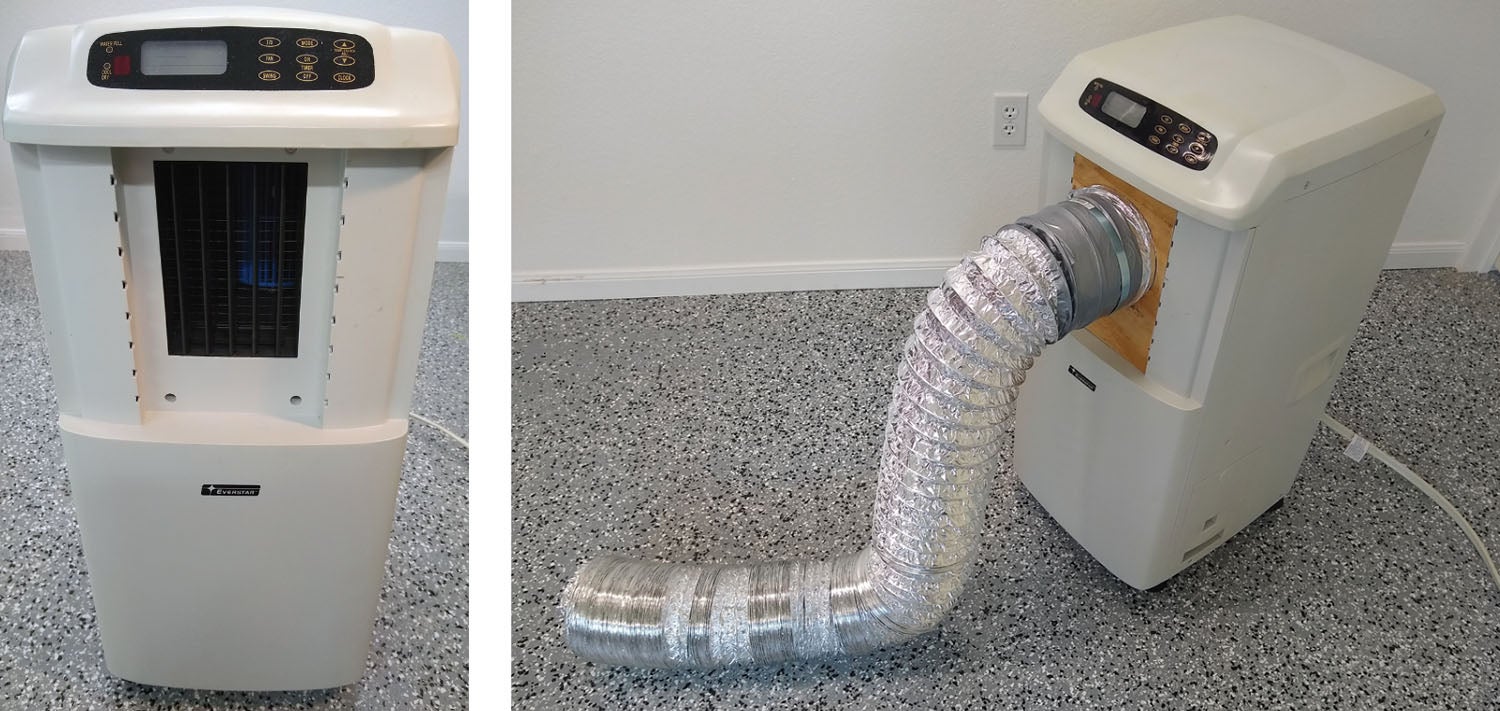
Portable or window mount air conditioners are available for reasonable cost and sometimes for next to nothing, if you come across a used one being removed as part of a remodel. In my case, I have a portable air conditioner originally assigned to emergency use in the event of a power outage. I live near Houston; around here power outages and loss of air conditioning is considered something of an emergency. However, like most portable and window air conditioners, balancing it on an airplane canopy or doorway sill is not practical. This means some way was needed to get the cold air coming out of a square hole, into a round duct, where it could be directed into the airplane.
As it turns out, the solution is simple and requires only a few items from the hardware store and minimal woodworking skills. The portable air conditioner used here is an Everstar MPA-08CR. However, many small air conditioners have a square outlet, so a similar approach should work for them. Those with long, horizontal outlets might call for some composite work, but that’s for another author to tackle. Let’s tackle this step by step.

Step 1: Remove the Louvers
Most small air conditioners have louvers covering the cold air outlet. These are intended to direct the air up, down or sideways into the room. They won’t be needed and will be in the way of the duct mount, so should be removed.
Step 2: Acquire Plywood and Supplies
Plywood costs like gold right now and only a piece measuring a little over 6 inches per side should be needed. With this in mind, a leftover from a flooring project might be of sufficient size. Otherwise, plywood, OSB or general flooring board of around 3/8-inch thickness should be sufficient.
Now that the louvers are out of the way, a square outlet on the air conditioner should be exposed. Cut the plywood to fit into or over the hole. If the outlet is recessed, the wood might be cut to be a pressure fit inside the outlet (the plastic housing will give a little bit as the wood is pressed into place). If not, the wood may need to be placed over the hole and affixed with double-sided tape or screws.
The following items will be needed from the local hardware store:
- 6-inch duct “takeoff,” e.g., Master Flow ATT06, $8.00
- 6-inch hose clamp, e.g., Everbilt MC6HD, $2.00
- 6-inch x 25-foot flexible aluminum foil duct, e.g., Everbilt Ever002, $28
You might get by with a shorter duct, but having a long length is nice if the unit is going to be located away from the doorway or sill of the aircraft and allows the cool air to be directed into the part of the cockpit where it is wanted most. A 25-foot duct is built a bit like a Slinky toy and collapses into quite a short length (around 18 inches) for storage when not needed.
Step 3: Build It!
For those of us who don’t have a 6-inch hole saw, a crude but effective way is to mark a 6-inch hole with a pencil and then drill paired ½-inch holes just inside the edge of the line. This will allow the blade of a Sawzall or jigsaw to be inserted and then follow the drawn line. Perfection is not needed here—the duct will seal against the back side of the wood, so the hole’s purpose is mostly mechanical.
Step 4: Fit the Hose, Finish the Job
The air takeoff should be inserted into the hole from the back side. Trim the flanges of the takeoff if necessary to fit within the outside edges of the wood.
Slide the duct over the takeoff. It may be necessary to rotate it to screw it onto the takeoff. Place a few wraps of duct tape over the duct/takeoff assembly once it’s in place to provide a more durable surface for the hose clamp, then tighten the hose clamp over the duct, securing it to the takeoff. Fit the assembly to the air conditioner, turn it on and enjoy being the coolest homebuilder on the block.


Hi Dave,
Great article! What plane is that in the picture? Bryce
Thanks – glad you enjoyed it!
It is an F1 Rocket.
Dave
If you are interested, you can read more about the airplane here: https://www.kitplanes.com/ten-years-with-a-time-machine/
Dave
Comments are closed.