Heres a small, fun and satisfying little project that takes little time or skill and gives almost instant satisfaction…and we all need one of those every now and then! (The project and the satisfaction.)
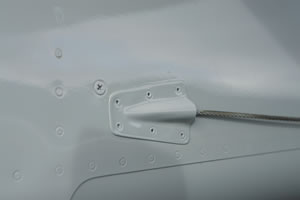
On most airplanes, there are at least two places where control cables exit the skin and are, at least for short runs, exposed. Its usually rudder cables penetrating the side of the fuselage, but there are plenty of designs with cable-actuated ailerons and even elevators. Putting a small, streamlined fairing over the cable exit hides the hole and might even add some fraction of a knot to forward progress. They can be made easily from either aluminum or fiberglass.
Building It
The shape of the fairing is a tapering section of a cone surrounded by mounting flanges on the long axis. To make it you’ll need a two-part die set. Start by making the female half of the die from a 5-inch-long block, about 3 to 4 inches square, of a resilient, interlinked, tough composite material. Like wood. A chunk of 4×4 fir will do just fine.
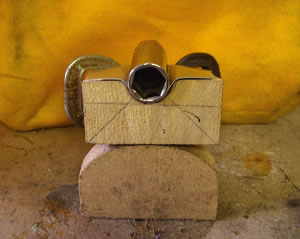
Drill the block along the lengthwise centerline. In the illustrations a 1-inch Forstner bit was used to drill a 3-inch-deep hole. There’s nothing magic about these dimensions-it was just the biggest bit in my shop, and the shank was only long enough to permit a 3-inch hole.
Once the hole was drilled, a line was scribed on side of the of the block, running from a point aligned with the center of the hole across to a point on the wall of the hole about an eighth-inch shy of the bottom. A sharp, coarse bandsaw blade cut the block into two pieces, one of which forms the die. After rounding the edges and smoothing out the saw marks, the mold is ready to receive a piece of soft aluminum (tempered aluminum works, too; it just takes a bit more effort).
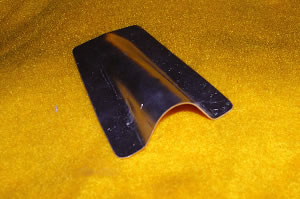
A short length of closet rod or pipe can serve as the male half of the die, but the examples shown here used a 5⁄8-inch-deep socket that measured 23⁄32 inch outside diameter…close enough. Cut a blank of soft aluminum to the width of the female die, and about a half inch longer than the recessed cone. Clamp or tack the blank to the female die with the front edges aligned. Tap the socket against the blank until a rough recess is started, then form the cone by pressing the rod into the aluminum with a vice or C-clamp. This will squeeze the aluminum into shape. The aluminum usually buckles up a little just in back of the point of the cone. Duckbill pliers or a small hand seamer will straighten it out in a few seconds-soft aluminum is pretty easy to work with. With a little tapping, trimming and edge-dressing, you’ll have a neat little fairing, ready to rivet or bond over the cable exit.
The female die can also be used as a female mold to build a composite fairing. Coat the mold surface with resin and then let it cure completely. Sand the surface to a smooth finish and coat it with release solution. Wet out three layers of 7-ounce fiberglass cloth (or lighter) and lay it in the mold. If you lay the weave at 45 to the long axis of the cone, the glass will conform to the curve more easily. After it cures, pop it free and finish to suit.


