
Taking out the trash? Not yet. The author is off to try out all the filter cutters he can find.
A lot has been printed about the need to cut open that oil filter and look for evidence of engine wear. But how? A visit to the retailers at Oshkosh and Sun n Fun revealed a wide range in tool prices. Are they all the same, and if so, why the price range? Looking at the hardware on the shelves showed that there are two prevalent approaches to opening the can: They use either the center of the filter or rely on the outer edge for support. Lets look at that a bit more carefully, though, because where the can is gripped seems like it should make a difference.
In all but one of these tools, the cutting is done by forcing a sharp wheel through the thin wall of the can, and then rotating the wheel around the perimeter. You have two forces to work with: radial to pierce the can, which means you need an opposing force, and rotational as you walk the cutting wheel around, which requires a stable axis.
Some of the cutters use the center threads of the filter for these requirements, while others use wheels on the opposite side of the cutter. Thats it. The rest is simply how much handle is mounted around the hardware that is doing those two jobs, how it is tightened, and what color is the finished tool.
Does It Make a Difference?
To answer this, I collected a bucket of used filters and went from hangar to hangar at several airports, talking with people about their cutters and then trying them out-the cutters, not the owners. What I found was surprising in that the high-priced cutters were not the best, and they all suffered some deficiencies that Ill describe. Hopefully, some savvy manufacturer will call me up, ask me to design the perfect can cutter, well split the profits, and Ill retire to Aruba. Or maybe hell just make a better cutter, and well all be happy.
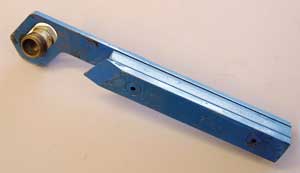
Three pounds of solid steel and a sharp point. Brute force did not win the day, though.
Youll note that I have deliberately omitted the crank-type cutters, the wall-mounted cutters and the fancy can holders only because they were overkill and way too expensive for a tool that gets used so infrequently. So I got my bucket of filters and went on a walkabout.
My first step was to just ask all the neighbors on the airport where I live if I could bring my bucket of filters over and try their cutters. The first candidate (see the photo opposite page) was a serious attempt to make a low-cost cutter. In retrospect, I would conclude that the operative word is attempt. The idea is to screw a round threaded piece into the filter and then walk the blade around the perimeter until the can is cut. Although my attempts looked like something from the carnival, the result most definitely did not win the fuzzy dice. I couldn’t get it to work. Perhaps thats why the owner said he didn’t want it back.
Next on the list was certainly what the Aussies might call flash. Its the Cancutter and has snazzy red anodizing, a big solid knob, beautiful machining and top-drawer hardware; this thing ought to have the end on the floor faster than fans diving for an Elvis handkerchief. Youll find it at www.cancutter.com for about $75.
At first glance I thought this would work like Godzillas tubing cutter-you know, take a turn, tighten it a bit, take another turn…except there was no screw to tighten. So with a light grip, round we go making a mark that gets pronounced, and then all of a sudden it simply breaks through! Whoa! I thought this was going to be James Bond, not Attila the Hun. I tried it again with the same result. A call to the owners (this thing is expensive, so they split the cost) revealed that they use it by simply grabbing, gripping and going around, slicing the can in two with one continuous motion. Another filter went in the vise, and it was time to just have at it! The can did indeed come apart quickly. I just expected subtlety out of such a beautiful example of the machinists art. Id have known this if I had just checked the web site beforehand; there’s a movie of it being used. Beethoven seems a bit over the top for background music, but its a good demonstration of a very effective tool.
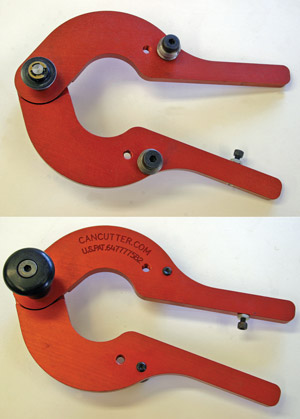
Top: Two concave, ball-bearing rollers on hardened shoulder screws and a razor sharp wheel. This Cancutter will do the job… possibly. Bottom: CNC machining even down to the name and patent number, and a knob you can really hang on to. But that knob is a clue to its use, that is, both hands are needed.
Shopping at the A&P
The next stop was at the local A&Ps to see what they liked. Jon Sanders, who worked at Placerville Aviation, was kind enough to dig out his favorite-the ubiquitous Champion filter cutter. Note that the cutter is positioned at the central axis of the filter instead of being opposed by a pair of wheels. That made it more laborious to use and required a glove or rag to remove the sharp-edged, oily filter base from the tool when the cut was complete.
This was a common problem with all of the tools, though. Technique sometimes avoided it, but if you’re using it only once or twice a year, practice is not going to make perfect here for quite awhile. The screw action should have, I assumed, made these work like a tubing cutter. And it did, almost. But something was not quite right. A close examination showed two things: One, the cutting wheel was badly chipped; and two, the wheel was cutting in an area of the can where the solid steel of the base was behind the thin steel of the can. That is what was destroying the cutting wheel.
Using several different cutters on a couple of dozen filters all in a couple of days showed that a key element in the cutting process has been overlooked by several of the makers: the cutting wheel should use the solid steel interior components of the filter as a shearing base. If the wheel is on that steel base, its a slow process and likely to chip the wheel. If the wheel is too far from the base, a lot of energy is lost in bending the wall of the can. I point this out not as a criticism of this particular style of cutter; all of them could or did suffer from this misalignment problem with only one of those I tried having the capacity for adjustment.
Several manufacturers make similar versions of this, and you’ll find them ranging from $50 to over $100 at Aircraft Spruce. Inasmuch as they all employ the same idea of holding on to the center thread for resistance to the forces of piercing and rotation, I did not test them all.
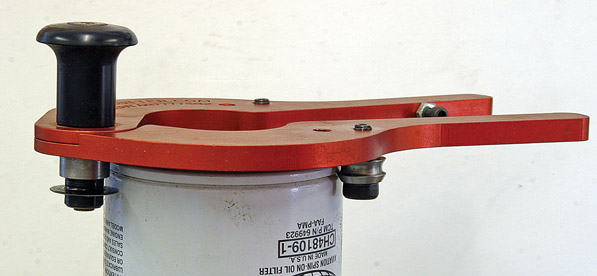
No mark yet from the cutter on the left. The two wheels, one showing on the right, are nicely concave so as to grab the bead of the can.
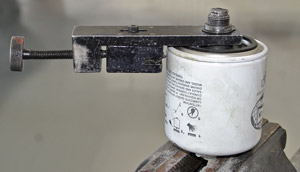
Straightforward in its use with a very stable circular path, the old-style Champion tool has been around forever.
Hungry Like the Wolf
Moving on down the hangars, I located a cutter from Airwolf (www.airwolf.com). It uses two wheels, and the blade is controlled by a screw. The wheels are simple ball bearings-nothing as sophisticated as the profiled wheels on the red wonder from Cancutter. That meant that after clamping the filter in a vise, a hand on top of the tool was needed to ensure that it tracked properly. That was not a problem in that your hand falls there naturally, but a large knob would be nice. That would add to the cost of an already expensive tool at $89, so skip it-the knob, that is. The Airwolf, like the Cancutter, worked very well, but not quite perfectly.
Wheels, and screws and high prices, oh my! OK, grab Toto and lets go next door to an A&P who had a surprise. Now, heres a different approach that I suspect had its genesis in the John Wayne, a foldable finger-thumb can opener used to access K-rations in WW-II. Its the only exception to the two styles of functioning I mentioned at the outset; that is, holding onto either the center of the filter or using the opposite side from the cutter. Using this filter cutter is rude, crude, effective and requires only a vise and a hammer. Pound the sharp point through the can, and start levering your way around. It works, and it cost Dick Wampack only $20 at Oshkosh. The downside is that he bought it 20 years ago, and there’s no makers mark. It came as a kit including a knife to cut the filter paper. Of course, $20 in 1989 would mean more now, but given the construction, its nowhere near as expensive as the techno-wonders with their profiled wheels and cutting blades. Does anybody know if its still available? I couldn’t find it other than in Dicks toolbox.
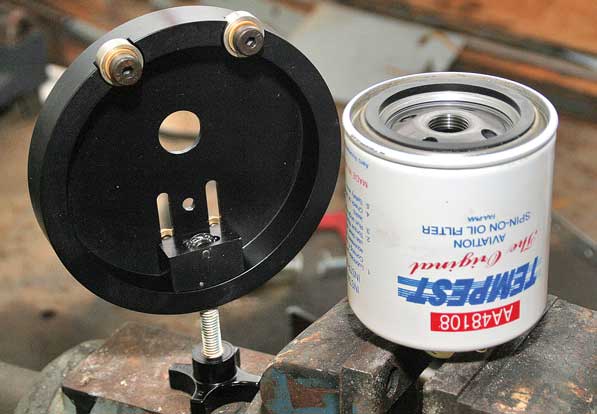
Two flat-profile wheels and a screw-in cutter. This one from Airwolf worked the best, but its expensive at $89.
Tom Tom
My last entry in this race around the can is from Toms Tools (available at Aircraft Spruce, www.aircraftspruce.com, for $52.30). No wimpy aluminum here, no sirree! A quarter inch of solid steel painted nicely black with a center pivot and a single wheel. It had a stack of washers under the cutter that positioned the cutting action perfectly with the cutter using the can end as the anvil.
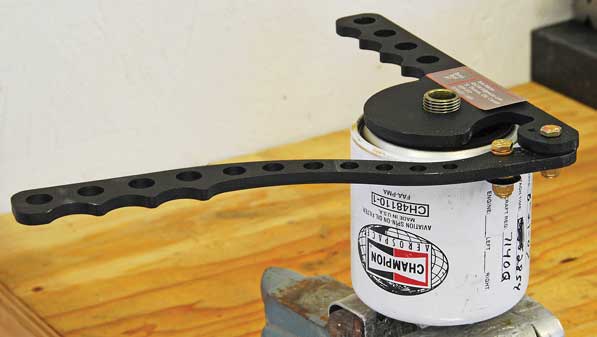
Tom’s tool, fully tightened and ready to cut. The longer, curved handle has just pierced the can and isn’t going to get closer to the shorter handle. A large nut on the can threads would stabilize the tool nicely.
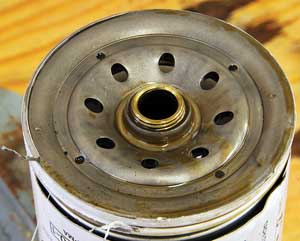
This is from Toms but could be any of the cutters. Look closely around the perimeter, and you’ll see that from about 8 oclock to 12 oclock the can has been folded over the steel base before it cut. This is caused by an unstable axis of rotation when pulling the handle around.
The handles seemed odd at first, as I thought they would be squeezed together something like your kitchen can opener. Turns out that Toms smarter than that; the long, curved handle is positioned so that once the cut is started, the leverage is divided between keeping the cutting wheel engaged and rotating the tool around the cut. Hmmm, thats quite subtle and on top of that its very effective.
The cutting wheel is at exactly the right height to achieve a shearing action against the can interior. You have to be sure to leave the rubber oil filter gasket in place to achieve this, though thats hardly an imposition. Toms has also included adapters to fit filters where the center thread is female, so you’re covered there as well. If there’s a flaw here, its that gasket. Using a flexible surface for an axis control isn’t ideal; the shearing line wandered. This could easily be fixed by taking out the gasket, removing an appropriate number of washers under the cutting wheel, and adding a nut to the threaded end of the filter to hold the tool in a single plane.
One other improvement would be a reshaping of the handles. They have fairly sharp corners that aren’t comfortable; if you had to do 10 filters, youd definitely need to wear gloves. Again, you can fix that yourself by rounding the corners, wearing gloves or letting your buddy do his own filter. What you cant fix would be to enlarge a couple of those holes in the handle, and then thread them to provide a place to store the two accessories. In the interest of keeping the weight down, Toms has not left enough material for threading. How about taking out the centers of the two bolts?
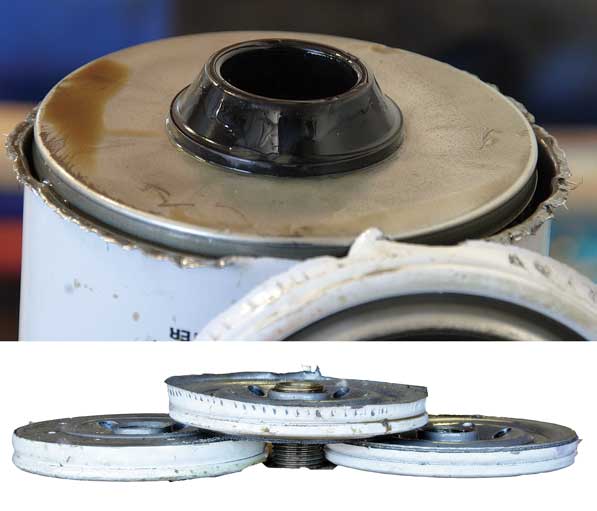
Top: The result of using the swing tool is that it looks as if its been gnawed off by a squirrel on steroids, but its going into the trash, so thats of no consequence. An internal spring has allowed the inner filter to move higher than the cut line. Bottom: These filter bases show the reason for various levels of performance of the can cutters: the right one is cutting with the steel base as a backing, which destroys the cutting wheel; the middle cuts too far away from the base (though this is from the John Wayne model, the Cancutter was about that far from the base); but the left one is the Goldilocks cut from the Airwolf.
Taking a close look at several of the removed filter bases showed that one, the Cancutter, cut too low to be able to use the steel in the filter base as a shearing die. It worked, but could work better. The black antique cut too high; with the cutting wheel right on the steel, it simply chipped the wheel. The cutters from Airwolf and Toms had the cutting wheel positioned at just the right height, making them the easiest to use.
While I didn’t find one tool that was leaps and bounds ahead of the others-perhaps there’s no such thing as the perfect tool?-its fair to say that dedicated tools are best for opening your filters. All are available online, and if I were to recommend a single one, it would have to be Toms for its price. Its not as pretty as the Cancutter, and its heavier than the Airwolf, but its less costly than either, its adjustable and it works.
Find a filter cutter you like the best? Send your recommendations to [email protected]


You forgot the Colchester Bantham Eagle can cutting tool.
Stick the nutty ind in the chuck , the threaded ‘engine’ end on the rotating centre in the tail stock . Aim a high speed cutting tool at the sweet spot where the can overlaps the base plate. Feed the cutter in thou by thou and Bingo it’s cut.
Also lubricates the lathe cross slide!