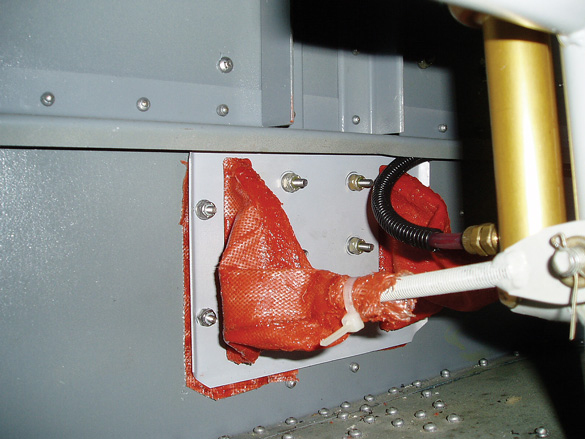
Several kit airplanes require you to think hard about anything that penetrates the firewall. In most installations, securing fixed components-wiring bundles, engine controls and so on-is relatively easy. There are plenty of methods, both homemade and off the shelf, for protecting these penetrations of the firewall.
But its a different story for components that have to move through the firewall, steering rods as an example. These rods connect the rudder pedals to the nosewheel strut and must be free to move through the firewall to do what they are supposed to do.
My Zenith CH-701 has two slots that are a half inch wide and 3.75 inches high. The steering rods have to move freely fore and aft as the nosewheel steers and, to further complicate things, must move vertically with each strut stroke.
Initially, I attached a rubber gasket to the firewall with slits for the steering rods. However, my Kidd carbon monoxide monitor occasionally showed peak readings of 25 ppm (parts per million). Although a transitory level of less than 30 ppm is generally safe, it was more than I was comfortable with. Taking a hint from a Sonex builder, I lowered this peak level by devising boots to seal the firewall openings. These were easily fabricated using fiberglass cloth that was impregnated with high-temperature RTV silicone sealant.

Boot Fabrication
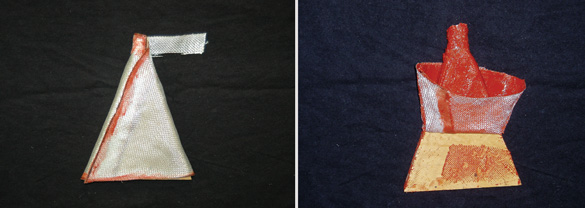
Start by making a form that is shaped like the desired boot. It must match the hole in the firewall, be long enough to provide a smooth transition from the hole size to the diameter of the rod, and it must be able to accommodate the motion of the rod. To provide a flap for mounting, the form is extended an additional inch.
For the CH-701, I cut out a half-inch plywood form and wrapped it with a sheet of paper to make a pattern. Be sure there is an overlap of about inch. Small slices in the paper may be needed for it to conform to the boot form. Transfer the pattern to the fiberglass cloth with a felt-tip pen. To keep the cloth from unraveling, outline the pattern with a swath of silicone and let it cure before cutting the cloth.
Attach one edge of the cloth to the form with a silicone bead and let it cure. Then wrap the cloth around the form and secure the overlapping edge with a second bead of silicone, and let it cure.
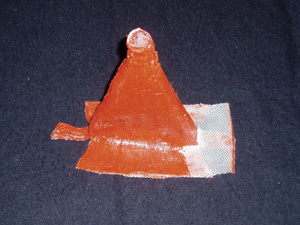
Using a putty knife, spread and fill the cloth with silicone. It is best to do one side at a time, including curing. Any gaps in the boot can be closed with small patches of cloth as needed. For example, a narrow strip of cloth at the rod end of the boot can be added. Add silicone to any thin areas as necessary.
Before curing is complete, slide a putty knife between the boot and the form to ease subsequent form and boot separation. After the silicone has cured, peel the boot from the form.
Cut slits in the corners at the bottom of the boot such that the height of the boot equals the height of the steering-rod slot. Fan out these flaps, fill in with cloth strips and coat with silicone. Now that you’ve done all that: Fabricate a second boot.
Boot Installation
Make a cover plate from 0.040-inch aluminum to match the steering-rod slots in the firewall. Slide the boots onto each steering rod and secure them with the cover plate. The silicone side of the boot goes to the cockpit side of the firewall. I used 8-32 screws to attach the plate, though rivets may also be used. Push the small end of the boot forward to allow movement of the steering rod, and secure the small end with a nylon tie wrap. (The nylon tie is acceptable because it is on the cabin side of the firewall, remember.)
And there you have it. You’ve sealed the firewall and maintained the steering rods movement. Not a bad outcome for a few afternoons work.





Hi Chuck, nice piece on the firewall boot, but somewhat concerned about that split pin on the retaining bolt on the far right of the pic….
Cheers
Marty