Checking your magneto timing is part of every yearly condition inspection, but beyond that it is something you should be able to do whenever you suspect that your magnetos’ performance is not up to snuff. If your plane seems a bit down on power or your mag tests start giving you drops of more than 120 rpm, it may be time to check your magneto timing. Or maybe your cylinder head temperatures (CHTs) are a little on the high side. Improper timing could cause that, too.
Effects of Improper Timing
If your timing is too far advanced your engine could be exposed to destructive detonation. In extreme cases, detonation can cause major internal damage to your engine—the kind of damage that can knock you out of the sky. The most common cause of detonation is timing that is too far advanced. It can also be caused by using gasoline with a low octane rating. This is something that could be a problem for people running auto gas in engines that require higher octane fuel, but if you stick to avgas, you should not have fuel-related detonation problems.
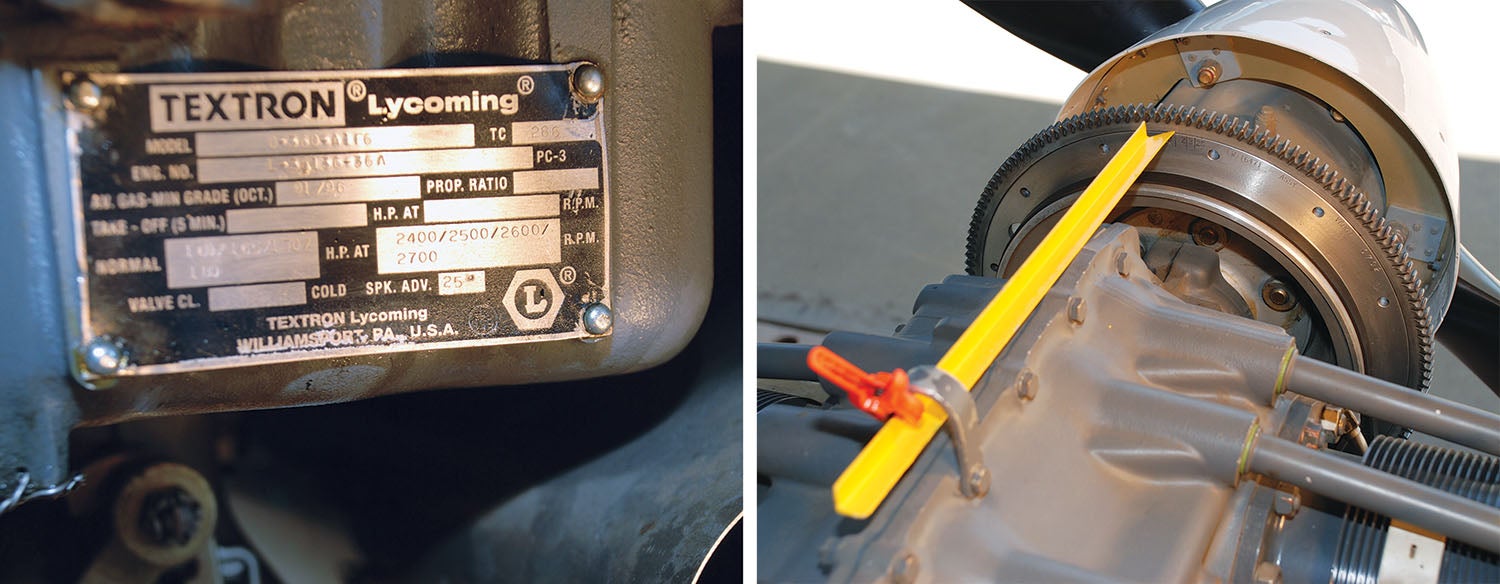
Timing does not advance itself over time in a good-running engine, but if the last person who adjusted your timing did it wrong you could end up with more advance than you want. To be sure you are using the right value, check the engine data plate found on the lower, right side of the engine sump. Most four-cylinder Lycoming engines should be set to 25° before top dead center, but some, such as the IO-390, should be set to 20°. Always check to be sure.
Timing tends to retard itself over time as the parts of the magneto wear, especially the follower on the points. In fact, a big reason why Slick magnetos need a 500-hour inspection is to check for wear on the points. Timing that was once set correctly at 25° a year ago could have drifted down to 23 or 24°. This retarding of the timing causes the engine to lose power. Under most circumstances, this minor power loss may not even be noticed, but every now and then it is really important to have full power. You can detect this performance loss in diminished climb performance or longer-than-usual takeoff rolls. You should not let this go uncorrected.
External vs. Internal Timing
The timing you set with your buzz box once a year is external timing. It is adjusted by rotating the magneto until it fires the Number 1 spark plug at the prescribed time. The engine will run best when both magnetos fire at exactly the same time, but it’s very difficult to achieve absolute precision. So if you can get both magnetos to fire within 0.5° of each other, you can probably call that good enough.
Internal timing is determined by when the points open and close, causing the coil to send a high-voltage shot of power through the plug wires to the spark plugs. This internal timing is also called E-gap. It changes due to wear on the points follower. Timing can also vary as the other internal parts wear, and this can cause erratic timing. This is why a Slick magneto needs to be opened up, inspected and repaired as needed (IRAN) every 500 hours. You could just replace the points and reset the E-gap every so often, but that would not address the other internal wear that can happen.
What we find is that internal timing changes affect external timing. This can be corrected by adjusting external timing to a point, but only to a point, after which we need to dig into the inner workings of the magneto.
Adjusting External Timing
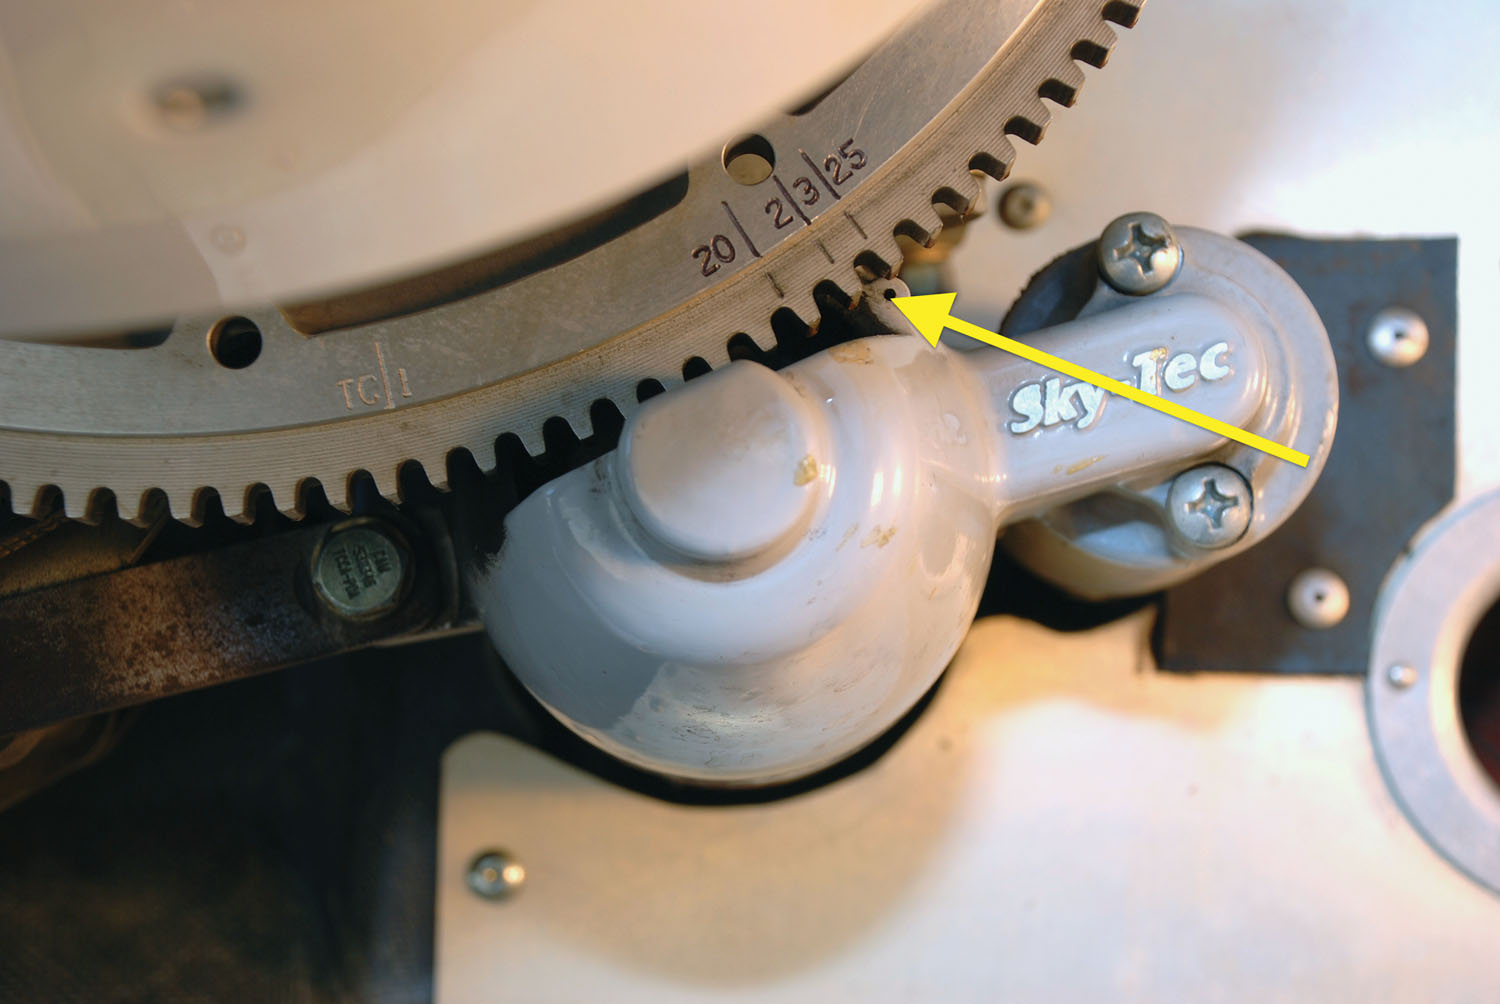
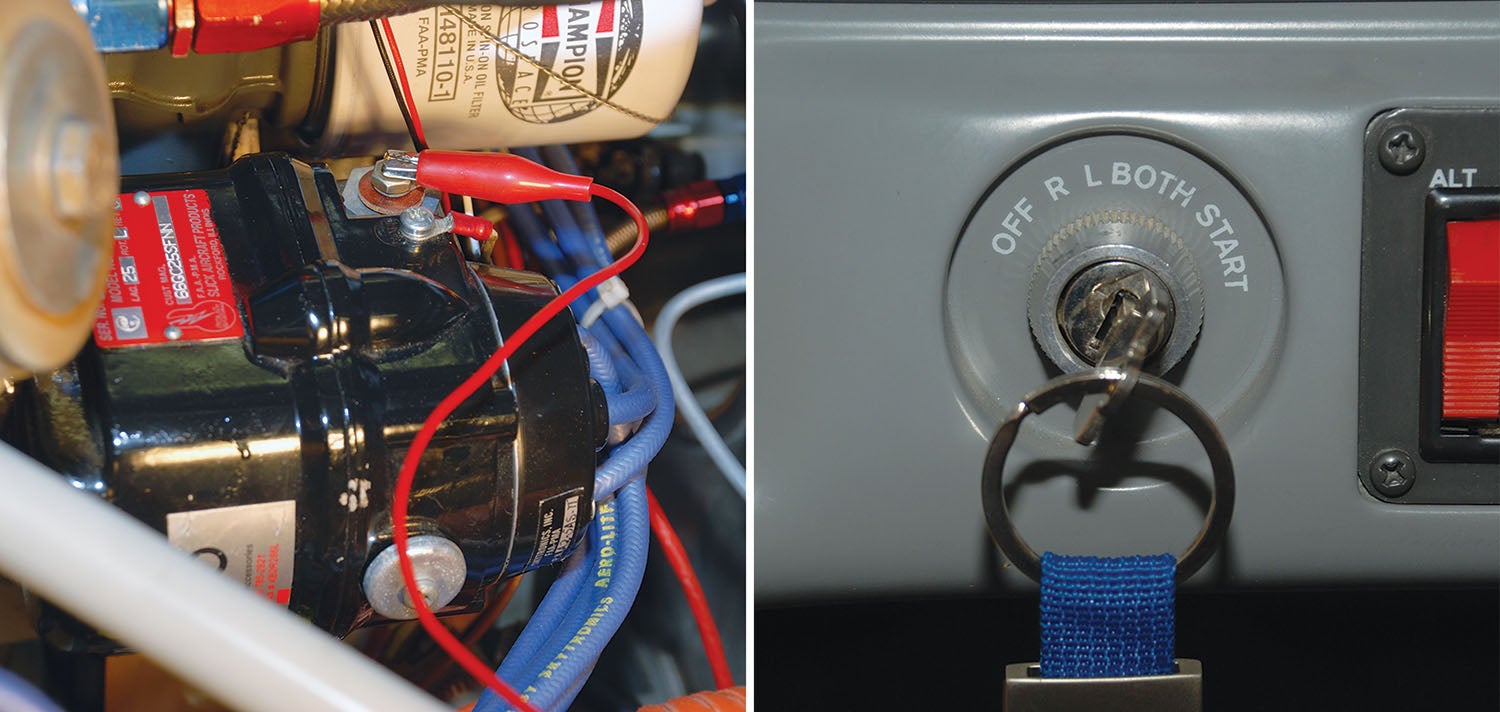
External timing is adjusted by rotating the magnetos until the precise timing is achieved at the Number 1 cylinder (front right on Lycomings). To do this, first remove at least one spark plug from each cylinder. This is vitally important because you will be turning the propeller with hot mags that could cause a cylinder to fire and thus severely injure you.
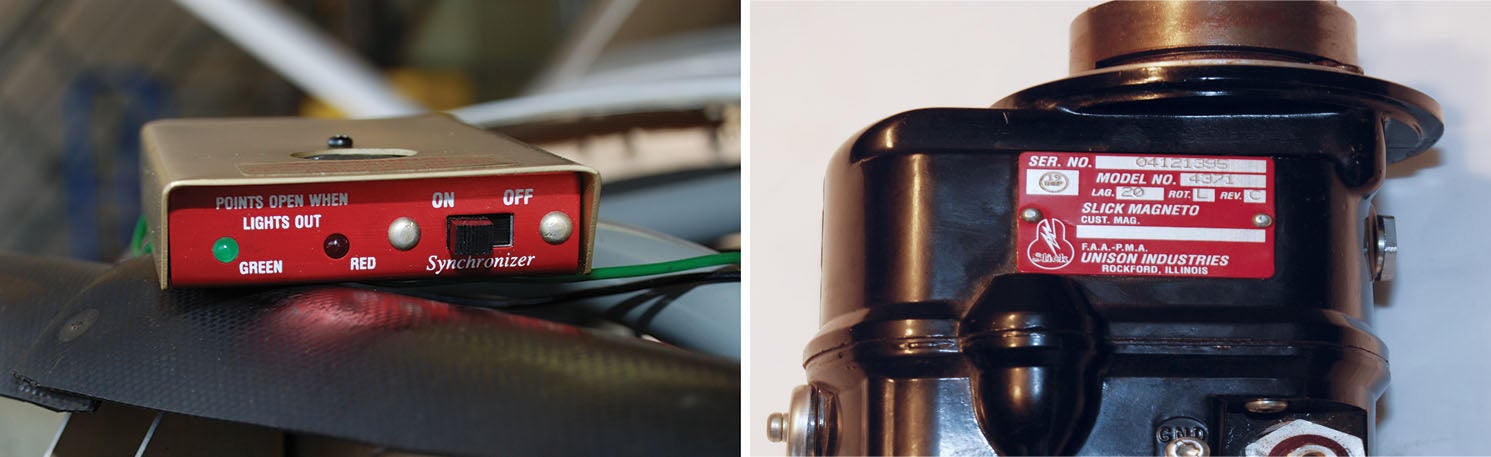
With the spark plugs removed, turn the engine to the firing position for Number 1 cylinder—typically the 25° mark, but be sure to check. Hold your thumb over the open spark plug hole to be sure the cylinder is on the compression stroke. Now turn the starter switch to the Both position or disconnect both P-leads. Then connect magneto timing box to each magneto P-lead and to ground. Next, turn the engine in the normal direction of rotation past the timing mark until you hear the impulse coupling click. It is not subtle, so you shouldn’t have a hard time hearing it. Then back the engine up to a position before the timing mark and re-approach the mark in the direction of normal engine rotation, stopping at the mark. In a perfect world, both magnetos would be in the firing position and your buzz box would be buzzing, but such is not likely to be the case.
Assuming your magnetos are not perfectly timed, you will need to adjust them to get as close as you can. This entails loosening up the two 1/2-inch nuts that hold each magneto in place and rotating each one in turn until it fires at the prescribed timing mark. Sometimes magnetos are stuck and won’t turn because someone has used gasket cement to stop a leak. In such a case it may be necessary to remove the magneto, clean it up and replace the gasket before you can reset the timing.
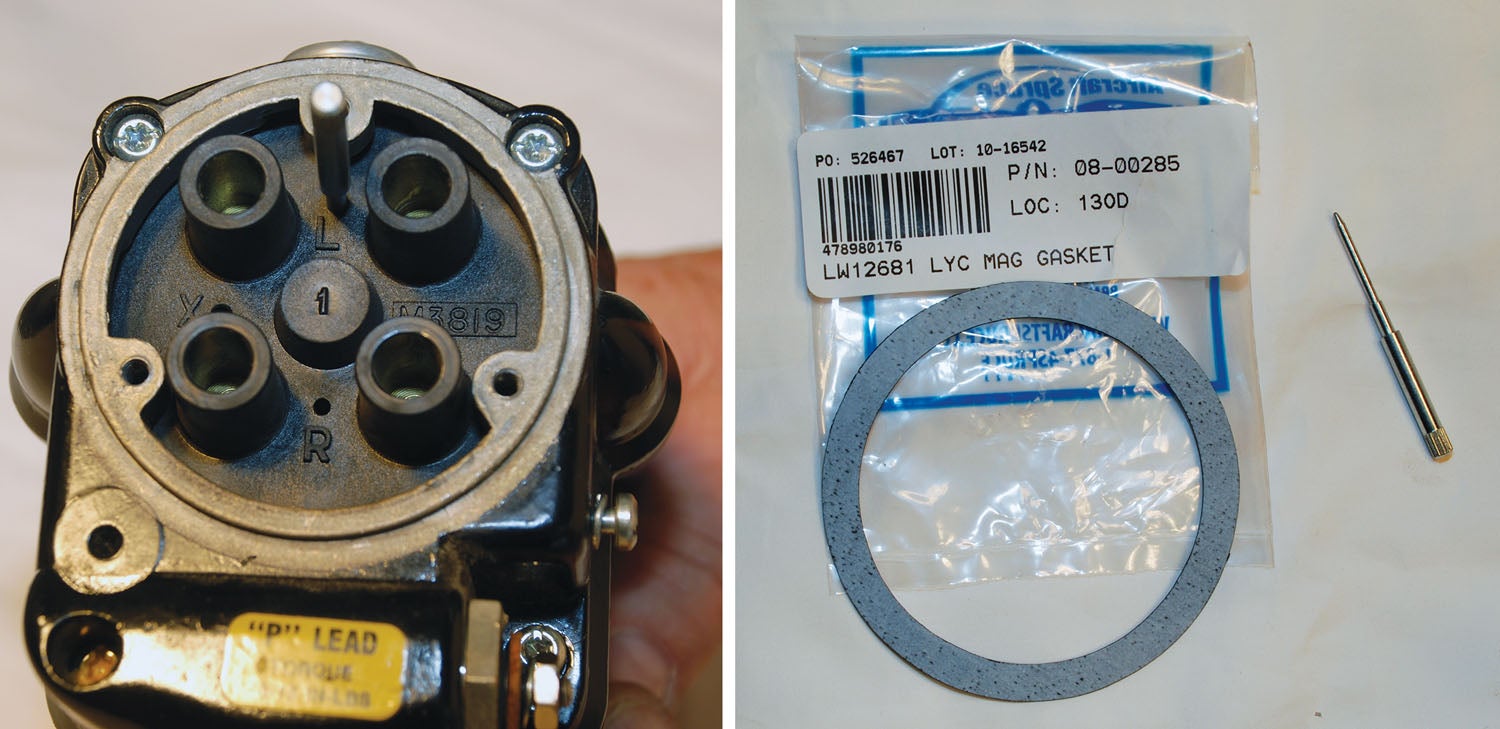
If you are very careful and a little lucky, you can simply pull the magneto back, clean it up and slide it back into the same position it was in before. However, if you aren’t lucky, you will need to remove the spark-plug cap from the magneto and turn it until the locating pin will slide into place. This pin case be purchased at your favorite airplane parts supplier for a nominal amount. Just be sure to place the pin in the hole marked “L” for a left-hand rotating magneto (most common) or in the “R” hole if you have a right-hand magneto. The direction is on the magneto data plate for your reference. With the pin in place and the engine set to the firing point, reinstall the magneto and secure the two retaining nuts. Once the magneto is in place, you can remove the pin and reinstall the spark plug wire cap.
With that task out of the way, it is time to get back to setting both magnetos to the correct firing point. This is usually an iterative process; in other words, you set it, tighten the retaining nuts and check it. Then you do it again until you get it exactly right. With one magneto set, it is time to do the same thing to the other magneto until they are both as close to perfect as you can get them.
Once the timing is set to your satisfaction, turn the key to the Off position, reconnect the P leads and reinstall the spark plugs. Of course, while the spark plugs are out it is a good time to inspect, clean, and gap them. Be sure to use anti-seize when you install the plugs and torque them to 35 foot-pounds, assuming a Lycoming engine. It is a good idea to have someone with experience help you through the process the first time. It is not terribly difficult, but reading about it and having someone walk you through it are hardly the same thing.
If your magnetos are near the 500-hour mark since last overhaul, it might be wise to go ahead and send them in for an inspection and repair. With an Experimental/Amateur-Built aircraft, you are not necessarily bound to the 500-hour inspection limit, depending on your operating limitations. But in my experience, magnetos with much over 500 hours on them will start to drift off time and deliver poor mag checks. Your mileage may vary, as they say.
There is an EAA “Hints for Home-builders” video that may help to make my written description easier to understand entitled, “Using a Magneto Synchronizer.” If you are taking on this task for the first time, it is worth seeing.
Internal Timing
Adjusting internal timing is more difficult than setting external timing, but you can do it with a little help from a more-experienced friend. My purpose here is not to encourage you to attempt this work, but to inform you of the process. If you decide to tackle internal timing adjustment, you should do so under the supervision of an experienced aviation mechanic. As with external timing, the process is not so much difficult as it is important to get it right.
It is most likely that you will never need to reset internal timing in between magneto overhauls, but if you feel the need and have the correct tools and expertise, here is how you do it. In all cases it is strongly recommended that you acquire a copy of the Slick L-1363F 4300/6300 Series Magneto Maintenance and Overhaul Manual. You can view the manual online at various sites or purchase it for $23.50.
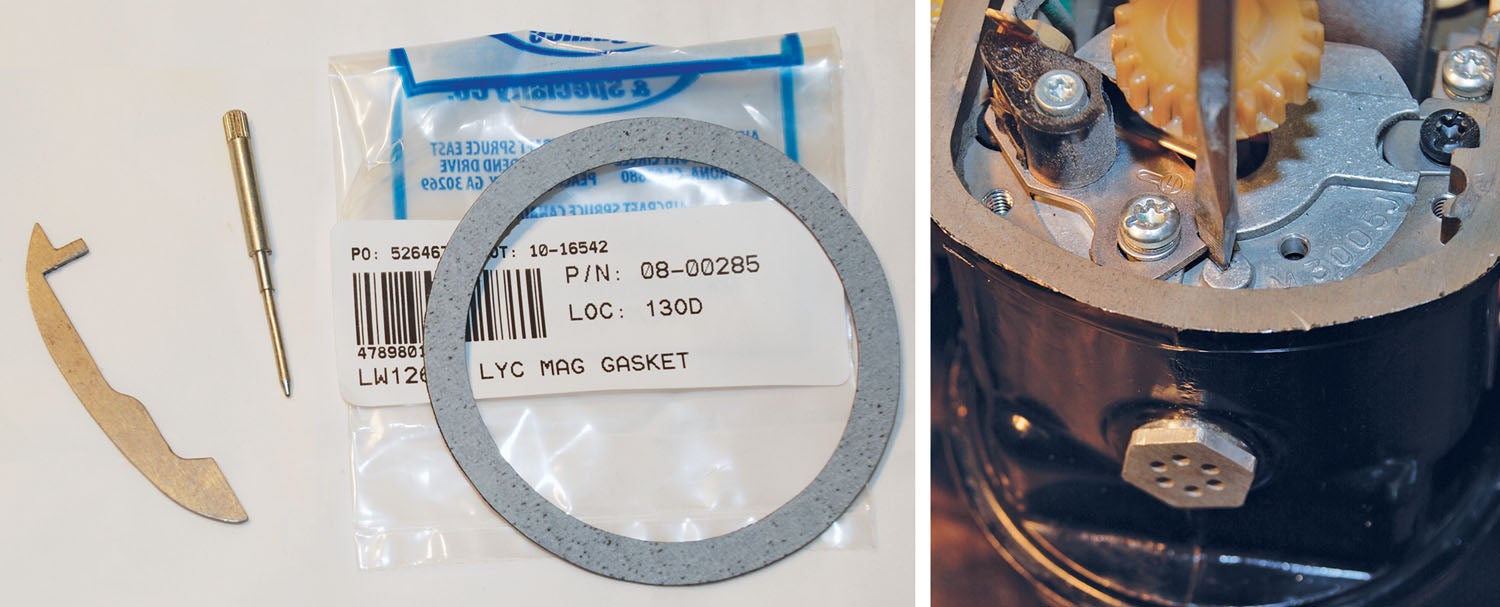
To set the E-gap or internal timing on a Slick magneto you will need a Slick T-150 E-gap tool. It is available separately from Sky Geek for about $15. Other vendors only seem to have it as part of a $500 Slick magneto kit, which contains many extra tools that you don’t need to set internal timing. The tool should come with instructions for its proper use.

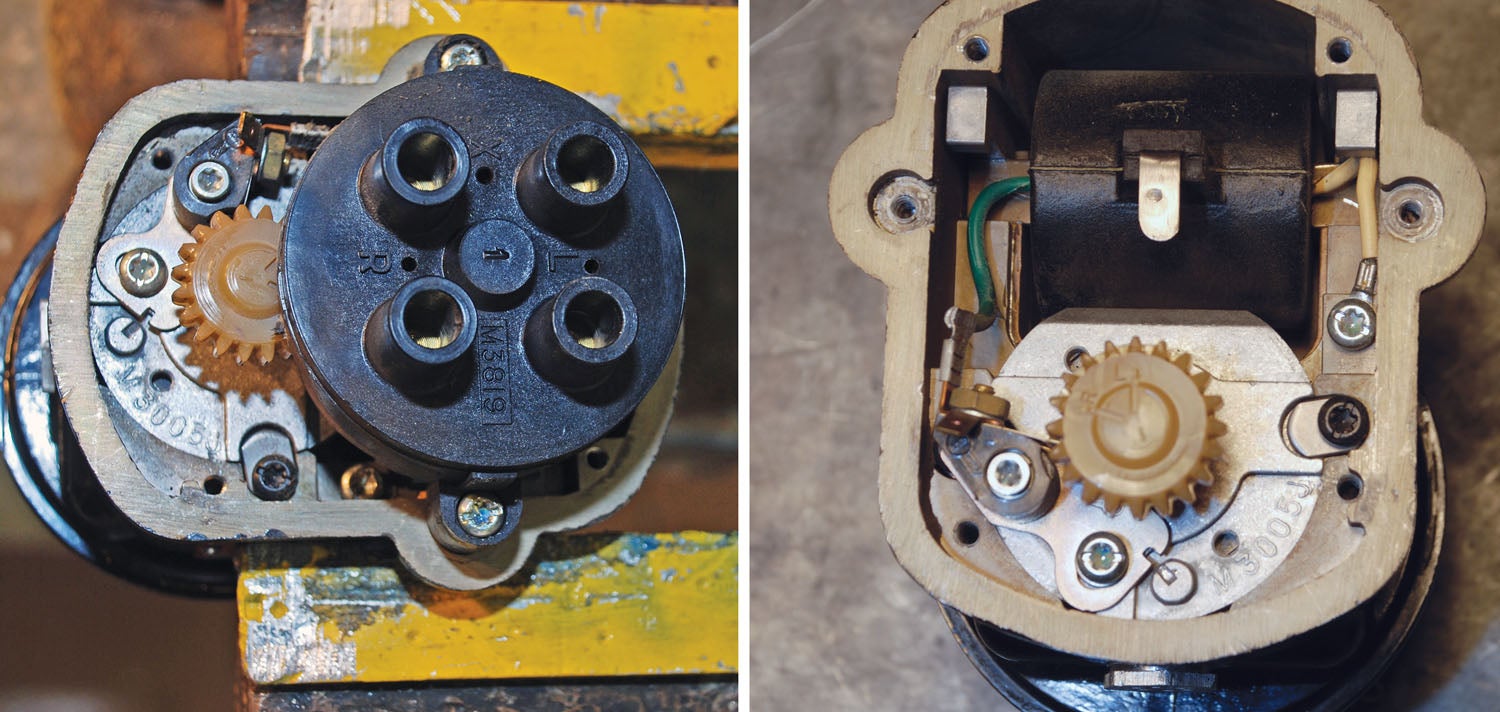
Here are the basic steps: Remove the magneto from the airplane, including removing the spark plug wires and cap. Then remove the distributor block (round, black plastic part) and set aside. The coil is now clearly visible. Next remove upper part of the magneto housing from the magneto, and hold the magneto so that the coil is at the top (12 o’clock position).
The armature is below the white nylon gear. There will be two slots cut into the side of the armature. One marked “R” the other marked “L.” Place the T-150 tool into the L slot for a left-hand magneto (most common with Lycoming engines) or the R slot for a right-hand one. The notched end goes in the slot on newer mags with the slot in the magnet head, but the flat end works best on older mags without the slot in the magnet head. The data plate will tell you if you have a right-hand or a left-hand magneto.
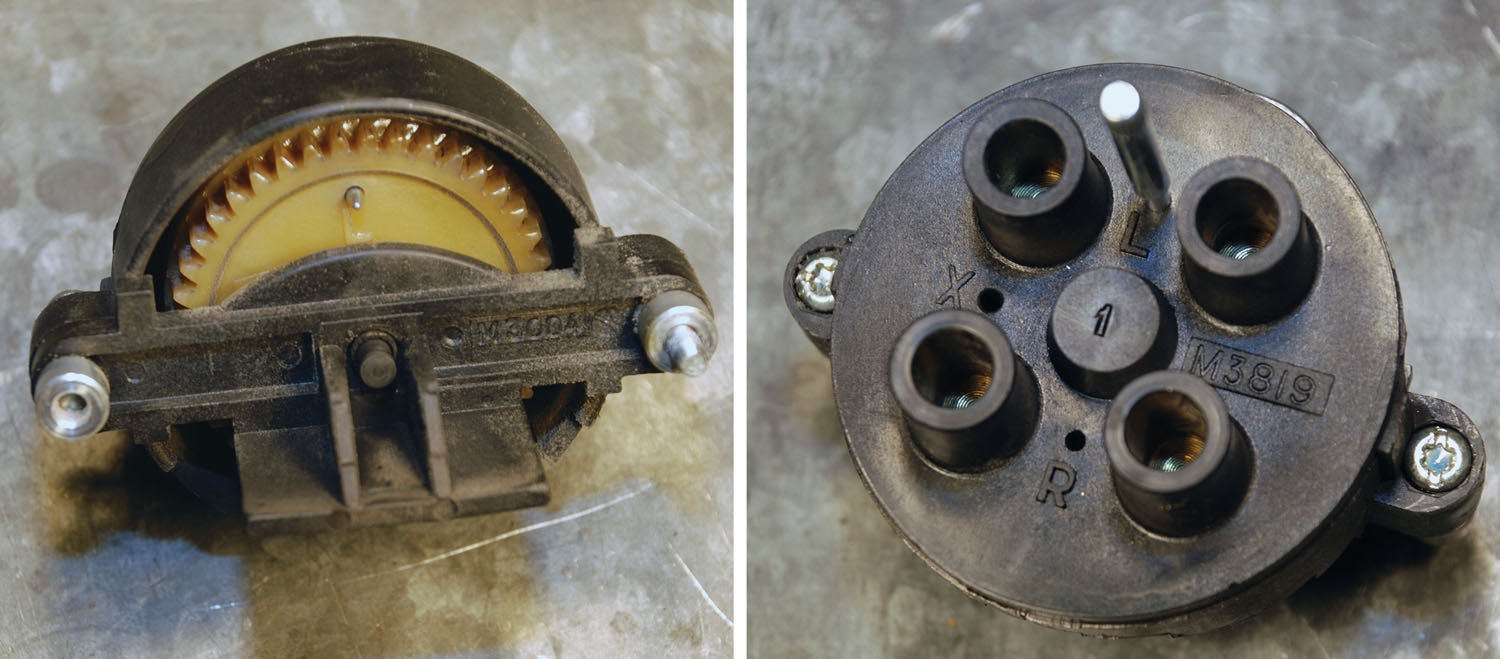
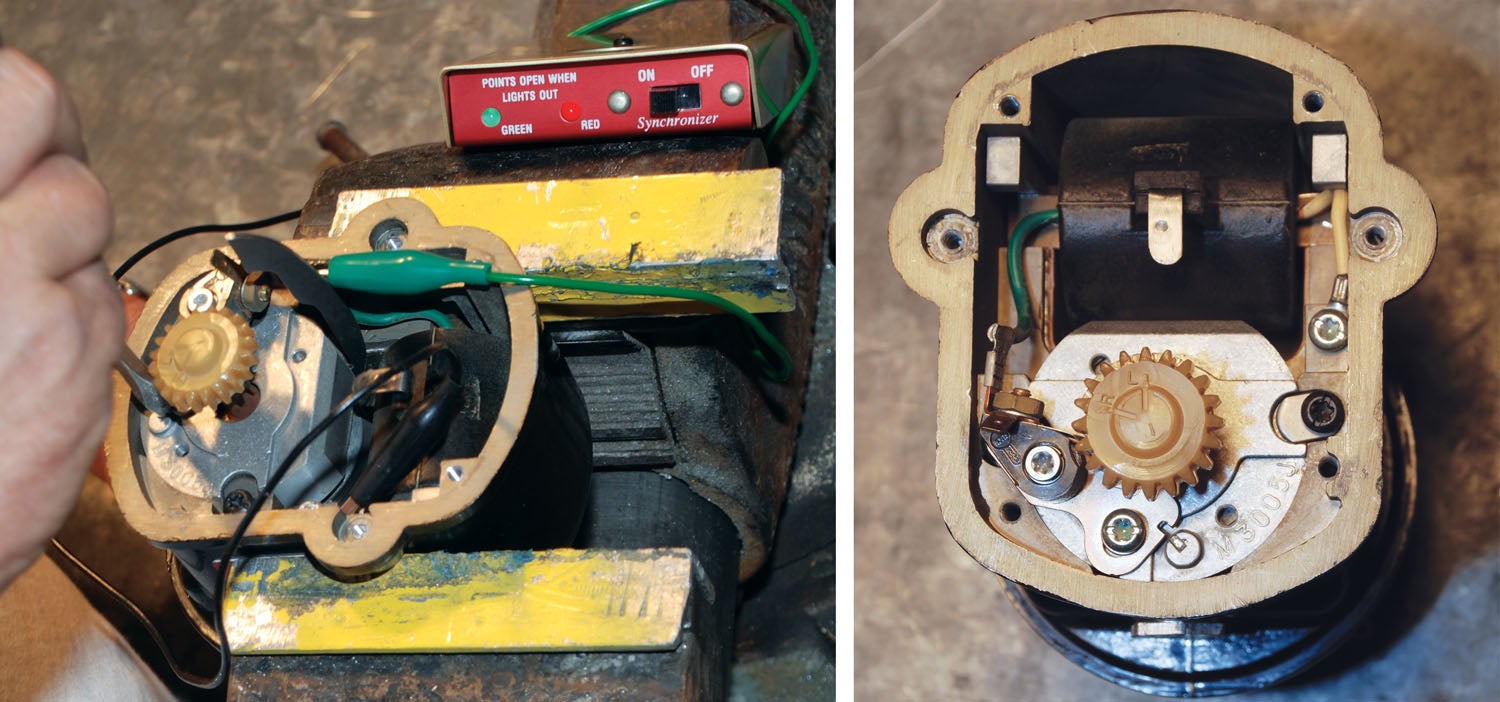
Rotate the magneto housing while holding the drive gear in place so that the armature turns in the housing. Turn the housing clockwise for left-hand mags or counterclockwise for right-hand mags. Turn it until the E-gap tool rests against the pole laminations in the magneto frame. You are now in the E-gap position. Next loosen the points retaining screw enough so that the points baseplate can move with moderate effort. Connect your magneto timing light so that the ground wire goes to the magneto housing and the green or red wire goes to the points wire connection. While holding the armature steady adjust the breaker points so the timing light just begins to indicate the points opening. To do this you will need a flat-blade screwdriver. Place it in the slot on the edge of the points baseplate and turn it slightly right or left as needed to make the points move. With the points properly set, tighten the screws that hold them in place.

To reassemble the magneto, first align the L or R mark on the distributor gear (white nylon gear), depending on the magneto, so it points toward the 12 o’clock position. Place the T-118 locking pin in the distributor block and rotate its gear (not the gear on the armature) until the locking pin goes all the way down into its indexing hole. Then carefully reinstall the distributor block. Use some Loctite 242 on the screw threads. Reinstall the magneto housing. When you do, be sure the wire from the condenser is connected. Reinstall the magneto on the engine. Don’t forget to remove the pin before you attempt to set the external timing.
If your magneto has gone 500 hours or more since it was last serviced, it probably makes more sense to have it professionally overhauled than to bother with resetting the internal timing. There are many other things that need to be done to your magneto besides setting the timing to keep it running at its best. Some of these things can only be done by a magneto shop.
If you have removed the magnetos to work on them, be sure to reconnect the P-leads and verify that the ignition switch is in the Off position before working on the engine. It is vitally important that the magnetos be grounded whenever there is a possibility that the prop will be turned. It is also a good practice to replace the magneto gaskets whenever the magnetos are removed, just to reduce the chance of leaks.
![[Credit: Lisa Turner]](https://www.kitplanes.com/wp-content/uploads/2026/02/Fuel-Selector.jpg?w=218&h=150&crop=1 "Fuel Follies")


")


It would be better to reference the current revision of the Slick manual, which is L-1363G (revised Oct. 30, 2017). Revision F (L-1363F) is from 2011.
The other things worth mentioning:
1. Use torque wrenches for everything. There is a torque table in the back of the Slick manual.
2. Be careful to keep track of the position of the P-leads. Make sure they don’t get reversed at the mags. It makes for some challenging troubleshooting if your mags are reversed to the mag switch.
Readers should be aware that the Sky-Tec XLT starter (For Lycoming) does not have a timing mark. Timing will need to be done using the upper crankcase seam and the marks on the aft side of the flywheel. Since I had a baffle that was in the way, I riveted a small angle on the face of the baffle, in line with the crankcase seam, and when timing, temporarily install an aluminum pointer on the angle with clecos. Works great! Picture: https://www.flickr.com/photos/baditude_rv-4/4961952200/in/dateposted-public/
Similar article for Bendix mags on Continental engines?
Thanks!
hello Dave
I am a French Aircraft builder (Jodel d18 with Limbach engine) and a subscriber and reader of Kitplane review.
Yours articles are very interesting and clear about magneto
I have a question on internal adjustment concerning 4230 right rotation magneto (vw) installed on my VW (Limbach) engine
Using the tool T 150 engaged in the right slot on the rotor in wich side the T100 gauge must be located after rotation of the magneto; on the right or left side of the frame of the magneto
on the photo, the t150 gauge is on located the left side ( L magneto)
for a R magneto does T 150 gauge must be located at the same place , or at the opposite side, on the right side of the magneto frame ?
Slick maintenance manual is not clear on this point .
thank you very much) for the answer
I don’t know the answer to your question. I suggest you contact Champion ( Slick) for clarification.
Comments are closed.