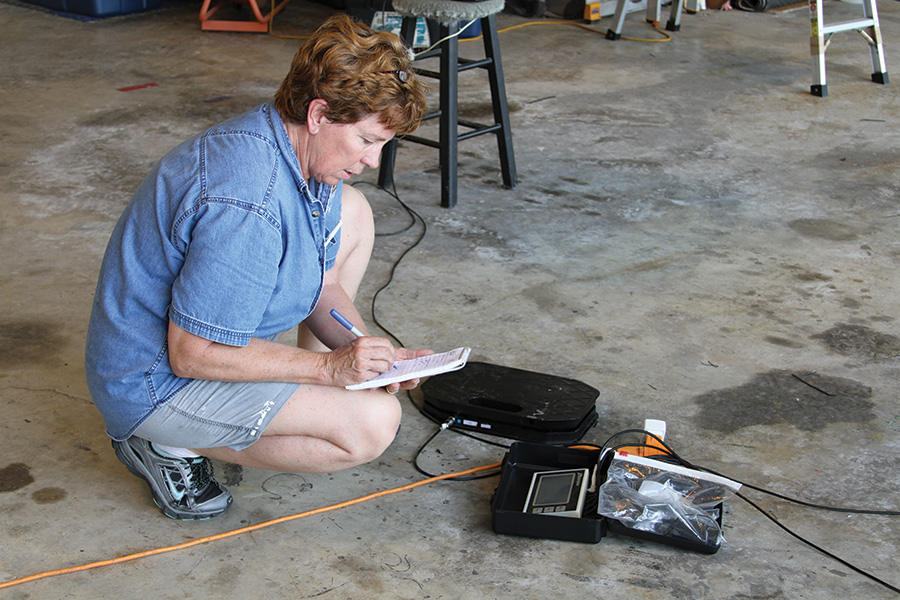
Weighing your plane and calculating the center of gravity (CG) are critical steps to take before your first flight or after any major modification. Any aircraft will only fly well if its weight is distributed in such a way that its controls can easily produce stable flight. A CG that is too far forward will make the plane hard to land, and a rearward CG that is too far back can make the plane very unstable and possibly unable to recover from a stall. But before we get too far along, let’s review a few key terms.
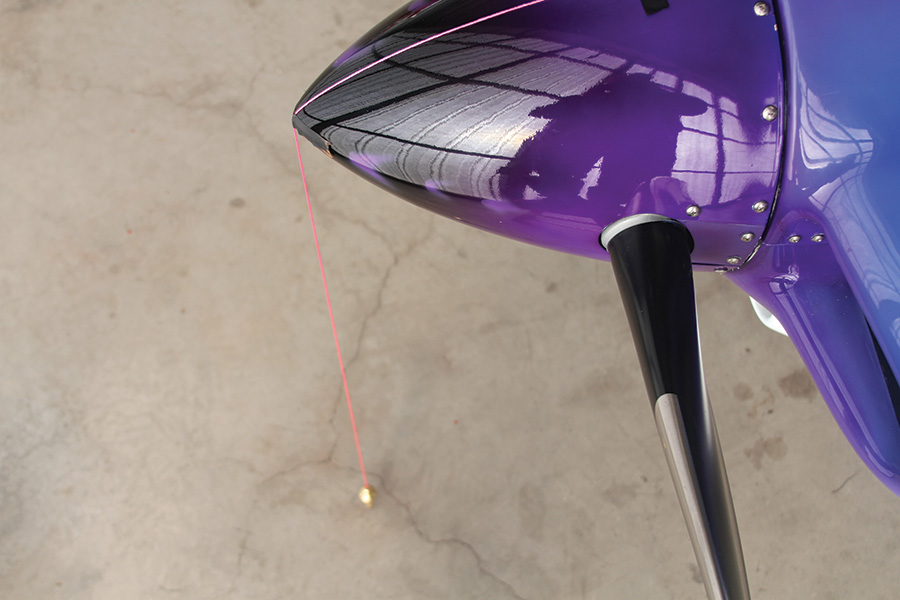
Use a plumb bob to drop a line down from the center of the spinner and from the center of the tail cone to establish a line from front to back on the floor.
Weight
Empty weight: typically the weight of the complete airplane with vital fluids such as oil, hydraulic fluid, unusable fuel, and nothing else. This weight should include all interior items, wheelpants, and paint. If you weigh before painting, you should repeat the process after your plane comes out of the paint shop.
Gross weight: the maximum weight of the airplane, fuel, passengers, and cargo, as determined by the designer or the builder.
Useful load: the difference between gross weight and empty weight. However, the useful load may be limited by the location of various items in the plane due to their effect on center of gravity.
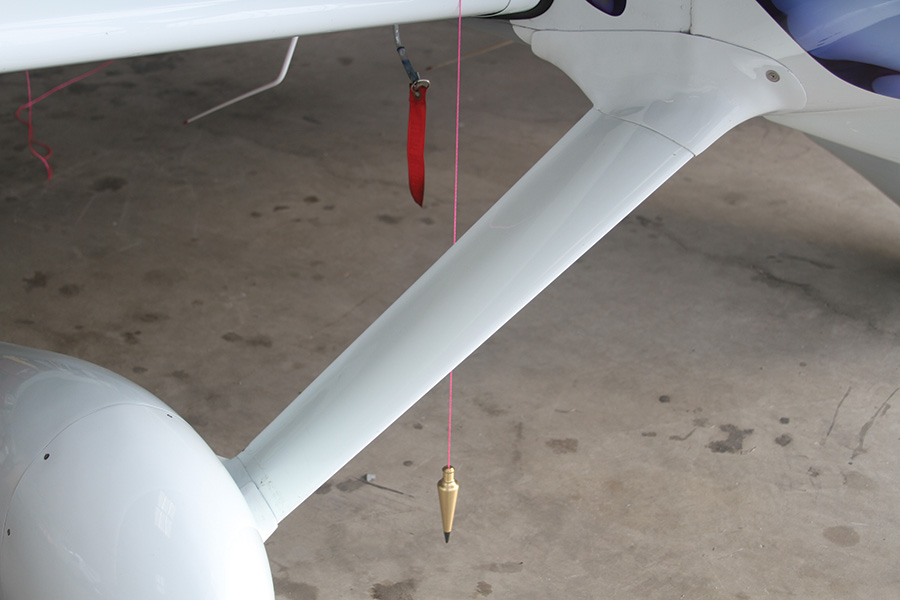
Plumb down from the leading edge of the wings or whatever other reference point is needed to establish the datum location. Use the same basic technique to drop down the locations of the mainwheel and the tailwheel.
Datum
A point determined by the designer from which all other dimensions are taken. This may be an actual point such as the firewall or the leading edge of the wings, or it may be an imaginary point out in front of the airplane.
Arm or Moment Arm
The arm is the distance from the datum to the center of gravity of any object in the airplane that we need to consider. It is important because the farther any weight is from the datum, the more moment it will produce. This is similar to the principle of leverage. The longer the lever, the more force you can exert with it.
Moment
Moment is simply weight multiplied by distance. Intuitively you know that a large weight in the back of the plane (farther from the datum) will have more effect on the flight characteristics of the airplane than the same weight positioned near the center of the plane. We can calculate that effect by determining the moment that such a weight exerts.
Center of Gravity
The center of gravity, sometimes just called CG for short, is the imaginary point at which the plane could be balanced, as if all the weight of the plane were concentrated in a single point. You can calculate the center of gravity by dividing the total moment by the total weight for any given load. The relationship between the center of gravity and the center of lift plays a vital role in determining the stability of the aircraft. A pilot is expected to know these things from his or her training, but it is easy to forget.
What You Need
To weigh any aircraft you will need a good set of scales. Calibrated electronic scales are the best choice, but admittedly they are expensive. Sometimes an EAA chapter can buy a set and share it among the members. There are now bathroom scales that go up to 500 pounds, making that a lower-cost option, but the accuracy of these scales is far from assured. Weight and balance is important enough to be sure it is done well, so use the best scales you can get. Along with the scales, you will need some ramps to get the plane up on the scales, and a level place to work that is protected from the wind.
Besides good scales, good information is very important. Kits and even plans should have information about weight and balance measurements and the CG envelope. The better plans and assembly manuals have step-by-step guidance for weighing your plane and calculating the center of gravity. At a minimum you need the datum point and the CG envelope to do a proper weight and balance. Everything else can be weighed or measured, but without those two items you are really in the dark.

Line the plane up with some gentle ramps to make it easy to push the plane onto the scales. Weigh the plane inside a hangar if at all possible.
Measure First
Before weighing the plane you will need to verify the location of the datum and other key points. To do this you will likely need a tape measure, a plumb bob, some masking tape, a pencil or marker of some sort, a carpenter’s chalk box, and a level. A carpenter’s square can also be helpful, but you can probably do without it if you need to. You will also need some boards of various thicknesses to level the plane and a support to elevate the tail if you are weighing a plane with conventional gear.
One might ask, “Why do we need to verify dimensions? I followed the instructions.” You would be amazed to see the problems that come up. One plane we saw had some of its dimensions referenced to a firewall datum and others to a wing leading-edge datum—on the same plane. Measuring everything was the only way to sort this out. Another plane had trailing-link maingear that swung back as fuel was added. In that case, the maingear location had to be measured with no fuel, and with full fuel, to do the weight and balance calculations correctly. In another, the builder had modified the gear to move the maingear forward. Most of the time there are no problems with dimensions, but most of the time is not the same as all of the time. Measure and verify, then weigh.
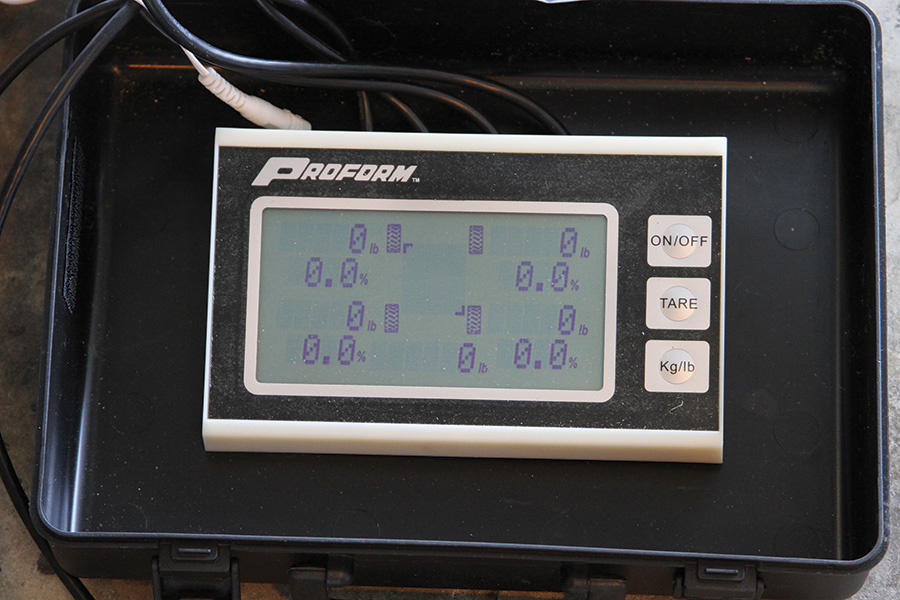
Be sure to zero out the scales before you start. Many scales allow you to zero out the weight of leveling boards or chocks at this time.
Getting Started
The measuring process begins with finding a nice, flat, clean floor, preferably inside, out of the wind, and then leveling the plane. Then use a plumb bob to drop down marks for the center of the spinner and the center of the tail cone to the floor. It works well to put tape on the floor in the approximate location, and then make an exact mark on the tape. Next, establish a longitudinal line from front to back using a carpenter’s chalk box. Establish the datum by dropping down another mark, from a point of known location such as the firewall, using the plumb bob again and mark it on the longitudinal line. If the leading edge of the wing is the datum, mark both wings and connect the two points with a line. Make a mark where that line crosses the front/back line. Do the same thing for the mainwheels and the tailwheel. It is usually necessary to offset from the tailwheel to clear the leveling support.
Now you can place your tape measure on the datum mark and measure to your key points. Compare these numbers to the plans or assembly instructions and double-check and adjust as necessary. You will need to use the actual measurements in your calculations, even if they don’t agree with the plans or the manual. If there are any differences exceeding fractions of an inch, you should find out why before you go any further.
Weighing the Plane
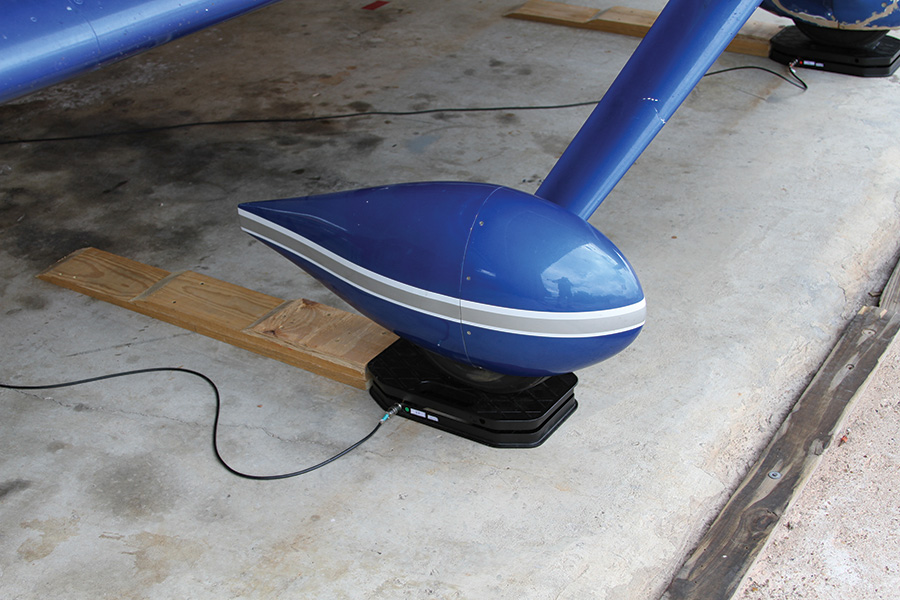
The plane should be weighed indoors, out of the wind. If you cannot weigh it indoors, you must do it when there is no wind. Any wind can upset the weight measurements, since wings are designed to produce lift. Position the scales and the ramps so you can push the plane up onto the scales. You will need some help to do this in most cases. Remember to be safe at all times. Discuss what you are going to do before you do it, and then coordinate your efforts. With a taildragger, you will need to move the tailwheel support as the mains roll up onto the scales. Chock the wheels once they are up on the scales if possible.
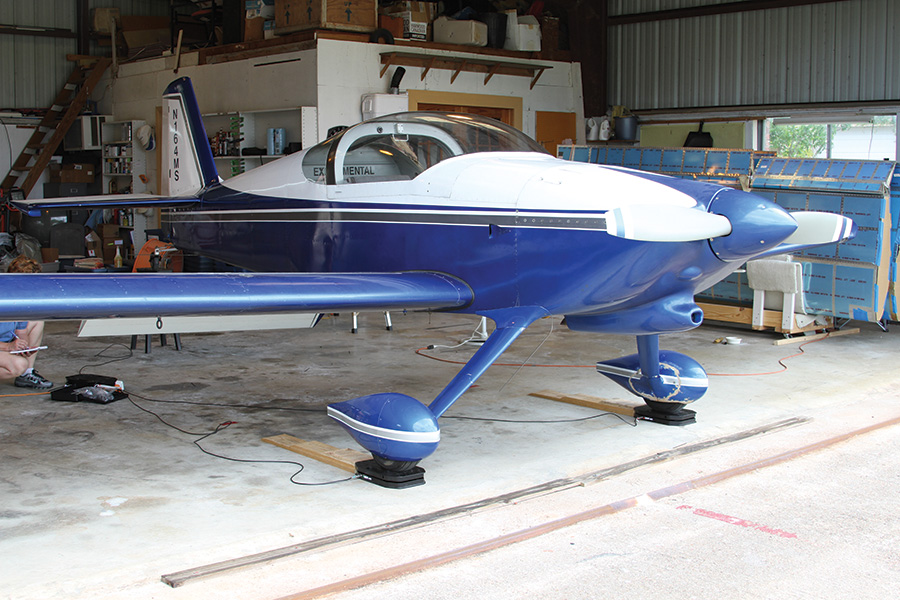
The plane must be level to get accurate weights. With a taildragger this means elevating the tail. Use the prescribed points on the airplane to assure it is level.
Now record the weights of each mainwheel and the nose- or tailwheel. The two mainwheels may have different weights. This is normal and should not be a concern, as long as the difference isn’t too great. You will need to subtract the weight of any chocks or leveling boards placed on the scales. It is generally best to place leveling boards underneath the scales to avoid this problem.
There is always a debate over whether a plane should be weighed with no fuel or full fuel. I prefer to weigh with no fuel, and then take a second weight with full fuel, if time and circumstances allow. This makes it easy to verify the location of the fuel in the plane. Empty weight means with oil and other fluids at their normal levels, and no fuel except unusable fuel aboard. If you have done your fuel system testing (see KITPLANES®, December 2012), you already have an unusable fuel quantity to use. If not, then why not? Go test your fuel system. Others like to fill the tanks and, knowing how much fuel they put in, calculate the empty weight and moment by subtracting out the fuel. This works, but has some disadvantages, such as having your plane completely full of fuel for your first flight.
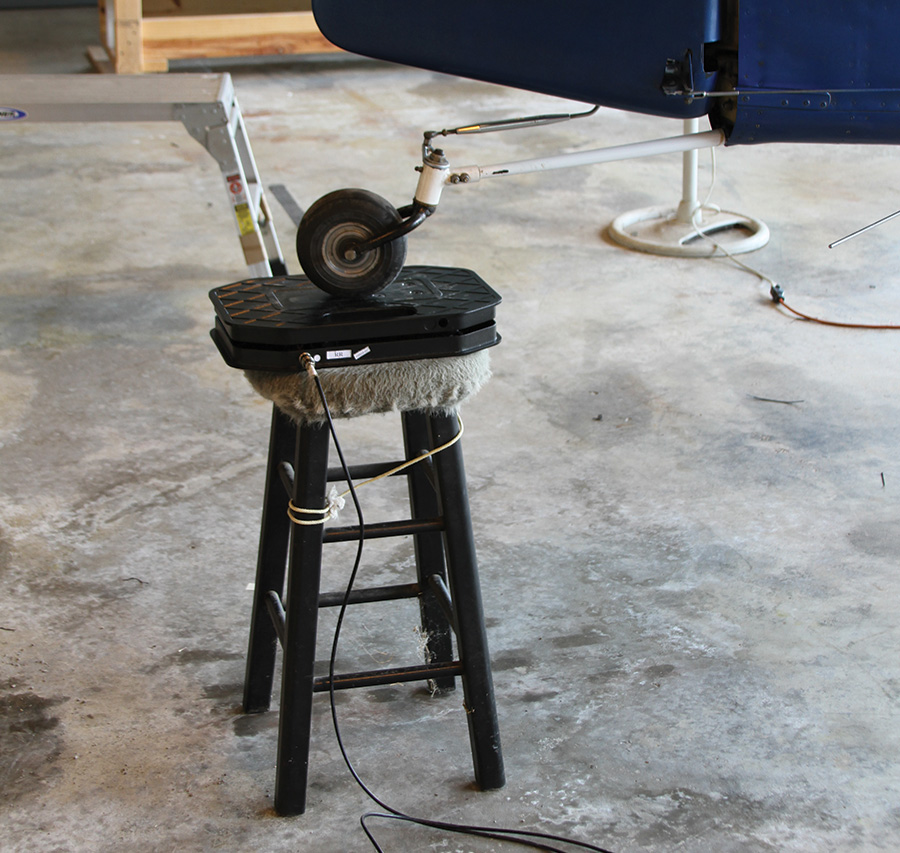
The tail will need substantial support to get the plane level. It is best to place the tail scale on top of the support rather than underneath it.
Do the Math
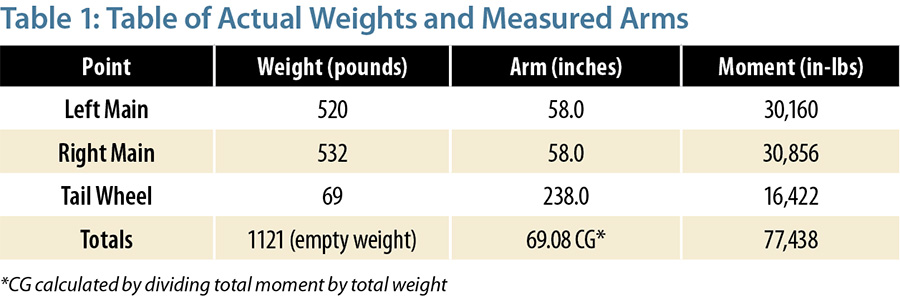
With your weights and fuel quantity duly recorded, it is time for a little math. No groaning, please; this is not calculus. For those of you with some computer skills, this is a great time to create a little Excel spreadsheet. However, a calculator will do just fine. Make a little table with three columns—weights, arms, and moments. Enter the weights in the first column, one at a time. Then multiply each weight by the distance that point is from the datum based on your measurements. That is the arm. Finally, multiply each weight by its arm to get the moment for that weight. Then total the weights and the moments. Your total weight is your empty weight, or your empty weight plus fuel if you weighed it that way. If you weighed the plane with full fuel, you need to subtract that weight from the weight you measured to get your empty weight. You also need to multiply the fuel weight (pounds, not gallons) by the arm for the fuel tanks from the assembly manual or plans to calculate the fuel moment. Then subtract the fuel moment from the total moment you previously calculated. (See why we like to weigh the airplane without fuel? It means less math—and a smaller chance for error.)
You now have the empty weight and empty moment. From this you can calculate your center of gravity by dividing the moment by the weight. These calculations can be done in inches and pounds or centimeters and kilograms; it does not matter as long as you are consistent. Just remember to use the weight of fuel and not the quantity in gallons or liters for your calculations. The empty weight, CG, and moment numbers (shown in Table 1) now become the basis of all weight and balance calculations, so be sure to record them in your builder’s log.
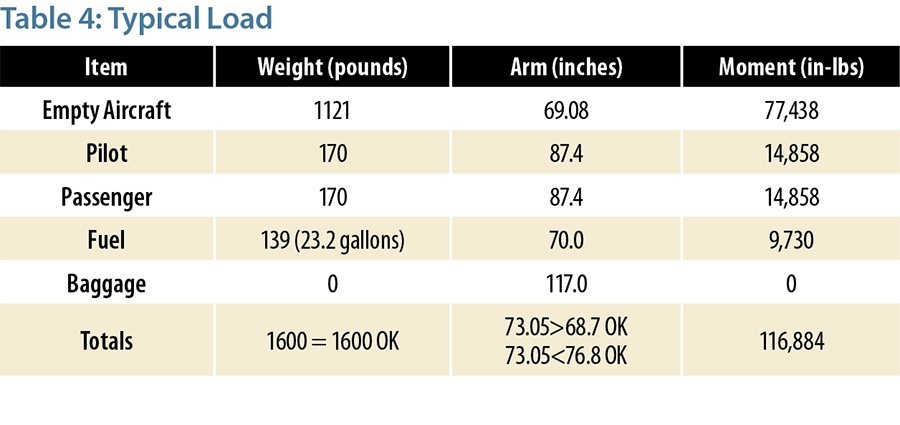
Here is the typical load for a $100 hamburger flight. Note that full fuel load of 38 gallons cannot be carried with this combination of pilot and passenger.
Testing Loads
Time for some more tables. The tables should include columns as before (weight, arm, moment) and rows for pilot weight, front passenger weight, rear passenger weights, cargo, and fuel. If you have more than one cargo area, each one must be included separately. Various load conditions need to be tested to make sure the plane will be safe to fly.
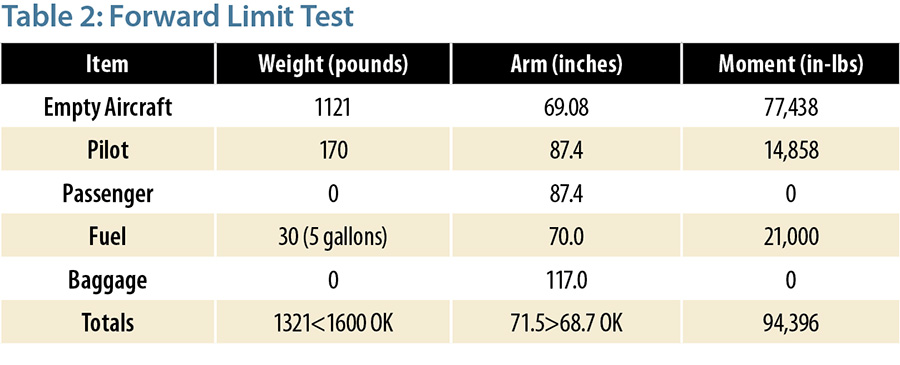
The first test is the forward CG test (Table 2). In this test the weight of the pilot and his or her moment are added to the empty weight, along with 30 minutes of cruise power fuel. The calculated CG must be behind the forward limit CG to pass this test. If not, you will need to add ballast to the tail until it does. If you have a forward cargo hold, you should also add weight to this area until you reach the forward CG and note the number. You may not be able to use the maximum allowable weight in the forward hold without having any weight in the rear.
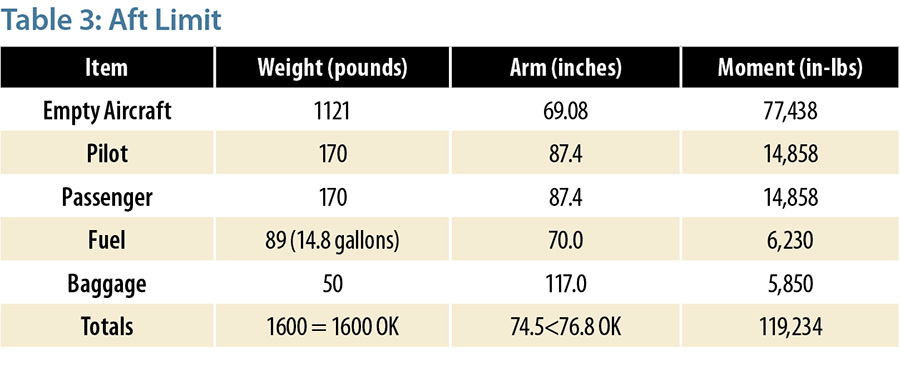
Next is the aft CG test (Table 3). Include the pilot and maximum allowable cargo in the rear. If you are still forward of the aft limit, experiment with adding passengers and fuel in various locations, up to the maximum gross weight and rear CG limit. The critical load condition will vary from one model of plane to another. Your worst-case plausible loading will likely be with two people in front, maximum cargo in the rear, minimal fuel, and passengers in the rear seats to reach the gross weight limit.
It is good to also test the most likely loading conditions such as pilot and front seat passenger with full fuel and no cargo, or other loading scenarios based on your typical flying. If you ever get ramp checked, it is good to have these weight and balance calculations readily available.
Once you have completed all of these test calculations, you will need to put something together that you can keep in the plane as the official weight and balance. This is required for safe flight and to keep the FAA happy.
The forward most plausible loading scenario easily falls behind the forward CG limit of 68.7. Unless the aircraft is modified from its present configuration, it is difficult to imagine how one could load this plane too far forward. Of course, the actual weight of the pilot/owner should be used in these calculations.
Even though this is not a particularly likely load scenario, Table 3 shows the most rearward loading imaginable without exceeding the baggage limit of 50 pounds. With this aircraft, it is unlikely that any plausible load could exceed the aft limit of 76.8. As before, actual pilot and passenger weights should be used for your calculations.
Equipment List
Larger planes will have detailed equipment lists attached to the weight and balance information listing major components, especially any items that are removable such as radios. It is a good idea to do the same for smaller planes, too. At a minimum you should note what fluids are included in the empty weight, such as the quantity of oil and any unusable fuel. If your plane is one that is often fitted with larger tires and wheels, it is a good idea to note the tires and wheels you have installed, along with the weight, arm, and moment. If you go back and forth between floats and wheels, you will need two sets of weight and balance figures to cover both configurations.
Final Note–Gross Weight
Inevitably when a builder sees what his or her new plane weighs, there is a bit of disappointment that the empty weight didn’t come out lower. That is to be expected. It is really easy to add weight to an airplane and really hard to keep it off. Disappointed or not, you should resist the temptation to simply bump up the gross weight to make up the difference. Dick VanGrunsven, for one, has come out very strongly against increasing gross weight of RV airplanes and for a good reason. The performance and structural integrity of the aircraft are based on the designer’s gross weight. Adding to that weight decreases safety and performance. There is a margin of safety in all designs to be sure, but as VanGrunsven says, that margin belongs to the designer, not to you.
Keep your airplane light and as simple as possible (but no simpler). Weigh it carefully and pay attention to gross weight and CG limits. You will be safer and get better performance out of your plane if you do.

![]()
Dave Prizio is a Southern California native who has been plying the skies of the L.A. basin and beyond since 1973. Born into a family of builders, it was only natural that he would make his living as a contractor and spend his leisure time building airplanes. He has so far completed three—a GlaStar, a Glasair Sportsman, and a Texas Sport Cub—and he is helping a friend build a fourth, an RV-8. When he isn’t building something, he likes to share his love of aviation with others by flying Young Eagles or volunteering as an EAA Technical Counselor. He is also a member of the EAA Homebuilt Aircraft Council.

