 The advertisement for my Murphy Maverick said metal fuselage with metal and fabric wings. Can’t be too hard, I thought…
After 15 years, the metal fabrication was finished, and I was ready to tackle the fabric. It turned out to be a whole new experience.
Getting some direction for this is recommended. Take a course, take advice from an old aircraft maintenance engineer (AME) or A&P, or find someone who knows an old AME or A&P and also knows what they are doing. Otherwise, do as I did: Because of my remote location, I acquired a book from Aircraft Spruce & Specialty Company on the Poly-Fiber System, sat down with a pot of coffee, and read it more than once. It seemed fairly simple. You just had to follow the steps, one at a time.
The Products
Chemicals
The first shock was acquiring the chemicals to do the job. Ordering from Aircraft Spruce Canada is as good as it gets, as those folks are very knowledgeable and provide excellent service. At this point, I almost feel like a shareholder in the company. Up here in Broken Toe, Ontario, everything is shipped, and these products arrived by Purolator Courier with extra environmental fees. Seems that someone figured products such as methyl ethyl ketone (MEK) could do damage to the watershed if it wound up there. Starting with the small control surfaces and not knowing how fast I was going to use these products or the length of their shelf life, I ordered small quantities to begin with.
Poly-Tack is the first product you’ll use. It’s used to stick down the perimeter fabric and goes a long way, so a quart was the perfect initial size.
Poly-Brush is next, which is used to seal the fabric after it’s been shrunk. You will use a lot of this stuff, especially when it’s brushed on, or not so much when you have to spray it on.
Poly-Spray is a UV light sealer that is sprayed on and also goes a long way.
Poly-Tone is the final finished coat that I don’t know much about. I liked the color of the Poly-Spray and left it as the final coat. This is not recommended by the folks at Poly-Fiber, and I was told it can scratch as a final coat.
Methyl Ethyl Ketone is a product used to undo what you have done that you don’t like. Instructions in the book say that you can simply apply MEK, and it will dissolve what you want out of the fabric. Yes it will, but by the time it has, the fingers in your latex gloves have also dissolved. A quart of this will go a long way if you are careful while you work.
R65-75 Reducer (thinner) is needed to thin down both the Poly-Brush and Poly-Spray, 1:3 and 1:4 respectively, so it too goes a long way.
RR-8500 Reducer is another product I found I didn’t really need while living up here in igloo country, as it slows down the drying process in temperatures above 85° F.
Other Items
Brushes: Your call here, but I ordered these by the boxful. At $15 for 20, they’re cheap, but this price is augmented by $17 for shipping. It’s either this or you clean the brush with MEK after each use. This becomes rather expensive, and then you have to environmentally dispose of the used MEK at the hazardous disposal site, which in my case is not open all year, so you get to store this potentially explosive product until then.
Fabric: Some fabric came with the kit, but it can also be ordered from Aircraft Spruce. It ships with a surcharge because it comes in a long tube.
Tapes: You’ll need four kinds: anti-chafe, reinforcing, straight, and bias (pinked edges). They come in various lengths and widths and are used for protecting, adding strength, and covering attachment points and seams.
Respirator: This is a mandatory tool. Order with organic filters and extra filters for replacement time. Note that it has to fit properly. If you have a beard, it won’t, but again, it’s your call. Reduce the beard to a goatee or cook more gray matter before the microwave does. Proper fit is to place the respirator on your face, cover the filter holes with your hands, and breathe in. If the mask sucks down to your face, you’re good to go. It’s time to replace the filters when you can smell the product you’re trying to filter out.
Sprayer: High-volume low-pressure (HVLP) is recommended. Along with the sprayer, you’ll need an air compressor, regulator, and moisture filter. An exhaust fan is also a good idea. You’ll need a space inside that is large enough to spray paint on the largest piece, and you must have clean air lines. By clean, I mean don’t use the ones that you use for your air tools; if you run an auto-oiler, the oil in the lines will ruin the entire process. If you start with some new tools, you’ll save money to spend on shipping.
Gloves: Latex is the type. The cheapest place to buy is Walmart, and you’ll need several boxes.
Scissors: You’ll need good, sharp ones, including pinking sheers.
Thermometer: It should be capable of reaching 350° F. Before use, start by making a cup of tea. While the water is at a rolling boil, check for accuracy. If it’s way off, return it. If it’s a little off, mark the dial at 212° F and calculate/mark 225°, 250°, and 350° as these are the numbers required.

Irons: Two are required for the job, one large and one hobby size. Good luck with this one. The first hobby size I ordered from a box store was so far out, it might as well have had a toggle switch. The store sent me a replacement, which was significantly more accurate.
As for the large one, we have a used products store here in my small town, and after explaining to the owner that I had to “calibrate” an iron for a specific job, he allowed me to take all 10 from the store and return what I did not want to purchase. I returned eight, all with tape on them listing the low/high ratings of each. He was pleased.
Temperature is very important. The key here is to use the same extension cord and calibrate the irons prior to each use. In addition, a small, pointed wood burner is a good idea. I found that melting holes is much more positive than punching or cutting them. Melting the holes for rivets will sear the circumference, preventing any fraying. These do not need to be calibrated, just hot.
Pencils: Number 2 soft is the preferred type. They should be soft enough to write easily on the fabric and are the only thing recommended for doing so. No ink or felt pens are allowed as they will bleed through the fabric onto the finished surface.
Tape Measure: Time to go buy a new one and designate it “airplane use only.” The one you used for the roofing job will not do for the same reason as felt pens. This virgin white fabric stains like nothing I’ve ever seen.
Vapor Barrier: Buy a roll of light vapor barrier from the hardware store. When you roll out your fabric to start a covering, roll out a piece of vapor barrier to cover it, marking the outside as “dirty.” When your day is over, cover the job. If you miss a day or two, you will be surprised how much unwanted dirt will accumulate, including flies.
The Procedure
As I mentioned, reading the book, making notes, and highlighting temperatures, etc. will ease the anxiety of this task. The procedure goes like this:
- Starting with the bottom, cover any sharp objects with anti-chafe tape, then lay out the fabric you need to cover the piece, including a little extra, and cut it.
- Using Poly-Tack, glue down the perimeter.
- Heat-tighten the fabric.
- Brush on Poly-Brush.
- Stick down reinforcing tape.
- Install fabric rivets (necessary in my case).
- Apply finishing tapes, inspection rings, and doilies.
- Add drain holes.
- Smooth out the rough points and paint with Poly-Spray, then Poly-Tone.
The entire procedure sounds easy enough, but let’s take a look at the details.

Fabric Preparation
Start with a small piece such as an aileron, which is straight, has no compound bends, and is manageable. Run your fingers over the structure, feeling for sharp protrusions and edges. Smooth these by filing or cover them with anti-chafe tape to prevent them from cutting the fabric.
When you’re satisfied with that, get out your roll of fabric and spool off a piece, leaving overhang all around—especially on the ends. You definitely want to cover the ends/root of the piece. I left enough so that the fabric went from the top surface to just past the bottom surface, and then I clamped it.

Don’t be afraid to mark the fabric with a #2 soft dull pencil. Anything you write on will be covered by the solutions. I marked dimensions, temperatures, and number of coats of solution, all without any problems. The long sides don’t need as much overhang as the ends, and the wingtip will be trimmed after Poly-Tack is applied and heat-treated.
The fabric should be loose, not tight. Not baggy loose, just loose—sort of like making an army bed then sitting on it. If it’s too tight, you can create structural issues, especially in light aircraft. Properly applied, this is one strong product that significantly pulls when heated.
When you’re satisfied with your dimensions, cut the fabric with a sharp pair of straight scissors, not pinking shears.
Different pieces are covered differently. I did the ailerons and horizontal stabilizer with a single wrap. The seam on the ailerons was at the trailing edge, and the seam for the horizontal stabilizer was the leading edge (the wrap is on the straight edge).
Apply Poly-Tack
With the aileron, I started by applying Poly-Tack on the bottom trailing edge. When applying Poly-Tack, I folded the fabric on a 45-degree angle and painted about 6 inches of Poly-Tack at a time. Then I folded the fabric into the wet Poly-Tack and pressed it down with the unloaded brush. You don’t want to brush Poly-Tack on top of the fabric, or you’ll overload the seam, which can create drying issues and possibly unsuccessful adhesion.
Once set, rotate the aileron and iron the fabric around the trailing frame onto the top surface. When it takes shape, Poly-Tack it into place, and when dry, flip it back upside down.
Tighten the Fabric
Wrap the fabric around the aileron loose, and Poly-Tack the top trailing edge to the wrapped-around bottom piece, which will give you the fabric-to-fabric seam on a structural piece and meet the supplemental type certificate (STC) compliance. The ends are now folded down and attached with Poly-Tack. The extra material allows for the minimum 1-inch overlap and again STC compliance. Once dry, break out the iron, calibrate it and have some fun: two levels of temperatures are used for the two steps of heat shrinking.
An important note here: Do not use an iron unless you calibrate it before use, every time.
Now that the fabric is tight as a drum, take the finishing iron and smooth out the rough spots on the seams. I found that using parchment paper between the iron and the fabric prevented residue build-up on the iron.

Apply Poly-Brush and Reinforcing Tape
When satisfied that the fabric is tight and smooth, the first coat of Poly-Brush is applied to the entire wing.
With that complete, the application of self-adhesive reinforcing tape is next. Leaving about 1 inch past the last holes, measure, cut, and apply as straight as you can because, from here on, everything you do shows.

Install Fabric Rivets
Using a flashlight placed face down on the fabric, the fabric rivet holes (if needed) are easily located, marked with the pencil, and then melted with a wood burner. Note that when melting the holes, twist the wood burner so the fabric doesn’t stick to the tip.

Applying the fabric rivets is a no brainer; just be careful not to let the stems that break off puncture the fabric. Once complete, again run your fingers over the tops of the rivets, ensuring no sharp edges remain. If so, cover with a small piece of anti-chafe tape.


Apply Finishing Tape
Start with the ribs and then the leading or trailing edge if there is a seam. Marks should be drawn on the fabric to guide you. Keep these very straight and centered. Again, I used one piece of tape, starting at the trailing edge and wrapping all the way around the aileron and back to the trailing edge.
These tapes are applied with Poly-Brush. Pre-coating the reinforcing tape two times and the finishing tape one time will prevent the tape from stealing Poly-Brush from the fabric and unsuccessful adhesion.

For rounded pieces, such as the horizontal stabilizer leading edge, the tape used is a bias tape. This is a cross-weave cut material that is sewn together about every 85 inches, and the seam cannot be used. To begin, you have to apply Poly-Brush to about 3 to 4 inches of the bias tape on a straight part of the leading edge. Once it’s dry, apply Poly-Brush to the curve and pull the end of the bias tape, allowing it to conform to the shape without ridges. All of this pulling, painting, and clamping can be simplified with a little welcomed help.

Add Drain Holes
At some point during the process, water drain holes have to either be attached or melted through the bottom surface. The easiest way is to simply melt them, and to comply with the STC, this has to be done where there are at least three layers of fabric. If you need to add a small patch so you have three layers, now is the time to do it. In my case, the trailing edges are pre-formed “V”-shaped aluminum, which allowed me to melt holes in the ends.

More Brushing and Spraying
With the drain holes complete, brush on another coat of Poly-Brush. This isn’t too bad with the small pieces, but the wing seemed to take forever. Soaking the fabric is the point here; if it’s loaded, you won’t get any bubbles. Take your time and really soak it to the point that it almost runs through. When done, go over the wing and look for pinked ears that are sticking up. Again using parchment paper and the finishing iron, stick them back down.

Spraying two coats of Poly-Brush is next, then multiple coats of Poly-Spray, applying just enough to prevent light from penetrating. Last, but not least, use Poly-Tone for the final finished coat. Because I really like the color, I ended the fabric painting with Poly-Spray and didn’t apply Poly-Tone. This is definitely not recommended by the people at Poly-Fiber, and I was warned that Poly-Spray can easily scratch without a Poly-Tone top coat. We’ll see how my decision works out once the Maverick is flying.
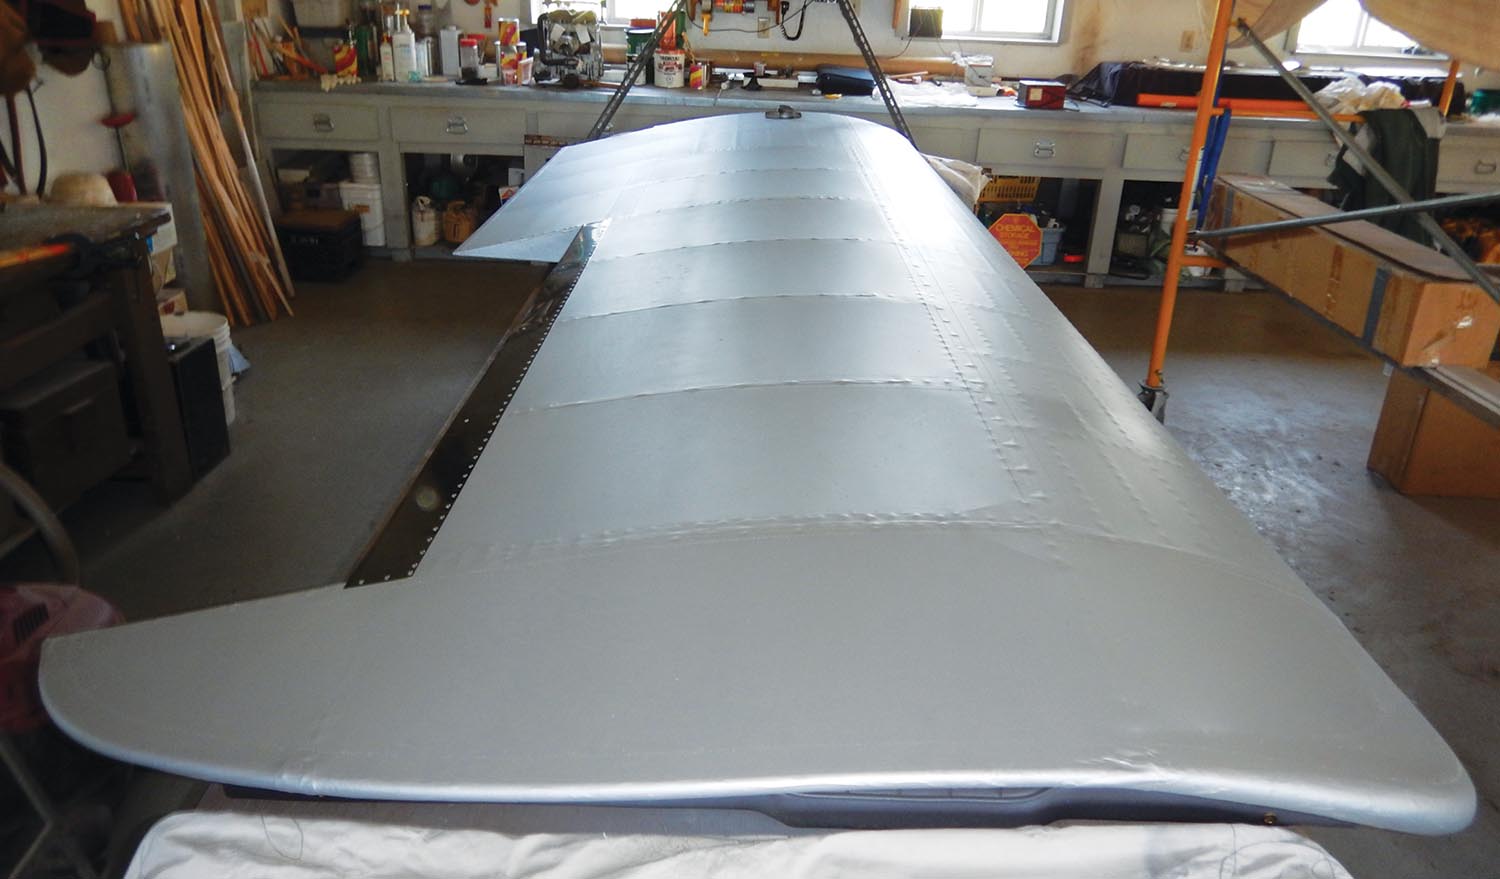
Covering the Wings
The wings are covered using the same basic procedure as the ailerons except you use one piece of fabric for the top and one for the bottom, starting with the bottom. With the wing, it is essential to mark the center of the wing with a chalk line. Next, mark 1 inch each side of it, which is the glue line for the top and bottom pieces. This results in the 2-inch overlap required by the STC.

The other difference is the installation of inspection rings, which is done prior to spraying the Poly-Brush. Using Poly-Tack, stick down the plastic inspection rings at every location you think you will ever need to access. These are then covered with fabric doilies, which you make and are stuck down with Poly-Brush. Using clean cardboard in between, I stapled the fabric onto the table, then using the large iron, shrunk it. Using a 1-gallon paint can as a template, the circles were drawn with a pencil and cut out using pinking shears. I painted Poly-Brush on the wing where the doily was going and set it into place. Note here: Do not melt out these holes unless you absolutely need to; you may never need to remove some of them.
Be Patient
The last item you need is patience. This is something you’ll need a lot of. You have to be patient and vigilant for this job. At some point, you will want to just walk away. But at other times, you’ll see that you have learned a new skill, and the end results really don’t look too bad. There’s always someone better, but this one is mine, and I built it.


