I am often asked the magic question, what piece of equipment do I need to purchase first? I am amazed at how many folks think a power hammer (Yoder or Penttingell), power reciprocating shaping machine (Pullmax or Dake), or even a planishing hammer (Chicago Pneumatic) is required. Are any of these machines really necessary for amateurs to begin with? What do these machines do? How much do these things cost?
The good news is, shrinking, stretching, doming, and beading—the fundamental skills required to shape metal—may all be accomplished with relatively inexpensive hand tools. Sure, power machines will accomplish these tasks faster and easier. But you don’t need to spend tens of thousands of dollars to get started. Prior to investing in expensive machines, I recommend you start with old-school hand tools to be sure you enjoy shaping metal.
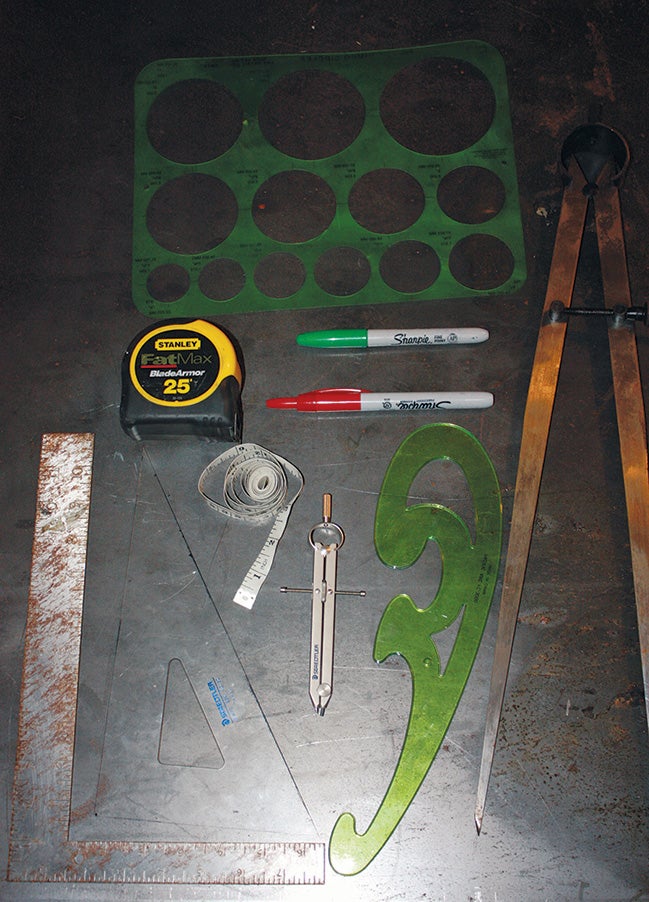
Layout Tools
First things first—before you begin forming metal, you need to mark the shape of the parts. To do this, you’ll need pencils, permanent markers, and masking tape. A general drafting compass, machinist’s square, combination square, and carpenter’s square can also come in handy. Aside from the machinist’s square, you probably have most of these items somewhere around the house or the shop.

Use magnets to hold patterns in place. On aluminum, use two magnets—one above the pattern and the other directly behind it. Layout fluid makes scribe lines easier to see.
A good combination scribe (bent and straight), center punch, and layout fluid are also useful during the layout process. Lest I forget to mention, a carpenter’s tape measure and a seamstress/tailor’s tape measure are extremely helpful, too. I still need to purchase this last item for myself or replace the one I permanently borrowed from my wife. (Thanks, Beck!) Dig a bit deeper into my toolbox and you’ll also find magnets, circle templates, and other odds and ends I have collected over the years that I use for layout. There’s nothing too exciting here, but I like having them readily accessible. I also find my old set of drafting tools comes in handy. The list can go on and on, but I think you get the idea—there aren’t many machine variants to aid in layout.
Shearing Tools
First in the lineup is a pair of aviation snips. These snips are manufactured for left hand cuts, right hand cuts, and straight cuts. Although difficult to use for cutting large sections of sheet metal, it can be achieved. Aviation snips are also needed when cutting a trim line prior to welding. There’s no real machine substitute for a set of aviation snips.

Basic shearing tools include electrically operated hand shears and aviation snips. There are even conversion kits to turn a drill motor into a set of shears.

Clamp a straightedge against the cut line to make straight cuts with electric shears.
Electrically operated hand shears are next on the list. There are many different styles, but the most common have an appearance similar to an electric drill motor with a shearing blade, rather than a drill chuck installed. Believe it or not, conversion kits are available to turn your drill motor into a set of shears. This allows you to cut many contours with a tool that is easily maneuvered by hand. You can achieve straight cuts by clamping a straightedge against your cut line. Sure, a foot squaring shear is nice, but it’s not mandatory.
A throatless shear is another excellent tool to invest in. As you have seen in previous articles, I am able to cut many contours using a throatless shear. The throatless shear is portable and may be mounted to your bench or fabrication table. I use a Beverly Shear model B2. This brand of shear has been on the market for more than 60 years and the blades can be factory resharpened. The cutting blades are also adjustable for various thicknesses of material.
Shaping Tools
The key tools in this category are sand/shot bags and a selection of mallets and hammers. The most common shapes of sand/shot bags are round and rectangular. Sizes range from 8 to 24 inches. I use a round, 18-inch bag made of quality grain leather, and I primarily use beach sand for a medium. Lead bismuth is also commonly used and can be purchased at sporting goods supply shops. The type of medium you use is a personal preference. Simply use a funnel to fill the bag and sew or clamp the end shut.

UHMW and wooden bossing mallets.
A large selection of hammers and mallets is a worthwhile investment. The larger your inventory of tools, the more tasks you can accomplish. The most common material used in the aircraft industry is 3003 H14 aluminum. Since this is a soft alloy, I use a mallet manufactured from a hard wood like maple or oak. I will also use a high-density polymer such as Delrin or UHMW (Ultra High Molecular Weight polyethylene). Utilizing either wood or polymer hammers protects the soft aluminum alloy from gouging. At times, a different radius or shape may be desired, and a wooden hammer may be reshaped to accommodate the particular radius or shape. Metal shaping cannot be completed with a single hammer and bag, so you’ll want a combination of wood and polymer hammers and mallets.

Using a wooden mallet and shot bag to turn a flat sheet of aluminum into a bowl.
Let’s say you’re working on a part like a wheelpant. Chances are, the part will have both a low and high crown section. Having a large variety of hammers on hand will make it easier to form these sections.
A leather-face slap hammer is used for low crown shaping. The body is constructed out of hardwood like maple or oak, with a subtle curve to the body. The face is covered with a leather band to aid in control of the shrinking and stretching process. This hammer, combined with the sand/shot bag, is used to rough a low crown shape in a part. The technique is to hammer lightly using overlapping blows. I move from left to right, repeating right to left, and then work over the shape 45 degrees relative to the first and second set of blows. In addition to low crown shapes, leather-faced slap hammers are used to shrink the edges of shapes over post dollies.

The body of this leather-face slap hammer is curved to make it easier to control the shrinking and stretching process.
Not all slap hammers are made of wood and covered with leather. I also use a low-crown metal slap hammer to “planish” or smooth parts over a post dolly or flat surface. What I am trying to accomplish is to lower the high spots and raise the low spots. By selecting the correct shape post dolly or a flat surface, I do not need an expensive planishing hammer.
Like hammers and mallets, post dollies are available in a variety of shapes and sizes. Half football, saddle, and button forming heads are among the most common. By using the right combination of hammers, mallets, and dollies, you will be able to shrink and planish all of the areas of the parts you are shaping. In past articles I demonstrated shrinking the edges of a bowl and teardrop shape.
Hand Mechanical Shrinking Machine
This tool is also known as the “Lancaster,” or simply a shrinker/stretcher. Very simple, but very effective, it puts a mechanical shrink or stretch in the material being shaped.

Hand-operated Lancaster shrinker/stretcher has a 5/8-inch throat depth and is used for edge shrinking/stretching.
Suppose I want to draw the edge of a part down; if I were to simply bend the material, I would end up with a crease or a line. This would be counter-productive to what I am trying to accomplish. The shrinker/stretcher will help me make a smooth transition.
While the jaw cartridges are interchangeable in the shrinker/stretcher, it is helpful to have two machines. One machine will have the shrinking cartridge and the other will be set up for stretching. This machine is a perfect way to create windshield fairings and bezels. While you can mechanically shrink and stretch using old-school forming steaks, the Lancaster will more than likely cost less than purchasing a set of forming steaks.

While planishing is possible using just a slap hammer, an English wheel is much faster and produces better results.
The English Wheel—Moving to the Next Level
If you’re very patient and willing to spend the time, you can complete basic projects using hand tools alone. That being said, you’ll see better results in a fraction of the time with an English wheel. If you’re serious about metal shaping, it’s the machine I suggest you get first. While planishing is certainly possible using just a slap hammer, nothing beats the speed and outcome of wheeling a part smooth. I work between the hammer and sand/shot bag, post dollies, and English wheel daily. Once you learn tracking patterns and know how this machine works, it’s invaluable.
But don’t let the lack of an English wheel keep you from getting started. There’s plenty of shaping that can be done with hand tools alone. Working with hand tools is also the best way to understand the entire process. The skills you’ll learn are directly transferable to even the most sophisticated metal shaping equipment.
Photos: Mark Lynn
![Trimming composites gets the full PPE job. [Credit: Eric Stewart]](https://www.kitplanes.com/wp-content/uploads/2026/07/7-2.jpg?w=218&h=150&crop=1 "A Few of My Favorite Tools")


I use double-sided tape to secure the template to the sheet metal.
Comments are closed.